Introduction
One of the standout features of Veeam Backup & Replication is SureBackup, which allows for the automated testing and verification of backups. SureBackup creates isolated environments, called Virtual Labs, to ensure the recoverability of your virtual machines. During a SureBackup session, it sometimes would be helpful to connect the virtual machines to the Internet By default, the VMs within the Virtual Lab run in an isolated environment and do not have access to the Internet. If you want the VMs in the Virtual Lab to access the Internet, select the Allow proxy appliance to act as an Internet proxy for virtual machines in this lab check box. See Setup Proxy Appliance and Veeam KB1165.
With the HTTP proxy settings in place, you can easily download security patches, update antivirus definitions, and install software updates on your Linux VMs. With this you can enhance your software testing and patching processes, streamline deployment workflows, verify compatibility, and evaluating the impact of software changes on your virtual infrastructure. Don’t forget to keep your Application Group running: SureBackup Job - Application Group
To enhance security and streamline access to the target Linux VMs, we will utilize public key authentication instead of passwords. Public key authentication offers stronger security and eliminates the need to store passwords in the script. To establish SSH connections to the Linux VMs, you will need the key file associated with the user that has access to these VMs.
Prerequisites
Before diving into the configuration process, make sure you have the following prerequisites in place:
- Veeam Backup & Replication V12
- OpenSSH package installed (you can find the package here.
- Download PsExec from Microsoft/Sysinternals
- The key file for the user that has access to the Linux VMs
Important: SureBackup runs the script with the user under which the Veeam service is running. In the following examples, the Local System account is configured for the Veeam Backup Service.
- Open a Command Line as Administrator and run Powershell in the Local System context:
PsExec64.exe -i -s powershell.exe
- Then store the password (encrypted) in a txt file:
$credential = Get-Credential
$credential.Password | ConvertFrom-SecureString | Set-Content <path to secure.txt>
- Add the key to the known_hosts file of the user profile directory for the Local System account.
C:\Windows\System32\config\systemprofile\.ssh\known_hosts
In the example above the Masquerade Subnet is 10.10.111.0/24 and the ssh-keytype is ED25519
Make the script ready
To set up the HTTP proxy for Linux VMs in your Virtual Lab, we will utilize a Powershell script. This script interacts with Veeam Backup & Replication, retrieves the necessary configuration details, and configures the proxy settings on the target Linux VMs. The script leverages SCP and SSH to store the shell script on the VMs, connect to the VMs and execute the script.
To get started, make sure you have the script available. You can find the latest version of the script on my GitHub repository: YetAnotherMightyTool.
Before running the script, ensure that you adjust the necessary parameters and file paths to match your environment. Open the script in a text editor and modify the following lines:
$encryptedPassword = Get-Content "<path_to_password_file>"Replace `<path_to_password_file>` with the path to your password file.
$KeyFile = "<path_to_key_file>"Replace `<path_to_key_file>` with the path to your SSH key file.
Adding the script to the Application Groups configuration
Once you have configured the script with the correct parameters and file paths, you are ready add it to your Application Group.

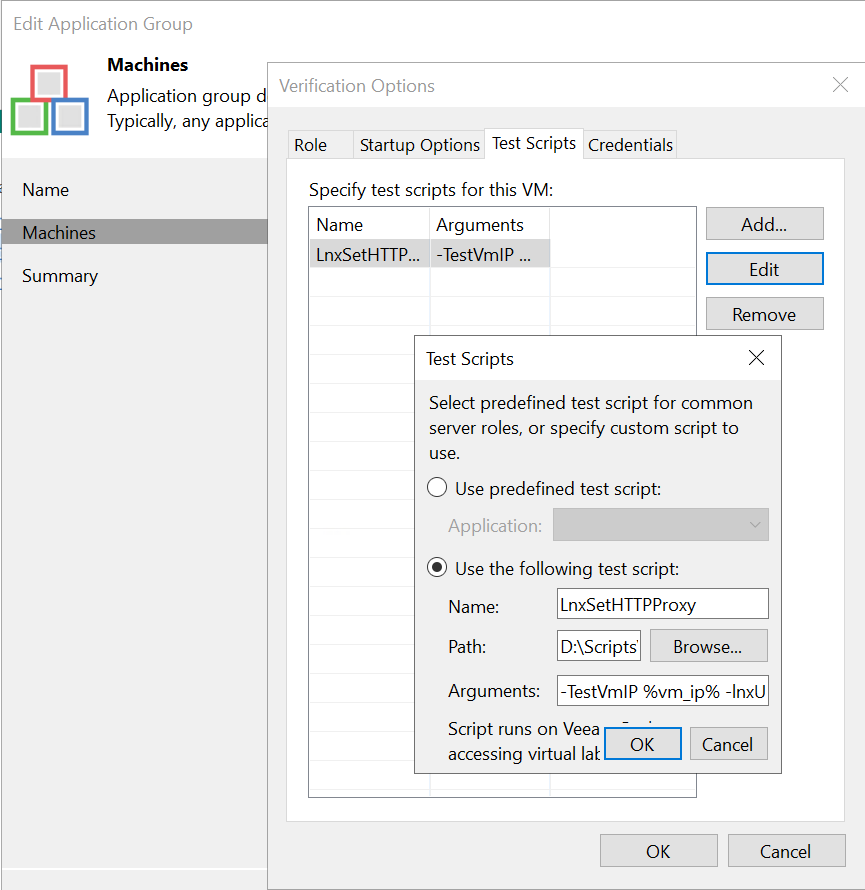
Add the script in the Test Scripts tab and add the following data:
Name: LnxSetHTTPProxy or any name you like
Path: The path to the Powershell script
Arguments: -TestVmIP %vm_ip% -lnxUsername <your linux username> -VirtualLab <your virtual lab name>
The script will retrieve the HTTP port configuration from the specified Virtual Lab and upload a shell script to the target Linux VM. It will then execute the shell script to configure the HTTP proxy settings based on the default gateway and the retrieved HTTP port.
Coming next
The same is ready for Windows VMs. I just need to upload and write a manual for it.
Happy testing!


