So what are we up to today? Let’s chain a few workflows together to build a laptop from no OS installed to a K8s environment running LLMs locally.
We are basically going to deploy this logic within a single system:

Lets put on our tunes, get your favourite bag of chips, grab some sodas, order some pizza …. NOPE. It will not take that long. Using these workflows, I can completely rebuild my Dev laptop in ~15 min (majority of that is waiting for the OS to install). Granted the first time you attempt this, it will take longer as you have to set some variables for your particular deployment but, then it becomes so easy.
TL;DR
- assuming your Ubuntu OS is already installed. If not, further down is the detailed explanation to install Ubuntu via autoinstall
- base OS packages
-
git clone https://github.com/abiwot/abiwot-starterkits-hpomen17-aiws.git

cd abiwot-starterkits-phomen17-aiws/hpomen17-aiws

bash bash/ansible_venv_install.sh

source /app/python/venv/bin/activate

ansible-playbook playbooks/main.yaml -i inventory/hosts.yaml
-
- install LXD
-
git clone https://github.com/abiwot/abiwot-lxd-custom-cdalapai01.git

cd abiwot-lxd-custom-cdalapai01

ansible-playbook lxd.yaml -K
-
- configure NGINX-proxy in LXD
-
git clone https://github.com/abiwot/abiwot-lxd-nginx-cdalapai01.git

cd abiwot-lxd-nginx-cdalapai01

ansible-playbook lxd_nginx_proxy.yaml -K
-
- deploy single-server K8s framework
-
git clone https://github.com/abiwot/abiwot-k8s-single-server.git

cd abiwot-k8s-single-server

ansible-playbook k8s-single-server.yml -K
-
- deploy AI local environment
-
git clone https://github.com/abiwot/abiwot-ai-framework-stack.git

cd abiwot-ai-framework-stack

# Create namespace if it doesn't exist
kubectl create namespace myai01

# Deploy using Helm
helm upgrade --install openwebui ./namespace/myai01/helm/openwebui \
  -f ./namespace/myai01/helm/openwebui/helm-openwebui-override-values-tls.yaml \
  -n myai01
-
I know that is a relatively “longer” TL;DR but, you just went from nothing to a fully portable local AI development environment. Not too bad.
The “why”:
One of my issues over the years is when someone comes to you with an application they developed and now want it deployed in Production. The infamous statement, “I tested everything and it is go to be deployed”. It is nothing but lies. Usually the app was built/tested in Docker, K3s, minikube, etc… that does reflect you production level K8s (mutating admission controllers, global network policies, probes, limitation policies, audit policies, etc...). Most of the time, you spend a bunch of time getting the developer to deliver the missing compliance components or you have to do it yourself. So why not have a local environment that can logically do everything your production K8s can do and can actually test like the big boys.
The logic of a local K8s environment to develop in can also be applied to a remote system you can make ephemeral for the developer to use. You don’t need to have a powerstation laptop to do this, just have them remote to the system and use as their playground.
The other reason is I have started to do a lot more work against AI (pipelines, agents, RAGs, etc..) so, it was nice I can make multiple AI environments that can be broken and rebuilt in < 3-4 min.
The “environment”:
- system: HP Omen17 i9 (20 cores) 32gb memory 2TB nvme
- gpu: Nvidia RTX 3080 Ti 16gb vram
The “workflow logic”:
I decided to break up the workflow into separate components. The main reason is you can re-run these workflows individually and not impact the overall deployment (besides the autoinstall for the OS, that is a one-way street). I know I was going to blow up some of these components trying different things so I needed a quick way to “factory reset”.
Here is each Git repository and what it is responsible for:
- https://github.com/abiwot/abiwot-starterkits-autoinstall.git = Deploy Ubuntu OS via autoinstall
- https://github.com/abiwot/abiwot-starterkits-hpomen17-aiws.git = Configure some basic packages and get the system ready to host AI environments
- https://github.com/abiwot/abiwot-lxd-custom-cdalapai01.git = Install LXD
- https://github.com/abiwot/abiwot-lxd-nginx-cdalapai01.git = Configure NGINX-proxy to be the K8s API aggregation layer
- https://github.com/abiwot/abiwot-k8s-single-server.git = Deploy the single-server K8s framework (metrics-server, cert-manager, dashboard are included)
- https://github.com/abiwot/abiwot-ai-framework-stack.git = Deploy the AI environment and expose it (Ollama and OpenWebUI)
The README within each repository has detailed instructions.
The “complications”:
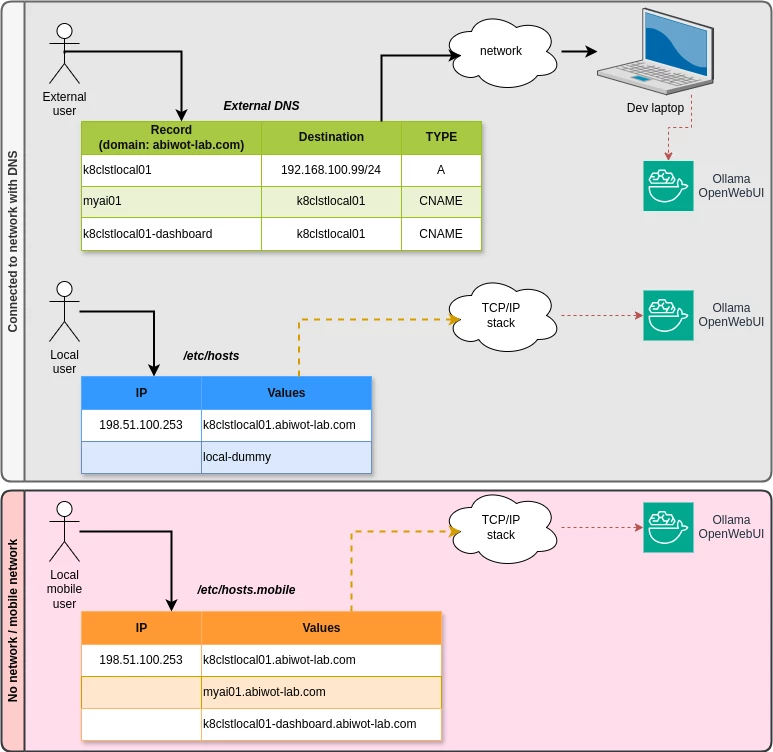
One of the complicated parts to figure out was that fact this system is actually portable. Meaning the local IP will change and DNS will not always be the same or reachable. So we needed a fixed focal point for K8s to always point to. We cannot really do that if the IP is always changing or even possible multiple IP’s (WiFi, onboard, dock). So we create a “dummy interface” within the TCP/IP stack and point our K8s and NGINX-proxy to use that as the anchor point (see diagram above).
The next complicated part was DNS. We want to always use the same FQDN to reach endpoints but, with the system being portable, DNS might not always be available or have the same records (as using internal DNS servers). So we can manipulate the local system DNS resolution mechanism and provide a very simple way to toggle which DNS we are using (toggle-hosts.sh within the abiwot-lxd-nginx-cdalapai01 repository). This way “myai01.abiwot-lab.com” always get to the AI endpoint, no matter if I have a network connection or not.
Here is a diagram to explain the DNS resolution: