

Hi all,
I had a customer who needed a way to obtain Veeam Software Appliance (VAS) updates within a closed OT/dark site/closed environment.
However, the challenge was that they lacked Linux experience and would prefer to do everything in native Windows, without using WSL (Windows Subsystem for Linux).
If you have no idea what I am talking about, read this section of the Veeam help center: https://helpcenter.veeam.com/docs/vbr/userguide/update_appliance_configure_updates.html?ver=13#setting-up-custom-update-configuration
So my idea was to build/configure two components:
1) A PowerShell script that can be run in Windows to download the necessary files from repository.veeam.com to a computer with internet access and then zip the files into a single large Zip file.
2) Create an IIS server website with all update files needed for the VSA.
Then we can easily hand-carry the Zip files from the internet-connected Windows computer to the IIS server in the OT/dark site/closed environment with you preferred or approved method
NOTE: If you are fortunate, you can run both in steps within a DMZ zone. and do not have a completely OT/dark site/closed environment. Then you can do the full guide on a single Windows computer.
Please be aware that the content for the VSA is ~28 GB, and an additional ~30GB is needed for the zip file. (Current state of Dec 2025)
Step 1 - Download and Zip
So, for the first step, we need a PowerShell script that can download all files from https://repository.veeam.com/vsa (BaseUrl) to a local folder (RootOut) and then kindly ask the user if we should create a zip files (ZipPath) and if your internet is unstable you can set the retry (MaxRetries) to 3
The script has been tested in PowerShell 7. You can download and install PowerShell 7 from: https://learn.microsoft.com/en-us/powershell/scripting/install/install-powershell-on-windows
After you have created the below Get-repository.ps1 you can simply call the script with:
.\Get-repository.ps1 -BaseUrl 'http://repository.veeam.com/vsa/' -OutRoot 'C:\Downloads\veeam-vsa' -ZipPath 'C:\Downloads\veeam-vsa.zip' -MaxRetries 3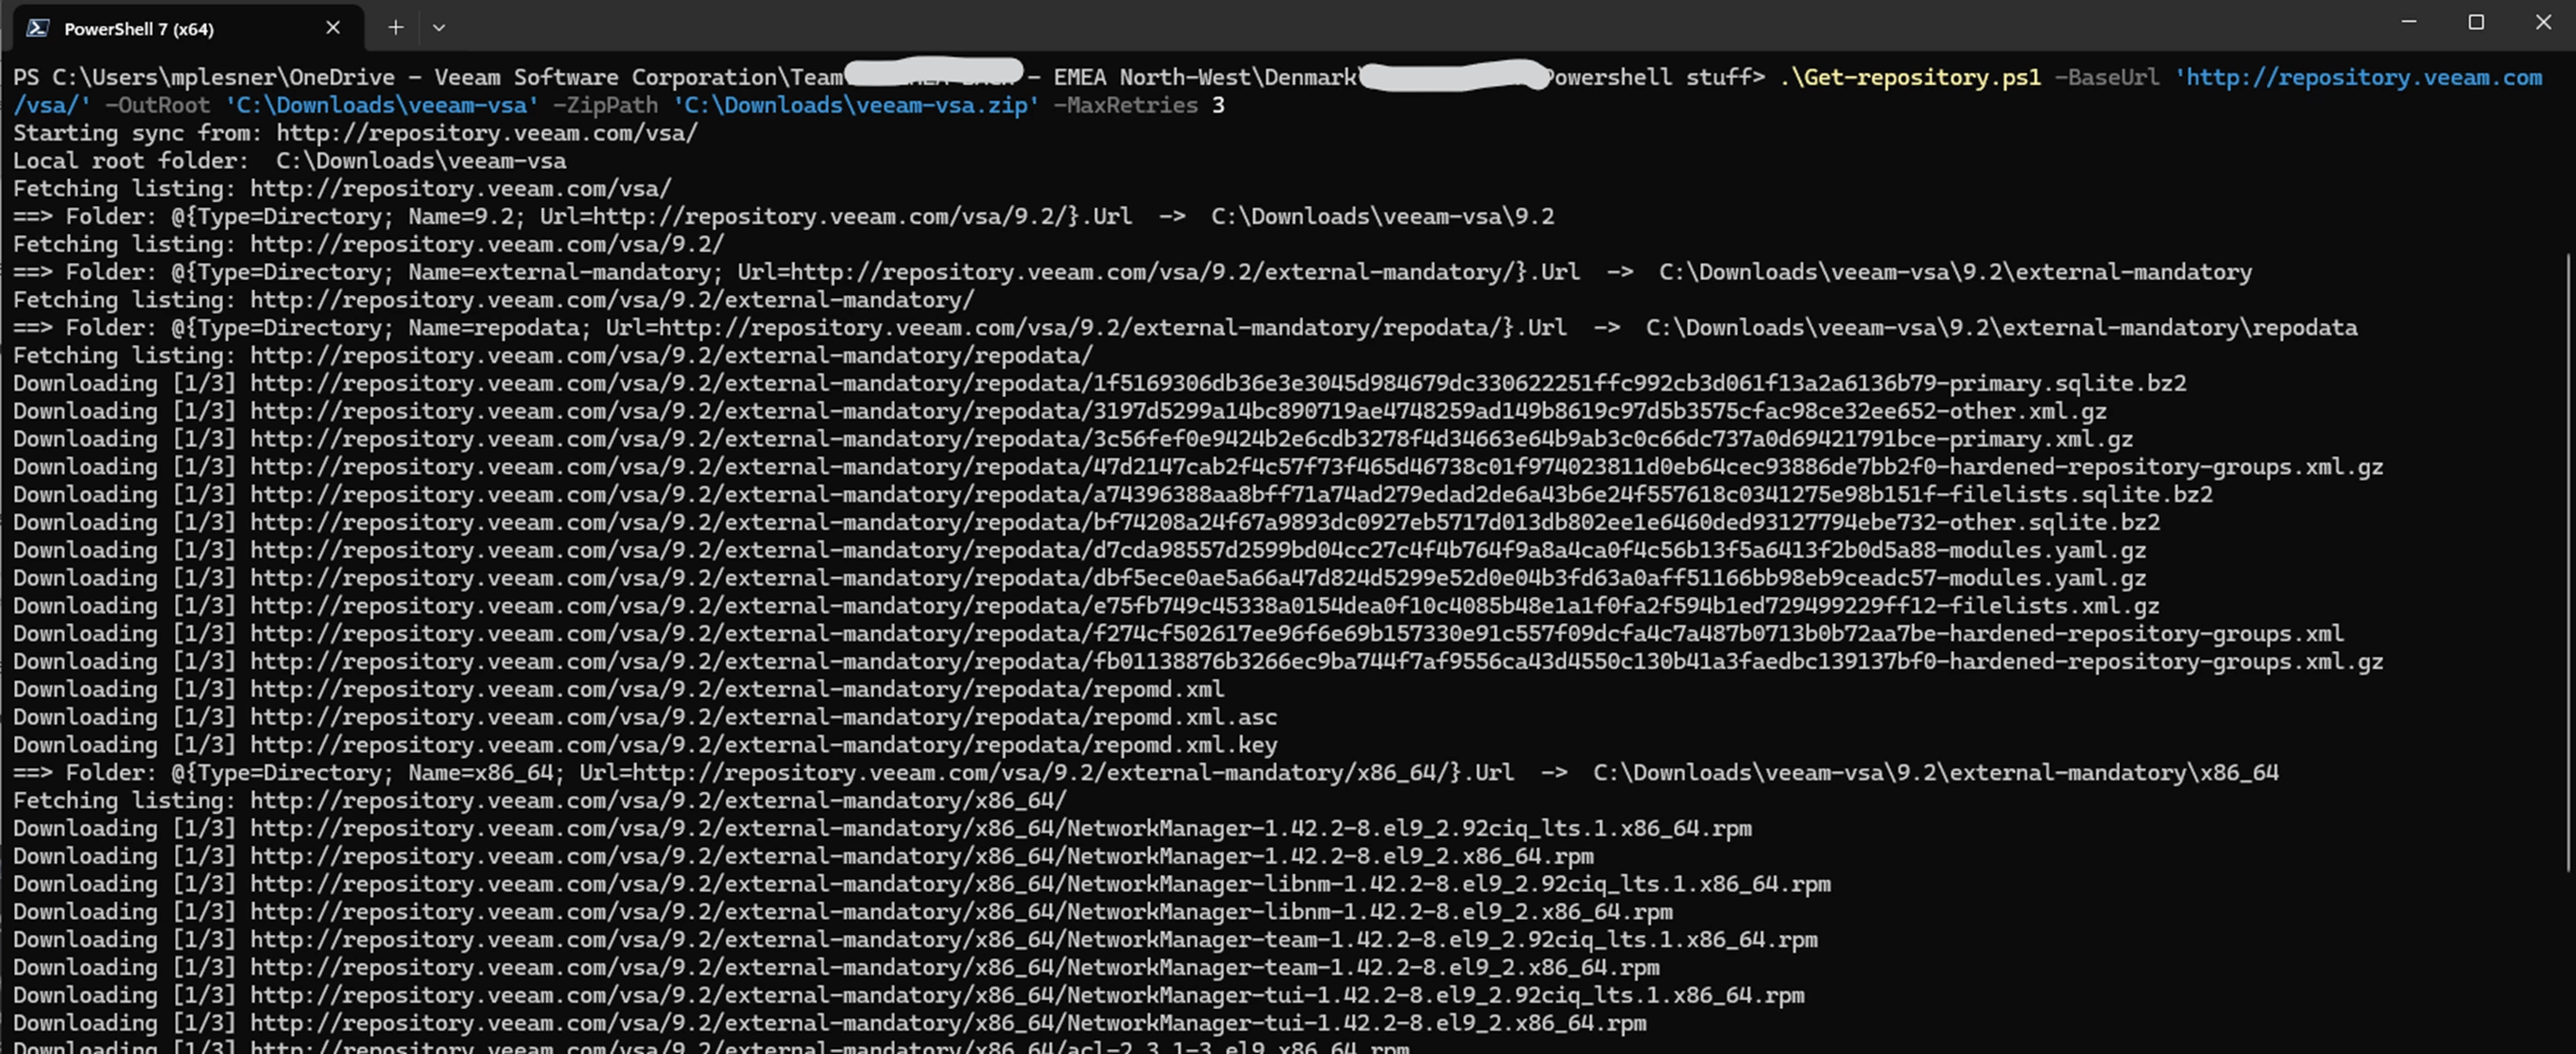
With a little help from co-writer, Copilot, here is the content of the Get-repository.ps1:
<#
.SYNOPSIS
  Fetch the entire content (recursively) from http://repository.veeam.com/vas/
  and zip it after download.

.DESCRIPTION
  - Preserves folder structure locally.
  - Skips files that have already been downloaded with the same size.
  - Retries on temporary network errors.
  - Zips the full local copy into a single .zip at the end.

.PARAMETER BaseUrl
  Root URL for the Rocky mirror (default: https://repository.veeam.com/vas/)

.PARAMETER OutRoot
  Local root folder for download (default: C:\Downloads\veeam-vas)

.PARAMETER ZipPath
  Location of the zip file after sync (default: C:\Downloads\veeam-vas.zip)

.PARAMETER MaxRetries
  Number of attempts on error (default: 3)
#>

[CmdletBinding()]
param(
  [string]$BaseUrl   = "https://repository.veeam.com/vsa/",
  [string]$OutRoot   = "C:\Downloads\veeam-vsa",
  [string]$ZipPath   = "C:\Downloads\veeam-vsa.zip",
  [int]$MaxRetries   = 3
)

# Ensure TLS 1.2 for any HTTPS redirect
 try {
   [System.Net.ServicePointManager]::SecurityProtocol = `
     [System.Net.SecurityProtocolType]::Tls12 `
     -bor [System.Net.SecurityProtocolType]::Tls11 `
     -bor [System.Net.SecurityProtocolType]::Tls
 } catch { }

# Use a fixed User-Agent so directory listing isn't denied
$Global:DefaultHeaders = @{
  "User-Agent" = "PowerShell/7 (Sync-VeeamVAS)"
}

# Helper: Create absolute URI from base + relative
function Join-Uri {
  param(
    [Parameter(Mandatory=$true)][string]$Base,
    [Parameter(Mandatory=$true)][string]$Href
  )
  $baseUri = [System.Uri]$Base
  # Handle absolute, root-relative, and relative
  if ($Href -match '^(http|https)://') {
    return $Href
  } elseif ($Href.StartsWith('/')) {
    return ($baseUri.Scheme + "://" + $baseUri.Host + $Href)
  } else {
    return ([System.Uri]$baseUri, $Href -join '')
  }
}

# Fetch and parse directory listing into files and folders
function Get-DirectoryItems {
  param([Parameter(Mandatory=$true)][string]$Url)

  Write-Verbose "Fetching listing: $Url"

  $resp = Invoke-WebRequest -Uri $Url -Headers $Global:DefaultHeaders -ErrorAction Stop -MaximumRedirection 10

  $content = $resp.Content


  # Simpler and robust: match only href attributes, not the full <a> tag structure.
  # Note: Use the RegexOptions enum, NOT a string.
  $hrefMatches = [System.Text.RegularExpressions.Regex]::Matches(
    $content,
    'href\s*=\s*"([^"]+)"',
    [System.Text.RegularExpressions.RegexOptions]::IgnoreCase
  )

  $items = @()
  foreach ($m in $hrefMatches) {
    $href = $m.Groups[1].Value

    # Exclude parent, sorting, and fragments
    if ($href -eq "../" -or $href.StartsWith("?") -or $href.StartsWith("#")) { continue }

    $abs = Join-Uri -Base $Url -Href $href

    if ($href.EndsWith('/')) {
      # Folder name = last segment without trailing slash
      $name = ($href.TrimEnd('/') -split '/')[-1]
      if ([string]::IsNullOrWhiteSpace($name)) { $name = $href.TrimEnd('/') }
      $items += [pscustomobject]@{ Type="Directory"; Name=$name; Url=$abs }
    } else {
      # File name = last segment
      $name = ($href -split '/')[-1]
      # Exclude plain listing files
      if ($name -match '^index\.(html?|htm)$') { continue }
      $items += [pscustomobject]@{ Type="File"; Name=$name; Url=$abs }
    }
  }

  return $items
}

# HEAD to get Content-Length (may be missing on some endpoints)

function Get-RemoteContentLength {
  param([Parameter(Mandatory=$true)][string]$Url)

  # 1) Try HEAD first
  try {
    $head = Invoke-WebRequest -Uri $Url -Method Head -Headers $Global:DefaultHeaders -ErrorAction Stop

    if ($head -and $head.Headers) {
      $clVals = $head.Headers['Content-Length']     # string or string[]
      $clStr  = $null

      if ($clVals -is [string]) {
        $clStr = $clVals
      } elseif ($clVals -is [System.Array]) {
        if ($clVals.Length -gt 0) { $clStr = $clVals[0] }
      }

      if ($clStr -and ($clStr -match '^\d+$')) {
        return [int64]$clStr
      }
    }
  } catch {
    # ignore and fall back
  }

  # 2) Fallback: GET a single byte and parse Content-Range (e.g., "bytes 0-0/123456")
  try {
    # Clone headers and add Range (and optionally disable compression)
    $rangeHeaders = @{}
    foreach ($kv in $Global:DefaultHeaders.GetEnumerator()) { $rangeHeaders[$kv.Key] = $kv.Value }
    $rangeHeaders['Range'] = 'bytes=0-0'
    # $rangeHeaders['Accept-Encoding'] = 'identity'   # optional

    $resp = Invoke-WebRequest -Uri $Url -Method Get -Headers $rangeHeaders -ErrorAction Stop

    if ($resp -and $resp.Headers) {
      $crVals = $resp.Headers['Content-Range']       # string or string[]
      $crStr  = $null
      if ($crVals -is [string]) {
        $crStr = $crVals
      } elseif ($crVals -is [System.Array]) {
        if ($crVals.Length -gt 0) { $crStr = $crVals[0] }
      }

      if ($crStr -and ($crStr -match '/(\d+)$')) {
        return [int64]$Matches[1]
      }
    }
  } catch {
       # Range not supported or server rejects: return $null
  }

  return $null
}

# Download with retry and skip if local file has identical size
function Download-File {
  param(
    [Parameter(Mandatory=$true)][string]$Url,
    [Parameter(Mandatory=$true)][string]$OutFile,
    [int]$MaxRetries = 3
  )
  $remoteLen = Get-RemoteContentLength -Url $Url
  $dir = Split-Path -Path $OutFile -Parent
  if (-not (Test-Path -LiteralPath $dir)) {
    New-Item -ItemType Directory -Path $dir -Force | Out-Null
  }

  if (Test-Path -LiteralPath $OutFile -PathType Leaf) {
    try {
      $localLen = (Get-Item -LiteralPath $OutFile).Length
      if ($remoteLen -ne $null -and $localLen -eq $remoteLen) {
        Write-Host "SKIP (match size)  $Url -> $OutFile  ($localLen bytes)"
        return
      }
    } catch { }
  }

  $attempt = 0
  while ($attempt -lt $MaxRetries) {
    $attempt++
    try {
      Write-Host "Downloading [$attempt/$MaxRetries] $Url"
      Invoke-WebRequest -Uri $Url -Headers $Global:DefaultHeaders -OutFile $OutFile -ErrorAction Stop
      # Validate size if we know remoteLen
      if ($remoteLen -ne $null) {
        $localLen = (Get-Item -LiteralPath $OutFile).Length
        if ($localLen -ne $remoteLen) {
          throw "Size mismatch: local=$localLen, remote=$remoteLen"
        }
      }
      return
    } catch {
      Write-Warning "Download error ($Url): $($_.Exception.Message)"
      Start-Sleep -Seconds ([math]::Min(15, 3 * $attempt))
      if ($attempt -ge $MaxRetries) {
        Write-Error "Giving up after $MaxRetries attempts: $Url"
      }
    }
  }
}

# Recursively sync from URL to local folder
function Sync-Url {
  param(
    [Parameter(Mandatory=$true)][string]$Url,
    [Parameter(Mandatory=$true)][string]$LocalRoot
  )
  if (-not (Test-Path -LiteralPath $LocalRoot)) {
    New-Item -ItemType Directory -Path $LocalRoot -Force | Out-Null
  }

  $items = Get-DirectoryItems -Url $Url

  # Folders first, then files
  foreach ($d in $items | Where-Object { $_.Type -eq "Directory" }) {
    $subLocal = Join-Path -Path $LocalRoot -ChildPath $d.Name
    Write-Host "==> Folder: $d.Url  ->  $subLocal"
    Sync-Url -Url $d.Url -LocalRoot $subLocal
  }
  foreach ($f in $items | Where-Object { $_.Type -eq "File" }) {
    $outFile = Join-Path -Path $LocalRoot -ChildPath $f.Name
    Download-File -Url $f.Url -OutFile $outFile -MaxRetries $MaxRetries
  }
}

# ==== Execution ====
Write-Host "Starting sync from: $BaseUrl"
Write-Host "Local root folder:  $OutRoot"
Sync-Url -Url $BaseUrl -LocalRoot $OutRoot

# === Zip (user interaction) ===
$caption = "Create ZIP"
$message = "Do you want to create a new zip file at `"$ZipPath`" from `"$OutRoot`"?"
$choices = [System.Management.Automation.Host.ChoiceDescription[]]@(
    (New-Object System.Management.Automation.Host.ChoiceDescription '&Yes', 'Create or overwrite the zip file.'),
    (New-Object System.Management.Automation.Host.ChoiceDescription '&No',  'Skip creating the zip file.')
)

# Default choice: No (index 1)
$decision = $Host.UI.PromptForChoice($caption, $message, $choices, 1)

if ($decision -eq 0) {
    Write-Host "Preparing to compress: $OutRoot -> $ZipPath"
    try {
        $doCompress = $true
        if (Test-Path -LiteralPath $ZipPath) {
            $overwriteCaption = "Overwrite existing ZIP?"
            $overwriteMessage = "A zip file already exists at `"$ZipPath`". Do you want to overwrite it?"
            $overwriteChoices = [System.Management.Automation.Host.ChoiceDescription[]]@(
                (New-Object System.Management.Automation.Host.ChoiceDescription '&Yes', 'Overwrite the existing zip file.'),
                (New-Object System.Management.Automation.Host.ChoiceDescription '&No',  'Keep the existing zip and skip compression.')
            )
            # Default: No (index 1)
            $overwriteDecision = $Host.UI.PromptForChoice($overwriteCaption, $overwriteMessage, $overwriteChoices, 1)

            if ($overwriteDecision -ne 0) {
                Write-Host "Skipping compression: existing zip kept."
                # Exit the zip step but continue the script
                $doCompress = $false
            }

            # Remove existing zip so Compress-Archive can create a fresh one
            Remove-Item -LiteralPath $ZipPath -Force
        }
        if ($doCompress) {
            Compress-Archive -Path $OutRoot -DestinationPath $ZipPath -Force
            Write-Host "ZIP created: $ZipPath"
        }

    } catch {
        Write-Error "Could not compress: $($_.Exception.Message)"
    }
} else {
    Write-Host "Skipping compression per user choice."
}
Step 2 - Set up Windows Server IIS to host the VSA Software repository
In this step, we will set up a new dedicated website on the IIS Web server. But out of the gate, IIS is hardened and does not support hosting all kinds of files for download as we need; we will change this. Also, in my guide, I am using Windows Server 2022, but the concept and setting should also apply to other Windows Server (and IIS) versions.
If you plan to use your IIS server's hostname as I am doing here in my lab, ensure that your Windows server has the correct Hostname or DNS entries.
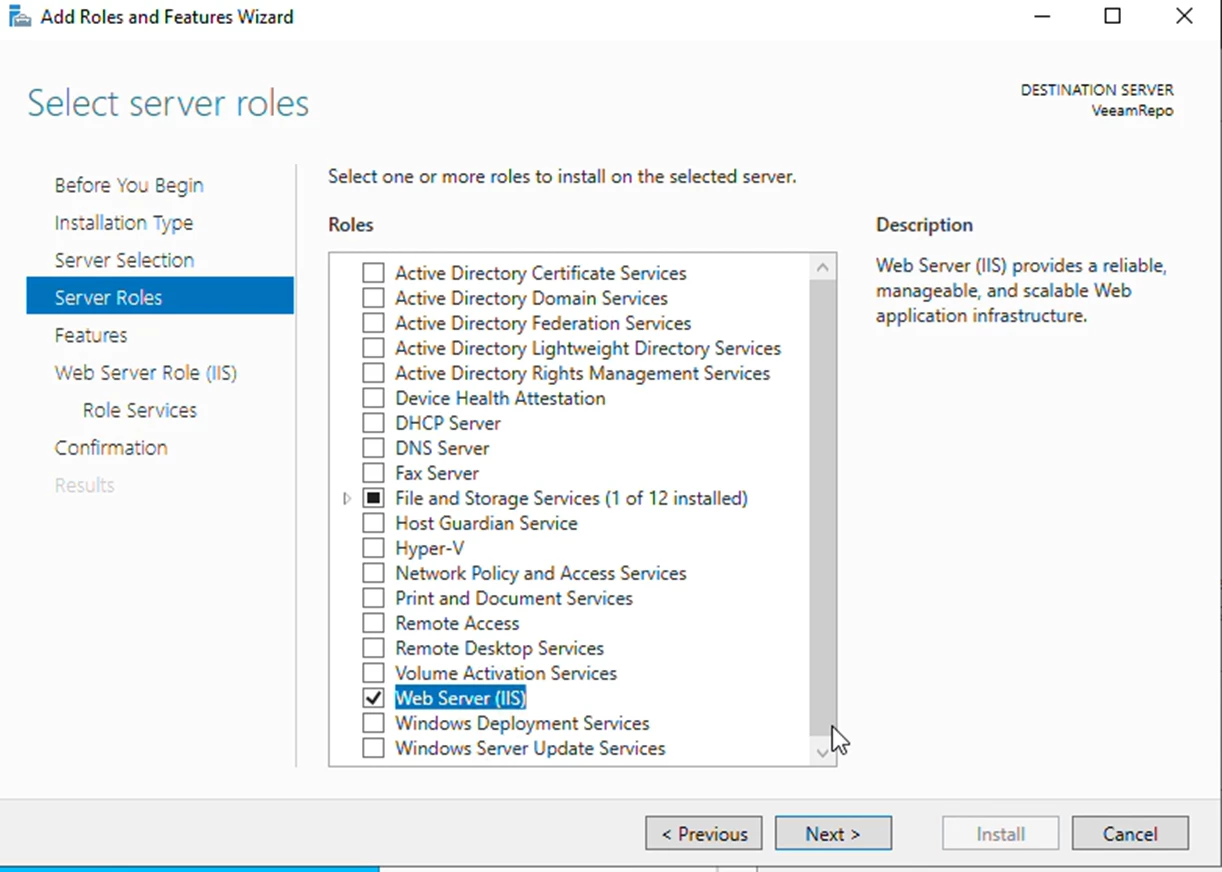
If your server is not an IIS web server already, add the Server role called Web Server (IIS) in the “Add roles and Features” wizard of Windows:
-> Just install the IIS with standard settings (no additional features or settings required )
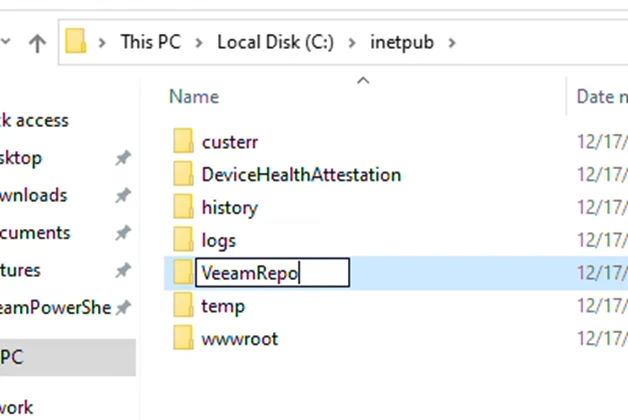
After this installation of the IIS you should see a folder called c:\inetpub and inside inetpub, there should be a folder called wwwroot.
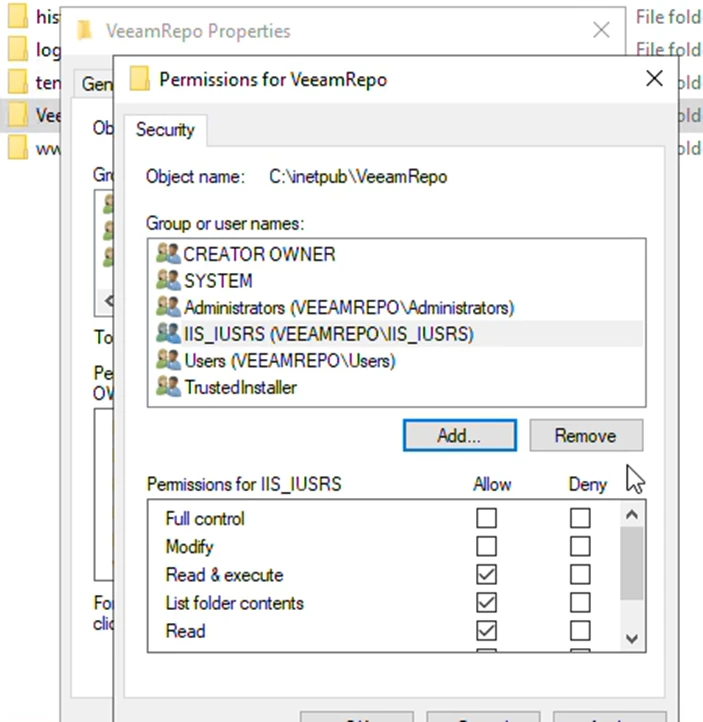
We will not be using or modifying the wwwroot folder, but I would like you to note down the Permission settings for the folder. This is because we would like to create a separate folder for our repository next to the wwwroot folder.
-> Create a new folder called VeeamRepo:
-> Now change the permissions setting of VeeamRopo folder to match wwwroot folder. In my demo lab, I should just add the IIS_IUSER with ‘Read & execute’, ‘List folder contents’ and ‘Read’ permission.
-> Next create a new subfolder called vsa
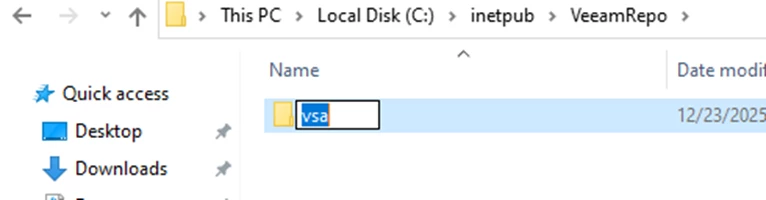
-> Create a file, using your favorite text editor, next to the vsa folder. The filename should be web.config
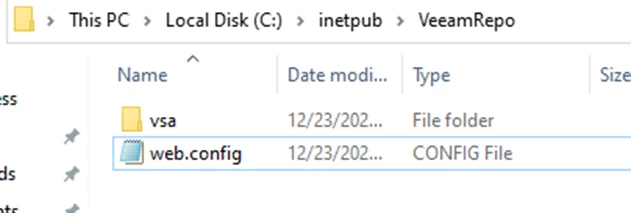
Past the following web.config configuration:
<?xml version="1.0" encoding="UTF-8"?>
<configuration>

  <system.webServer>
    <security>
      <authorization>
        <!-- Deny all users access to the root of the website, since it
             contains this web.config -->
        <remove users="*" roles="" verbs="" />
        <add accessType="Deny" users="*" />
      </authorization>
    </security>
        <caching enabled="false" enableKernelCache="false" />
  </system.webServer>

  <location path="vsa" allowOverride="false">
    <system.webServer>
      <directoryBrowse enabled="true" showFlags="Date, Time, Size, Extension" />
      <defaultDocument>
        <files>
          <!-- When requesting a file listing, don't serve up the default
               index.html file if it exists. -->
          <clear />
        </files>
      </defaultDocument>

      <security>
        <authorization>
          <!-- Allow all users access to the Public folder -->
          <remove users="*" roles="" verbs="" />
          <add accessType="Allow" users="*" roles="" />
        </authorization>

        <!-- Unblock all sourcecode related extensions (.cs, .aspx, .mdf)
             and files/folders (web.config, bin) -->
        <requestFiltering>
          <hiddenSegments>
            <clear />
          </hiddenSegments>
          <fileExtensions>
            <clear />
          </fileExtensions>
        </requestFiltering>
      </security>

      <!-- Map all extensions to the same MIME type, so all files can be
           downloaded. -->
      <staticContent>
        <clear />
        <mimeMap fileExtension="*" mimeType="application/octet-stream" />
      </staticContent>
    </system.webServer>
  </location>

</configuration>
I will not review all the details in the web.config file; in short, access to the website’s root folder is restricted, whereas our ‘vsa’ subfolder can be accessed and all files will be streamed as binary files
http or https. In my case, I will go with the https with self-signed because VSA does support self-signed Certificate, so why not..
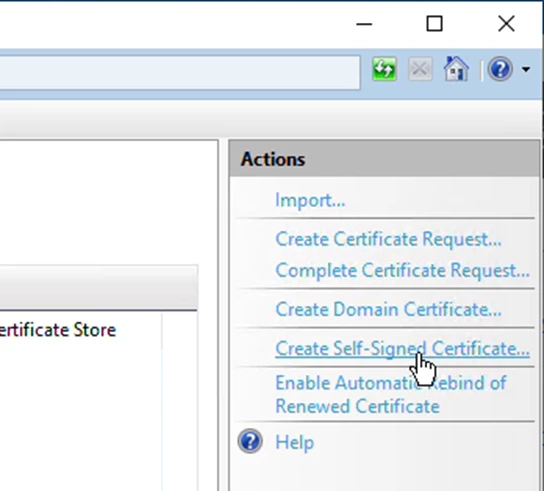
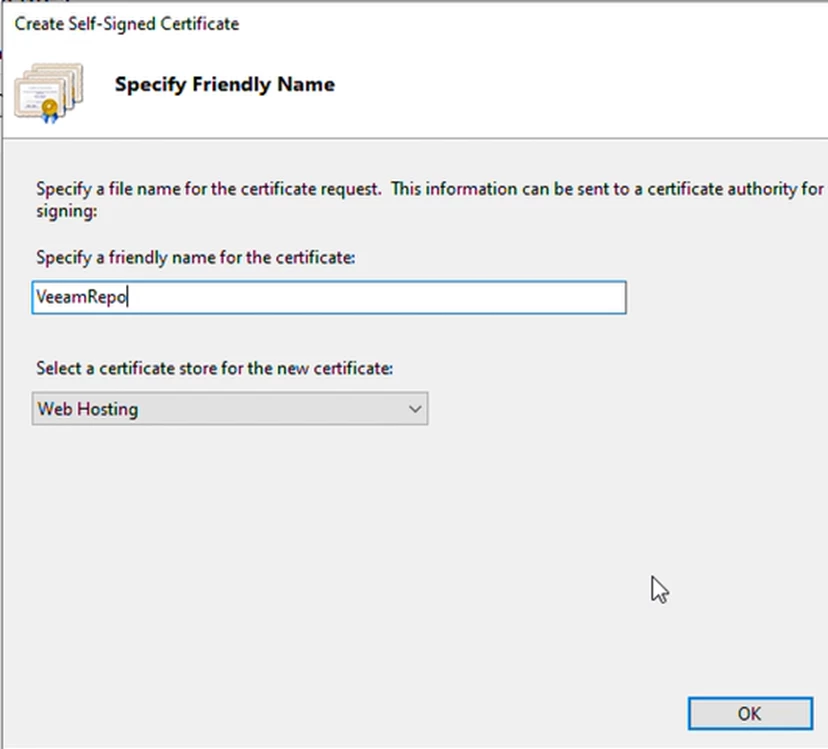
-> Now let's open up IIS Manager and create a self-signed Server Certificate. Of cause you can use you perfed let's encrypt cerfiticate or the company PKI, but for the concept of next-next-next I am going to use the built-in self-signed part of IIS:
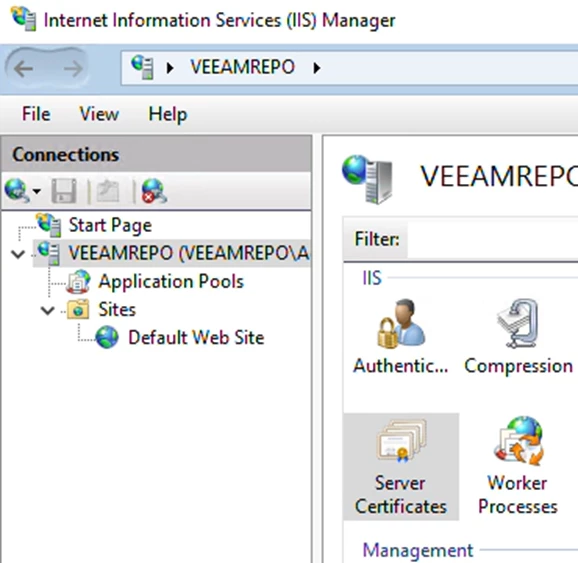
-> Click the Create Self-signed Certificate on the right-hand side:
-> Fill in the URL / hostname of where you are planning to host your web server. In my case, I will ensure that “VeeamRepo” resolves to the correct IP address using the host file.
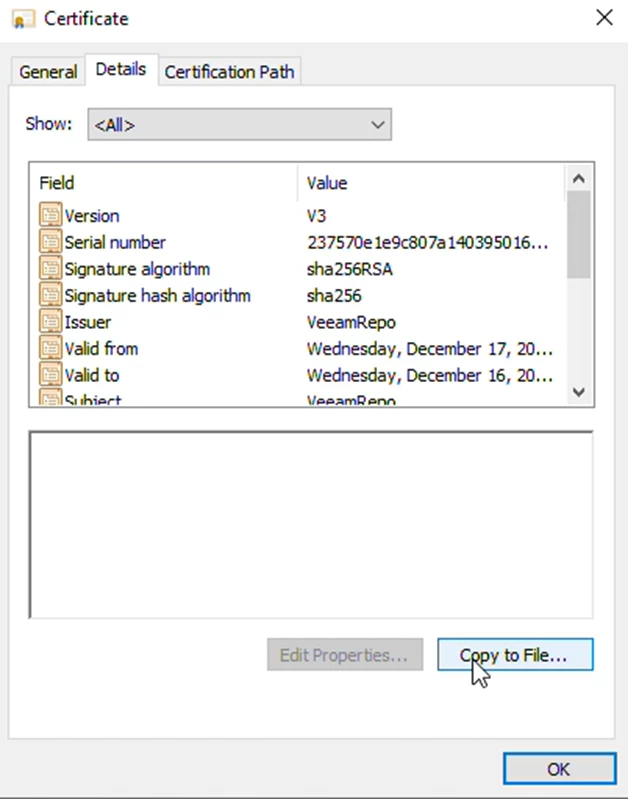
-> After the certificate has been created, right-click the certificate and click View.
We want to export the public part of the certificate to a .cer file. We need to use this later in the VSA interface
-> Export only the public part of the certificate by selecting NOT to export the private part:
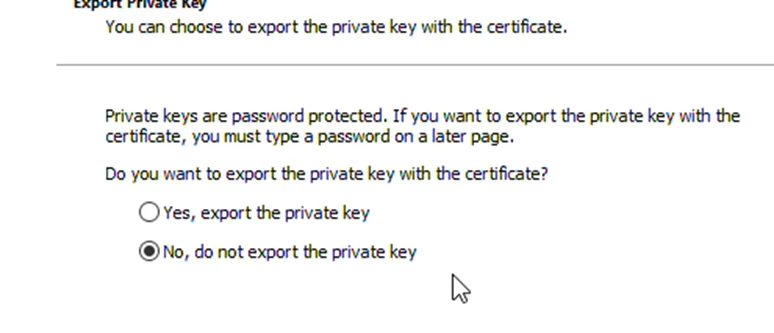
If asked about the certificate format, you can use the Base-64 encoded X.509 (.CER) format, which works for me. I exported to a VeeamRepo.cer file.
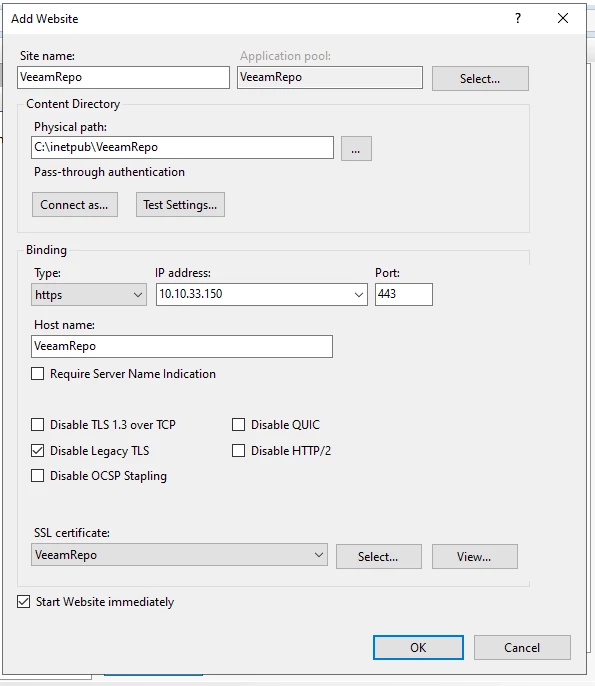
Now it is time to create the website.
->Add a new website by selecting c:\inetpub\VeeamRepo as the root folder, binding with https and the url/hostname also used in the certificate. I my case I want to make sure to bind the website to the fixed IP of the server, this way I make sure that I can control access by local firewall or by the network firewall if you have one. Remember to select the new Self-signed certificate.
That is it. Now the web server is ready to get the content of the Zip files from step 1
To test the website, we can go to the root site, I my case https://veeamrepo
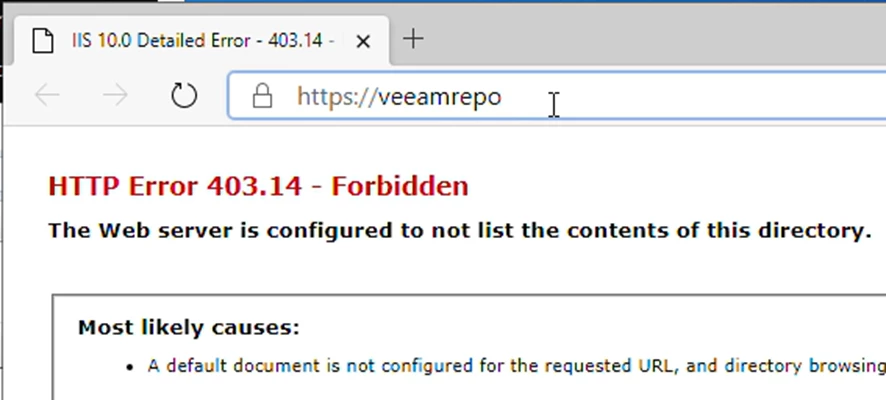
If you test from another server other than the IIS, you will get a ERR_CERT_AUTHORITY_INVALID aka. “Your connection is not private”
After acceptiong the ERR_CERT_AUTHORITY_INVALID, you should see a 403.14 access denied, which is expected:
Now, let's try the subfolder VSA:
https://veeamrepo/vsa
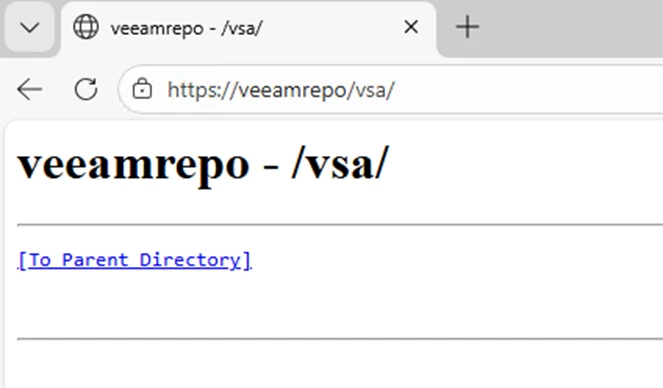
Success, certificate https, and file browsing are working!
Step 3 – Unzip the files
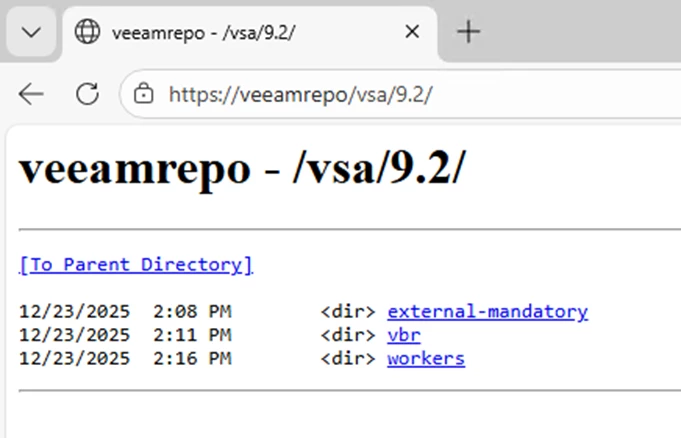
Now all you need is to unzip the content of the zip file to c:\inetpub\VeeamRepo\vsa\ and make sure two things:
First, make sure the zip file is not in a “block mode” before unzipping.
And second, make sure the folder structure is c:\inetpub\VeeamRepo\vsa\9.2\... The current version VSA 13.0.1 will first look up the /vsa/9.2/vbr/13.0/mandatory/repodata/repomd.xml file.
Now your IIS is ready to serve the VAS with updates.
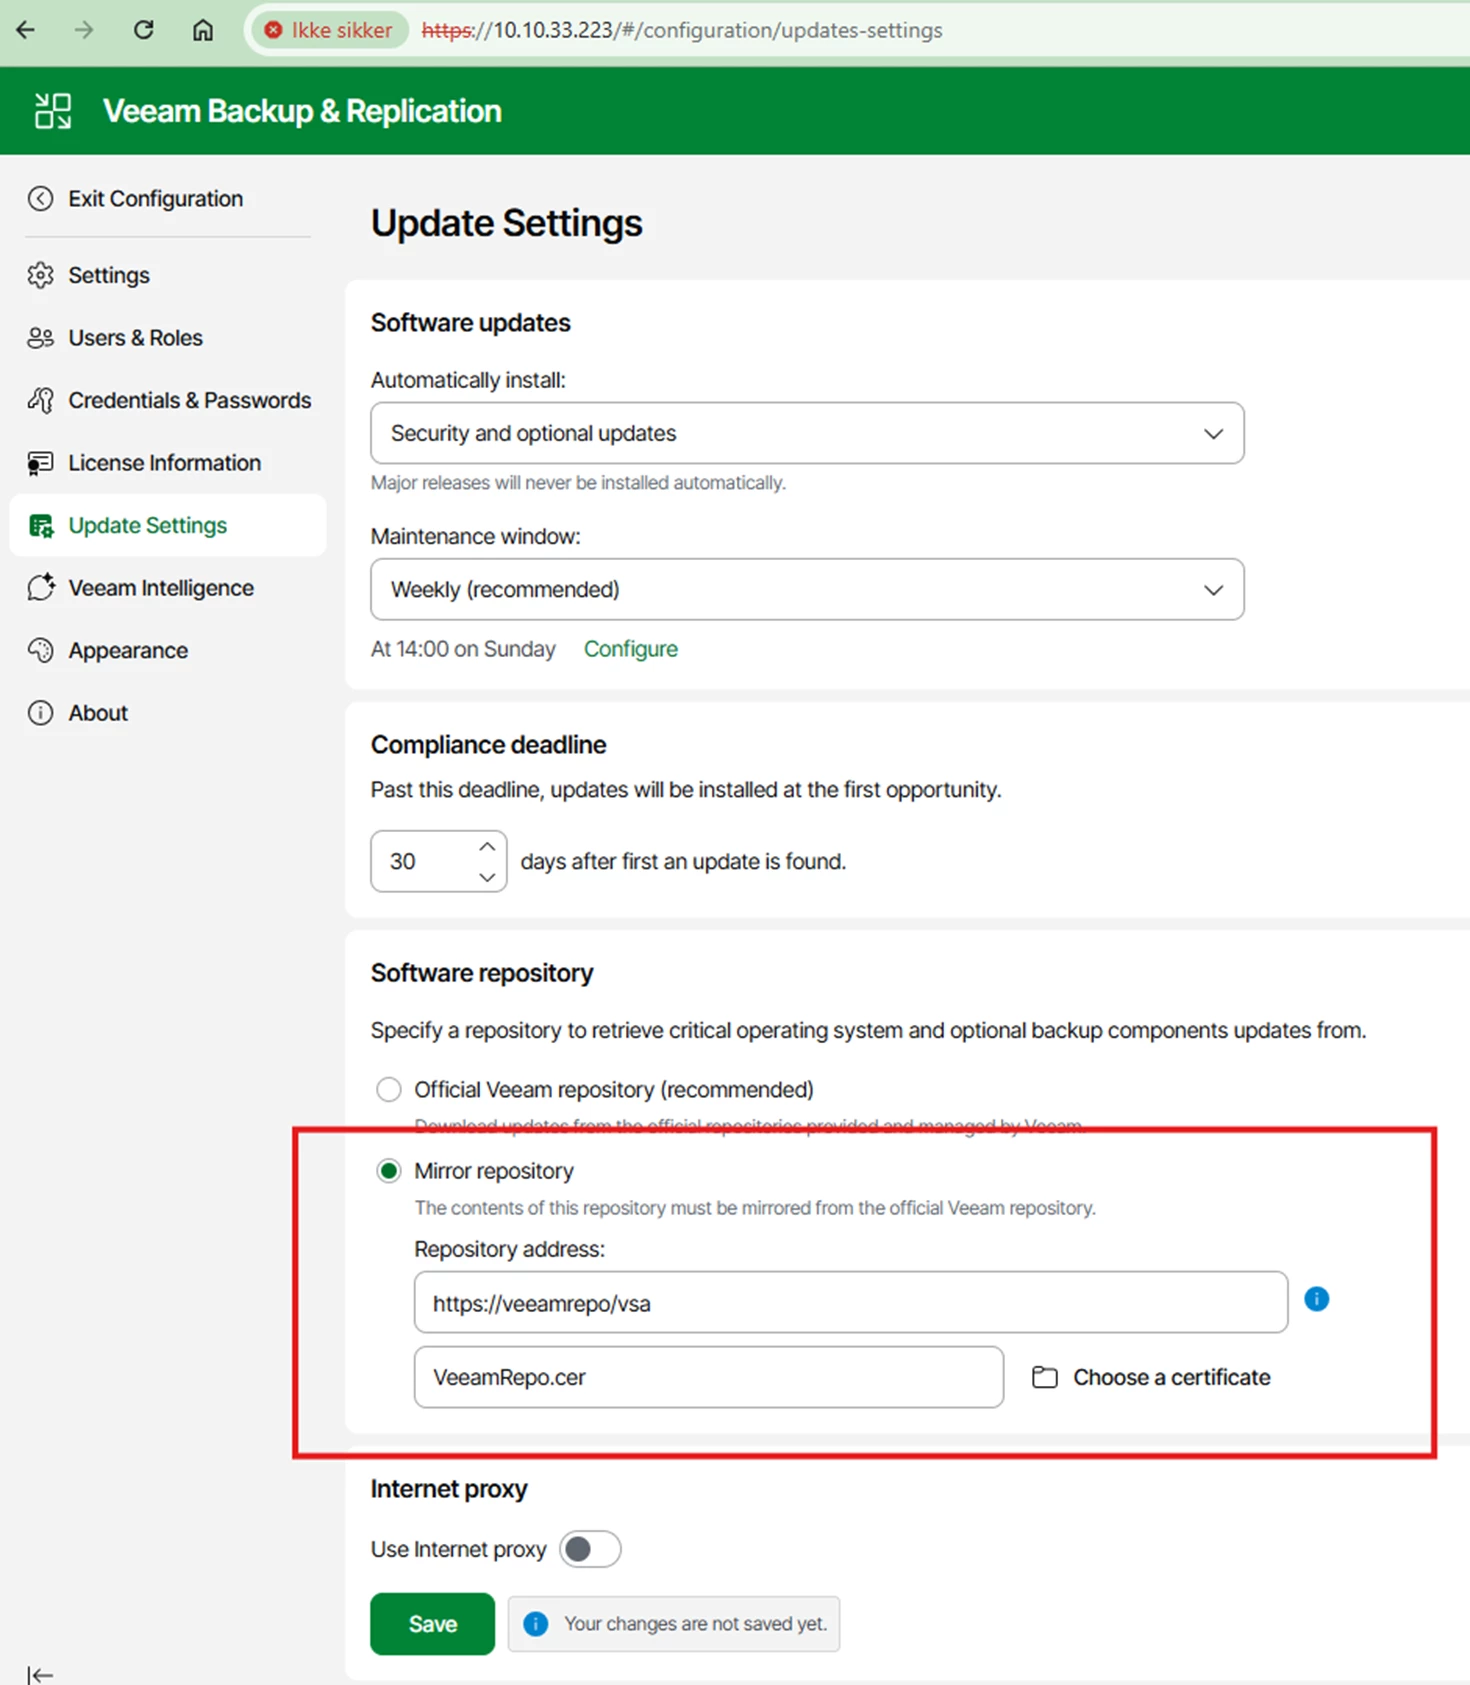
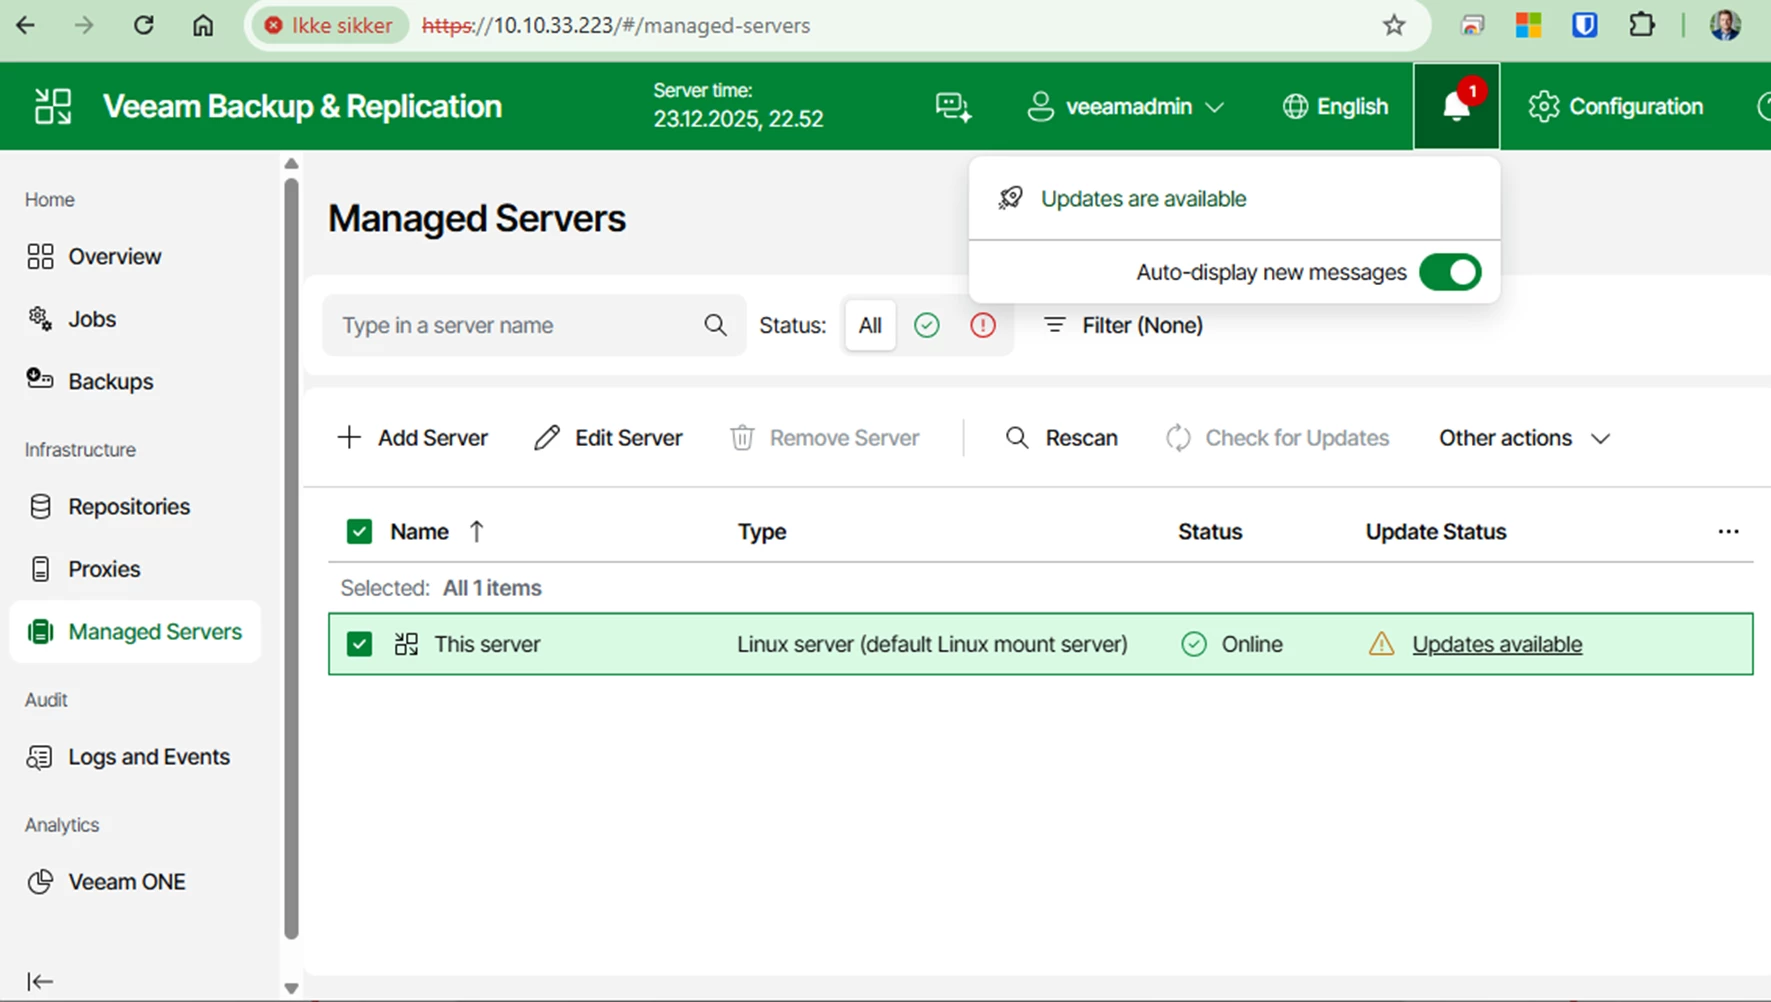
Step 4 - Update the VSA (current version is v13.0.1)
Now we can go to the Veeam Software Appliance or Veeam Infrastructure Appliance “Custom Update Configuration”: https://helpcenter.veeam.com/docs/vbr/userguide/update_appliance_configure_updates.html?ver=13#setting-up-custom-update-configuration
Or you can set the “Global Update Configuration” in the VBR server: https://helpcenter.veeam.com/docs/vbr/userguide/update_appliance_configure_updates.html?ver=13#setting-up-global-update-configuration
Select “Mirror repository” and point to the IIS https://VeeamRepo/vsa and choose the certificate we exported in step 2 called VeeamRepo.cer
Test that updates can be checked:
If you are looking for a way to host a Linux version of the Repository mirror. Go have a look at PeteSteven’s post: https://community.veeam.com/blogs-and-podcasts-57/veeam-appliance-updates-and-veeam-update-repository-mirror-server-12216

