
For those who joined my online and VeeamON sessions on migrating from VMware to Hyper-V or Proxmox, I promised I would share my cleanup scripts. It took longer than planned to prepare them, but they are now ready.
Online session HERE unfortunately there is no video of the VeeamON session that was migrating to Proxmox.
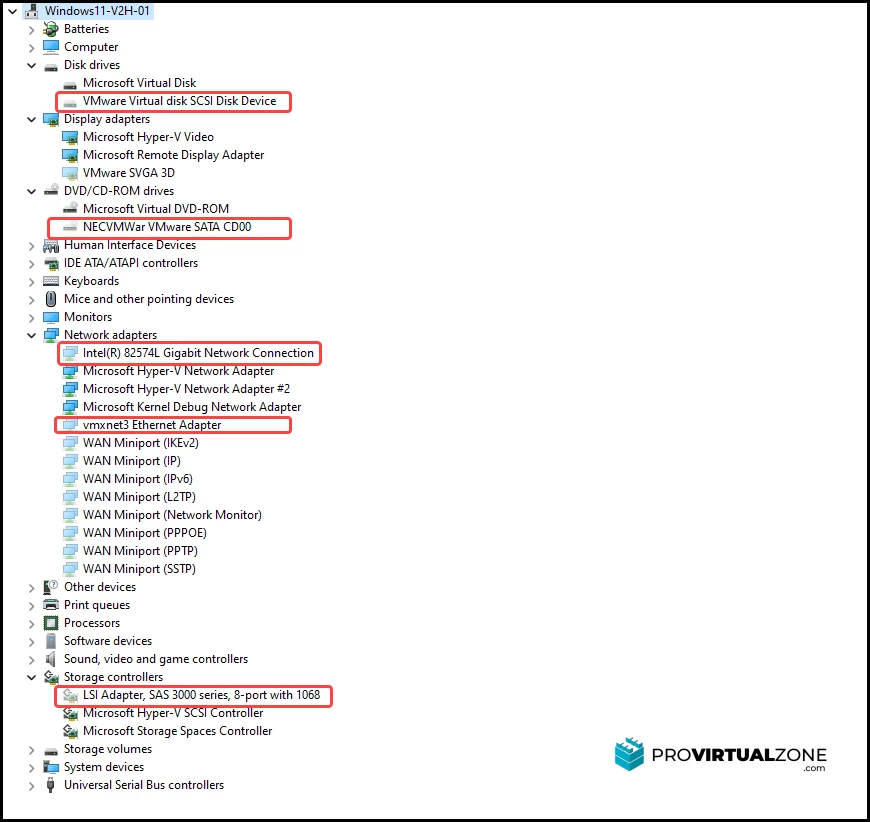
When you use Veeam to migrate a Windows virtual machine, the work is not done when the job finishes. Your migrated VM is now running on a new platform, but it still contains old drivers and devices from VMware.
These leftovers can cause instability, performance issues, or future driver conflicts. This post explains how to use my PowerShell scripts to safely clean the VM after your migration, making it ready for the new platform.
Get the Scripts on GitHub
All the tools discussed here are available in my public GitHub repository. You can clone or download them to get started.
My GitHub: My GitHub Repository
Before You Begin: A Safety Checklist
Before running any scripts, take these three steps:
-
Uninstall VMware Tools (Pre-Migration)
The best approach is to uninstall VMware Tools from the VM before you migrate it. If you do not, the uninstaller can become corrupted, which makes it very difficult to remove after the migration. This step prevents most problems.
-
Have a Fallback Plan (Optional but Recommended)
Take a snapshot or backup of the VM right after migration and before you run the cleanup. This gives you an "undo" button if something unexpected happens.
-
Copy the Scripts
To avoid network dependency issues after migration, copy the script files into the VM before you start your migration.
The goal is an "as-is" migration. We want to remove the VMware-specific hardware drivers while keeping the machine's network settings, like its IP address, DNS, and routes.
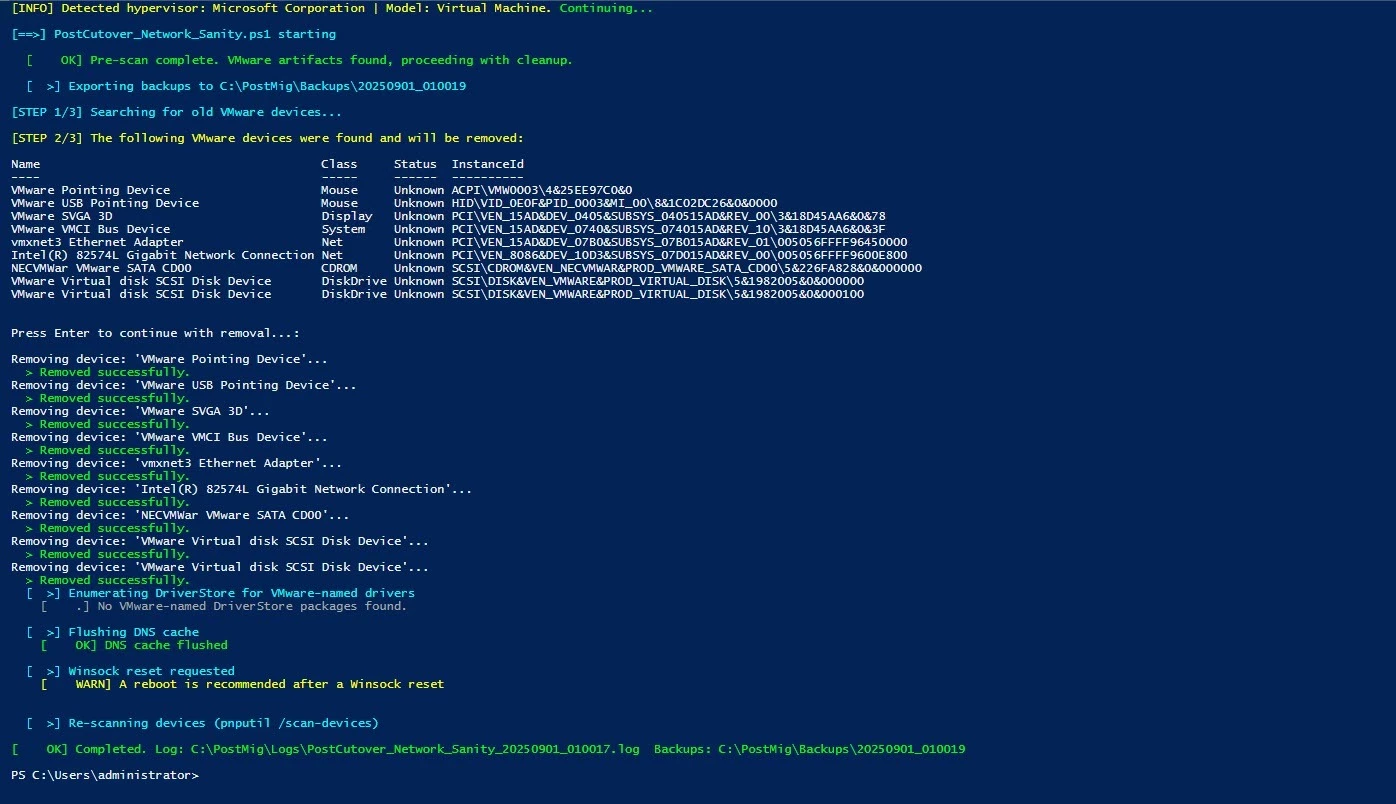
The All-in-One Cleanup: PostCutover_Network_Sanity.ps1
This is your main tool. It handles safety checks, backups, and the final cleanup automatically.
To run it, open an elevated PowerShell window inside the migrated VM and execute the script with no parameters:
.\PostCutover_Network_Sanity.ps1
Here is what it does, step-by-step:
-
Safety Checks
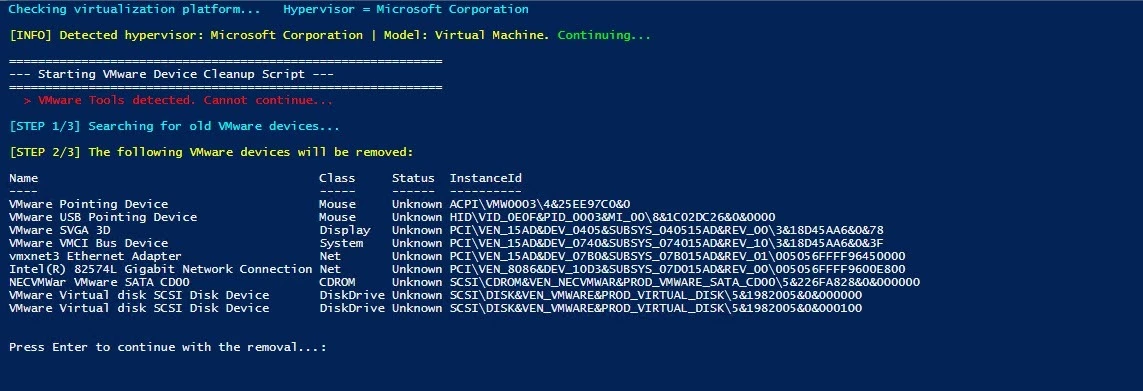
It first checks that it is not running on an active VMware hypervisor and will ask for confirmation twice if it detects one. It also checks for VMware Tools.
-
Pre-Scan
The script scans for hidden VMware devices (like SVGA, VMCI, and PVSCSI) and old VMware driver packages in the Windows DriverStore.
-
Intelligent Execution
If it finds no VMware components, it exits cleanly. It makes no changes and performs no unnecessary work.
-
Automatic Backup
If leftovers are found, it automatically backs up your current device inventory to C:\PostMig\Backups\. Every backup has a timestamp.
-
Automated Cleanup
It then removes all hidden devices and cleans the Driver Store packages. By default, it also flushes the DNS and resets Winsock to clean the network state.
-
Logging
Every action is recorded in a detailed log file stored in C:\PostMig\Logs\.
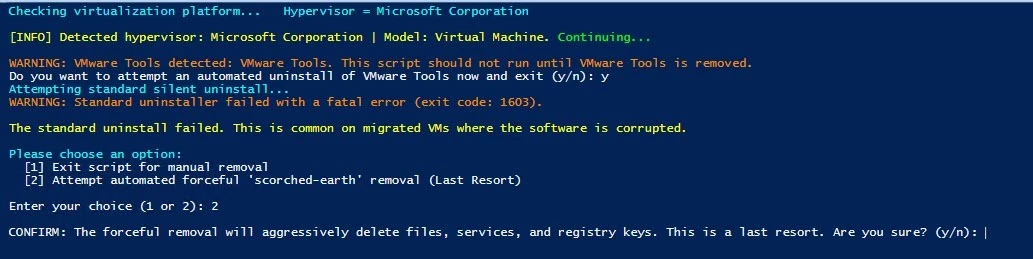
When VMware Tools Will Not Uninstall: The Last Resort
My number one rule is to uninstall VMware Tools before migrating. If you forget, the standard uninstaller will often fail with an error (1603). The script handles this:
-
It will first attempt the standard silent uninstall.
-
If that fails, it will present a menu with two choices:
-
Exit: You can exit and try to remove it manually (for example, with the Microsoft Install/Uninstall Troubleshooter).
-
Forceful Removal: You can authorize the script to perform a forceful removal, which deletes all VMware Tools services, files, drivers, and registry keys.
-
For situations where you need to perform this forceful removal as a standalone task, I have provided the Force-VMwareToolsRemove.ps1 script in the repository.
Surgical Strikes: Targeted Commands
Sometimes, you do not need the full routine. The main script includes parameters for performing specific actions.
-
Remove All Hidden VMware Devices Only:
.\PostCutover_Network_Sanity.ps1 -CleanupDevices -
Remove VMware Driver Packages Only:
.\PostCutover_Network_Sanity.ps1 -RemoveDriverStore
What the Script Does Not Change
To ensure a stable "as-is" migration, the script is designed to be safe:
-
Your IP configuration is safe. It will not be changed or reset unless you use the
-RestoreIPparameter. -
It performs no risky registry edits by default. It uses standard Windows utilities like
pnputil.exe. The only exception is the optional forceful VMware Tools removal, which will remove specific VMware registry keys as a last resort. -
The default cleanup routine does include a
netsh winsock resetto clean the network state. You can run a more targeted cleanup using parameters if you want to avoid this.
Verify Your Success
After the script finishes, confirm that everything is clean:
-
Open Device Manager and select "View" > "Show hidden devices." The VMware devices should be gone.
-
Run
pnputil /enum-driversin PowerShell or CMD. Confirm that packages for vmxnet, pvscsi, vmci, and others are no longer listed. -
Check
ipconfig /all. Your IP address, gateway, and DNS servers should be exactly as they were before. -
Review the log file in
C:\PostMig\Logs\for a final confirmation.
How to Roll Back
If you encounter an issue, you can revert the device driver changes using the backups the script created.
-
To restore drivers:
.\PostCutover_Network_Sanity.ps1 -Restore -
To also re-apply the backed-up IP configuration:
.\PostCutover_Network_Sanity.ps1 -Restore -RestoreIP
For a Quick and Simple Cleanup: Hidden_Devices_Remove.ps1
Sometimes you do not need all the extra features. If you want a lightweight, interactive tool that only removes hidden devices, use the other script in the repository:
.\Hidden_Devices_Remove.ps1
This script is for a quick, manual cleanup. It does not have the deep cleaning, backup, or restore features of the main tool.
A Final Word on Safety
You should use these scripts at your own risk.
Always test these scripts in a non-production environment first before using them on live systems. This gives you a chance to see how they work and what they do.
If you find any issues or have suggestions for improvement, please let me know in the comments so I can fix them.
Give the scripts a try on your next migration and let me know how it goes in the comments.


