Amazon Virtual Private Cloud (Amazon VPC) allows you to deploy AWS resources within a logically isolated virtual network that you create. This virtual network mirrors the structure of a conventional network found in your own data centre while leveraging the scalable infrastructure provided by AWS. If you would like to follow this process, kindly use these steps to create your AWS account.
BTW, Why You Should Create Your Own VPC?
Creating your own virtual private cloud (VPC) offers numerous advantages. This allows you to design a networking architecture that aligns with your organisation’s requirements. You can define subnets, configure route tables, and implement various network configurations to optimise performance, reliability, and data flow within your virtual network.
Note: You can delete the default subnet or default VPC just as you can delete any other subnet or VPC. However, if you delete your default subnets or default VPC, you must explicitly specify a subnet in one of your VPCs when you launch instances. If you do not have another VPC, you must create a VPC with a subnet in at least one Availability Zone. If you delete your default VPC, you can create a new one!
Choosing this path instead of taking the easier route, you'll discover the IP Subnet Calculator to be incredibly valuable, especially if your skills in networking and subnetting are not at an advanced level. This tool can significantly aid you in managing IP addresses and subnets effectively. Here is the Subnet calculator I found very useful. There are numerous ones out there.
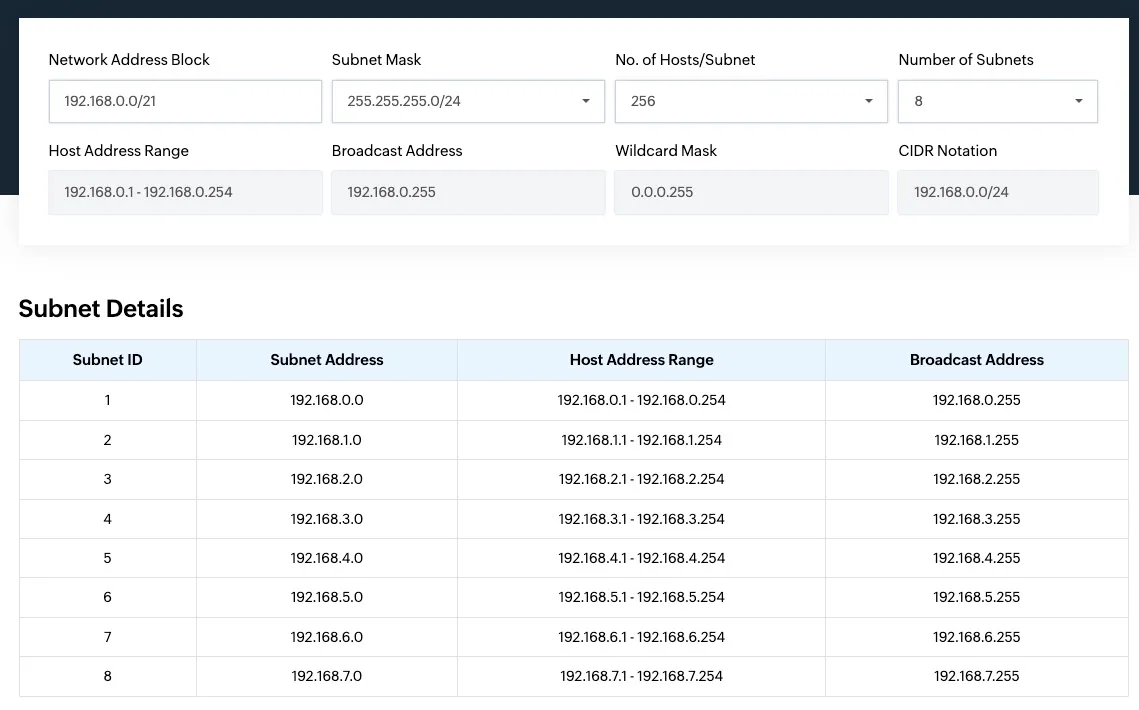
Simply input your Network Address block, and specify the desired number of subnets, and watch the subnet calculator work its magic as shown below.
The CIDR block 192.168.0.0/21 represents a block of 32 contiguous IPv4 addresses. To determine the individual CIDR blocks within this range, you can divide it further. For example, here are the eight subnets within the 192.168.0.0/21 CIDR block as shown above
VPC Creation
Navigate to AWS VPC Console and under services, search for Networking and Content Delivery.
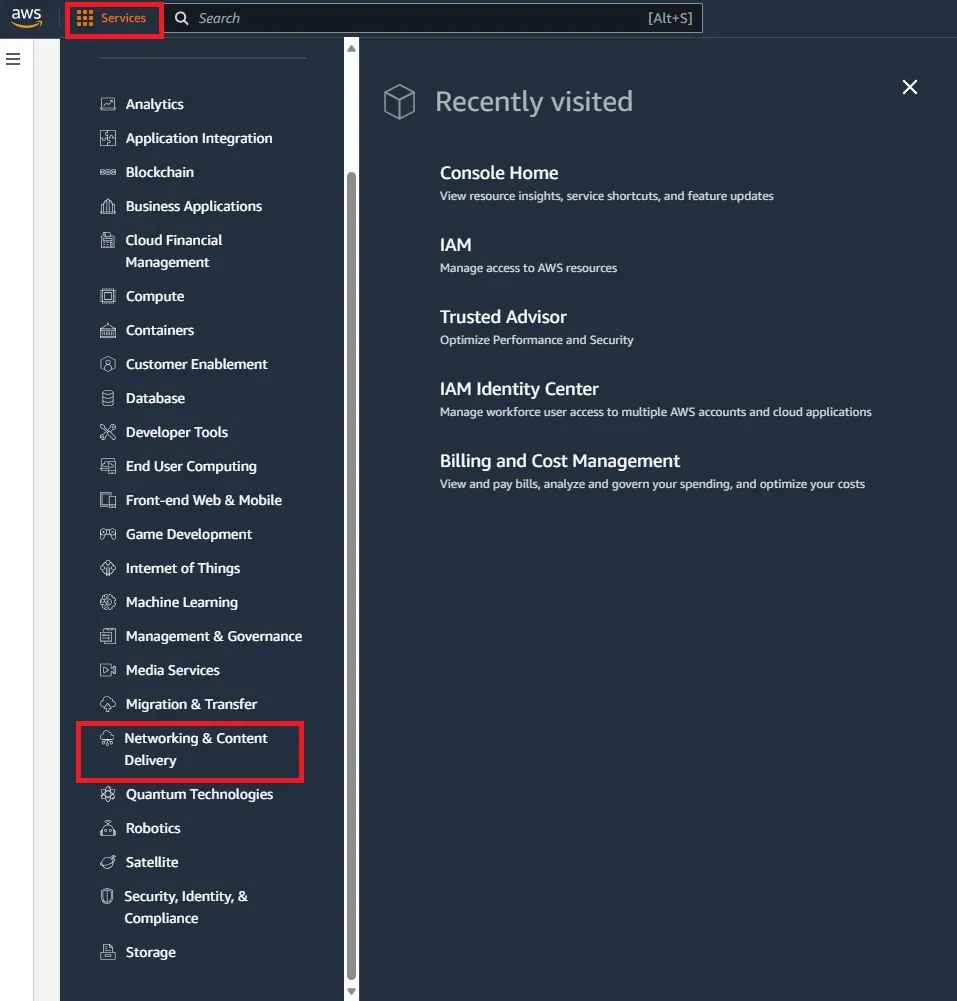
Select VPC

Want the easy path to life, then choose VPC and more. This will ensure the creation of your VPC, Subnets, Route tables and Internet Gateway etc. This is not the method I wish to demonstrate here. For detailed information not covered here, please see “VPC, Subnet, NACL, Security Group: Create your own Network on AWS from Scratch [Part 2]”.
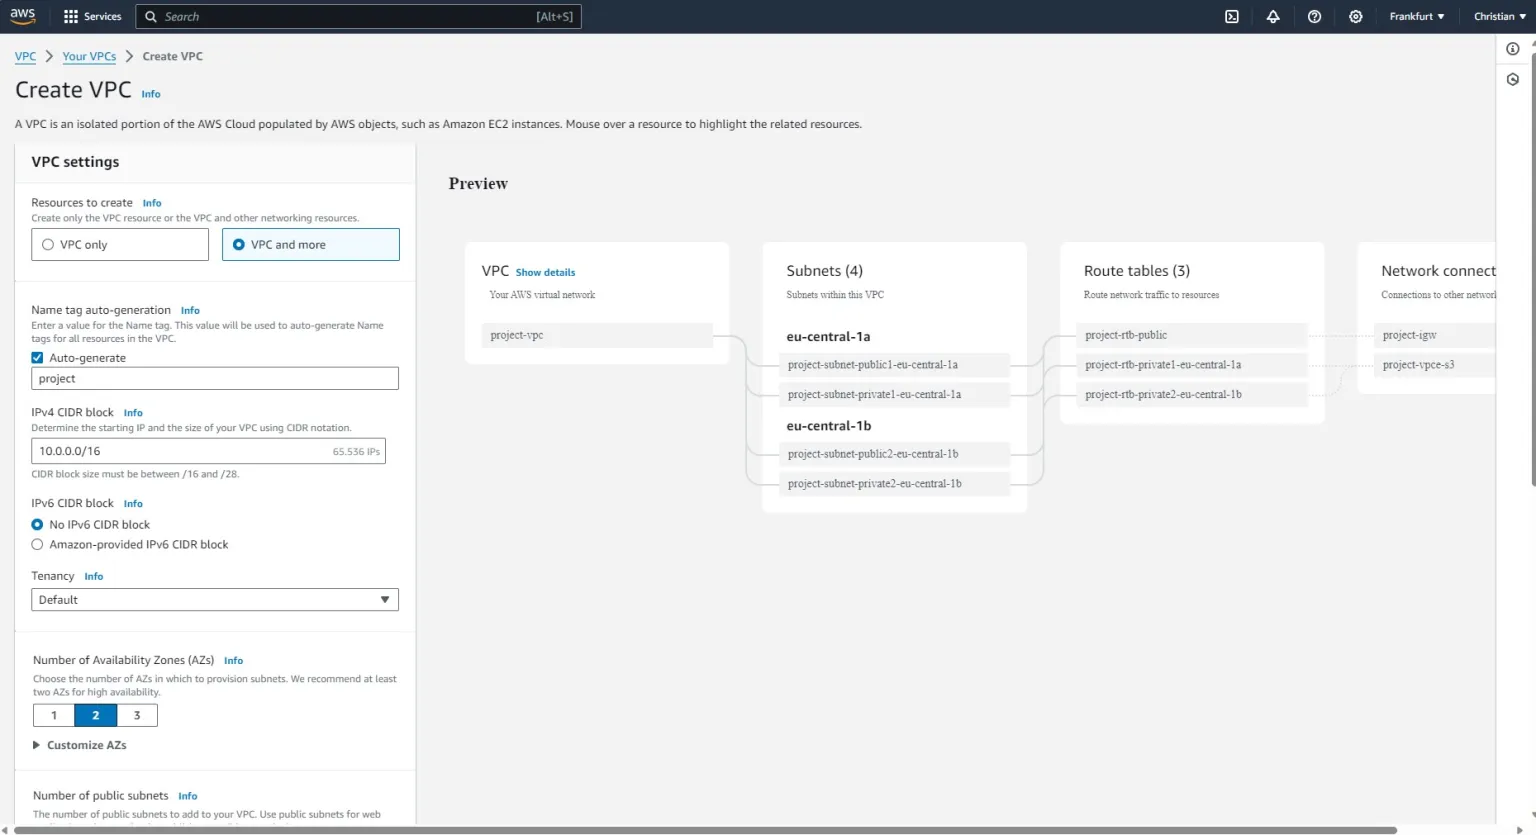
Select VPC only and populate the Create VPC field. I will not be creating an IPv6 CIDR yet. I will edit this VPC and create an IPv6 CIDR in the future

The IP addresses for your virtual private cloud (VPC) are represented using Classless Inter-Domain Routing (CIDR) notation. A VPC must have an associated IPv4 CIDR block. You can optionally associate additional IPv4 CIDR blocks and one or more IPv6 CIDR blocks.
Create Subnet
A subnet in your Virtual Private Cloud (VPC) defines a specific range of IP addresses. This enables you to allocate AWS resources, such as EC2 instances, within designated subnets to effectively organize and manage your network infrastructure in AWS.
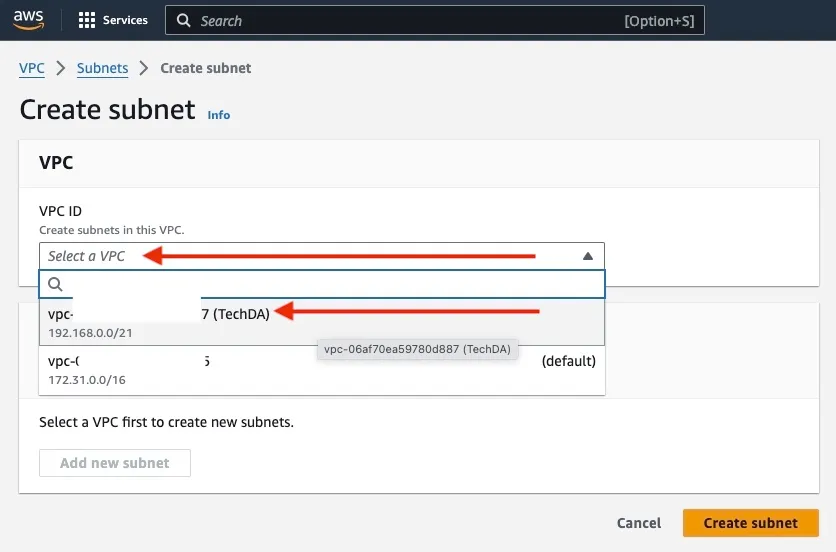
Open the Amazon VPC console, and navigate to the Subnet menu. Choose Create subnet.

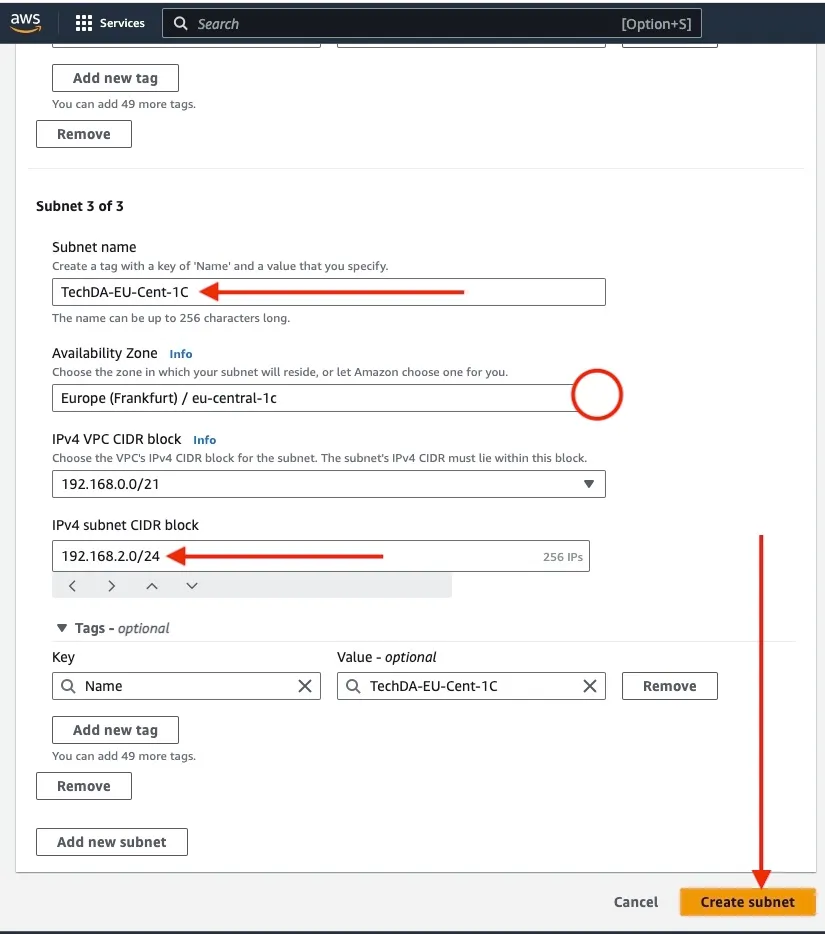
Populate the subnet fields as such below by selecting the VPC you have created.
Instead of clicking on “Create Subnet”. We will be clicking on “Add New Subnet”.
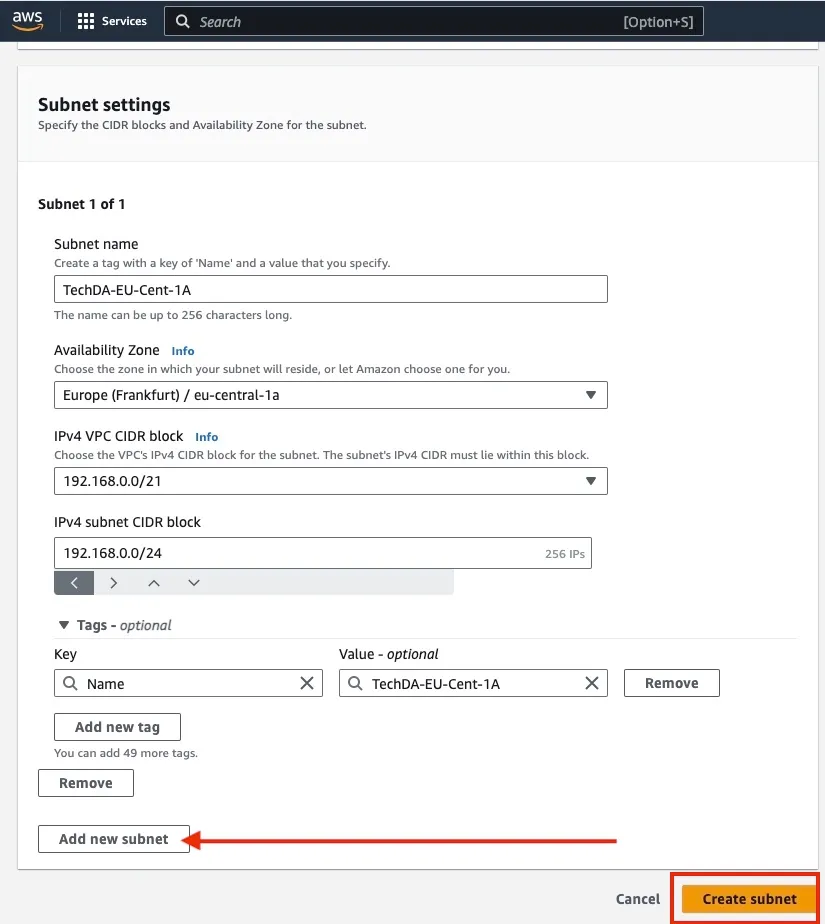
Note: Note: Implementing multiple subnets across availability zones serves as a robust strategy for safeguarding our applications against downtime and failures, enhancing resilience and ensuring continuous availability.
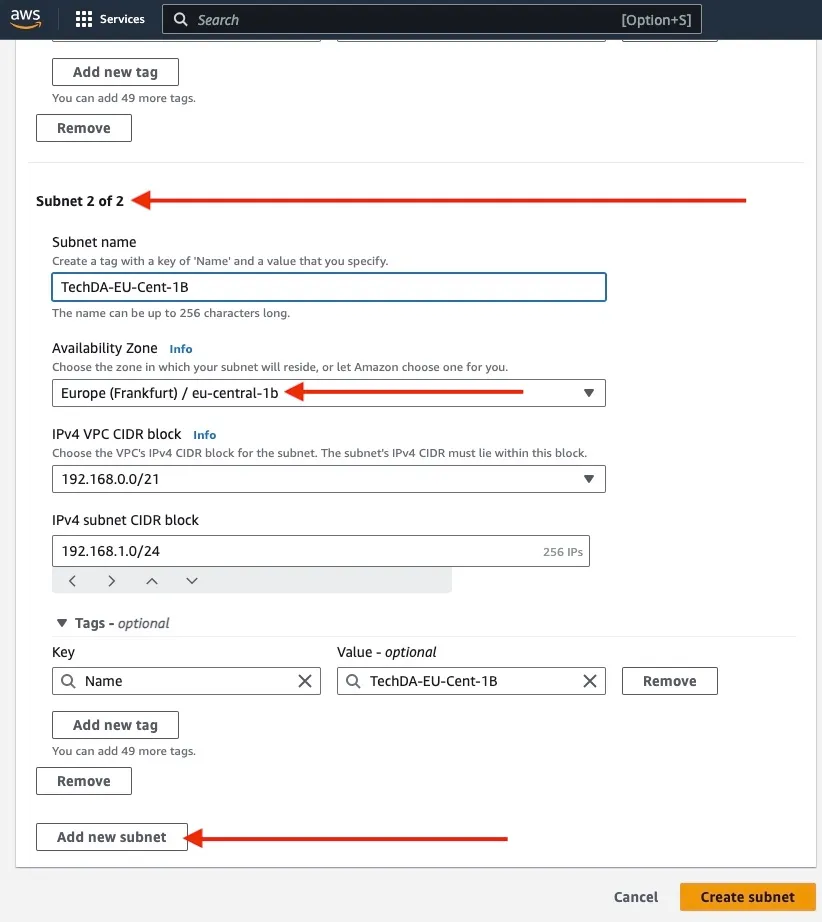
Do the same for the third (3rd) subnet as shown below.
All desired subnets are created as shown below.

Private Subnet
If a subnet is associated with a route table that has a route to an internet gateway, it’s referred to as a public subnet.
If a subnet is associated with a route table that does not have a route to an internet gateway, this is called a private subnet. In the next article, I will be showing you all that is needed to create a Private Subnet
I will be creating a separate post for this and why you would want to create a private subnet. This would include the creation of the NAT Gateway as well.
Internet Gateway
An internet gateway is a horizontally scaled, redundant, and highly available VPC component that allows communication between your VPC and the internet. IGW supports IPv4 and IPv6 traffic. It does not cause availability risks or bandwidth constraints on your network traffic.
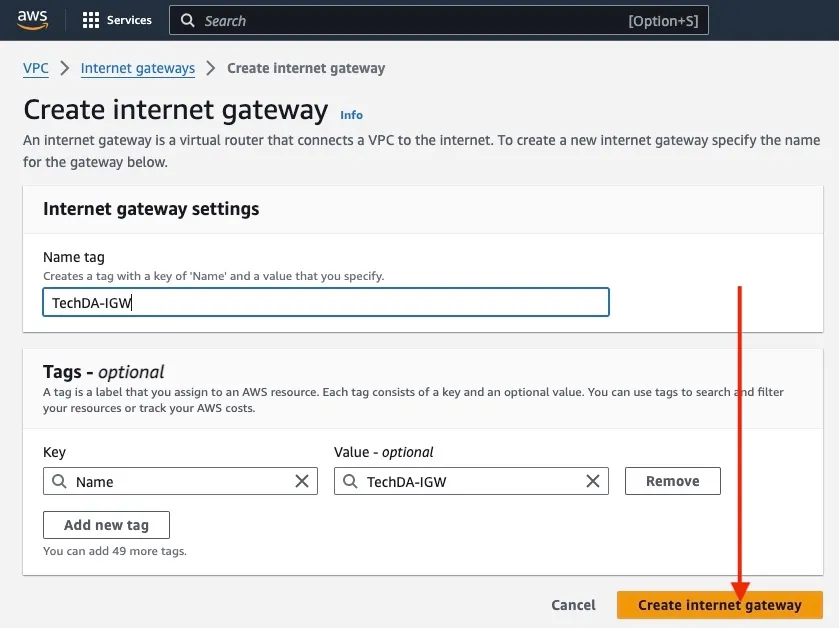
Open the AWS VPC console as shown below. In the navigation pane, choose Internet gateways. Then click on “Create Internet Gateway”.

Enter a name for your internet gateway. You can optionally choose a Tag and hit the Create Internet Gateway button.
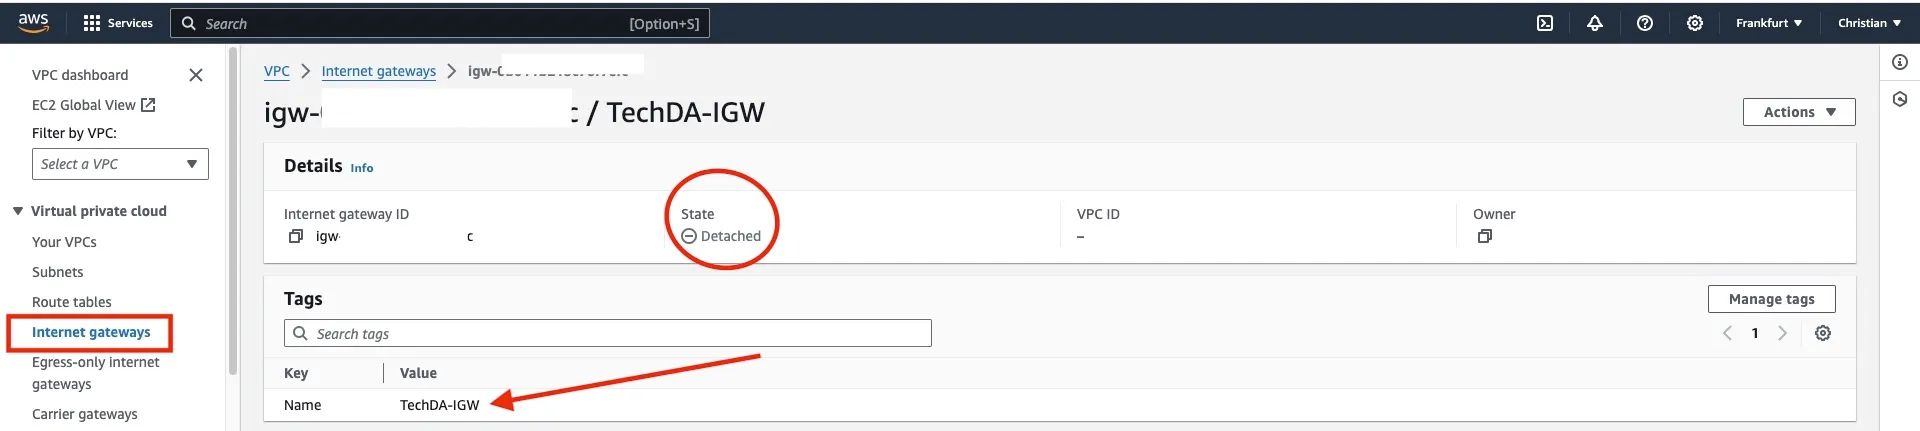
Now, we have successfully created our IGW
Attach Internet Gateway to VPC
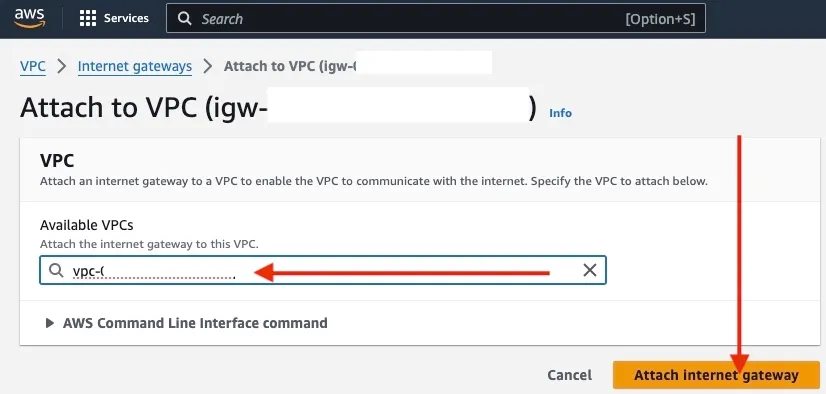
To attach the internet gateway to a VPC now, choose Attach to a VPC from the banner at the top of the screen.

Select the VPC we created above, and then choose Attach Internet gateway. Otherwise, you can attach your internet gateway to a VPC at a later time.
The Internet Gateway has been attached successfully.

Note: If you no longer need an internet gateway, you can delete it. You can't delete an internet gateway if it's still attached to a VPC.
Create Route Tables
A route table contains a set of rules, called routes. This determines where the network traffic from your subnet or gateway is directed.
The route table for the public subnet has a route that sends all internet-bound IPv4 traffic to the internet gateway. The instances in the public subnet must have public IP addresses or Elastic IP addresses to enable communication with the internet over the internet gateway.
Any subnet that does not have an explicit association defaults to the main route table. The Main route table comes automatically with your VPC. We have to create a route table for our public subnet and our private subnet (later time).
Open the Amazon VPC console and on the navigation pane, select Route Tables. Click create Route Table.

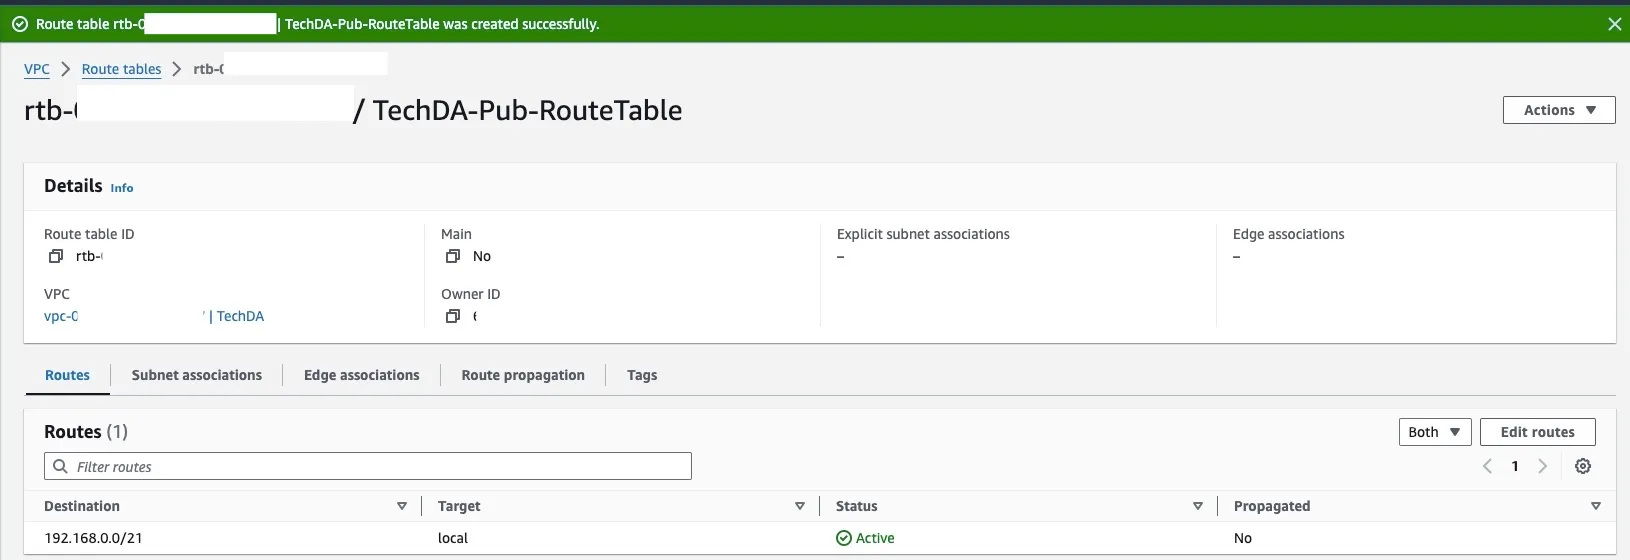
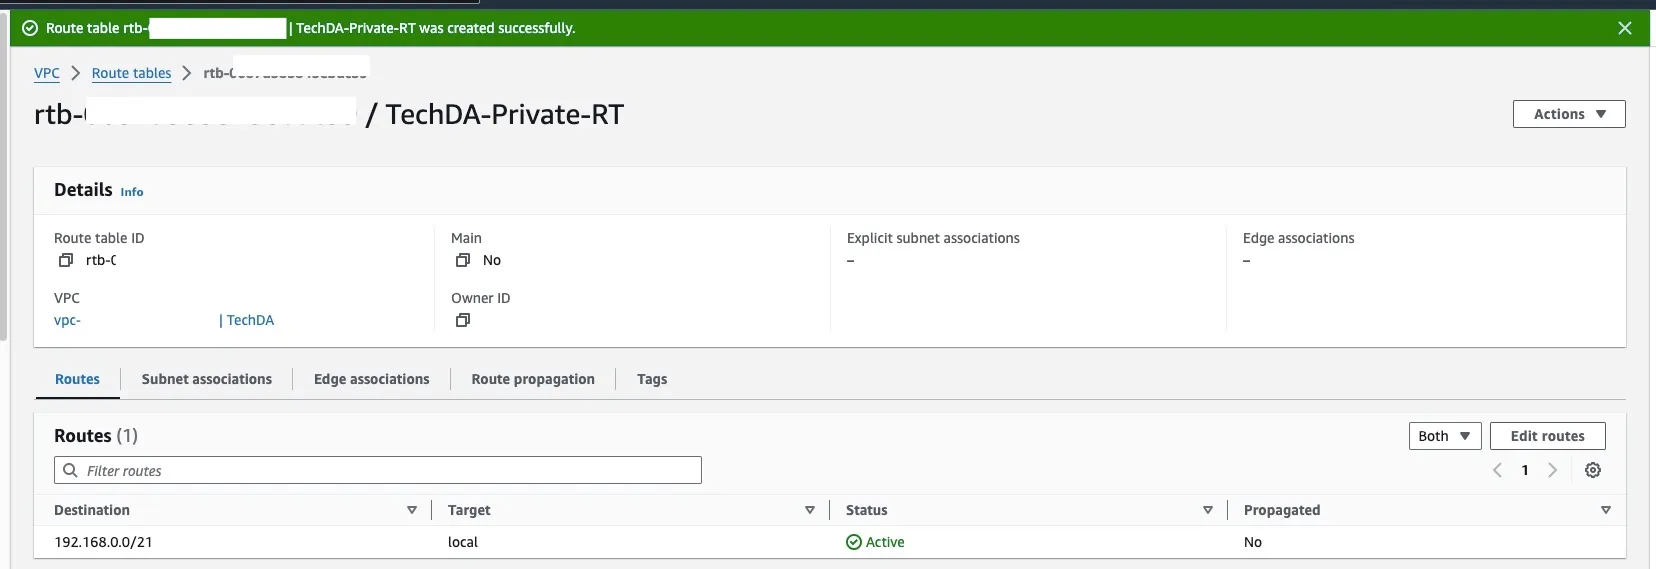
Enter the Route Table name which is optional and select your desired VPC. Then hit the Create Route table button.

Route table created successfully.
Create a Private Route Table
Private subnet because its route table does not have a route to the internet gateway. Instances in the private subnet can’t communicate with the internet over the internet gateway, even if they have public IP addresses.
Follow the same steps as above to create your private Route Table.
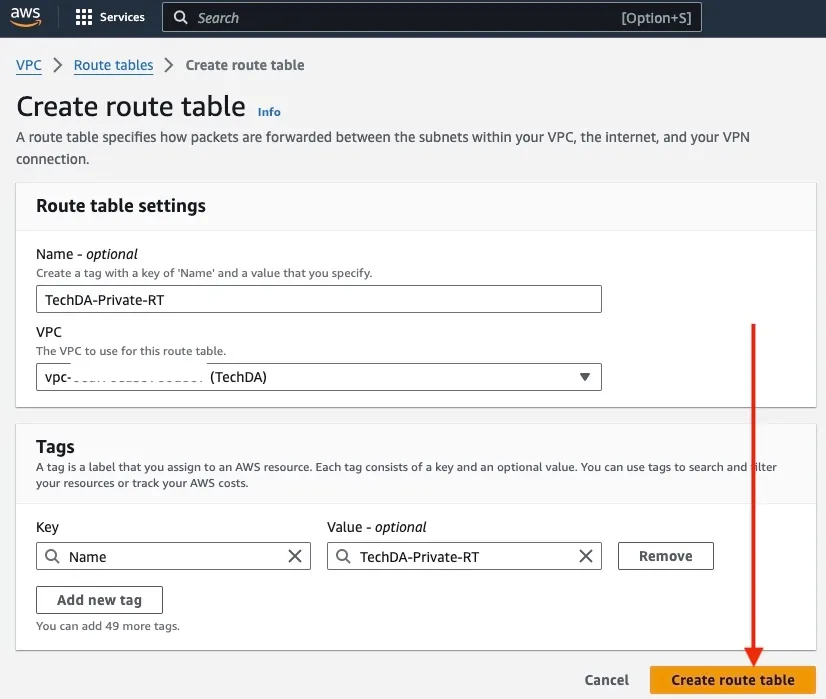
Private Route table created.
Associate Subnet to Route Tables
Every subnet in your VPC must be associated with a route table. A subnet can be explicitly associated with the custom route table, or implicitly or explicitly associated with the main route table as discussed above.
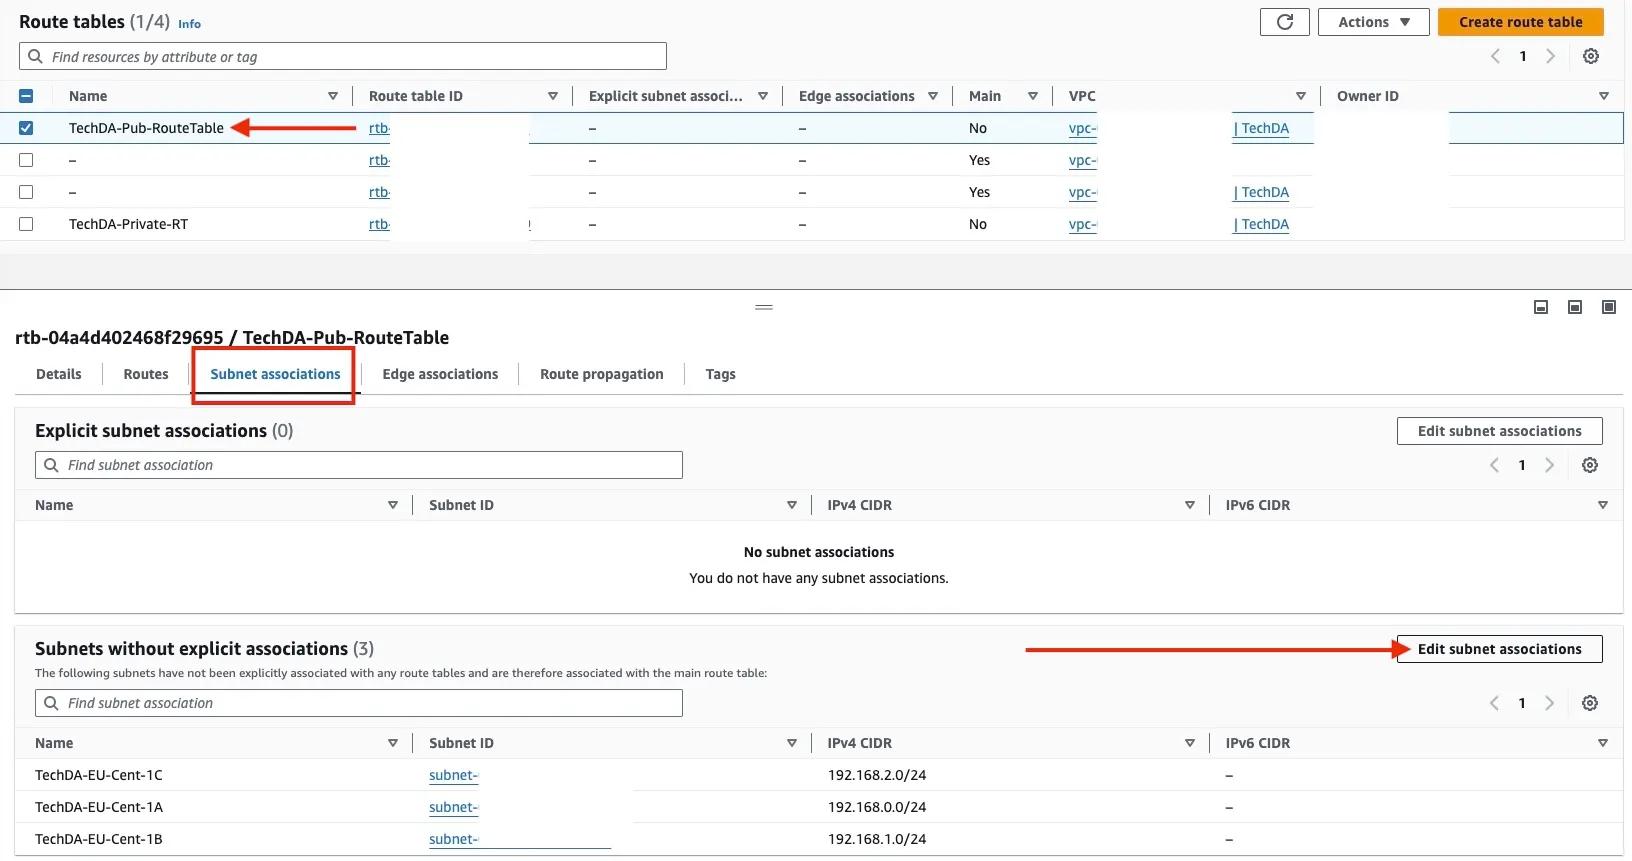
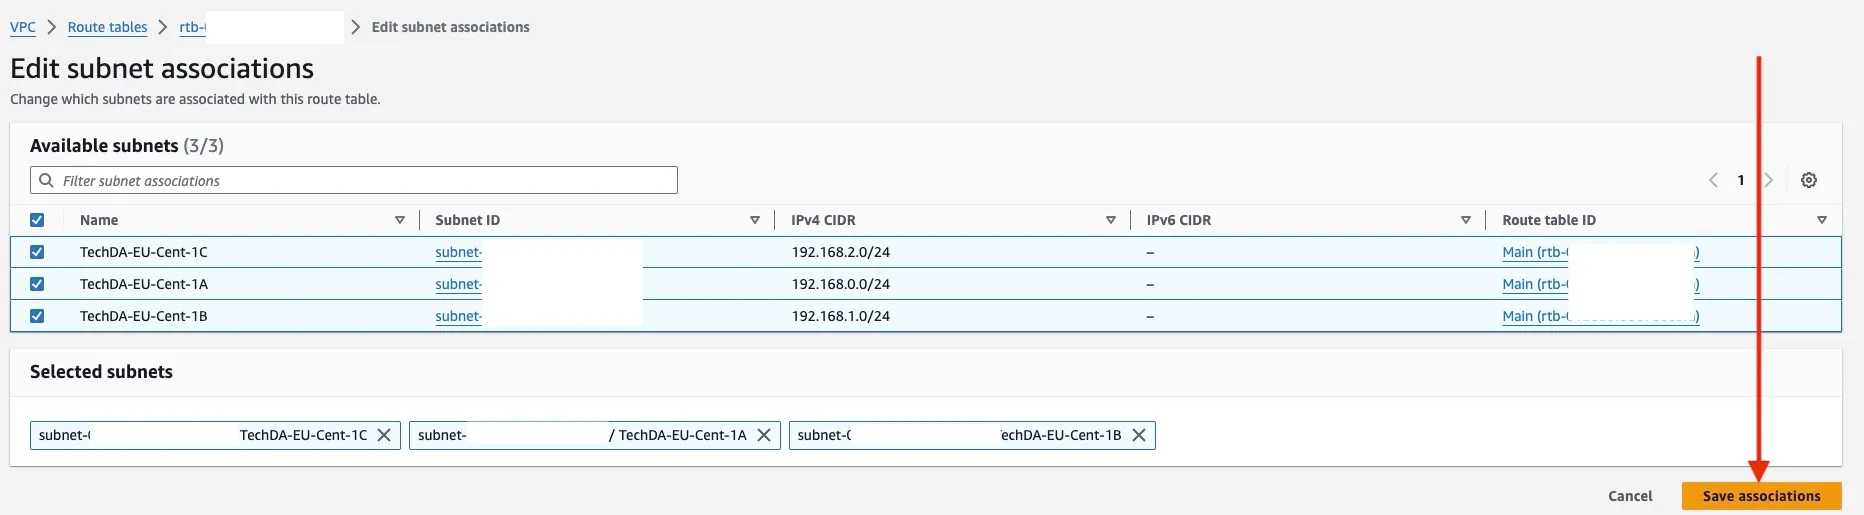
To associate our subnets with the Route Table, select your custom route table. Click on Subnet Association, and select Edit Association.
Save associations.
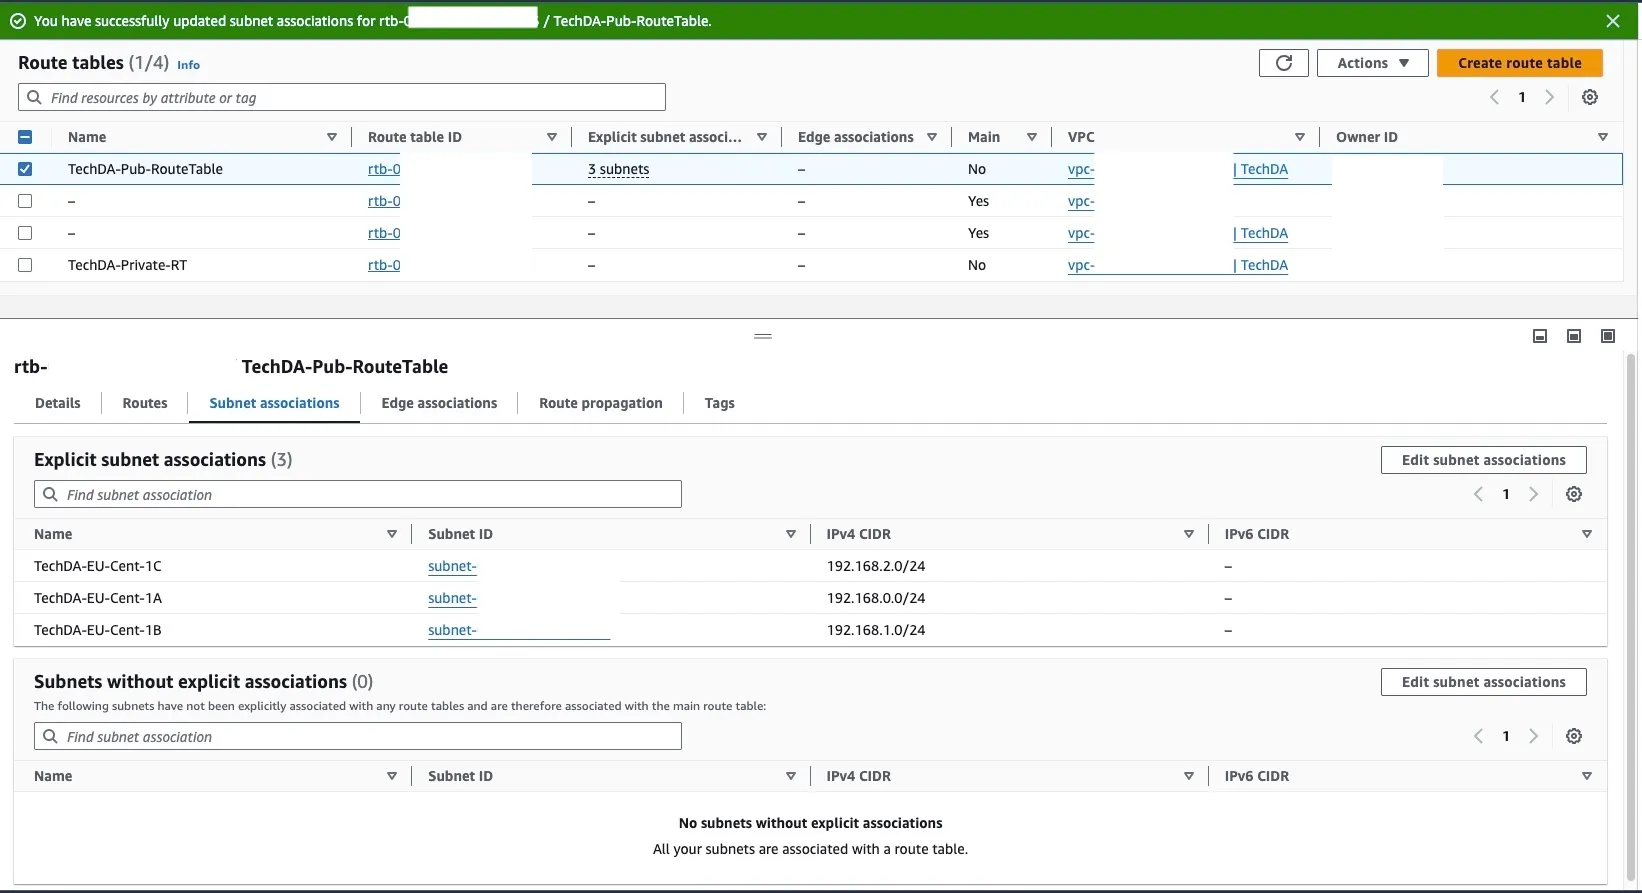
The public subnets are associated with our Route Table.
Gateway Route Table
You can associate a route table with an internet gateway or a virtual private gateway. When a route table is associated with a gateway, it’s referred to as a gateway route table. You can create a gateway route table for fine-grain control over the routing path of traffic entering your VPC.
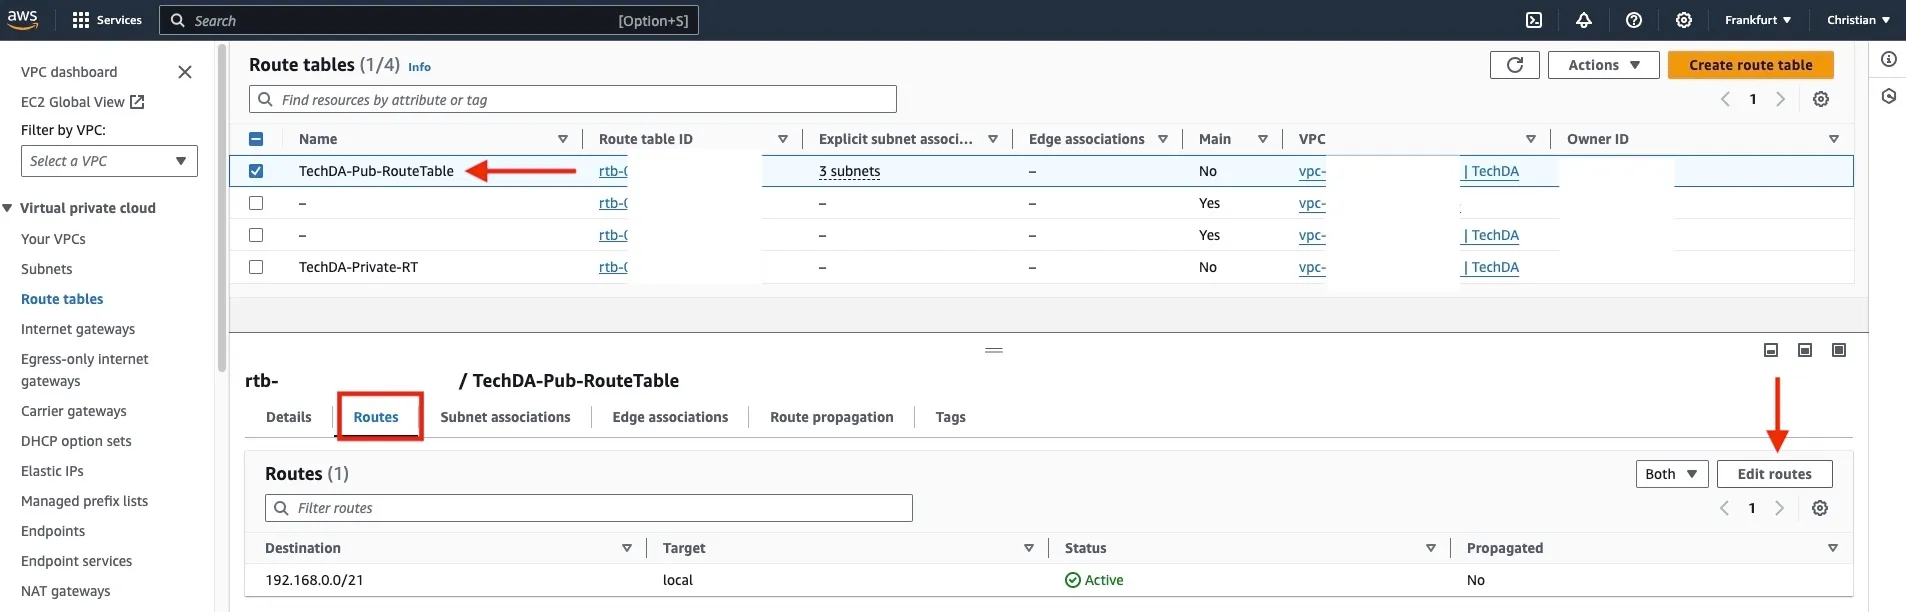
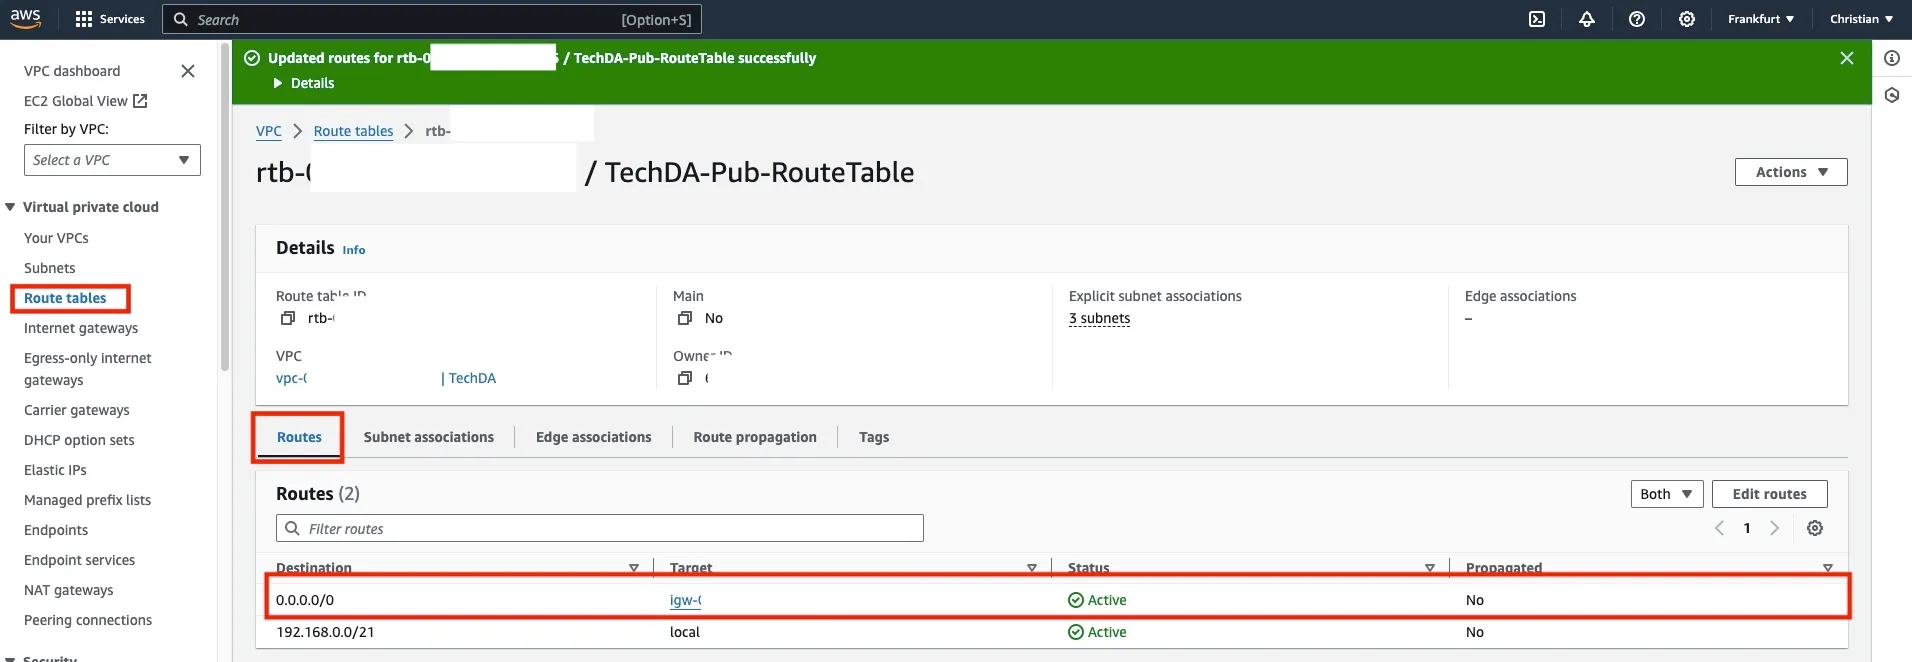
To do this, on the navigation pane, select Route Table. Select the Public Route Table, and click on the Edit Routes
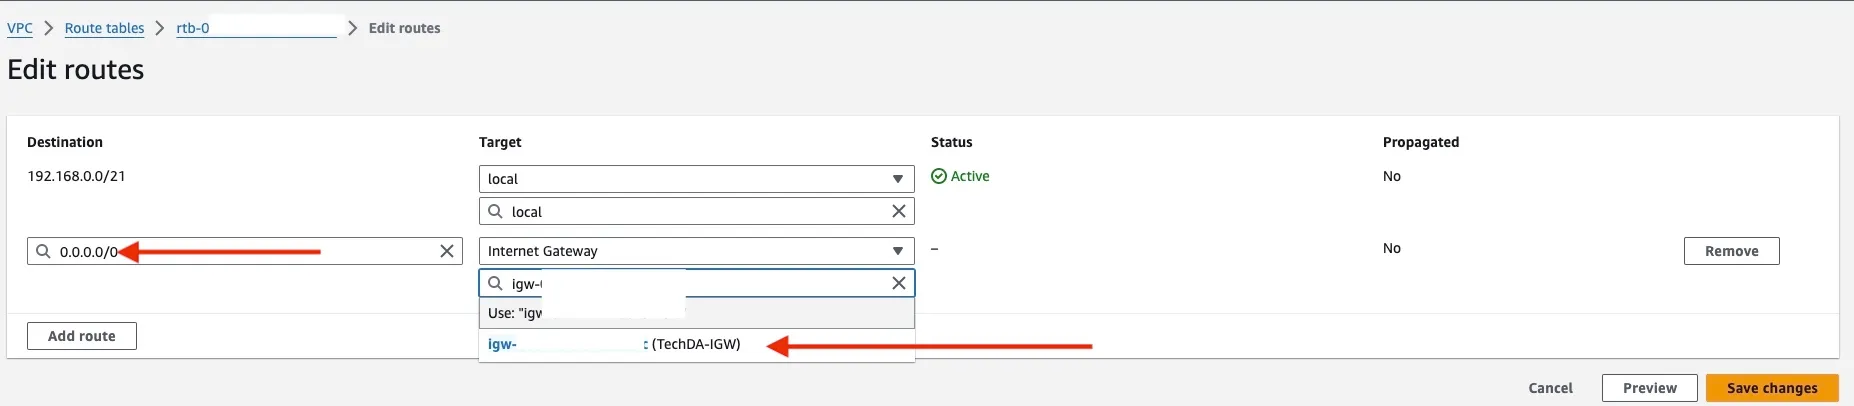
Click Add Route

Below are the available targets. Choose “Internet Gateway”.

I am fine with sending all traffic to the internet gateway. Save changes when complete.
Internet Gateway Route Created successfully.
Network Access Control (NACL)
Note: In Amazon Web Services (AWS), you are responsible for defining and configuring security rules through security groups and network access control lists (NACLs) to control inbound and outbound traffic for your resources.
Network access control lists (ACLs) are stateless and allow or deny specific inbound or outbound traffic at the subnet level. You can use the default network ACL for your VPC, or you can create a custom network ACL for your VPC with rules similar to those for your security groups to add a layer of security to your VPC.
Note: Each subnet in your VPC must be associated with a network ACL. If you don't explicitly associate a subnet with a network ACL, the subnet is automatically associated with the default network ACL.You can associate a network ACL with multiple subnets. However, a subnet can be associated with only one network ACL at a timeIn this guide, I will not be creating a new NACL. I am fine with the default. The image below shows the inbound rules
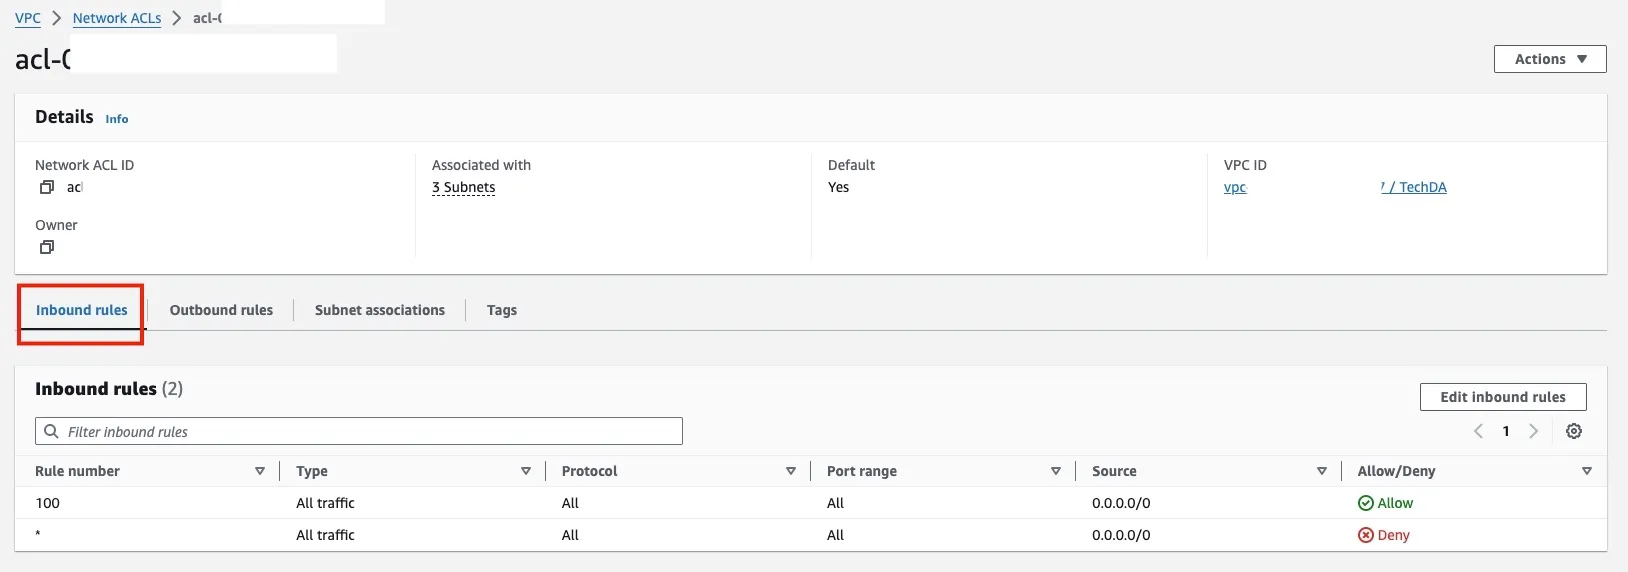
A network ACL has inbound rules and outbound rules. Each rule can either allow or deny traffic. Each rule has a number from 1 to 32766. This rule is evaluated in order, starting with the lowest numbered rule, when deciding whether to allow or deny traffic. If the traffic matches a rule, the rule is applied and we do not evaluate any additional rules.
AWS recommend that you start by creating rules in increments (for example, increments of 10 or 100) so that you can insert new rules later on if need be. The image below shows the outbound rules.
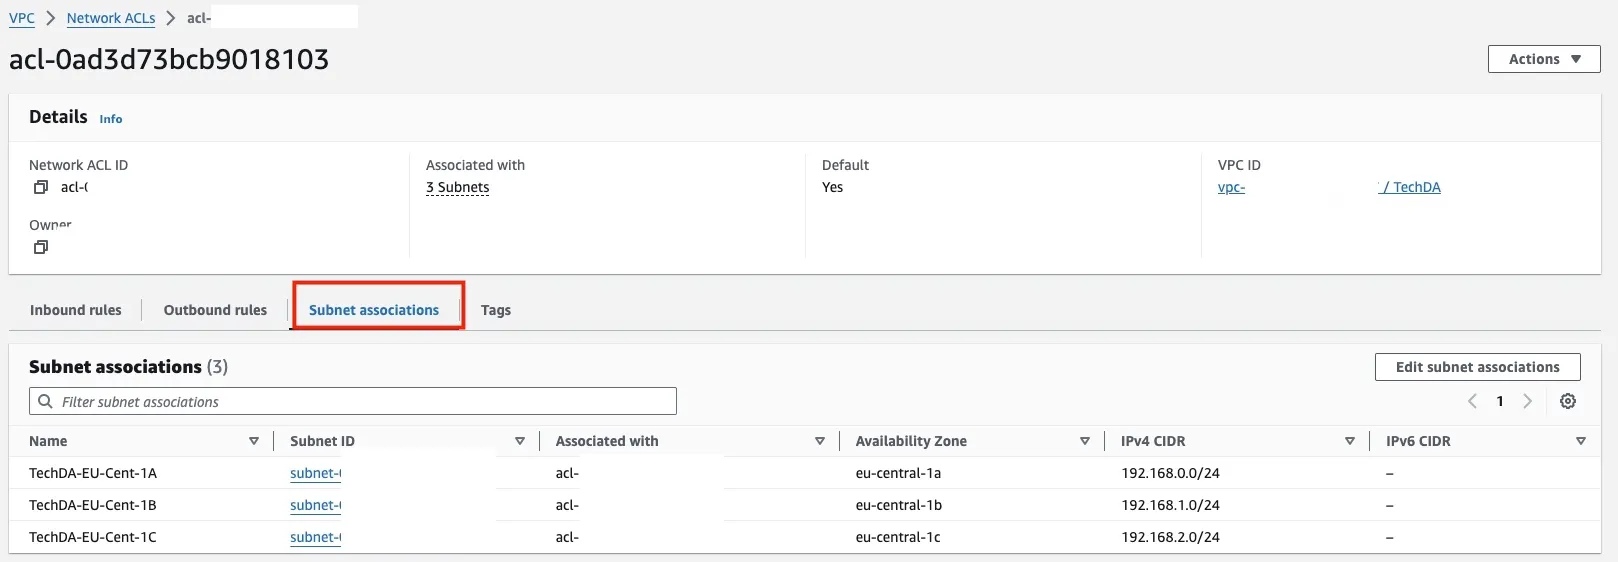
Below are the subnet associations of this NACL.
Security Group
Security groups act as virtual firewalls for your Amazon EC2 instances, controlling inbound and outbound traffic at the instance level. You can specify rules that allow traffic to and from specific IP addresses, other security groups, or CIDR blocks.
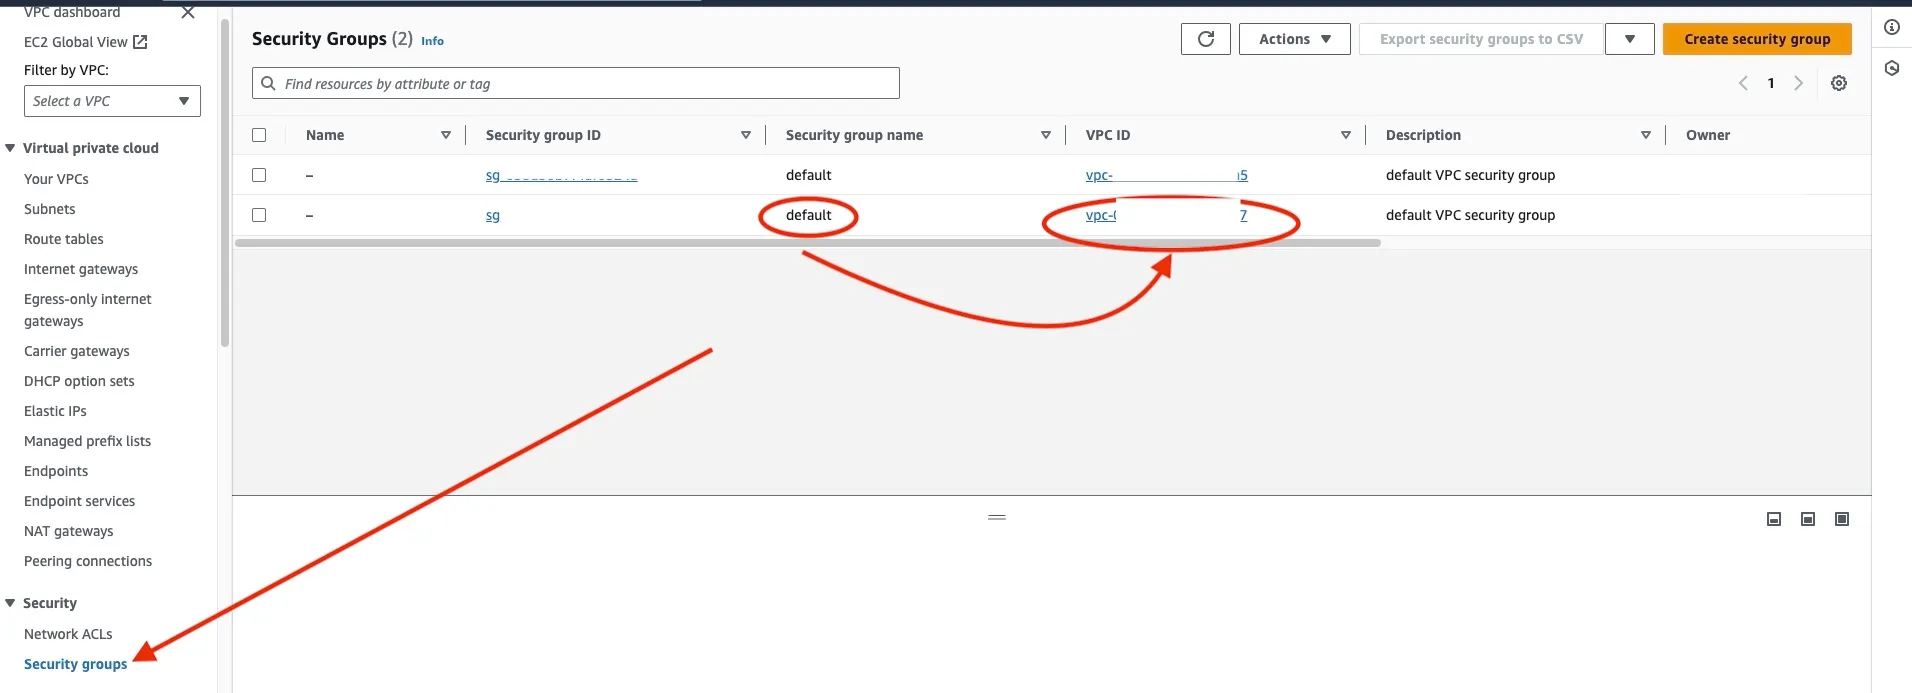
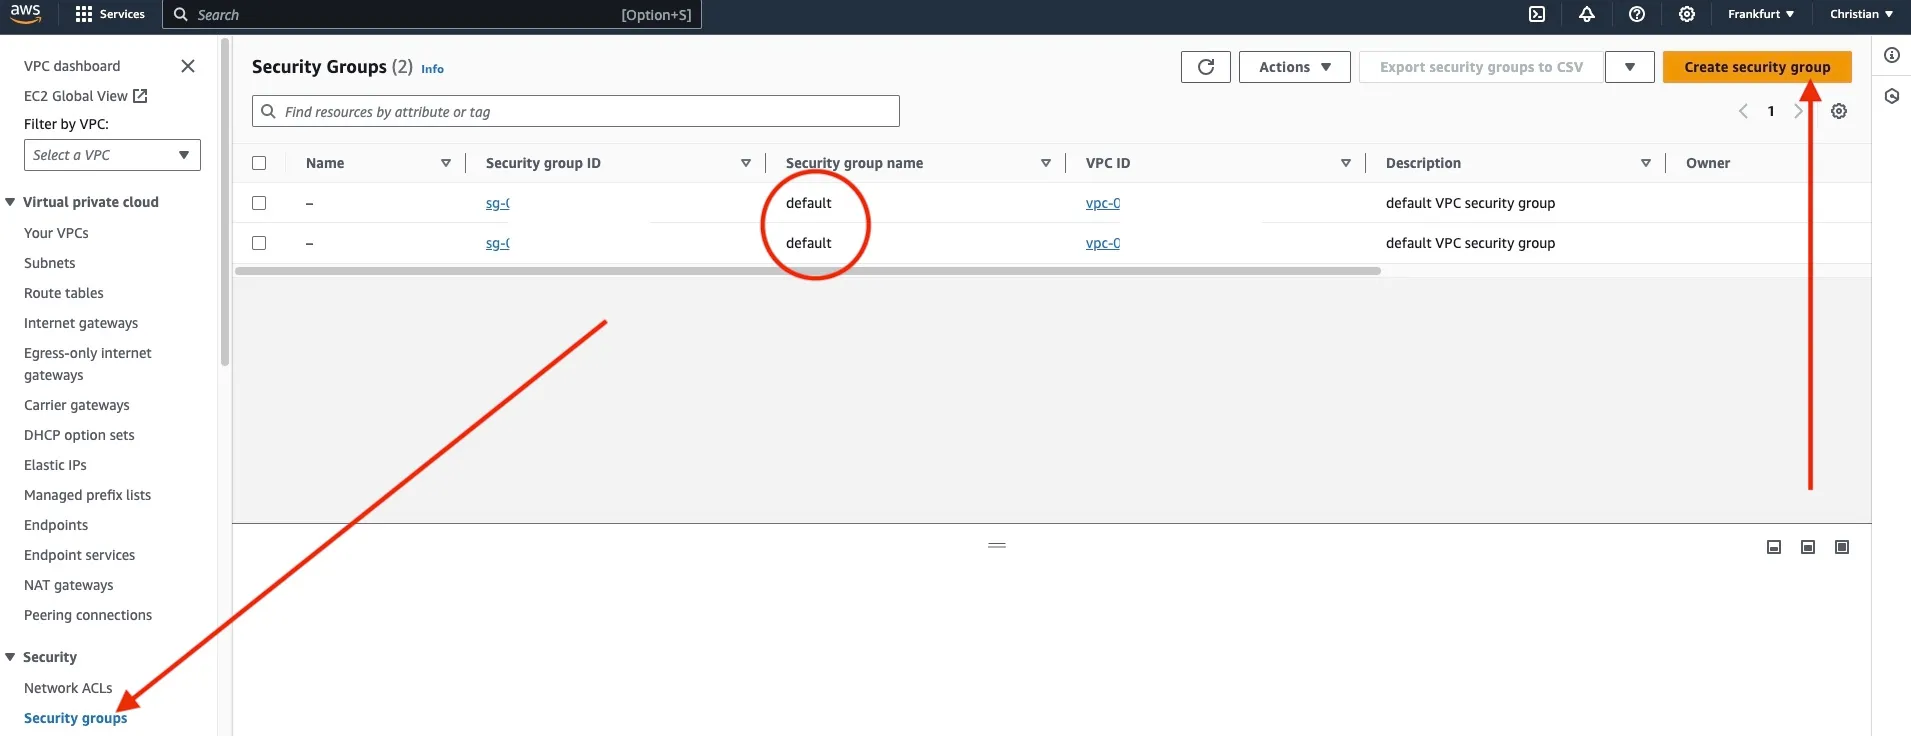
Your default VPCs and any VPCs that you create come with a default security group. The name of the default security group is “default” as shown below.
AWS recommends creating security groups for specific resources or groups of resources instead of using the default security group. However, if you don’t associate a security group with some resources at creation time, AWS will associate them with the default security group.
Security Groups are applied on a per-instance level within an Amazon Virtual Private Cloud (VPC). You assign a Security Group to a VPC to ensure that every instance running in that VPC can be associated with the designated Security Group, effectively managing and controlling their network traffic and security settings.
Create a Security Group
Open the Amazon VPC console and in the navigation pane. Select Security Group, and Choose Create security group.
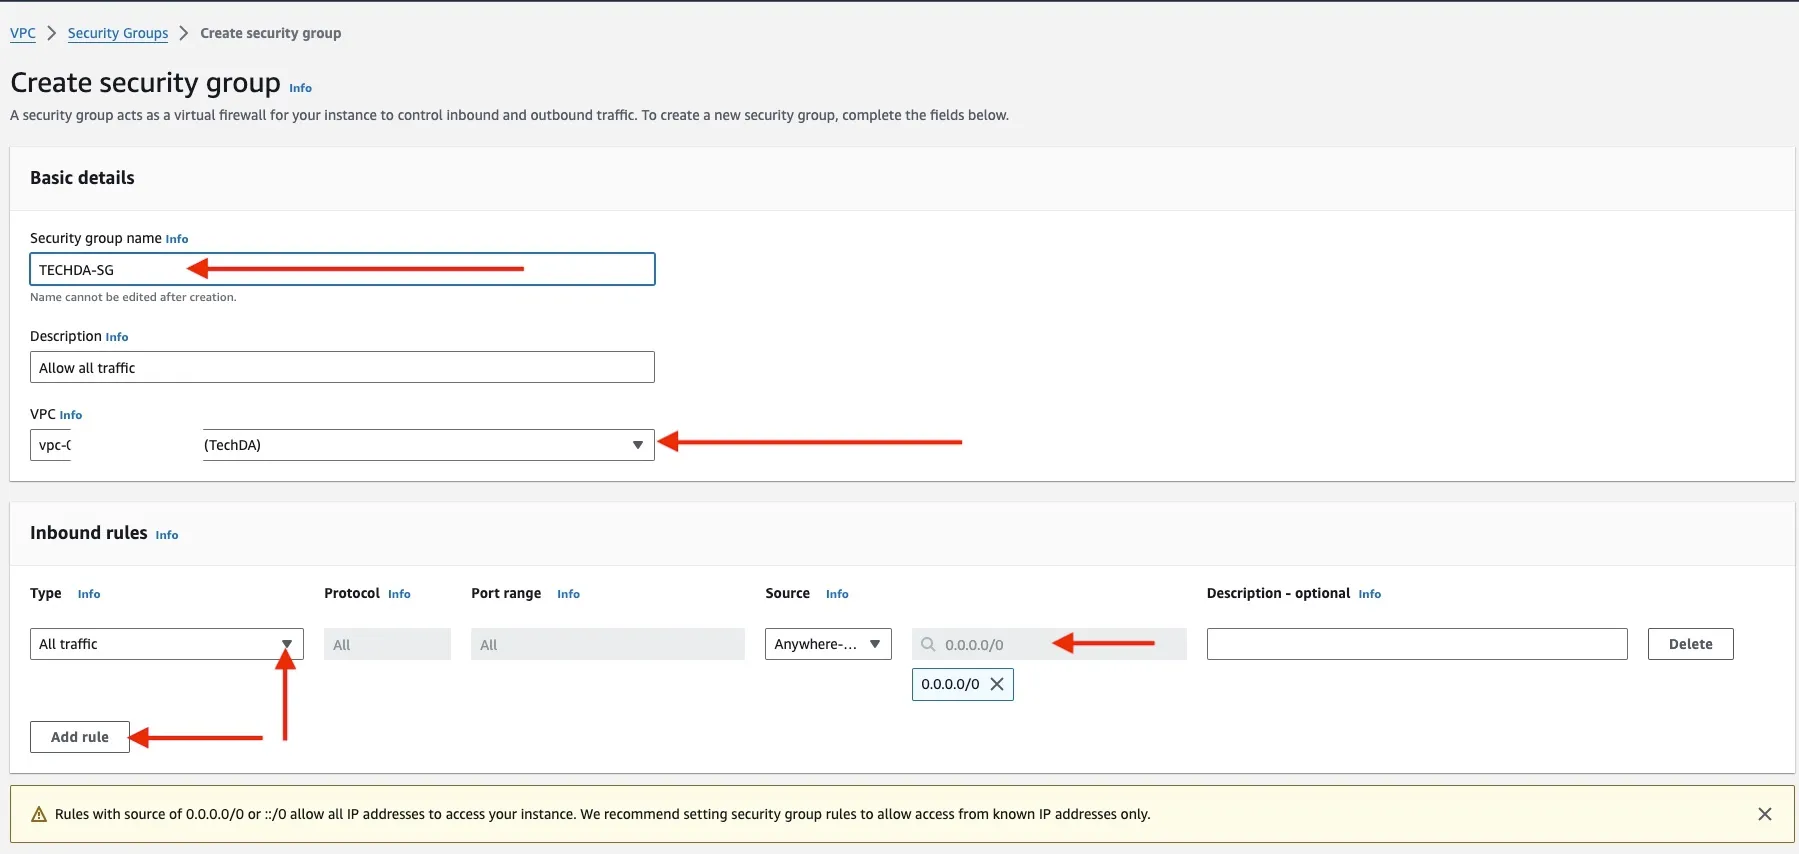
Enter a name and description for the security group.
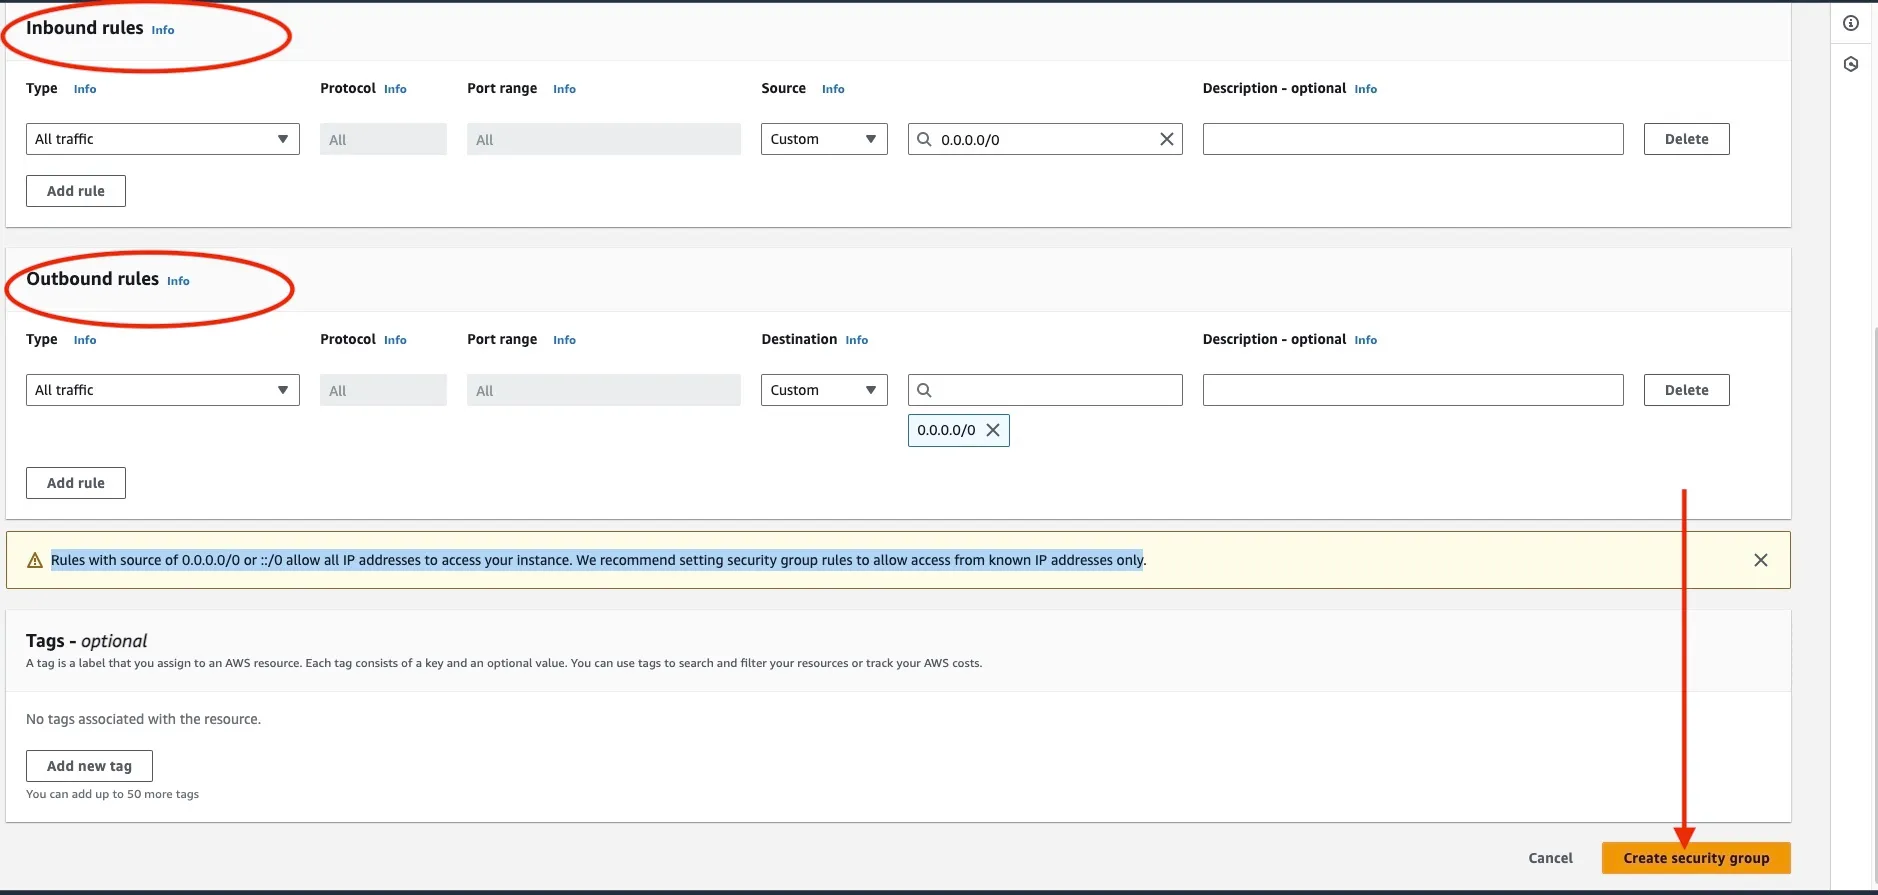
Click Create Security Group
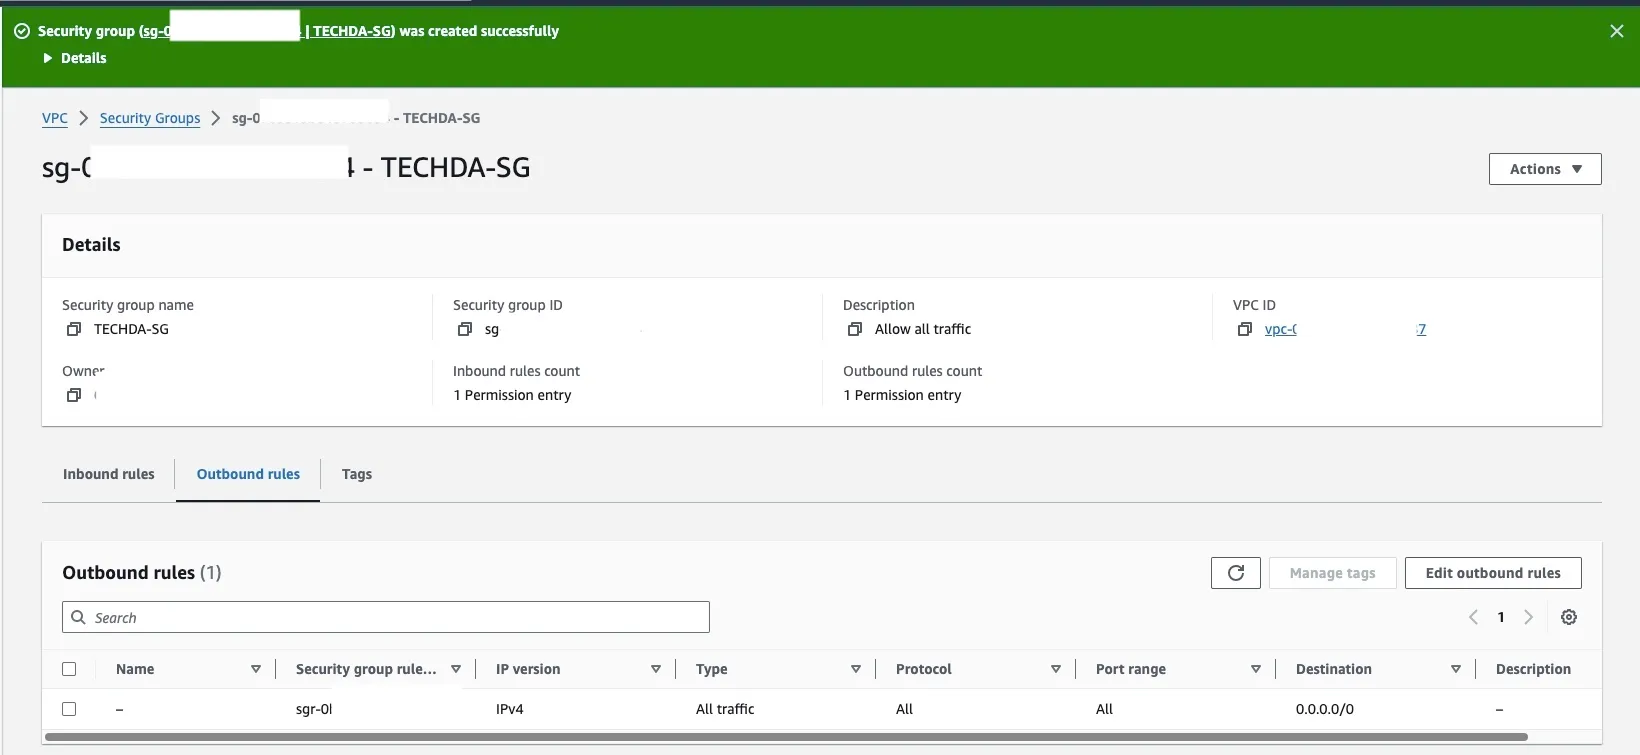
Our custom security group has been created.
We have our custom VPC in addition to the default for each VPC

Now, you may want to create an EC2 instance, create S3 and AWS RDS instance as well as you wish. There are numerous services you can play with.
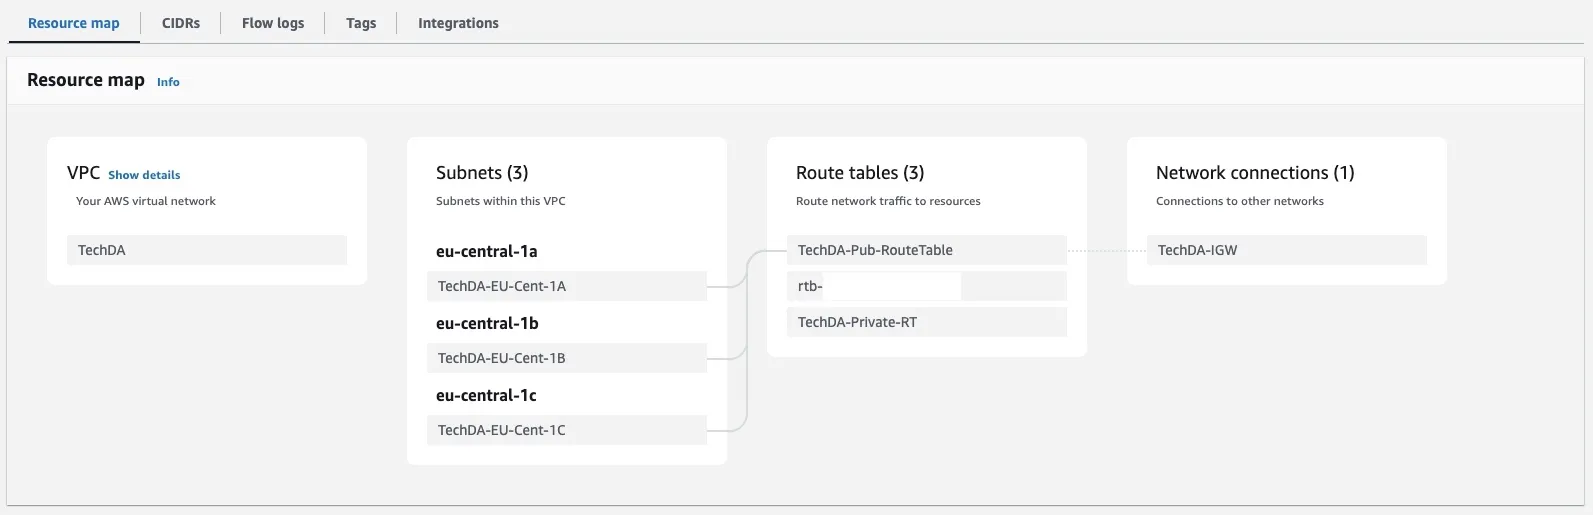
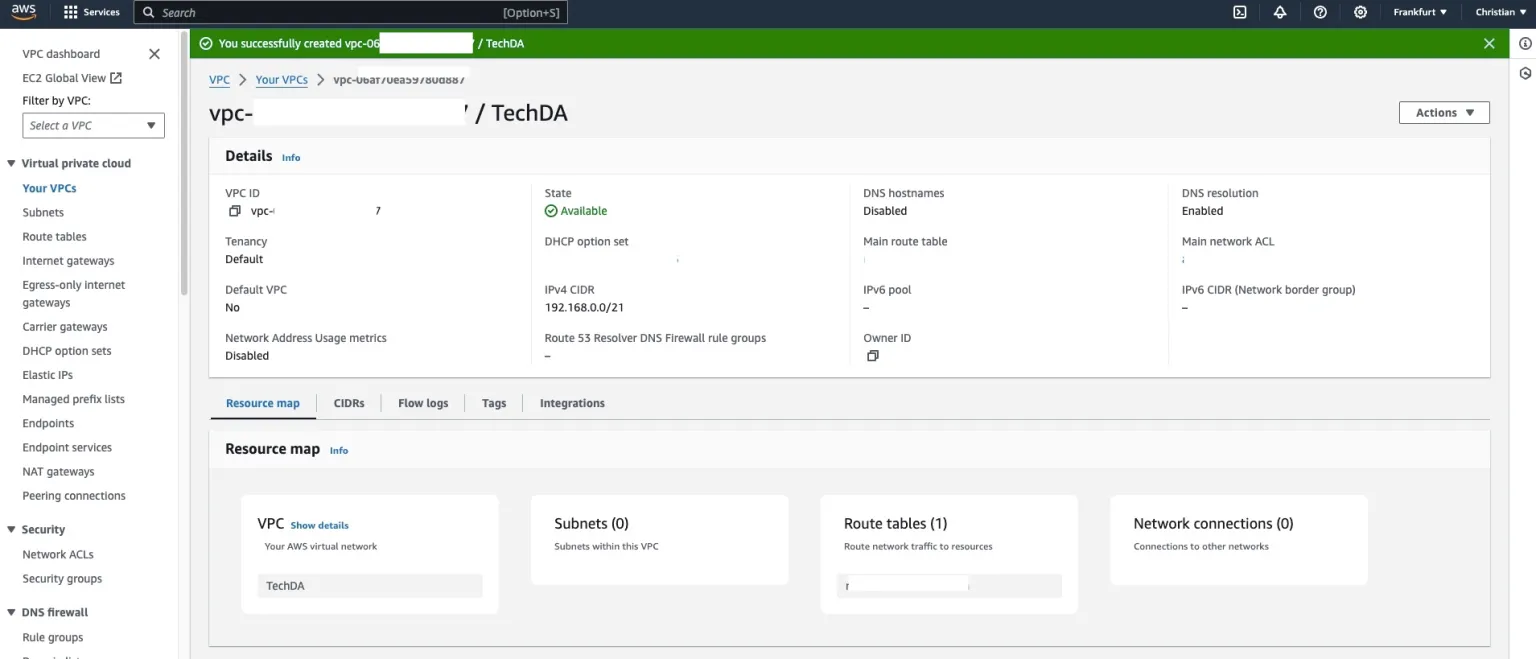
Resource Map
The resource map shows relationships between resources inside a VPC and how traffic flows from subnets to NAT gateways, internet gateways and gateway endpoints.
You can use the resource map to understand the architecture of a VPC, see how many subnets it has in it, which subnets are associated with which route tables, and which route tables have routes to NAT gateways, internet gateways, and gateway endpoints