

I shared with the Community last week how to get XCP-ng up and running. If you missed it, you can go review this Part 1 post. Here in Part 2 I'm going to discuss how you should begin setting up your XCP-ng environment to be centrally managed by Xen Orchestra (XO), then move on to discuss features in XO you should be interested in knowing about & configuring if you're looking at this hypervisor to transition to away from VMware.
Add Users and XCP-NG Hosts
Adding Users
After creating your Xen Orchestra (XO) server, the first thing you should do is configure your user base. As shared in my Part1 post, take note of the default username/password needed to login to XO after the XO installation completes. In my test environment, I only use local users, but XO does provide the ability to configure your environment for LDAP/S, e.g. using Open LDAP or Active Directory. If you want to create local users, it's as easy as navigating to Settings > Users in XO, providing a username, role (only User and Admin; no granular or other pre-defined roles are currently available), and password; then click Create.
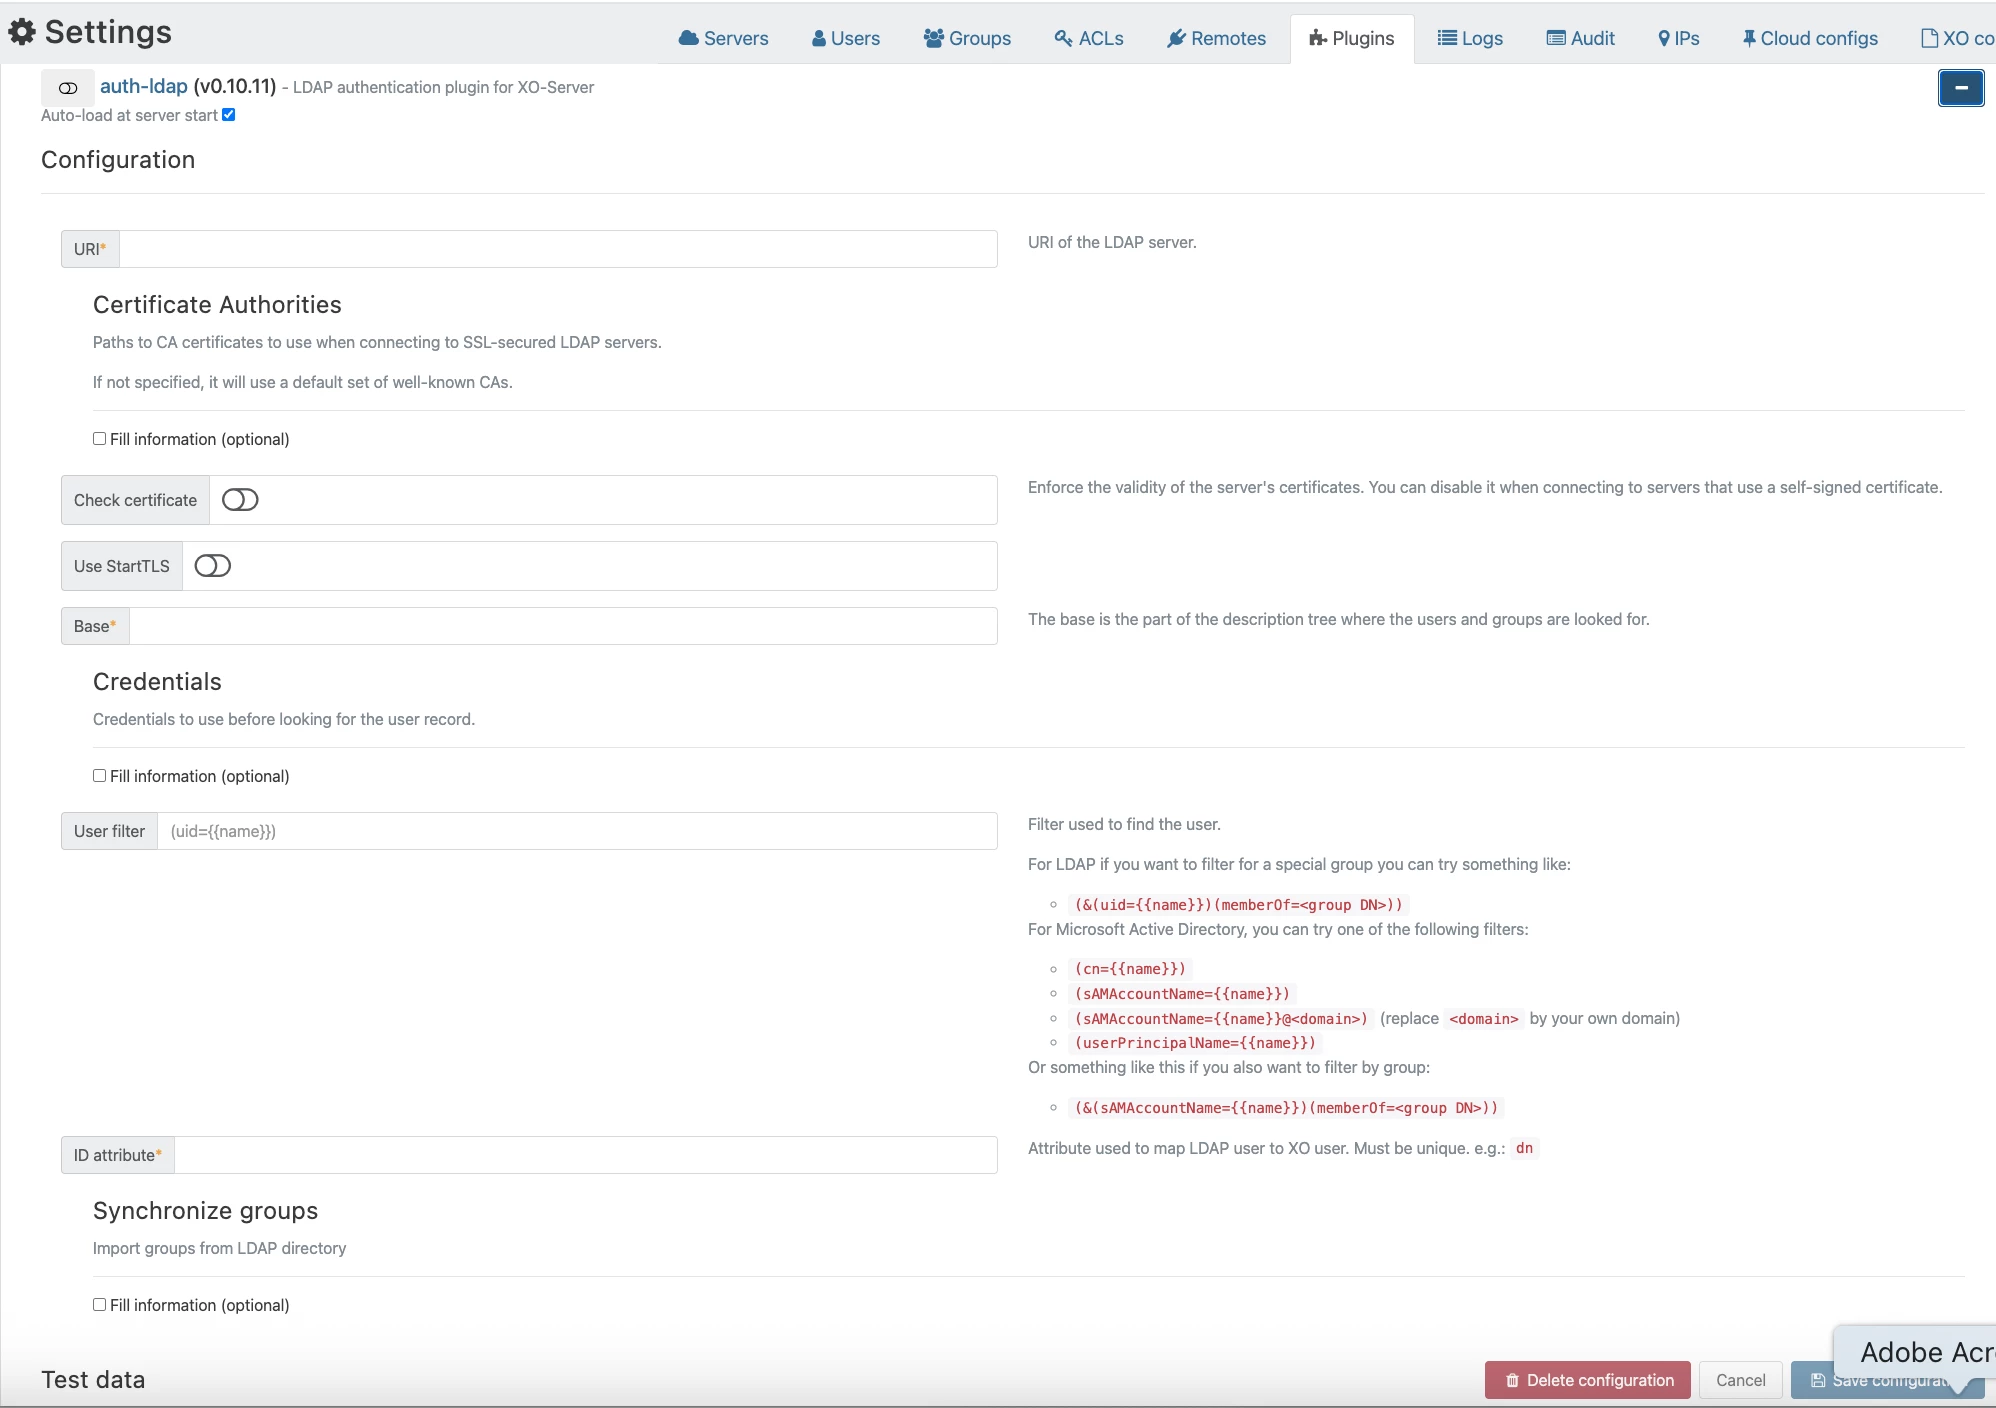
To add LDAPS to XO, navigate to Settings > Plugins, then scroll down to the auth_ldap Plugin. Expand the Plugin by clicking on the + to the right and enter the LDAPS information requested. Plugins are simply configurable items allowing you to extend features within XO.
To test your user settings, log out of XO then test logging back in with a user(s) you created. If all is successful, and at least one of the users you created is an Admin, it is recommended to delete the default XO Admin account.
Add XCP-ng Hosts
After you have your user-base sorted, you'll now want to add any XCP-ng Hosts you've created. Navigate to Settings > Servers, provide the requested information, and click Connect to add your XCP-ng Hosts to XO. The label is just metadata information to describe the Host you're adding. I use the server hostname for this, but you can provide anything you want; for the address, all you need is simply the Host FQDN or IP; provide the Host username and password credentials to connect to the Host; then click the Connect button.
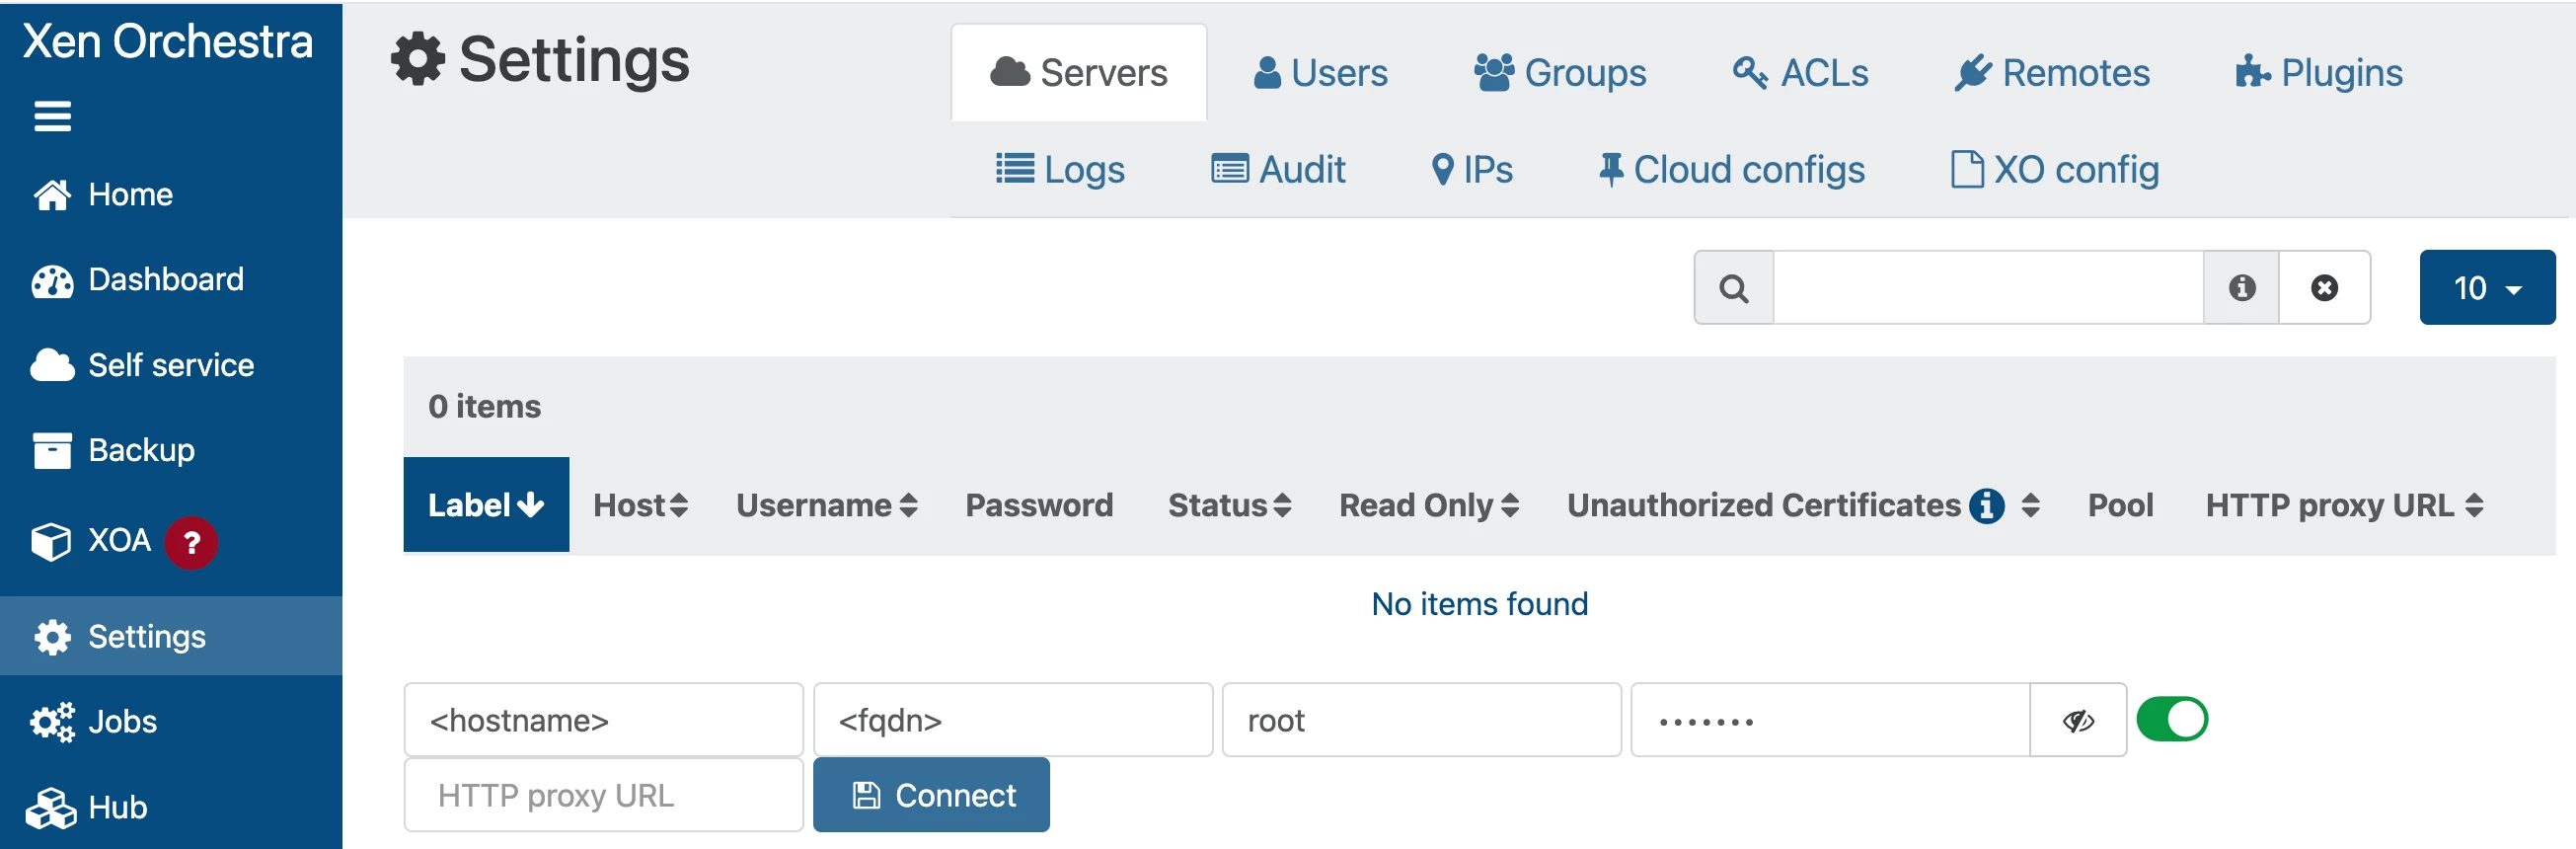
I want to especially draw your attention to one of the columns here after the Host is connected → Pool. This column reveals the Pool name XO gives the Host after connecting to it (adding it to XO), which is typically the Host FQDN. If you read my Part 1 post, I talked about this already. Analogous to the default ESXi Host-level Resource Pool, XCP-ng Hosts also have a default Host-level Pool. I'll talk a little bit more about Pools and how you can change the Pool name to whatever name you want below; let's segway to covering this process next.
Create a Pool
XO Pool Information
Before we get to the technical aspect of XO Pools, creating and configuring them, let me share a little bit what they are exactly, as well as some similarities and differences from VMware Clusters. From a high-level, Pools allow you to view multiple XCP-ng Hosts and their networking & connected shared storage as a single unified resource; similar to VMware Clusters. Pools comprise of multiple XCP-ng Hosts, bound together in a single managed entity which can host VMs. The main management of Pools is done through the Pool Master Host. Commands are then disseminated to other Hosts (Slaves) in the Pool as needed. You can have a maximum of 64 XCP-ng Hosts in a Pool. You can also configure features such as HA and add shared storage, referred to in XO as Storage Repositories (SRs).
Like VMware vSphere Standard Switches (vSS), when you configure your networking for a given physical nic (pnic), you have to do so per Host, not in the Pool; specifically when you need to configure static IP addressing. But, as long as all your Pool Hosts use the same pnic placement, you can modify remaining pnic settings in one location – from the Home > Pools, Networking tab (e.g. pnic Name, MTU, etc). This behavior is a little similar to VMware Distributed Switch configuration, but just not as complex. But, unlike VMware Clusters where most Cluster settings/features are done in the Cluster, some XO features are not configured in the Pool…for example, Load Balancing (DRS). This is configured through the Plugins section. So you can see how XO Pools are similar to VMware Clusters, yet not quite like them.
Updating XCP-ng Hosts
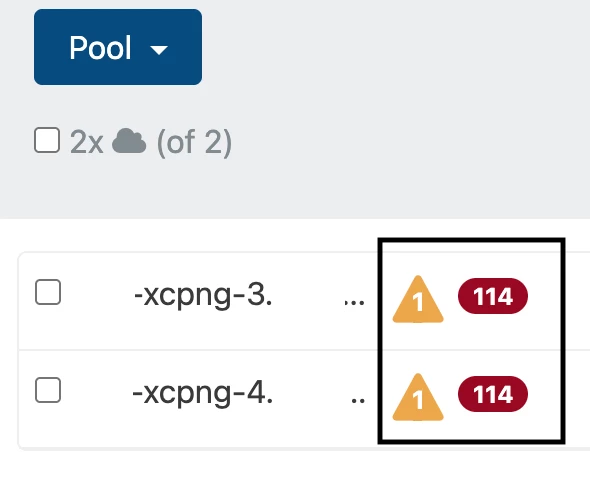
After you've added your XCP-ng Hosts to XO, you can view each one as a Pool by navigating to Home > Pools. Before continuing to create and configure a XO Pool, it is recommended to first install any missing patches on your XCP-ng Hosts. You can see the number of patches missing in the Pools section:
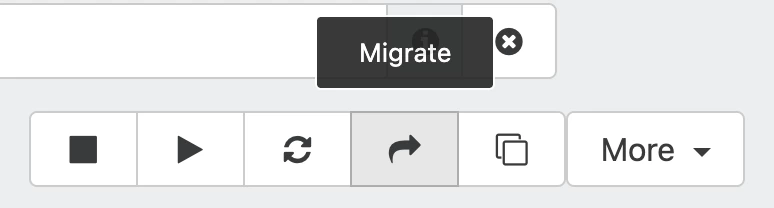
To install these patches, navigate to the Host via Home > Hosts, then select the Patches tab. Click the Install All Patches button to begin installing the missing patches. Be aware you may lose "visual" of your XCP-ng Host in XO while the patches install, but be rest assured the Host is still connected. After the patches are installed, your Host will reappear. Click the warning triangle next to the Host and you'll see an alert stating you need to Reboot the Host to apply patches. You can perform a Host reboot from the icons next to the Host (click the last one on the right):

NOTE: If you have any VMs on this Host you're patching, make sure to migrate it to another available XCP-ng Host by selecting the VM in Home > VMs, then clicking the Migrate button; then select the few needed options – Host, Storage, Network – to migrate the VM(s).
I think it's pretty "slick" you don't have to setup VM Migration in XO like you have to for VMotion in VMware. Though I won't cover it in detail here, I want to share about Host patching within Pools real quick. When you see your Pool Hosts missing patches, updating your Hosts within Pools is pretty simple and automated. All you need to do is go into Home > Pools, then Patches tab and click the Rolling Pool Update button. Starting with the Pool Master Host, VMs are live-migrated to other Pool XCP-ng Hosts, the missing patches installed, and the Host rebooted. Once the Master Host is back up, the same process is repeated for other Hosts in the Pool, sequentially. This works really well….at least it did when I tested it in my small lab of 2 Hosts and around 15 VMs. You may be familiar with the Host update feature in VMware, VMware Lifecycel Manager, with similar function as RUP (as it's called).
Customize Filtered Views
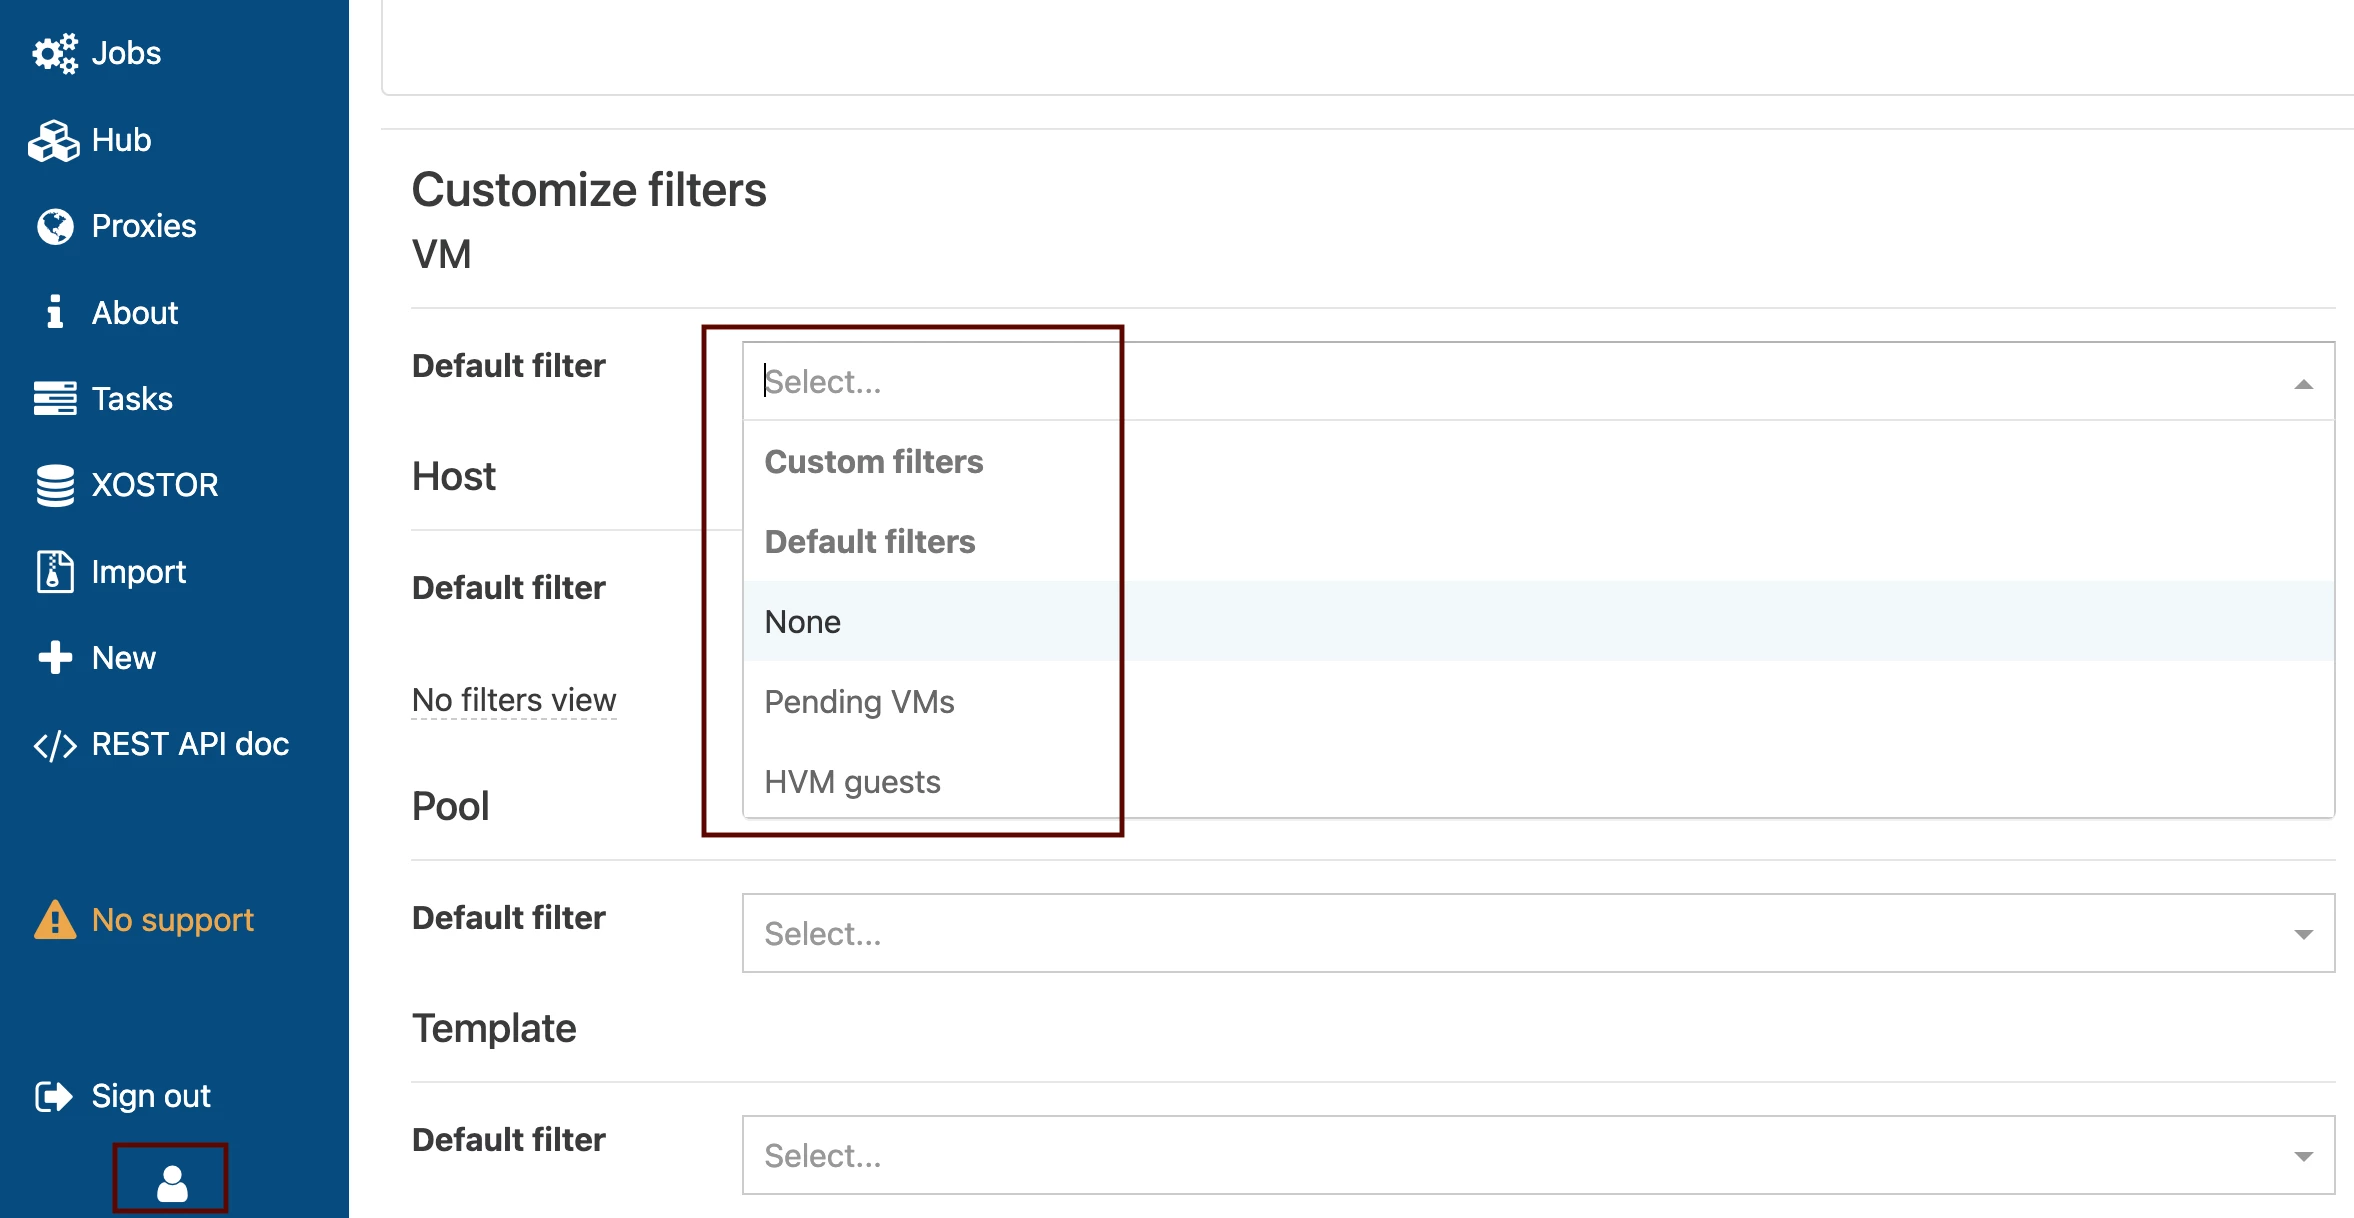
After all Hosts are patched, let's next take care of one housecleaning item in XO with regards to Views, specifically Filtered Views. When you go into certain areas of XO (Home > VMs, Home > Hosts, etc), the XO objects displayed are filtered based on some criteria. For example, in Home > VMs the default Filter is to show only a "power state" of only powered on VMs. For me, I do not like this. Personally, I want to see all my VMs in this section regardless of power state. XO allows you to configure default views in XO. To change what views you see, click on the user icon in the lower left in XO. Here you can then change various view settings for VMs, Hosts, etc. Scroll down to the Customize Filters section and select your default filter for each view type. Selecting "None" from the drop-down will allow you to see all objects in the given section, regardless of power state.
If there is a certain view you want to see but is not listed in the drop-down, go to that section in XO and add a Filter(s). Click the "links" underneath the Filters text box (Power State, Pools, Hosts, etc) and select given filters for those options. After you've selected what you want, and the view displays objects correctly based on your criteria, you can click on the Filters button > Save to save the given Filter view you created. Go back to your user profile area and choose your custom filter from the drop-down to use as your default view.
Setting up a XO Pool
After getting all XCP-ng Hosts updated and the default XO Views configured, let's create a XO Pool. This is quite simple to do, although I must say…compared to how Pools are configured vs VMware Clusters, it may seem a bit "klunky" at first. From Home > Pools, click on one of the Pools (Hosts) listed. At the top of the page, "long-click" the Host name, which will enable a text box of which you can then type a name for the Pool. For my test environment, I changed the "address" (FQDN) Pool name of one of my XCP-ng Hosts to Test XO Pool. To make your Pool into a "cluster" of Hosts, go into Home > Pools if not already there, click the new Pool name you created, then click the Add Hosts icon at the top (3rd icon). Select XCP-ng Hosts to add to your XO Pool. And that's really all there is to creating a XO Pool.

A couple XO behaviors to be aware of when and after performing this task:
- Some menus will go away in XO for a time, but will return (e.g. Home > Pools, Home > Hosts, etc); took 30 minutes or so in my test environment. You may even need to patch or reboot your XO server. Updating my XO VM is what worked for me because doing this restarts the xo-server service. XO menus, etc. then returned again
- If you go into Settings > Servers, you will now see less XCP-ng Hosts listed. This is expected. Do not try to re-add your missing XCP-ng Hosts! There is no need. Only the Pool Master Hosts (if you've configured multiple XO Pools) will show in this section If you do attempt to re-add your Host(s), it will cause significant connectivity issues with the Hosts you try to re-add…so much so you would need to reinstall XCP; this would also mess up your XO Pool
- If/when you need to remotely connect to your Slave XCP-ng Hosts via ssh, Console, etc, the password you created when installing XCP-ng on the Slave Host is no longer valid and instead takes on the password of the Pool Master Host. This is not the behavior of XCP-ng per se', but rather Xen Server. Keep this in mind
- Lastly, if you ever need to do local XCP-ng Host management via XO-Lite, you are not able to login to any Slave Host web UI. You can only login to the XO Pool Master Host web UI. You are able to see/manage all Pool Slave Hosts from the Master Host web UI
Configure a Pool
Modifying XO Pool Network Settings
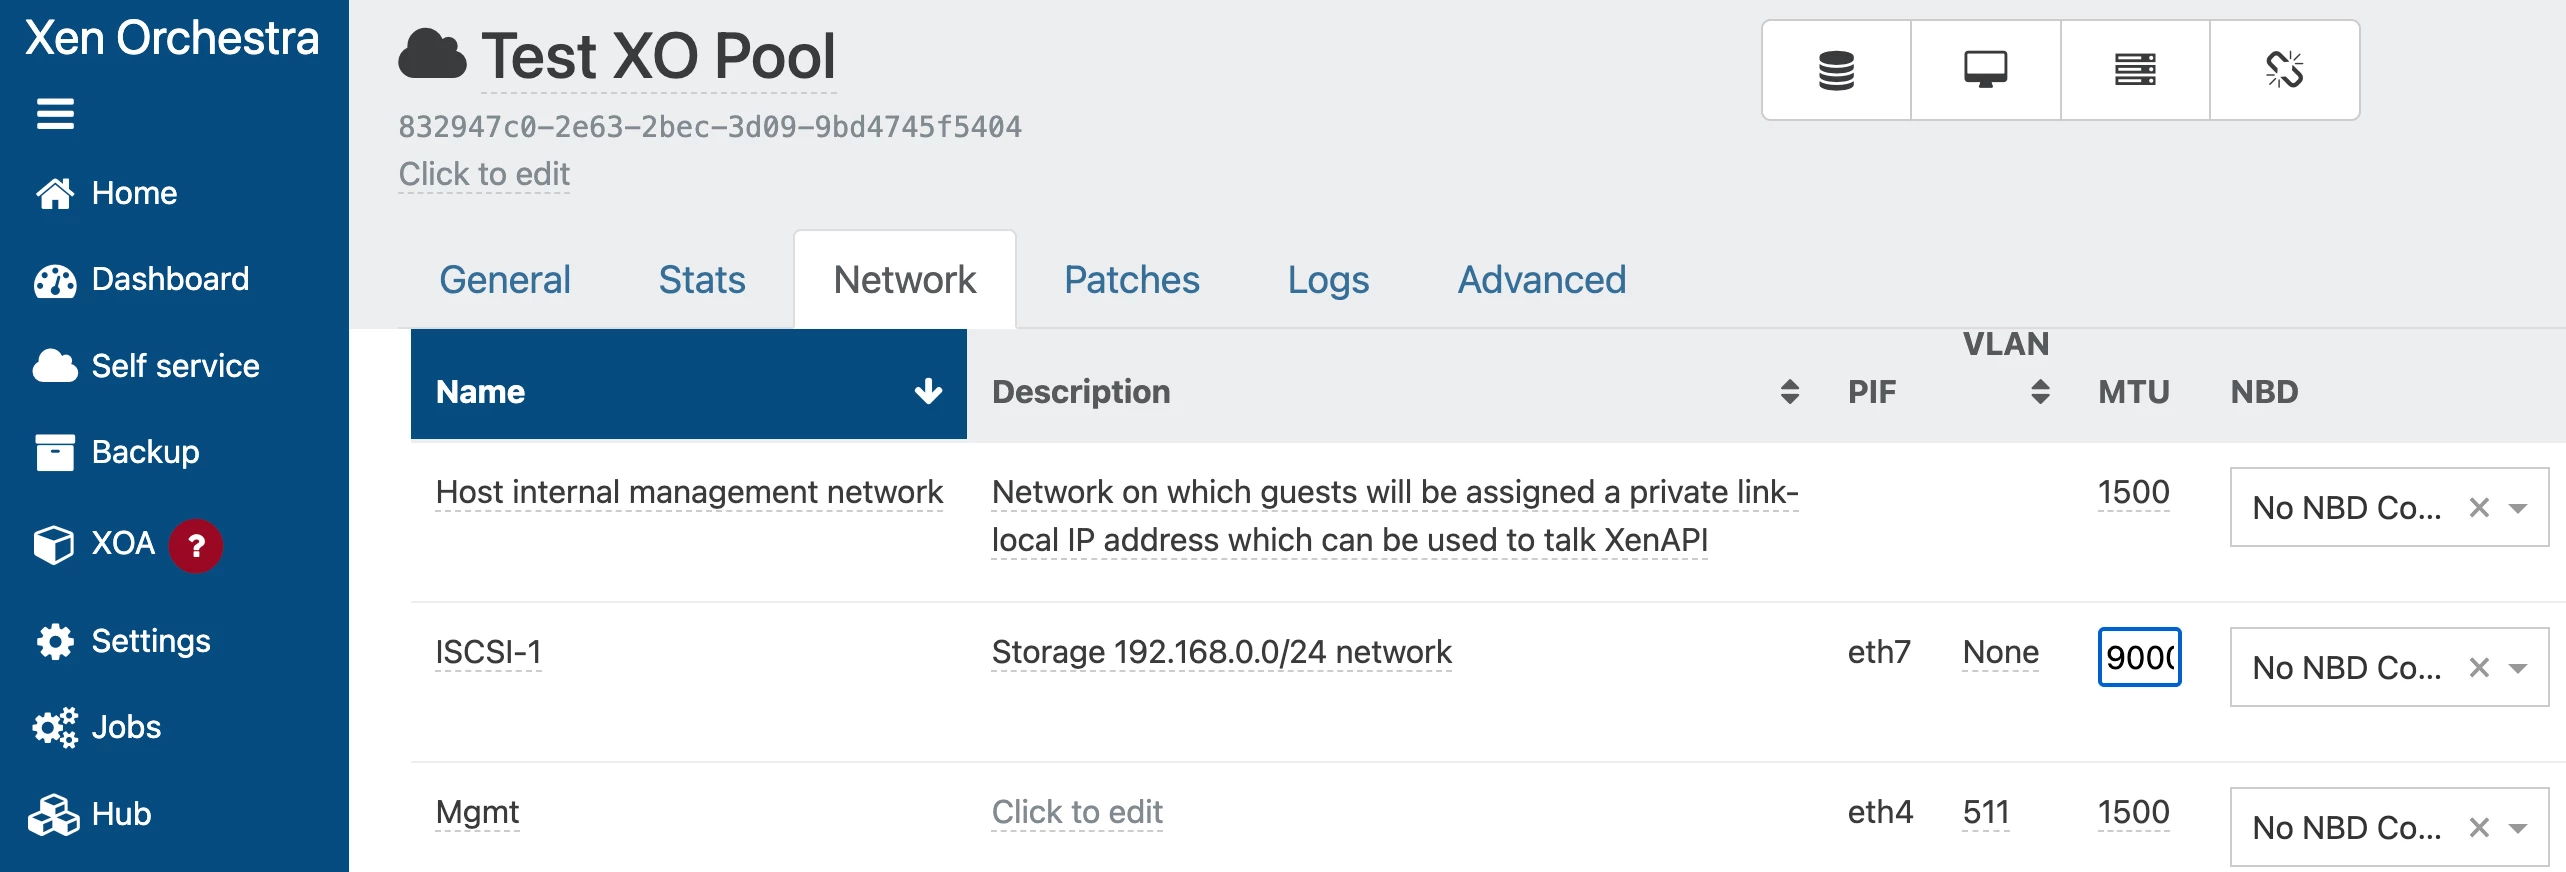
There are some initial Pool management settings I configure after creating a XO Pool. You may want to as well → first, I change my management pnic name to something more descriptive, like Mgmt. You can do this by going to Home > Pool, select the Network tab, then long-click the pnic Name you're managing your Hosts with and editing it from "Pool-wide network associated with eth#..." to whatever Name you'd like. All management pnic Names on all XCP-ng Hosts in the Pool will be modified. You can repeat this process for other pnics (e.g. ISCSI-1, ISCSI-2, ILO, etc)
Something to keep in mind here, and I already referenced this above – make sure all your XCP-ng Hosts use the same pnics for a given connection. While I'm at discussing requirements & considerations for XO Pools, make sure your Hosts also have similar CPU processors (same vendor, etc), for similar reasons as for VMware Clusters. For the all Pool requirements, see the XCP-ng User Guide System Requirements.
If you need to modify MTU settings for a given pnic, long-click the MTU value for the pnic and enter the value desired. Again, the MTU value will be changed for the given pnic across all Hosts in the Pool. But, if you need to assign an IP to a Host pnic (eth#), you can't do this from the Pool Networking area; you have to do so on each Host in Home > Hosts, Network tab.
Adding Storage Repositories to an XO Pool
I also recommend you add some non-local storage to your Pool environment. From Home > Pools, click the Add Storage icon:

Depending on the type of SR you're wanting to add and select, you will then be presented with various settings to configure to add the given SR. You can add iSCSI, FC, SMB, NFS, Local, etc. I won't go into detail for this process because it is pretty similar to adding storage to any hypervisor system, so I'll assume you have at least foundational knowledge of how to complete this task.
Enable High Availability
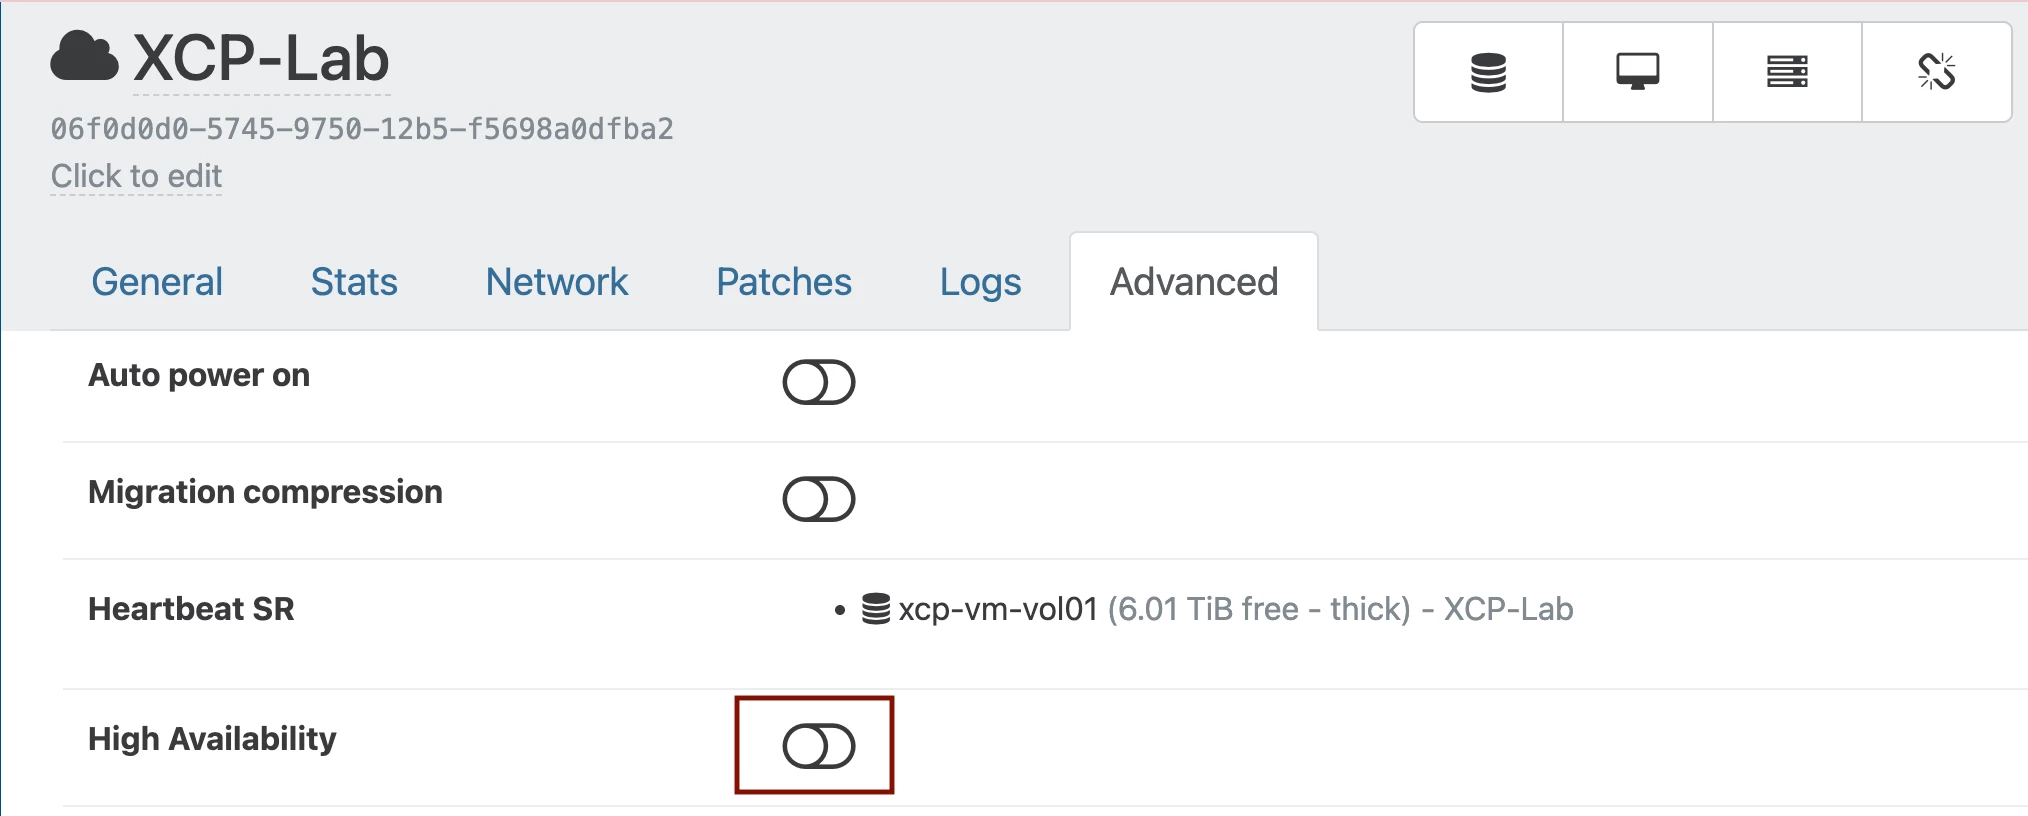
Like some of the other features above, enabling HA is pretty simple. To enable HA, go to Home > Pools, click the Pool name then go to the Advanced tab. Scroll down just a bit and toggle the slider for High Availability to the right.
I've shared how to enable HA. Now let's review how this feature works. If you're familiar with VMware HA, XO HA is quite similar. If a XCP-ng Host goes down somehow (power, isolated, etc), VMs hosted on the failed Host get started on other active, functioning XCP-ng Hosts in the Pool. And like VMware HA, for XO HA to be enabled, you must first meet some prerequisits, like having some kind of Shared Storage and a minimum of 3 XCP-ng Hosts added to your Pool. For the full list of HA requirements, see here. To save some length in this post, I'm just going to direct you to read all the info in the link I shared above, as well as this older XO Blog Post which discusses in detail how it XO HA works.
Enable Load Balancing
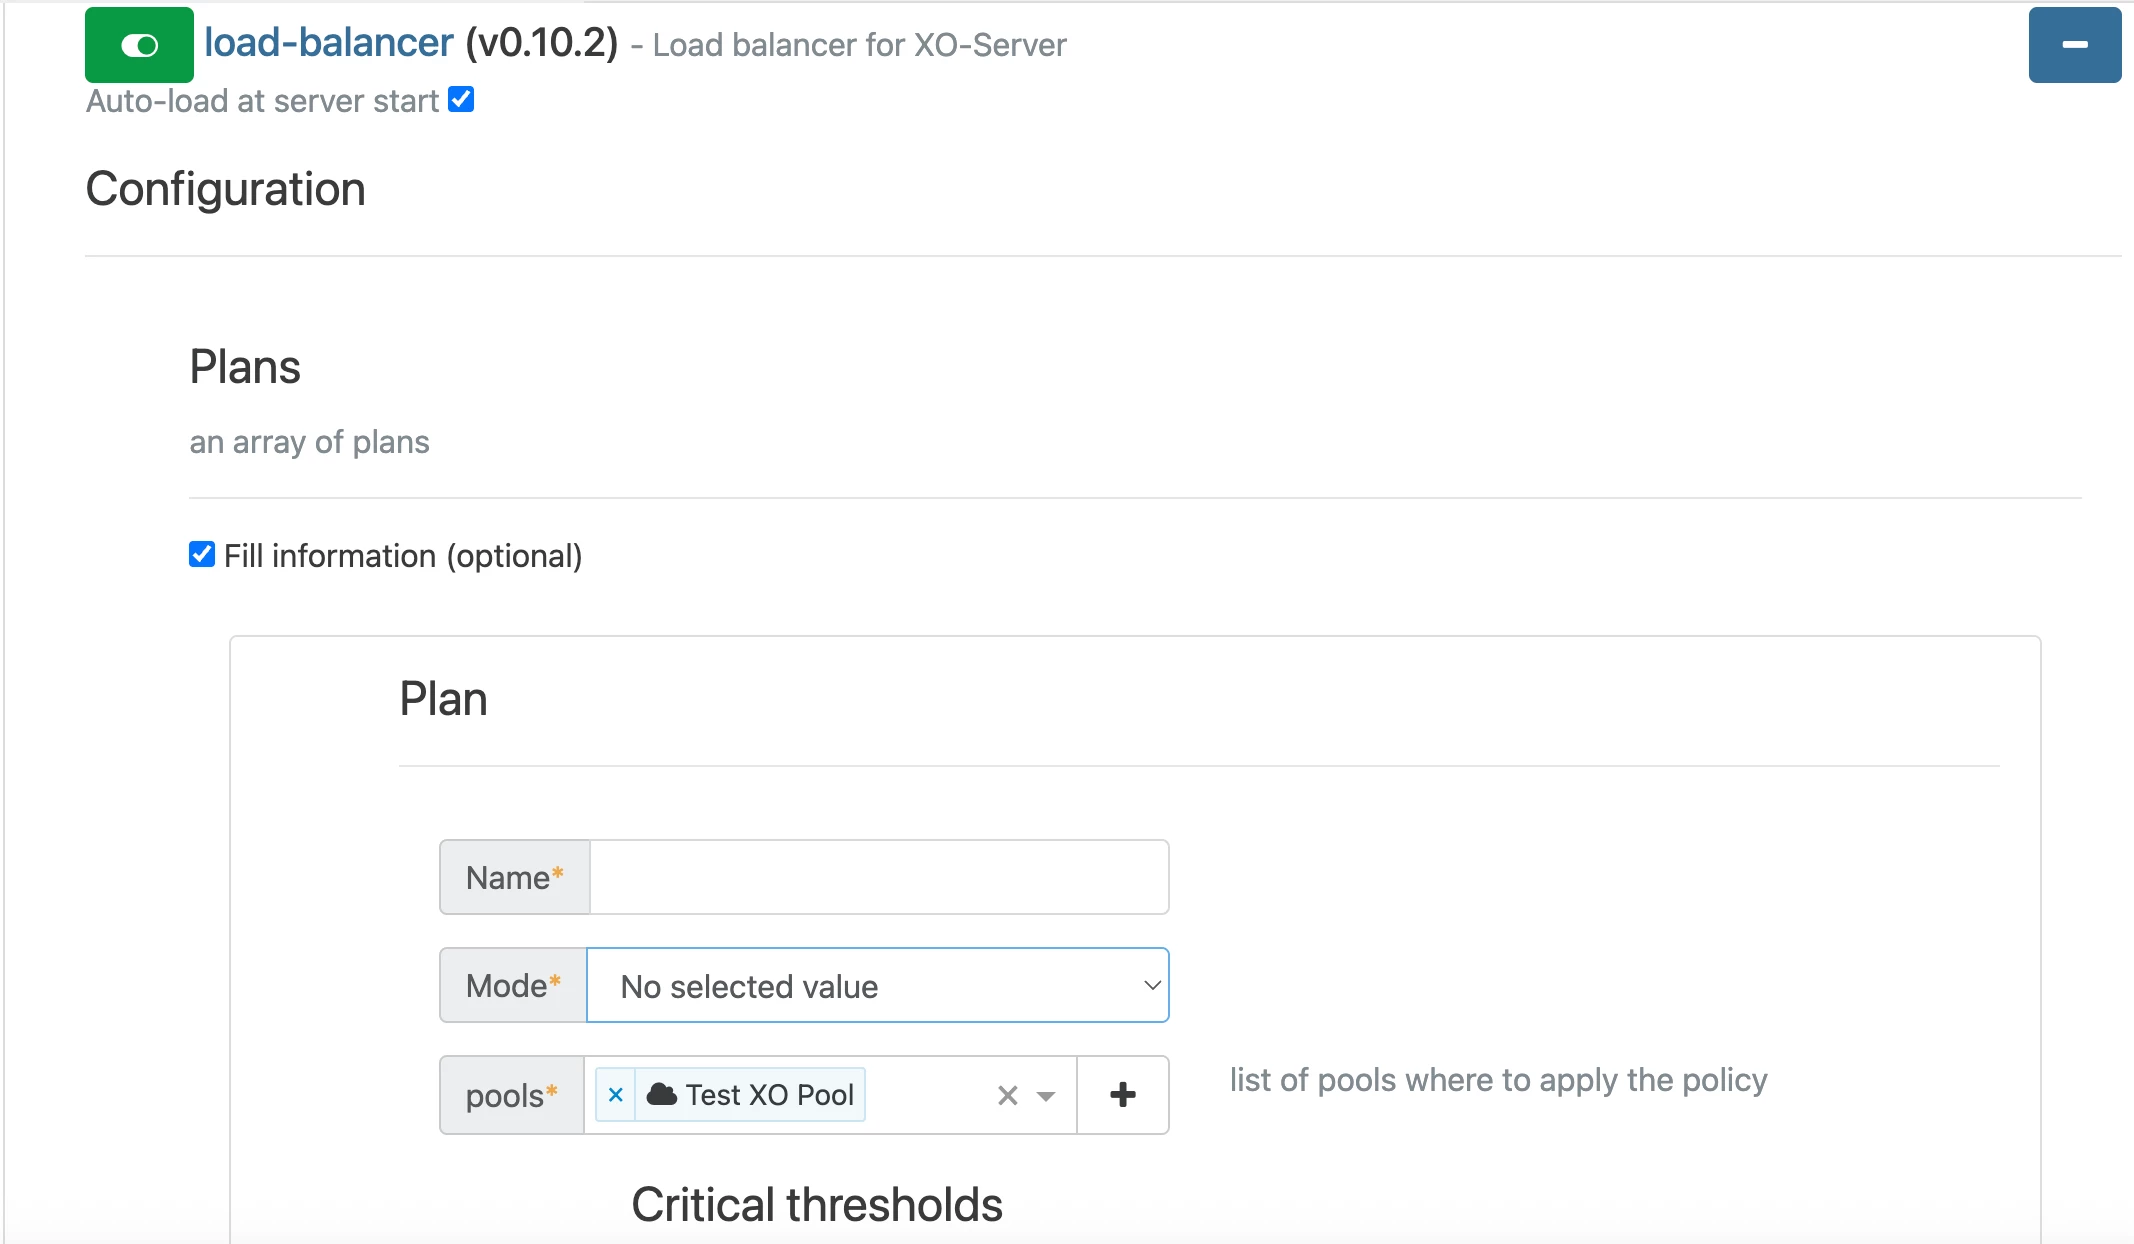
The last item I'll talk about is VM load distribution among Hosts in a Pool. Most of us know this in VMware as Distributed Resource Scheduler, or DRS. In XO this is referred to as Load Balancing. This feature is very easy to configure, but is not done so in the Pool explicitly. Rather, it is enabled in Settings > Plugins. From there toggle the load-balancer Plugin slider to the right to enable it. Expand the Plugin, check the "Fill Information (optional)" box, then click the Add button to configure the various settings for a Load Balancer Plan:
As I did with HA above, to save length on this post, I'll just refer you to a link to the XO User Guide which discusses Load Balancing in detail. Just know there are 3 Load Balancing Modes: Performance, Density, and Simple; but Simple Mode is more for when using Anti-Affinity rules and performs no Load Balancing. Based on some of my testing and the information discussed in the User Guide, I think most environments will use Performance Mode in some form or fashion. One cool thing about Load Balancing is you can "piggy-back" multiple Plans together, which will probably be needed when the need arises to use Anti-Affinity.
Summary
To make sure these XO features function like you need them to, I of course advise to test them out rigorously, then make changes as needed. As you can see, Xen Orchestra/XCP-ng is pretty powerful. Does it have enough for you to consider moving away from VMware? No doubt it doesn't have everything VMware has, but for a lot of SMBs, I think it has enough. The only thing lacking is Veeam support. But, this may be changing soon too… Stay tuned! 😉
Let me know what your thoughts are on XCP-ng and Xen Orchestra below.


