As many of you are aware, VMware has basically tossed the SMB market to the wayside the past several mos (at least imo they have). Since then, Veeam has been listening to its customers regarding what other hypervisors they are looking at to transition to away from the Broadcom behemoth. Some made their voices heard on the Forums, asking for Proxmox support ; and some made requests for XCP-NG support. Veeam answered the call for Proxmox lovers, going GA with a Proxmox Plugin in August 2024 (announcement in May 2024). Though Veeam has yet to announce any plans to officially support XCP-NG, I'm hopeful they will in the near future based on the comments in the XCP-NG Forums post I shared above; how soon "near future" is, is to be determined. 😏
Because I believe Veeam will be supporting XCP-NG eventually, I thought I'd get ahead of the game and create some posts around this Xen-based hypervisor discussing my findings during testings, so the Community can get a first-hand look of what it may be able to bring to your environment. I'll also discuss some features analogous to vCenter to see if this hypervisor is something worth investigating for your organization to migrate to (in subsequent posts).
Brief History
Let's start with the acronym → XCP-NG. What does it even stand for? It stands for Xen Cloud Platform - Next Generation, and was created by Vates in 2018. Since this is a "NG" version, you'd be correct in assuming there is/was a predecessor; and you'd also be correct in assuming it was aptly named XCP. XCP was initially created as an open source version of Citrix XenServer back in 2010. Both XCP and XCP-NG are sourced from Xen Hypervisor, which has been around over 20 years, so if you aren't aware, this hypervisor has quite a bit of maturity to it. Even though XCP-NG has only been around since 2018, with the VMware debacle, it has matured rapidly in recent months. To view all its updates and release notes, you can go to the Vates blog and see what they've added to a given version and when.
Vates
Now let's discuss some of the stalwarts backing XCP-NG has. Besides its creators at Vates, it is also supported by Xen Project, which is itself managed through the Linux Foundation. So as you can see, XCP-NG has a pretty strong corporate and community backing. As mentioned, Xen Hypervisor is the core hypervisor behind XCP-NG and it has been around for quite some time; almost as long as VMware. Because of its longevity and focus on security, Xen Hypervisor is used by many large Cloud corporations such as Amazon, IBM Cloud, Oracle Cloud, and others. And, while no hypervisor is "foolproof", Xen Hypervisor is well respected in the industry as being highly secure; you can read more on how and why here. Lastly, even though this is considered an open-source hypervisor, all updates and patches are managed by Vates. You can review past release information at the blog link I share above.
XCP-NG Architecture
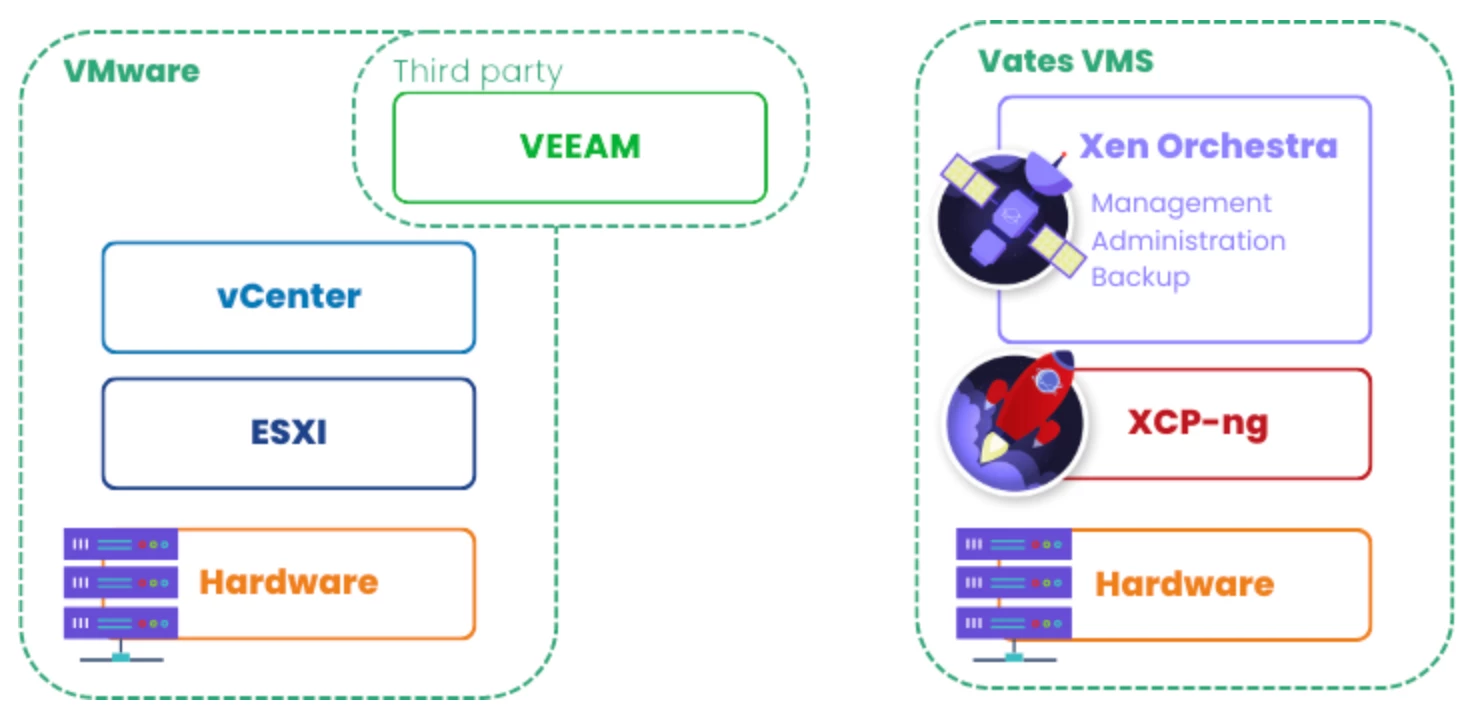
Before I discuss the installation, which is relatively straight forward, I thought it would be beneficial to provide a high-level architecture overview of how XCP-NG works and is managed. There's no better way to do so in my opinion than with a diagram:
XCP-NG/XO Architecture Diagram
Let me briefly discuss what is shown above as ESXi is to physical hosts for VMware, XCP-NG is to physical hosts in XCP-NG. As vCenter is to VMware, Xen Orchestra is to XCP-NG. XO, as it is generally referred to, is the central orchestration tool used to manage your XCP-NG infrastructure. It provides the framework to centrally manage your Xen-based virtual storage, network, and compute; and, until Veeam supports it..even your VM backups. XCP-NG is all "bound together" through Xen Project Management APIs, or XAPI.
VMware vs XCP-NG Architecture
XCP-NG Installation
Ok, so now let's get to the "meat" of this post XCP-NG and XO installations. We'll start with the hypervisor:
For my testing, I had a couple older HPE DL360 G9 hosts laying around, so I grabbed two of them and racked them up. Each host also has two Broadcom, 2-port 10Gb NetXtreme BCM5719 HBAs in them to use for management and (shared iSCSI) storage traffic. You can use VMs to begin your testing if you want to, but I won't be covering how to set up a nested virtual environment to test XCP/XO. There is a video blogger on YouTube, Lawrence Systems, which I hink provides a walkthrough of how to set up a XCP-NG virtual environment for testing. At the very least I recommend following him as he provides some pretty good info and tutorials in general about XCP-NG and XO
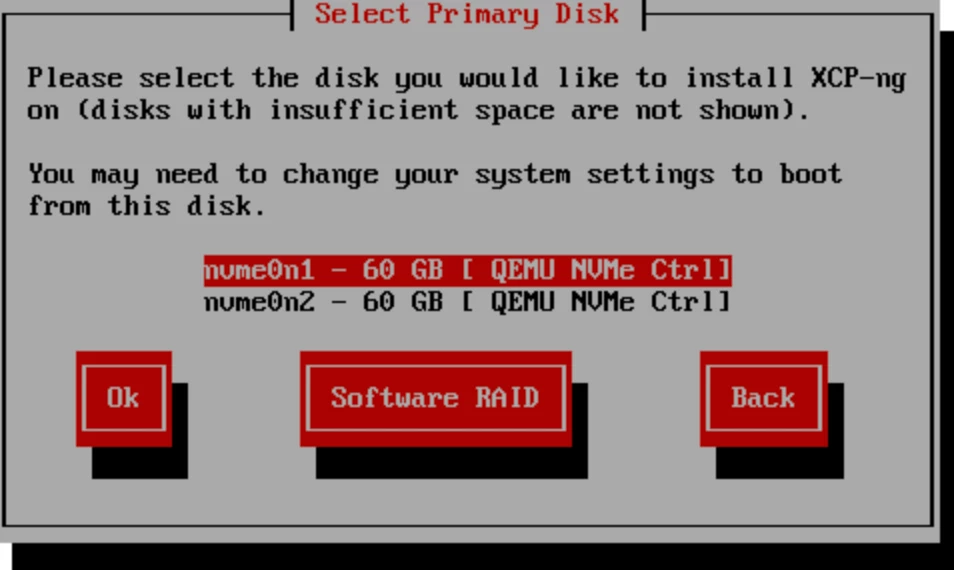
Download the XCP-NG install ISO and begin the install on your host. The current LTS is XCP-NG 8.3
Go through each prompt/menu and make your selections. NOTE: I won't cover all screenshots so I can keep this post a nominal length; configure what disk(s) to install XCP-NG on and what storage to use for VMs XCP-NG Install on Disk Selection Menu
Go through the next few screens to choose the install souce type, whether to verify the source (not needed), and enter an admin user password, then set up your host networking XCP-NG Installation Network Configuration Menu
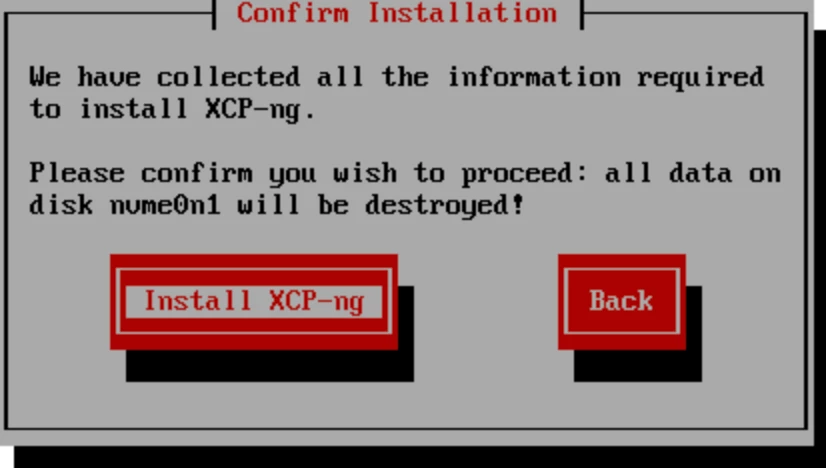
Finish the remaining screens configuring DNS, timezone, and NTP info, then confirm to install XCP-NG XCP-Installation Final Menu
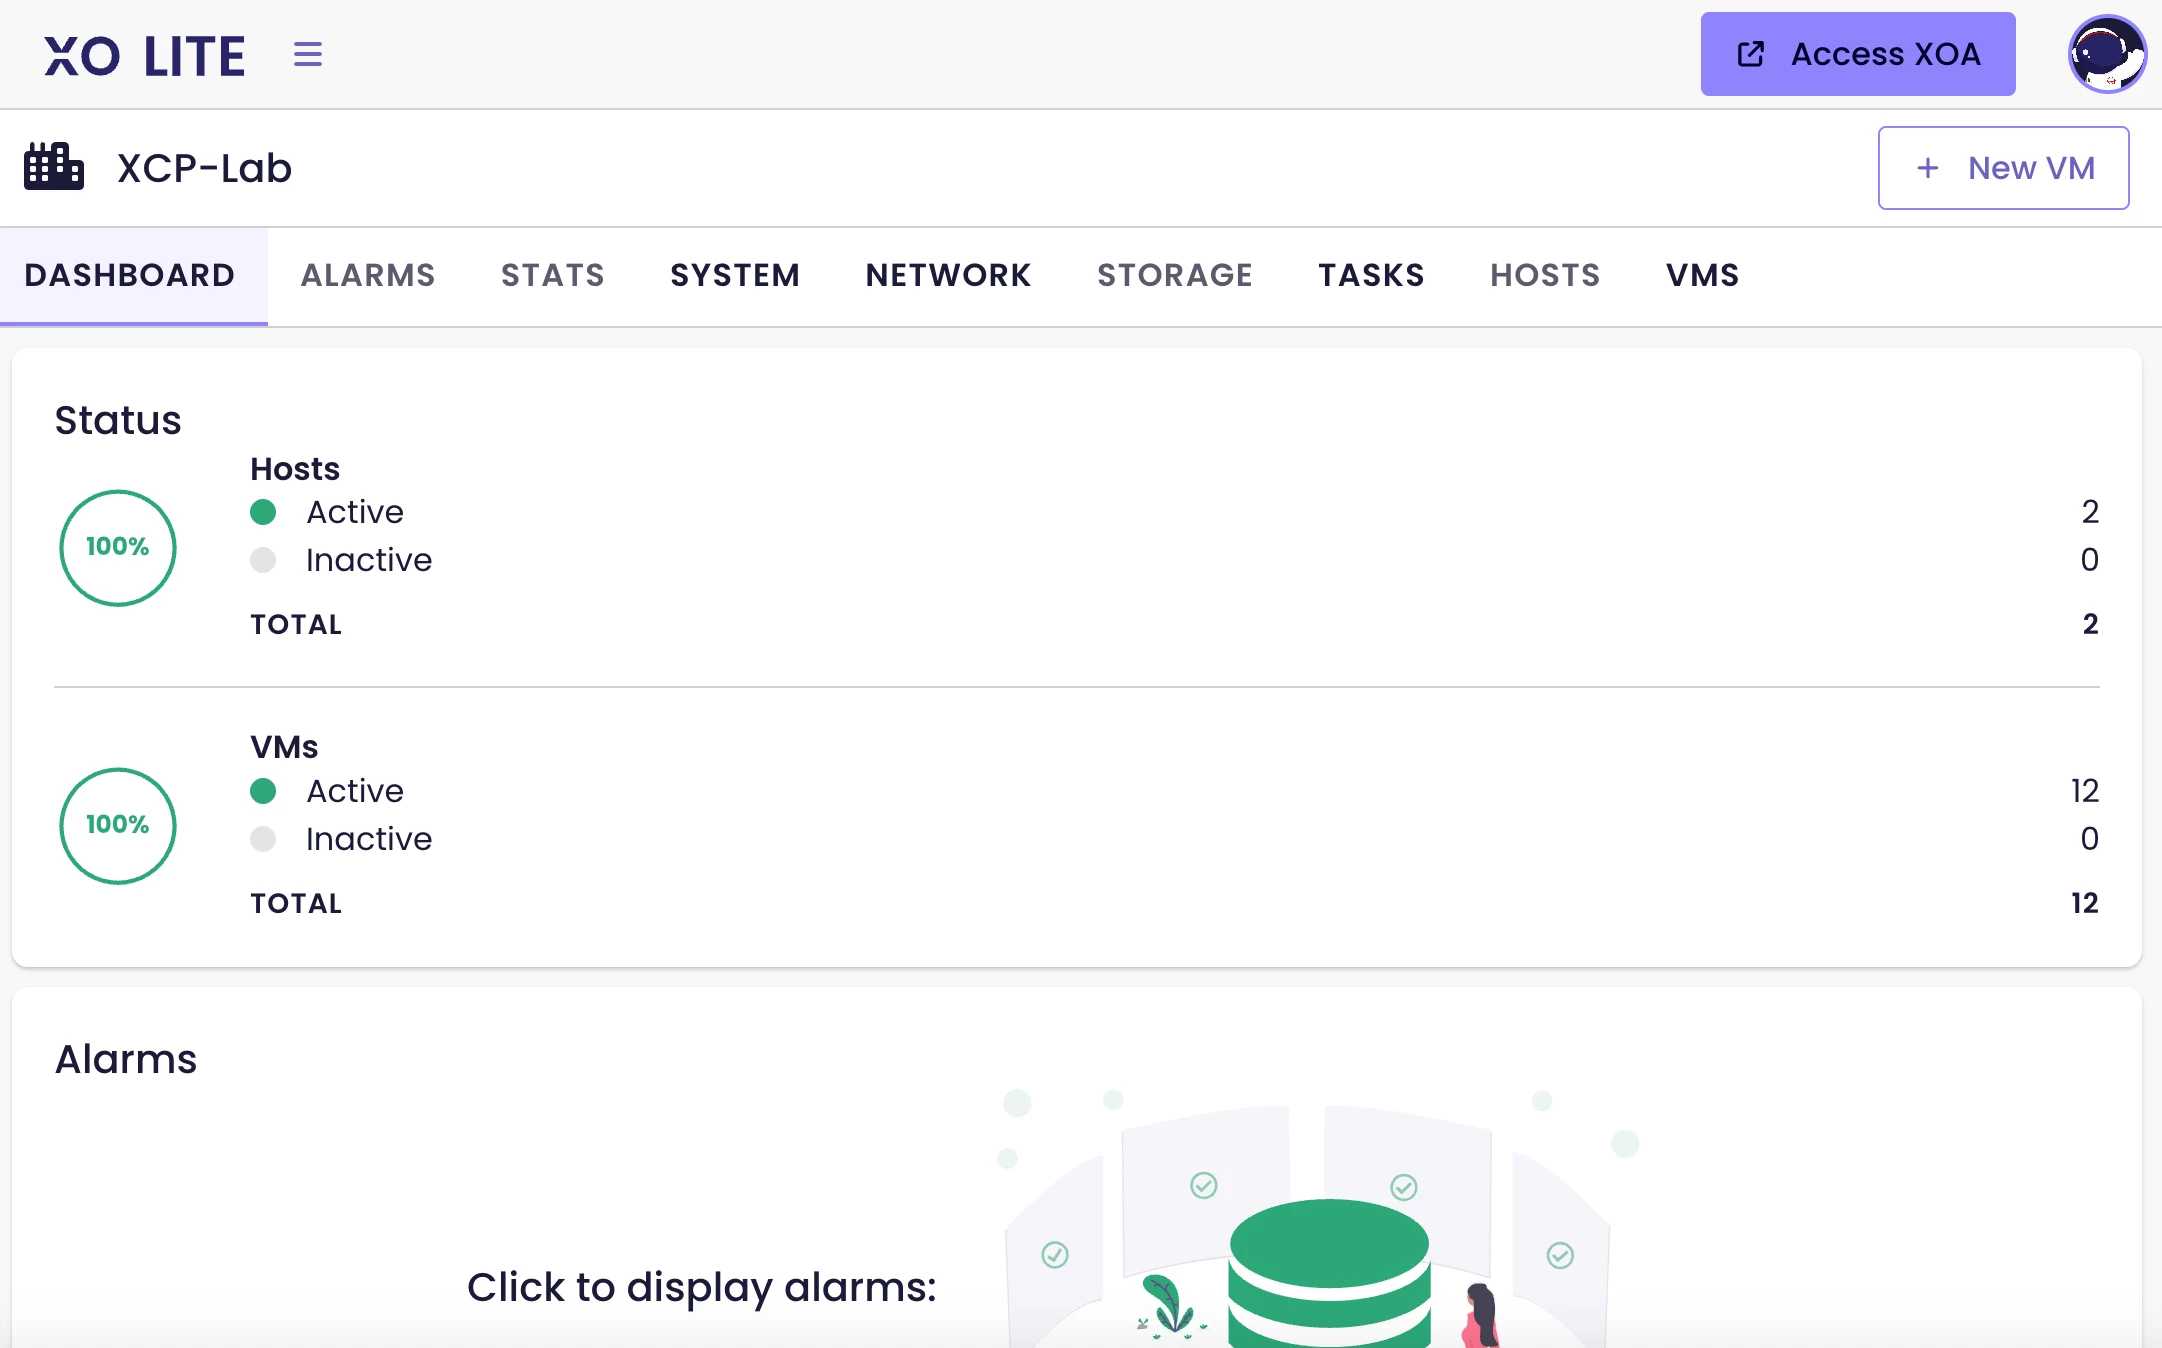
Reboot the host and you are done. Like ESXi, XCP-NG has a nifty host-based web UI, XO-Lite, you can use to perform a minimal amount of management operations to get started. The screenshot below only shows a small amount of what you can view in the XO-Lite Dashboard: XO-Lite Dashboard View You can view Alarms, as well as resource info (e.g. Memory, Network Usage, etc), as well as create a VM, interact with VMs in their Console, and manage VM state. This is a good segway to proceed into creating our XO management server VM in XO-Lite
Xen Orchestra Installation
To best manage your XCP-NG hosts and VMs, you need a central management tool. Xen Orchestra is the very tool you need to use for this task. Vates provides a means to auto-download and deploy an appliance-based XO version (XOA) you can install and trial for 30 days, or you can get it for a cost, which includes support. But for lab'ing, you can take advantage of a full-featured XO server via creating a VM and a performing a little bit of harmless Linux command line tasks. This version of XO is called "XO from sources", as you're essentially installing XO from github. Let's start the process…
Since we're testing out XCP-NG, I recommend going ahead and creating a Linux VM on one of the XCP-NG hosts you just created. But, this is not a requirement for using XO. XO is fairly lightweight so you can install it anywhere → on your Desktop..i.e. in VirtualBox, in VMware, Hyper-V…or wherever. I'll install it on one of my XCP-NG hosts. Log into XO-Lite XCP-NG Host web UI on one of your Hosts and click the Create VM button at the top right
Follow the Create VM wizard by selecting a template for the VM → this is nothing more than XCP-NG supplying a set of parameters and specs for the OS desired in the VM you're creating. This will then display various settings you need to configure to create your VM: VM name, Boot option (BIOS vs UEFI), RAM, CPU, Network, Disk Storage, etc. XO-Lite Create VM Wizard/Options
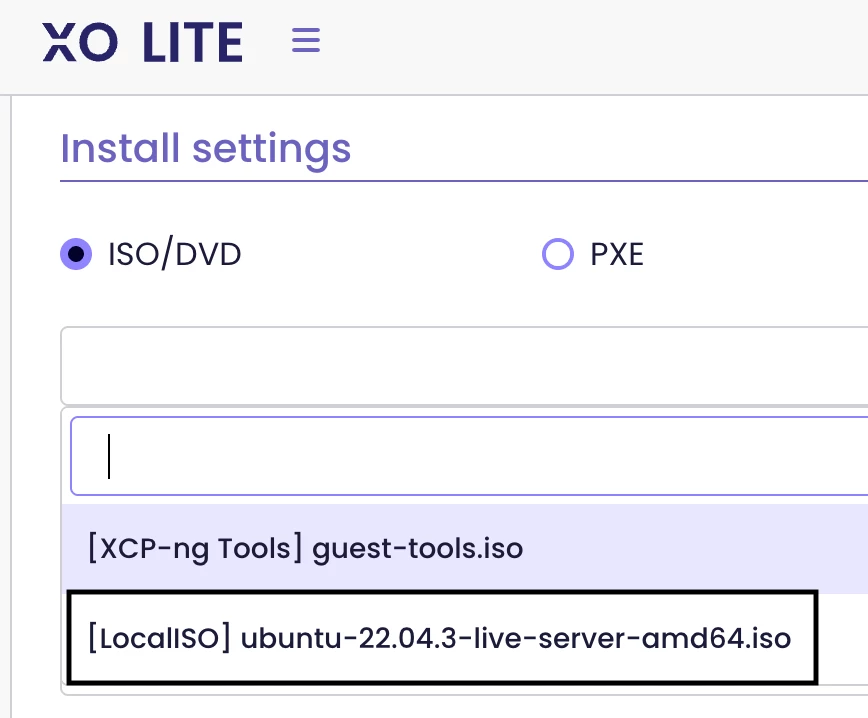
A couple items to note with regards to creating a VM in XO-Lite : a. To be able to use an OS ISO, you 1st need to create an ISO SR (storage repository) on the XCP-NG Host you’re using XO-Lite on. It’s pretty simple, only needing to run 2 cmds (see this post). SSH (or Console) onto your XCP-NG host and run: mkdir -p /var/opt/xen/iso_store , then run xe sr-create name-label=LocalISO type=iso device-config:location=/var/opt/xen/iso_store device-config:legacy_mode=true content-type=iso , then scp your OS ISO to your Host scp local-path-to-ISO/file-name.iso root@<xcp-ng-host>://var/apt/xen/file-name.iso
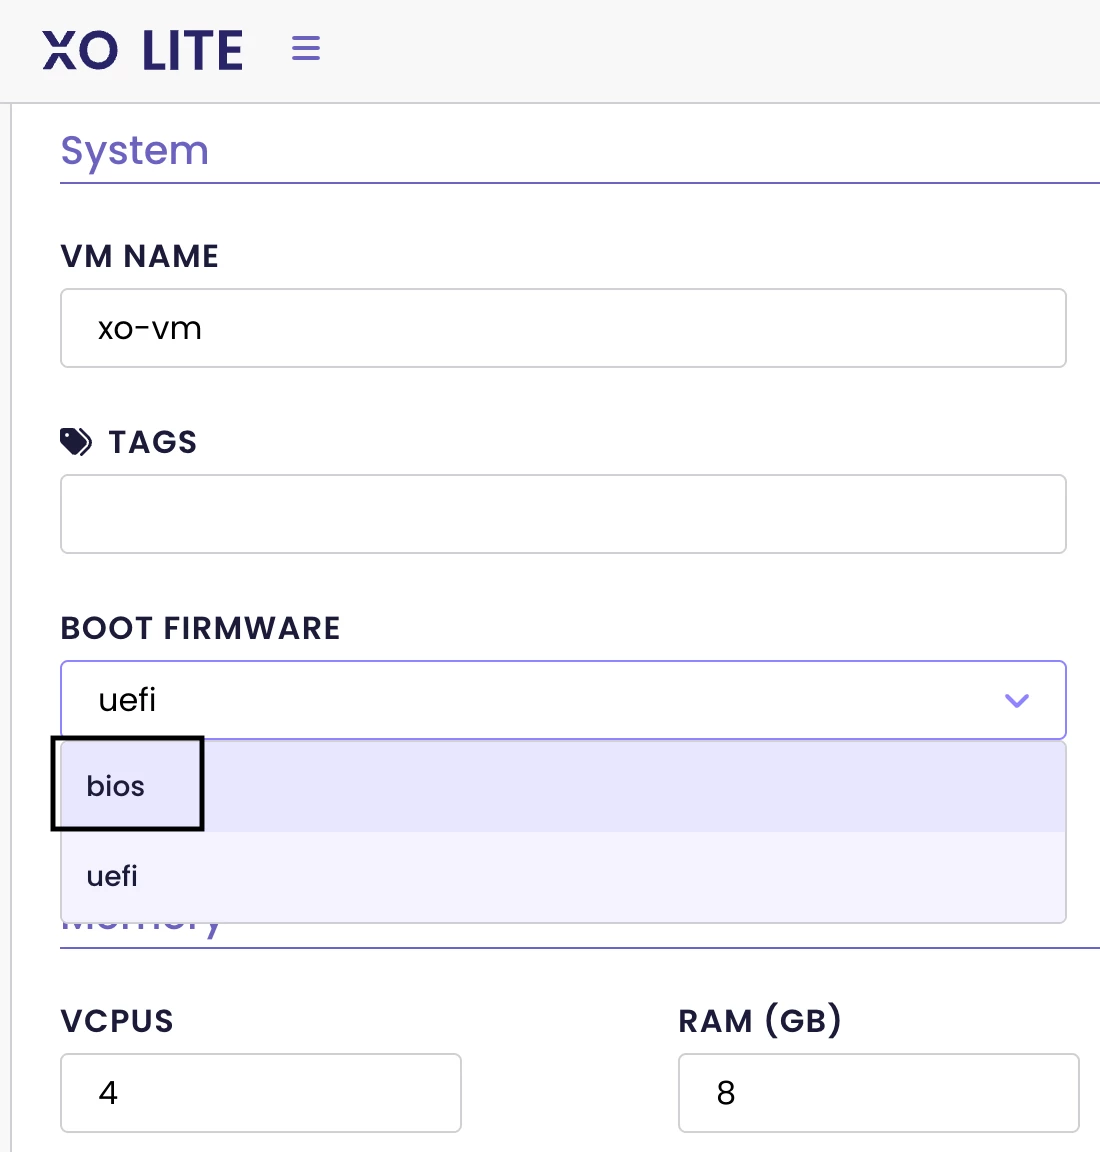
XCP-NG ISO SR b. Additionally, when creating your VM, using the UEFI boot firmware causes the VM not to boot to your ISO when powering on the VM after creation. At the time of this post, this is a known bug in XO-Lite which I believe will be resolved soon. To work around this, simply choose the BIOS firmware instead VM Options - BIOS Firmware c. Lastly, understand XO-Lite is still a pretty new XCP-NG feature. It has some nifty views and Host-specific features, but many areas are still in development, so are not usable (e.g. networking & storage functions, etc)
After you’ve configured your VM, boot it up and install the flavor of Linux you're comfortable with (and which is supported by XO, which most major Linux distros are). You can Internet search for the Linux install process if you're not comfortable doing so
After you have your VM up and going, update it and install any other tools you may want or tend to use on it. I'm using Ubuntu 24.04, so most of what I need is already installed; to update it I'll run: sudo apt update && sudo apt upgrade -y
To install XO from sources from github, you need to install git on your Linux VM. For Ubuntu the command is: sudo apt install git -y . Run the cmd for your specific Linux distro
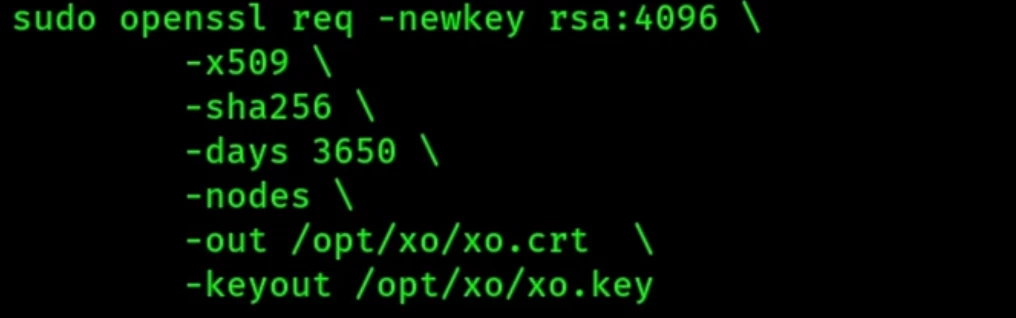
Once you have git installed, run the following cmds: a. sudo git clone https://github.com/ronivay/XenOrchestraInstallerUpdater.git b. cd XenOrchestraInstallerUpdater , then ls to list the files c. Customize the listed xo-install.cfg file: sudo vim xo-install.cfg d. Press "i" to modify the PORT parameter from '80' to '443', then uncomment (remove the #'s) for the 'PATH_TO_CERT' and 'KEY' parameters. Once modified, press ESC, then :wq! to save and quit the vim editor e. Create a directory to put XO files in: sudo mkdir /opt/xo f. Enter the following info to create the cert: OpenSSL Certificate Creation Command Then provide the information when prompted (Locale, State, Org, etc) g. Go into the XenOrchestraInstallerUpdater directory and run the installer: sudo ./xo-install.sh , then press 1 to begin the XO Install process. The install takes about 15 minutes or so to complete, so be patient h. After the installation completes, note the login credentials displayed: admin@admin.net / admin ; go to the XO web URL (https://ip-of-xo-vm) and login. Once logged in, go to Settings > Users and modify the username and password for the admin@admin.net user to be what you want it to be i. Once your admin user is modified, log out then back in and again & go into Settings > Servers to add the XCP-NG hosts you installed earlier. You can now begin playing around in XO (XCP-NG) j. When in XO, if you go to the About section, it is here you will see if your version of XO is current or is running behind # number of "commits" (i.e. your XO is then not up to date). To update your XO VM server, ssh or Console into your XO, login, cd to the XenOrchestraInstallerUpdater directory and again run the xo-install.sh script. Instead of selecting "1" for Install, choose "2" to Update it. And that's it! That's how you keep your XO VM up to date
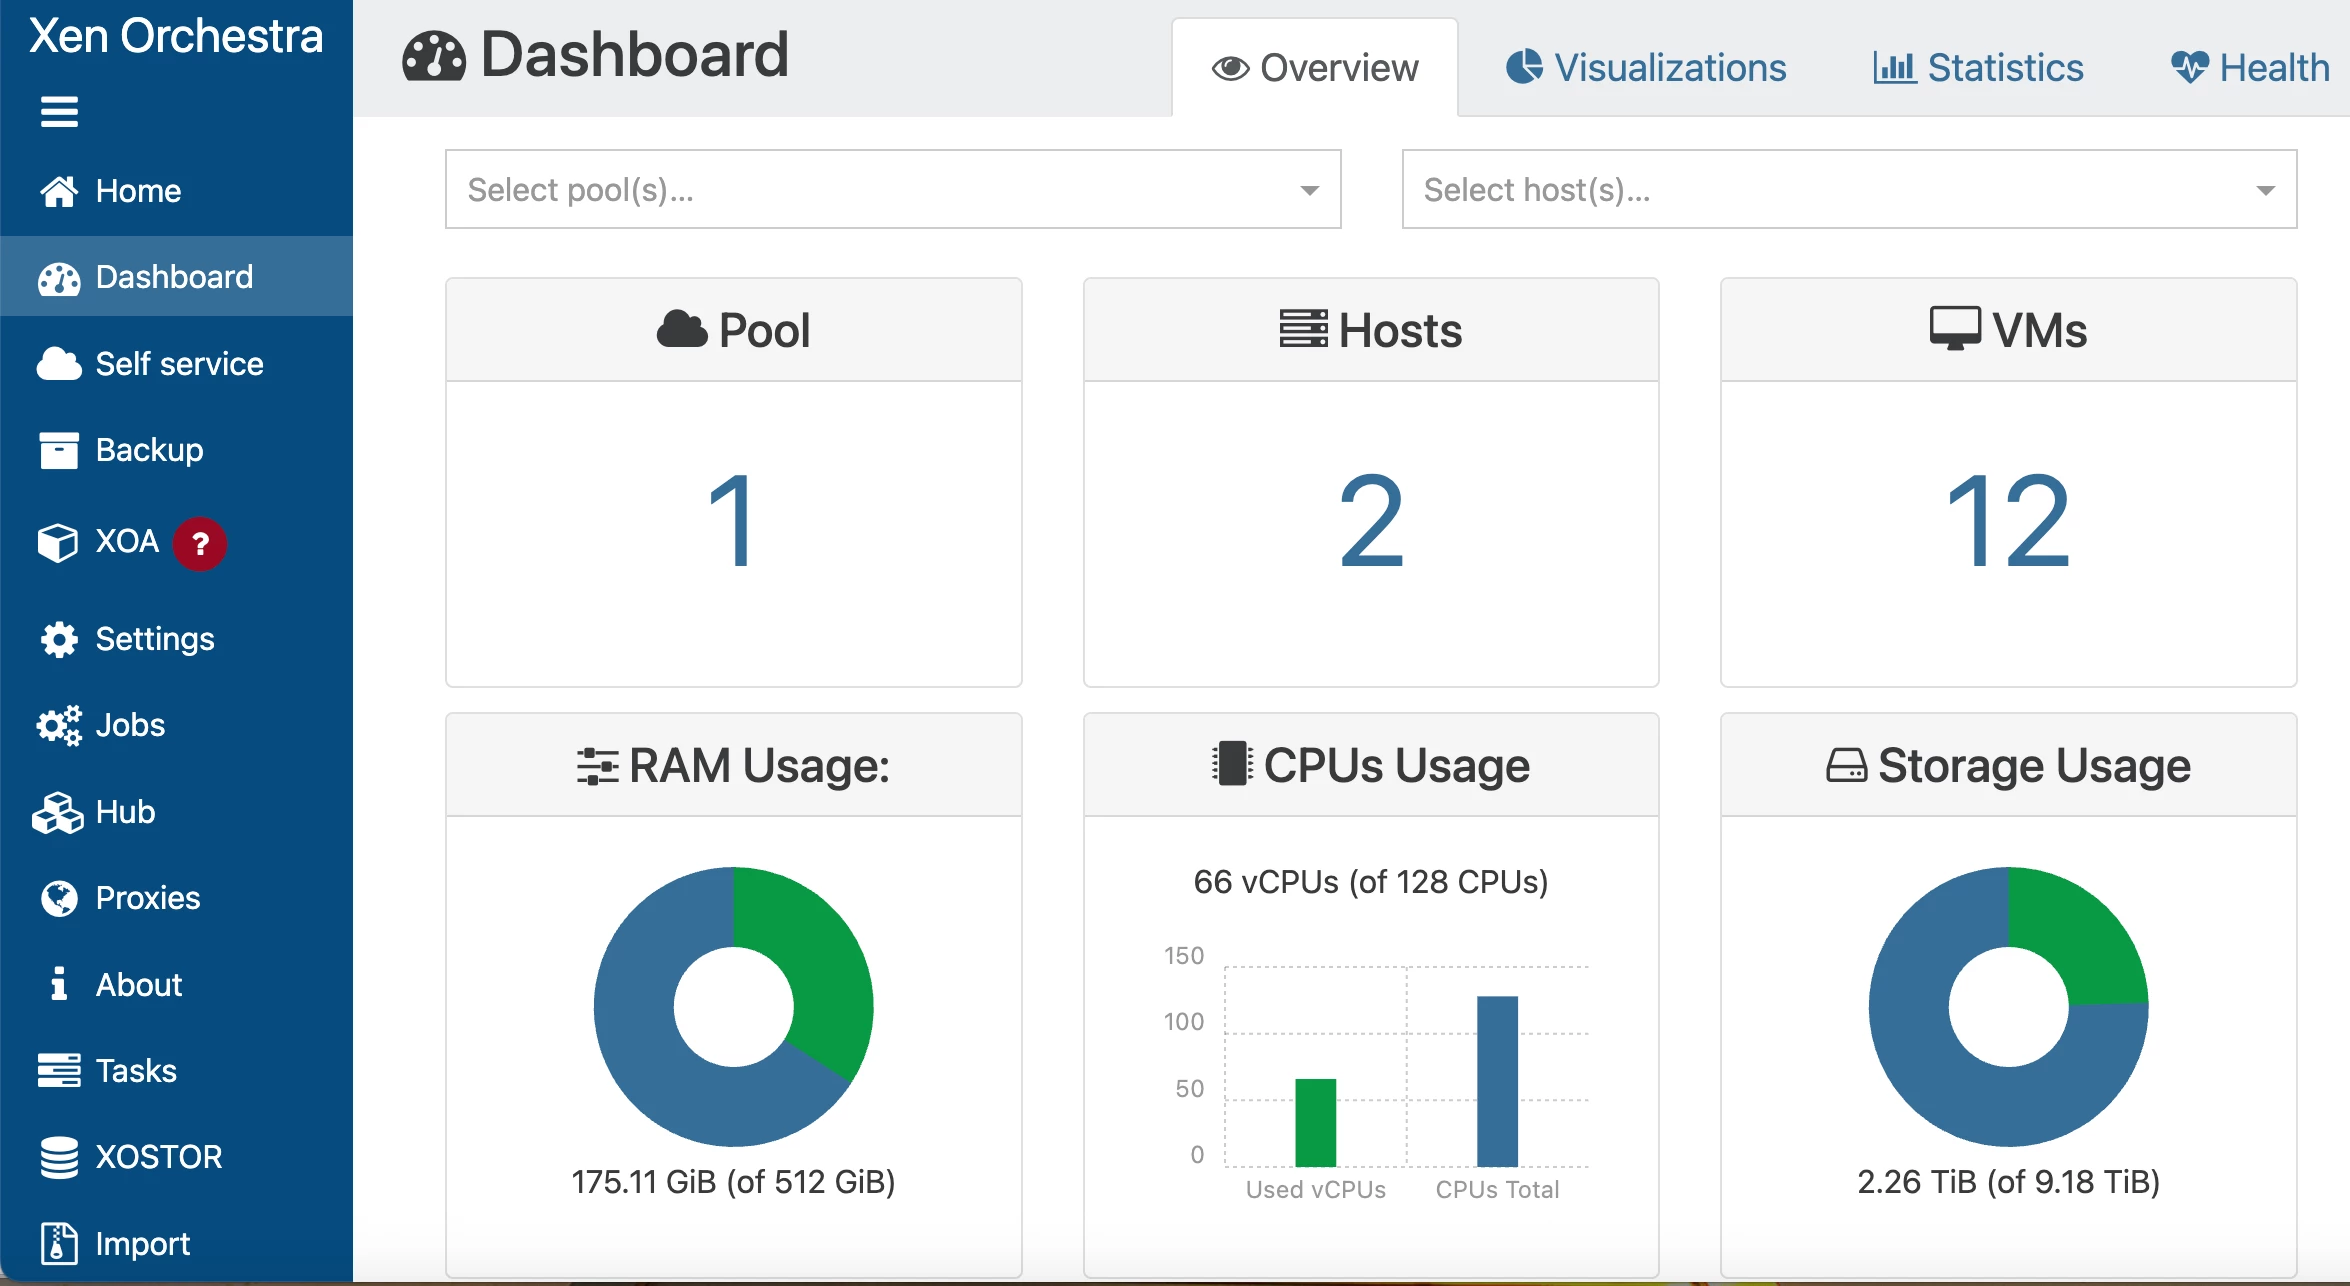
When you login to your XO website each time, the default view is Home > VMs, showing a list of all the VMs you've created. But, you can view performance information and other useful charts and graphs in the Dashboard view (below)
Xen Orchestra Dashboard Overview
It's a pretty neat and clean visual overview of the resources in your XCP-NG environment.
To begin testing things on how they conpare to VMware vCenter, you'll need to add your XCP-NG hosts into what's called a Pool in XO, similar to VMware vCenter Clusters. I won't cover the process to do so in this post, but I will share some behaviors to keep in mind when XCP-NG hosts are in a XO Pool:
Even before you add XCP-NG hosts to XO Pools, like VMware ESXi hosts, XCP-NG standalone hosts have a standalone Resource Pool on their own, analogous to ESXi host Resource Pools
After adding XCP-NG hosts to a XO Pool, if you need to ssh into any of your XCP-NG hosts, each slave host in the XO Pool takes on the admin user password of the master host in the Pool
If you ever need to login to any XCP-NG host XO-Lite UI after adding your hosts to a XO Pool, you can only do so on the Pool master host. You are not able to log onto any slave XCP-NG host XO-Lite UI. You'll be able to see all slave hosts in the XO Pool in the XO-Lite UI though
When you create networks in the XO Pool, the networks are propagated to all hosts in the Pool, kind of like using Distributed Switches and vDS Port Groups in vCenter; same goes for adding any Shared Storage (as long as all your XCP-NG hosts have their storage network setup properly)
If for some reason you need to remove a host from a XO Pool, do so from the Pool section; do not attempt to do so from Settings > Servers. Your XCP-NG hosts can 'break" (having funky networking/connection behavior). As a matter of fact, after adding your XCP-NG hosts to XO then adding them to a Pool, there should be no need to ever go into Settings > Servers to manage your hosts again until you've removed a host from the Pool. All XCP-NG host management is done within a Pool
And that's all there is to installing XCP-NG and Xen Orchestra. If you're a SMB shop and looking for hypervisor alternatives, this may be just the ticket you're looking for. Check it out, and let me know what you think of XCP-NG. I've also provided a few documentation/video resources below you can reference for various installs covered here and to get info to any questions you may have