Sometime last year,
With the current opportunity available to some of us as documented below, I have decided to create various articles to reinforce my knowledge.
Since the Orchestrator server must be connected to the SCVMM servers or Hyper-V Cluster (which I no longer have in my lab) enviionrment. I will be showing you guys the steps to install System Center Virtual Machine Manager (SCVMM) in this guide, and how to connect SCVMM to VRO in a subsequent article.
VMM 2025 supports Windows Server 2025 hosts and Virtual Machines. It works with TLS 1.3, and the dependency on legacy authentication protocols, such as NTLM and CredSSP, has reduced significantly. Also, if you are running System Center 2025. The Service Provider Foundation (SPF) will be discontinued as its capabilities are now built into Azure Arc-enabled System Center Virtual Machine Manager.
Hardware Requirements
VMM servers need at least 8-core processors (2 GHz), 4 GB RAM minimum (16 GB recommended), and 4 GB storage. Hyper-V hosts must run on supported Windows Server editions with adequate resources for virtualization workload.
Please see the table below for more information on the hardware requirements. For instance, if the minimum RAM requirement is not met, the installation will fail.

- Supported OS Versions: Hyper-V hosts support Windows Server 2025, 2022, 2019 (Standard/Datacenter/Server Core/Windows10 and 11 Enterprise), and select earlier versions like 2016. VMM servers require Windows Server 2025, 2022 or 2019.
- Software Prerequisites: Install Windows ADK (for Windows 11/Server 2025 with WinPE add-on), PowerShell 5.1, and .NET 4.6 on the VMM server before setup. SQL Server 2019 or 2022 (Standard/Enterprise) is required for the VMM database. Because, SQL Server 2025 isn’t support at the time of writing this article, I will be installing SQL Server 2022.
The following table provides the scale limits that were tested for System Center Virtual Machine Manager 2025. There are various factors that affect the scale limits, such as hardware configuration, network, topology, and other.

Create a VM on Proxmox to Host SCVMM
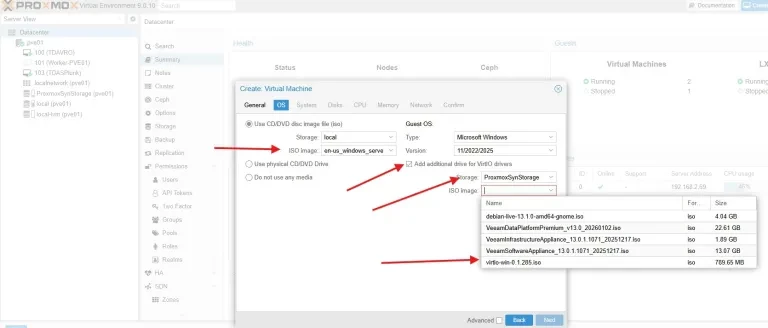
This section involves creating a VM on Proxmox for VRO. To do this, head over to Proxmox and select the node where the VM will reside. Enter the VM name, and click on Create. If you have another virtualization platform, here are the steps on how to set up a VM on any hypervisor, such as Proxmox, Hyper-V, vSphere, and XCP-ng, to host VMM.

Select the OS ISO Image and populate the fields with the right details, and click on Next.
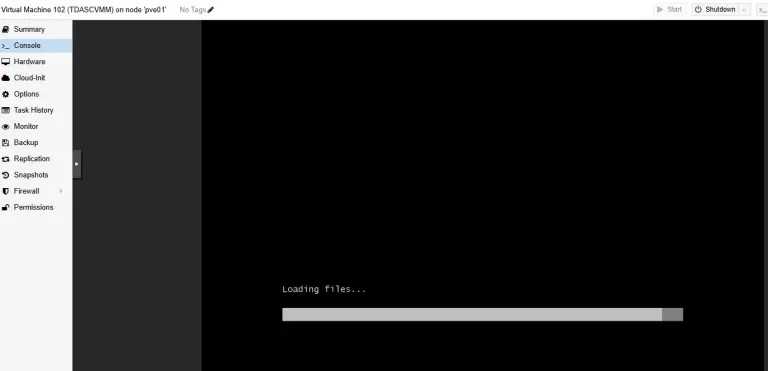
Windows is currently in the early setup phase. Here it the loads installation files from the media into system memory.
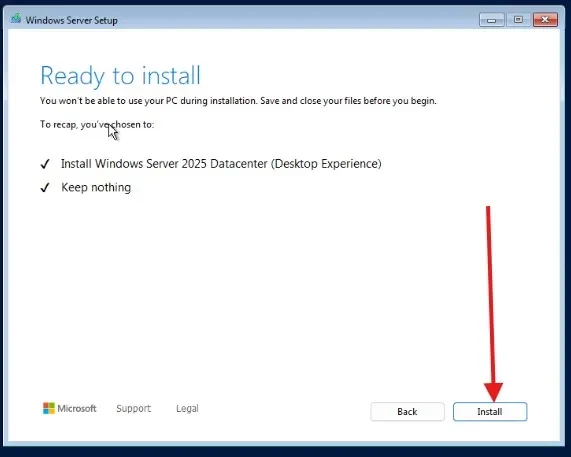
Windows Server Post OS customization
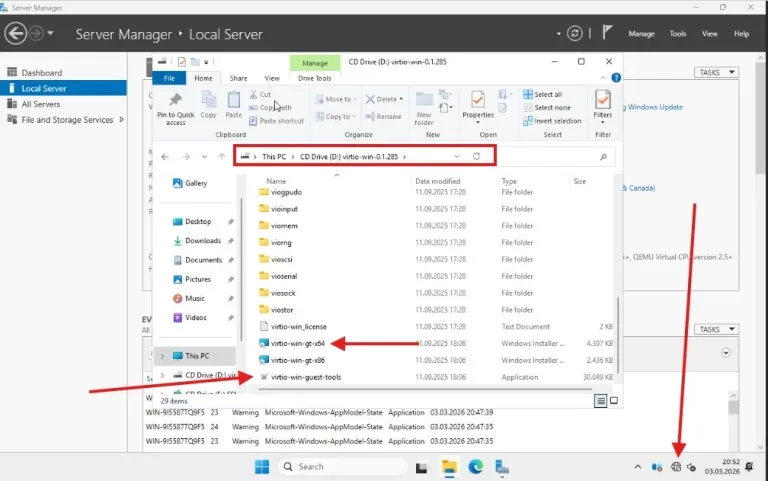
VirtIO Drivers are paravirtualized drivers for KVM/Linux. They enable direct (paravirtualized) access to devices and peripherals for virtual machines, instead of slower emulated ones.
There are two methods for installing the VirtIO Drivers inside the existing Windows VM. You can download the virtio-win-gt-x64.msi and the guest tools as well.
You can download the virtio drivers from here. As you can see during the VM setup, I have already downloaded and attached the ISO image to the VM as a CD/DVD, which has both the virtio-win-gt-x64.msi and the guest tools as well.
Note: In Proxmox environments, both the VirtIO-Win drivers (virtio-win-gt-x64) and VirtIO Guest Tools (virtio-win-guest-tools.exe) are needed for optimal Windows VM performance and management.
The (virtio-win-gt-x64) handles core paravirtualized drivers during/after OS install, while the (virtio-win-guest-tools.exe) adds the QEMU Guest Agent and SPICE enhancements.
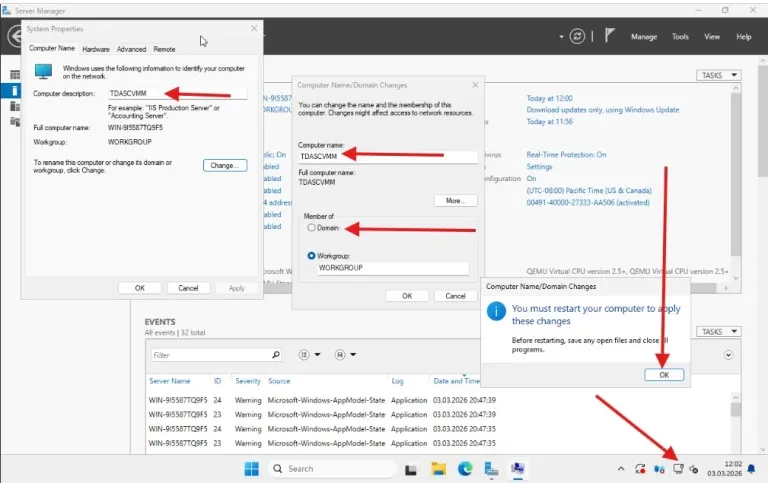
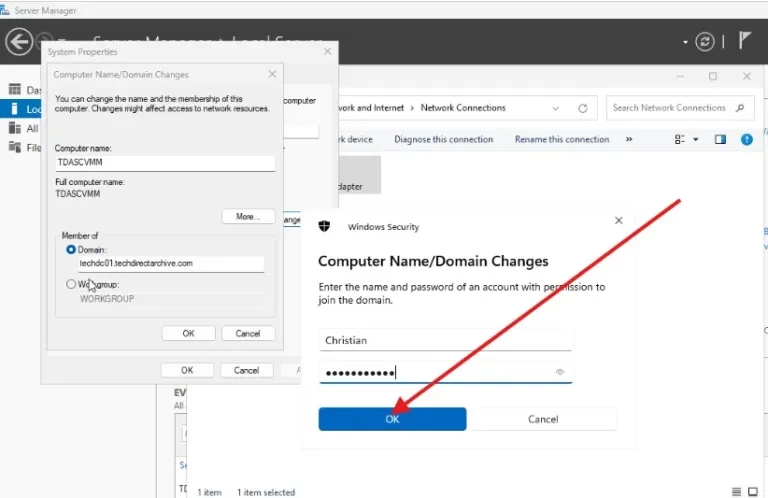
Change Server Name and Description
Some of these steps have been discussed here: “Post OS installation: Configure the properties of Windows Server“. I will proceed and enter the Computer Description and Name.
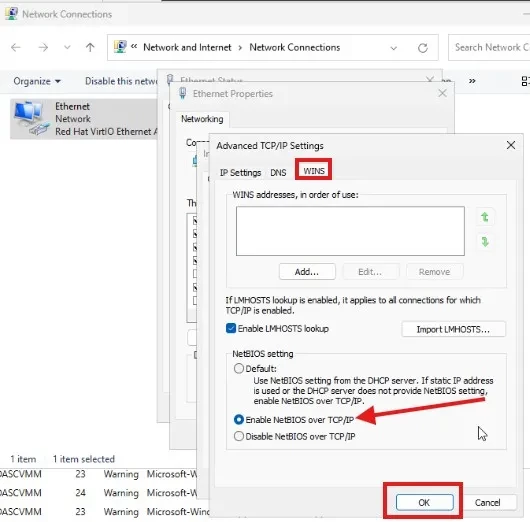
Also, ensure to enable NetBIOS over TCP/IP in order to be able to join the server to the domain. You need NetBIOS over TCP/IP in some environments.
This is because domain join does not rely only on modern DNS-based name resolution, especially in legacy or misconfigured networks. But if DNS is correctly configured, NetBIOS is NOT required.
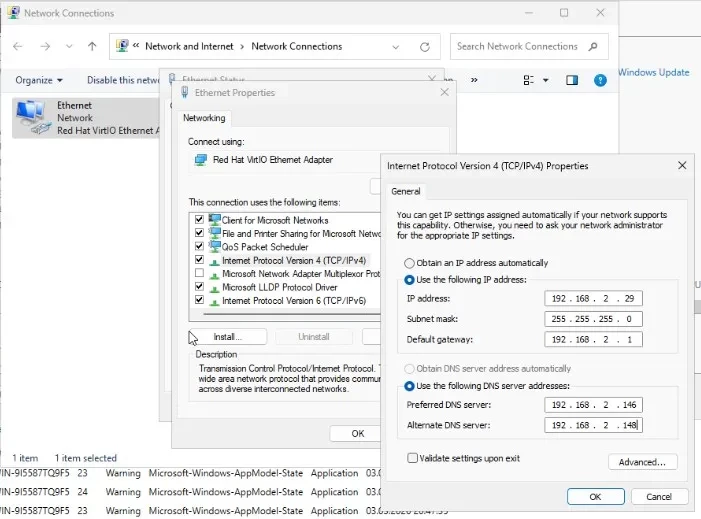
Configure TCP/IP
Must also be a member of the domain. VMM server computer names cannot exceed 15 characters.
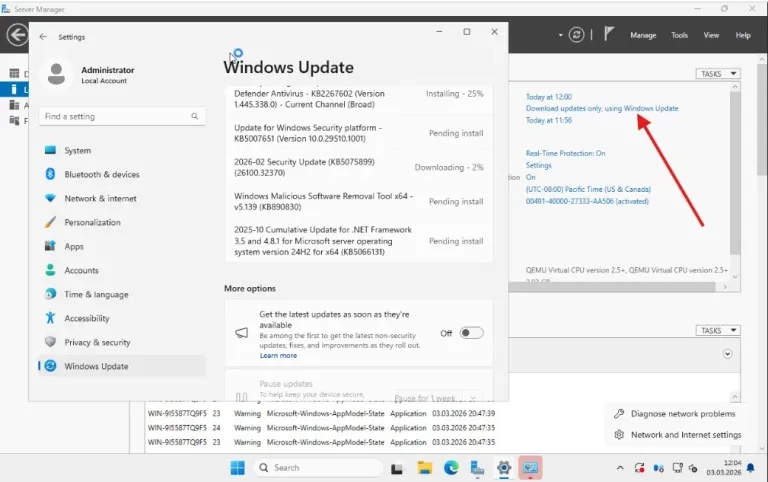
Do not forget to apply Windows Updates
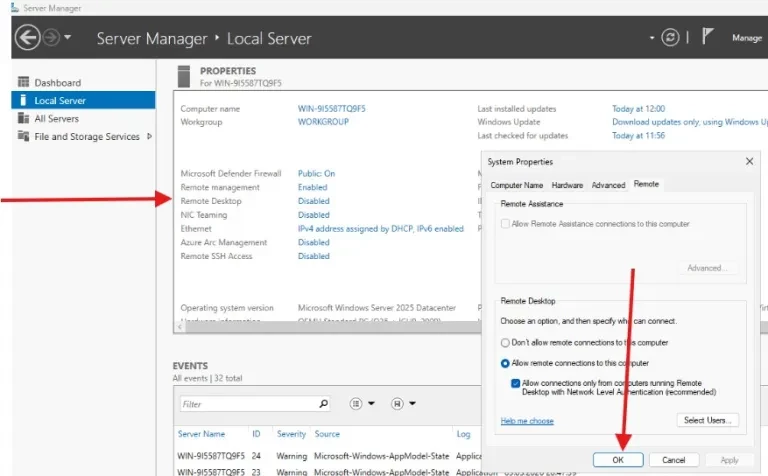
Enable RDP, this way I can connect with Devolution. Please see ‘How to set up Devolusion Remote Desktop Manager on Windows, and Enable SSH and Remote Desktop Connection in Windows Server.
You can now access your Server and proceed with the installation of SCVMM

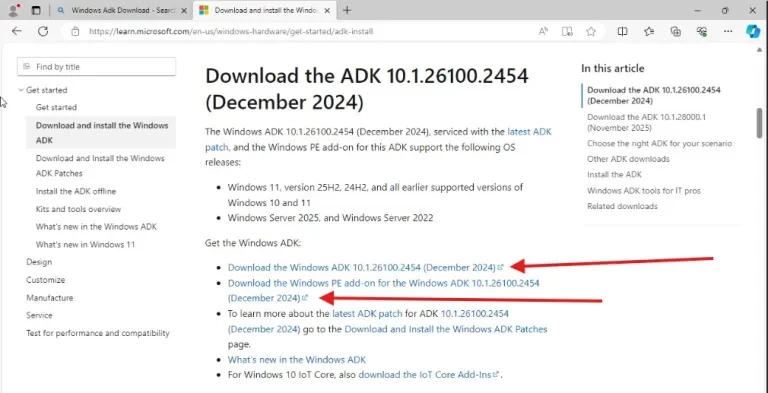
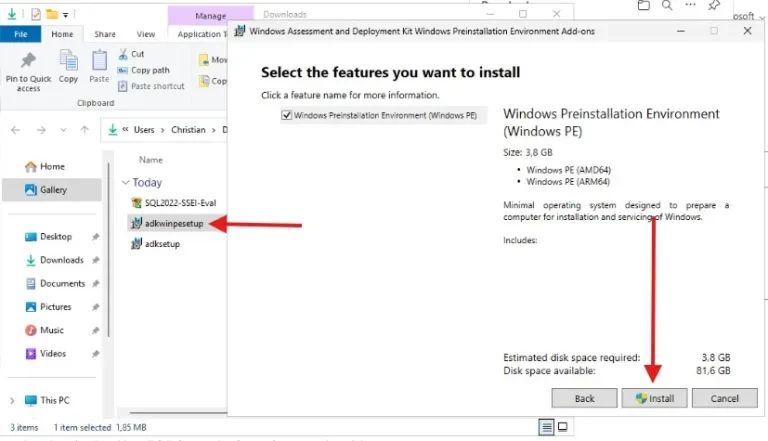
Windows ADK and WinPE
Windows ADK and the Windows PE add-on are required for preparing and customising Windows images for deployment. The ADK provides tools such as DISM, Windows System Image Manager, and deployment utilities that allow administrators to create, modify, service, and automate Windows installations.
Note: With these tools, organisations can build standardised, preconfigured images that include updates, drivers, roles, and applications, ensuring consistent and repeatable large-scale deployments across servers and virtual machines.
The Windows PE add-on is specifically needed for booting systems into a lightweight preinstallation environment during deployment. With System Centre Virtual Machine Manager, WinPE is used for bare-metal provisioning of physical Hyper-V hosts.
Note: For SCVMM, you only need the Deployment Tools
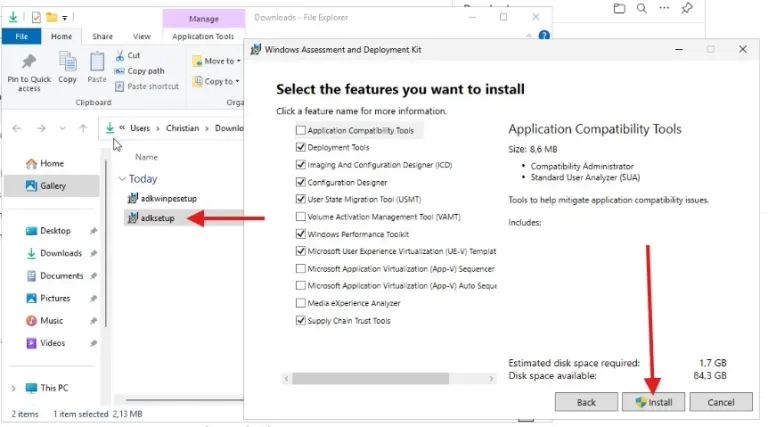
When the Windows ADK is complete, please install WinPE as shown below.
SQL Server 2022
I will install SQL Server 2022 until VMM supports SQL Server 2025. Then I will upgrade VMM to version 2025 and SQL Server 2025. We also discussed these steps below.
SQL Server 2022 entered mainstream support on November 16, 2022, during which Microsoft provides full feature updates, security/hotfixes, and free extended support transitions. Mainstream support ends January 11, 2028, shifting to extended support until January 11, 2033, focused mainly on security updates

If you are testing with an express edition. Note that Microsoft SQL Server 2022 Express is a powerful and reliable free data management system that delivers a rich and reliable data store for lightweight sites and applications. SQL Server 2022 Express can be downloaded from here.
Select the installation type as you wish. This can be custom and Express as shown below
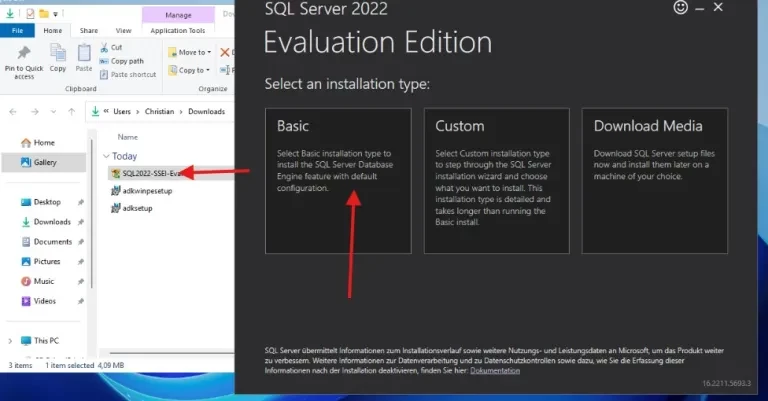
Here, I will discuss the custom installation method.
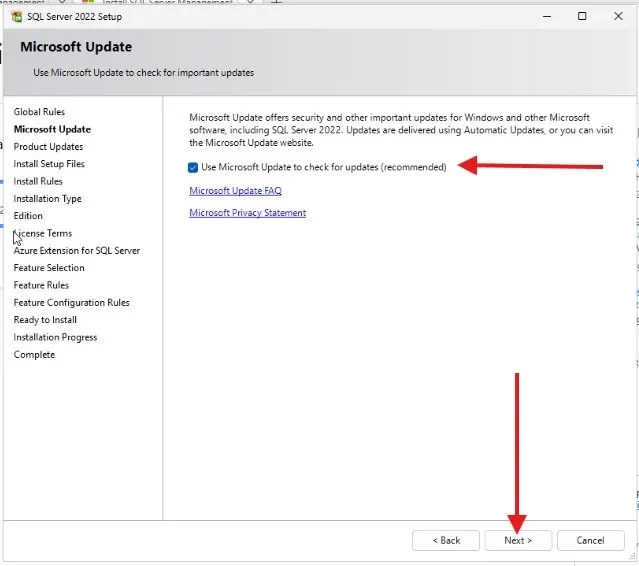
For the Microsoft update, ensure this is checked as recommended and click Next.
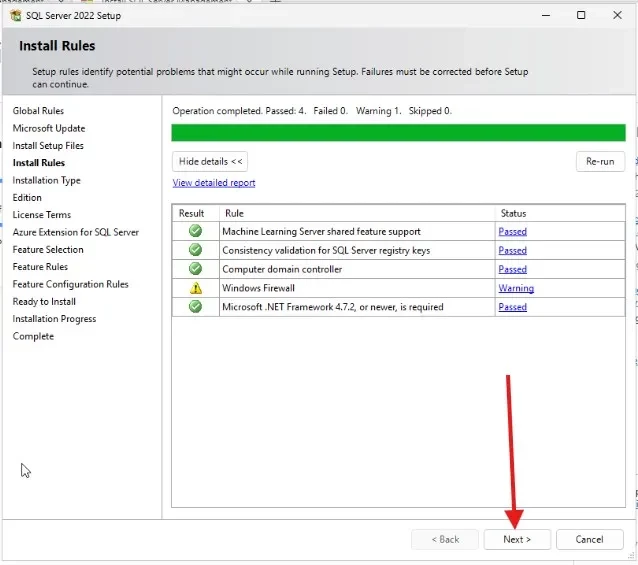
On the install rule, click on Next
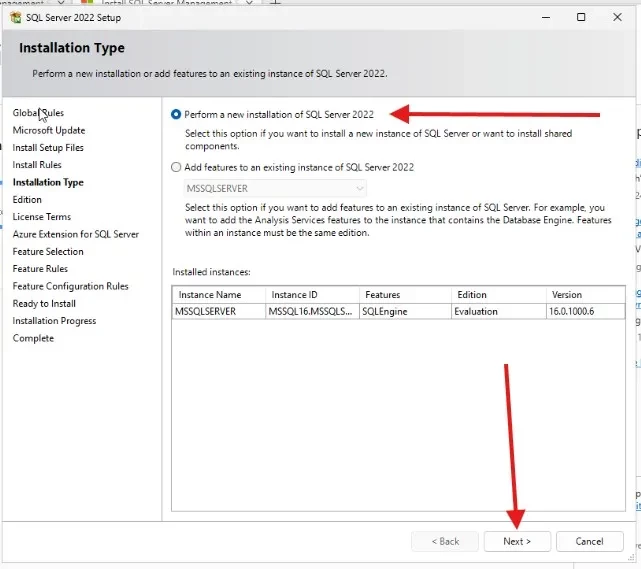
We will perform a new SQL installation
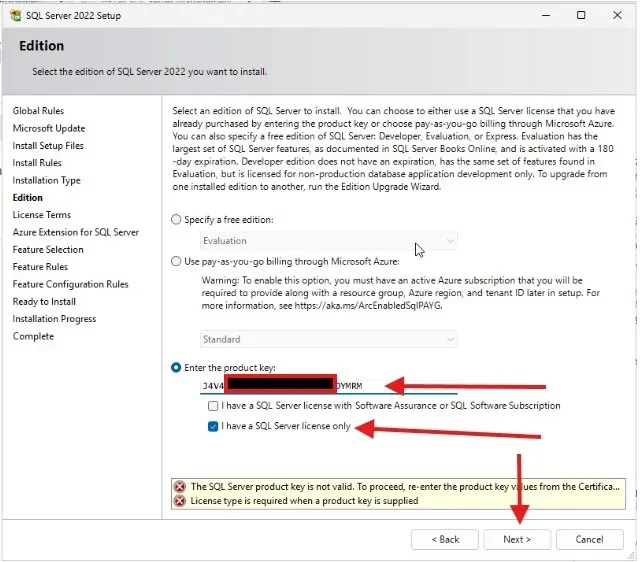
You can enter a product key or continue using the 180-day trial license for SQL Server 2022. The product key determines which edition of SQL Server the installer will deploy. Each edition unlocks specific features and capacity limits, such as:
- Standard
- Enterprise
- Datacenter
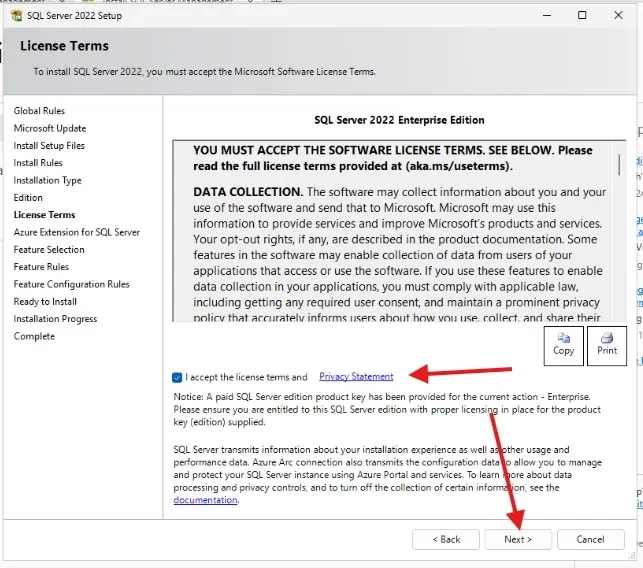
Accept the license
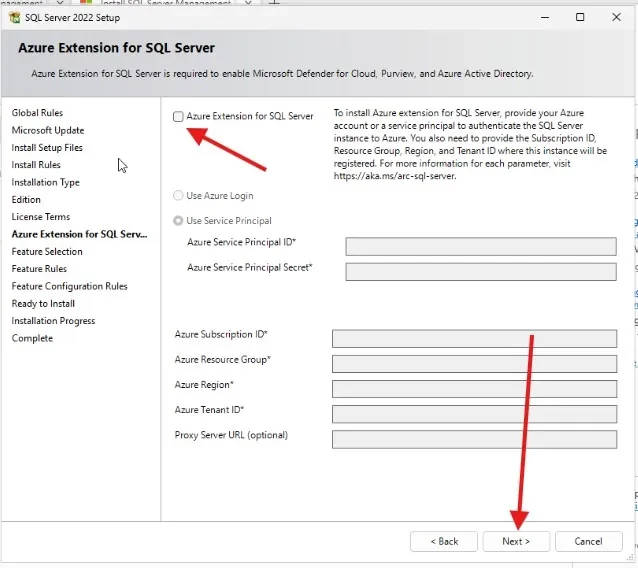
At this point, I am not interested in integrating with Azure services. I will uncheck this button and proceed with the next steps.
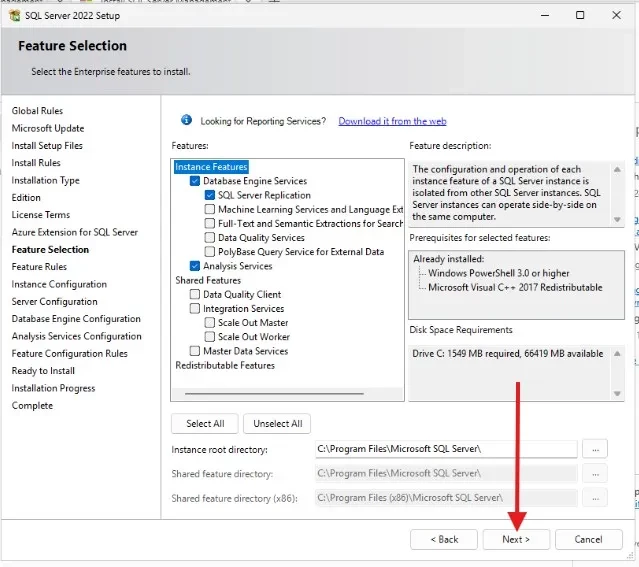
Feature selection
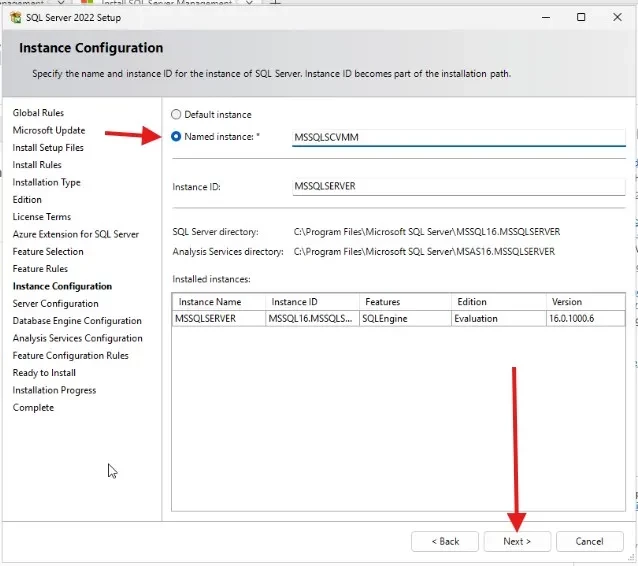
Specify a named instance as shown below and click next
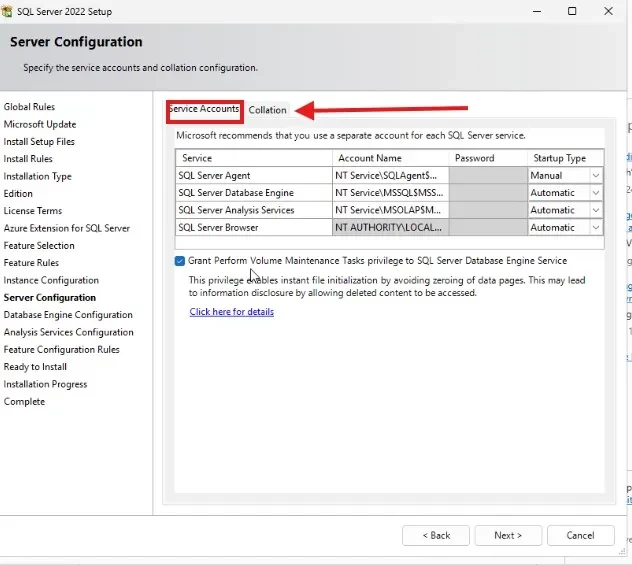
This is a lab and I am fine with the following service acocunts
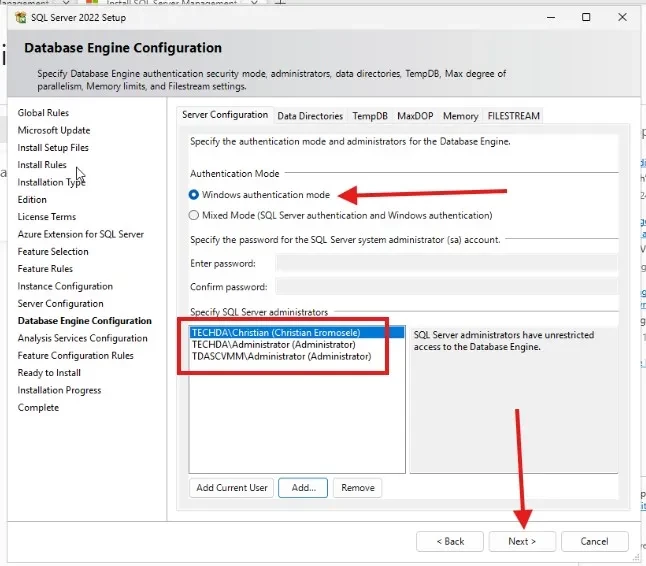
Will select the Windows Authentication Mode, and will add as many account I wish to have access to administer this SQL Server. Please see how to Change from SQL Server and Windows Authentication Mode to Windows authentication Mode.
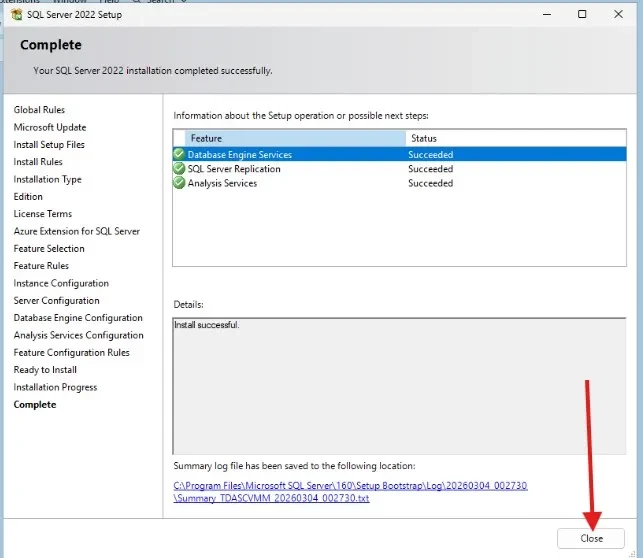
Installation succeeded
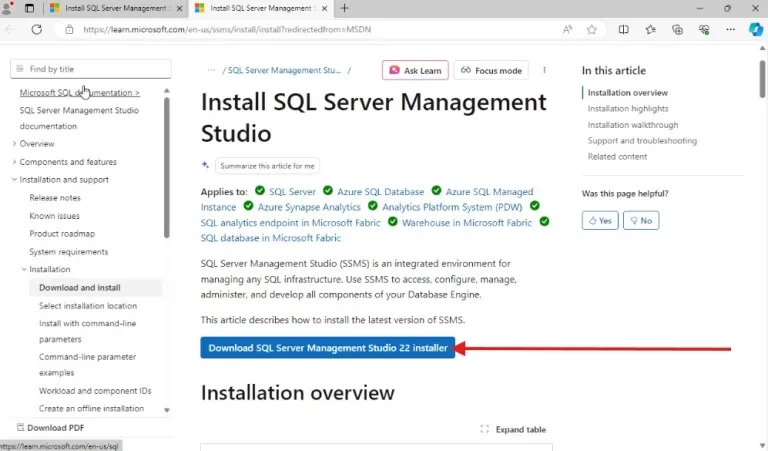
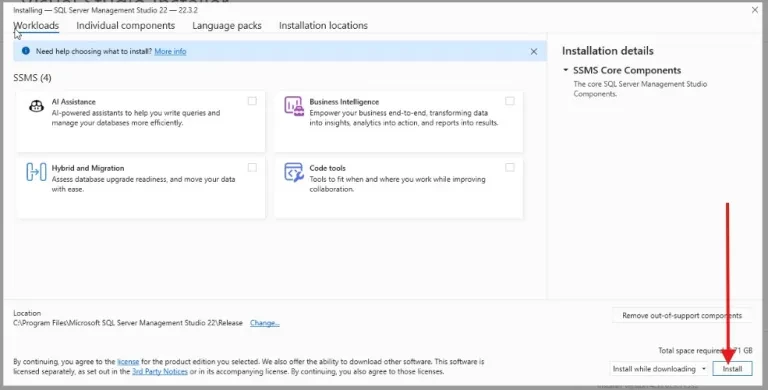
Install SSMS
Click on Download SQL Server Management Studio 22 Installer.
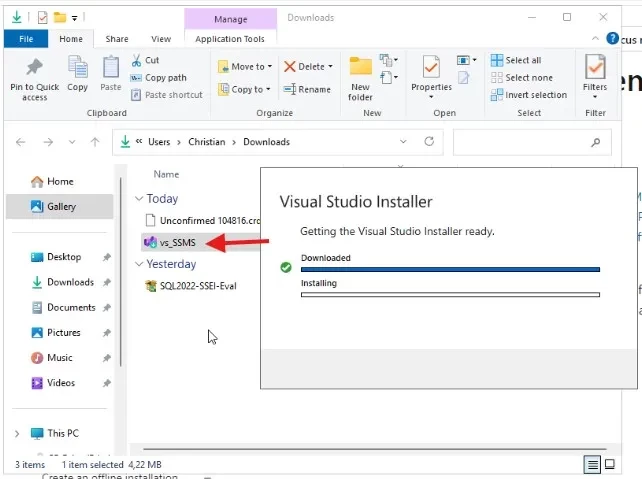
Upon download of SSMS 22, I will click to begin the installation. This will download and install Visual Studio as shown below.
Under the workload, click on install to install the SSMS Core Componnets
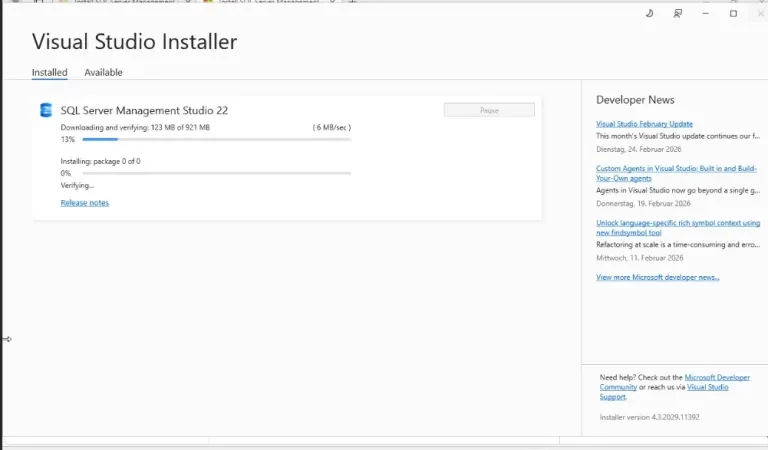
As you can see, SQL Server Management Studio 22 (SSMS) is being installed.
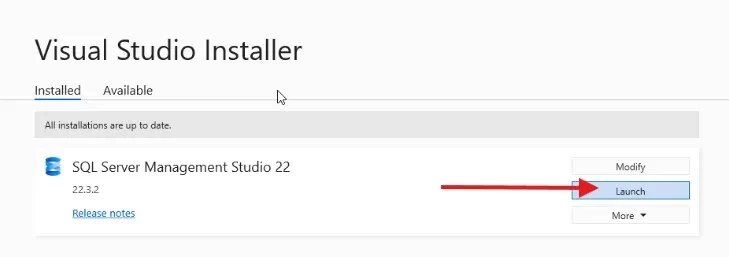
When complete, you can launch the SQL Server Management Studio 22 (SSMS) tool if you wish when the installation completes.
In a different guide, I will show you how to connect to SQL Server with a certificate.
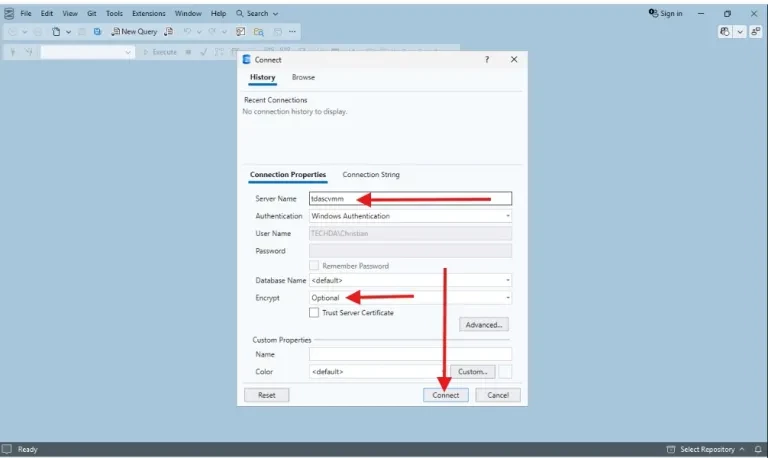
Connected to the SQL Server

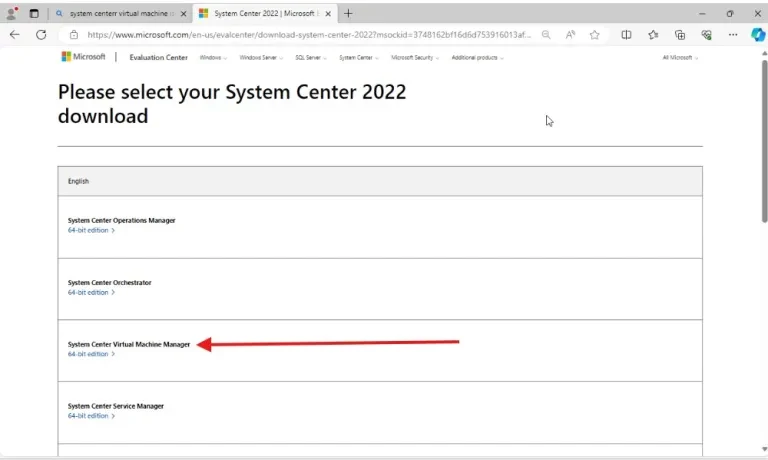
Download SCVMM
Now that we have met all the prerequisites, we will have to proceed with the download and installation of SCVMM (System Center Virtual Machine Manager).
Note: If you install SCVMM using a local or non-domain account, you must manually create a Service Principal Name (SPN) for the VMM service to enable proper Kerberos authentication and communication with Hyper-V hosts and other managed resources.
Note: According to Microsoft, If the account installing SCVMM does not have permission to register the Service Principal Name (SPN) in Active Directory, setup will complete with a warning. If the SPN isn’t registered, VMM consoles on other computers cannot connect to the management server and you won’t be able to deploy a Hyper‑V host to bare metal via VMM
You can download System Centre Virtual Machine Manager from here.
Note: Microsoft recommends verifying that the file isn’t corrupted after the download of the Zip file with the following checksum of the file
223CE90811799223DA635EC66F81302ECBB3AB4842C37002AC29B23D556F5AAF
To verify its authenticity, perform checksum validation on your computer by running the following PowerShell snippet below. When validation passes, you see True printed. If you see False printed, the downloaded file isn’t valid and you need to download it again.
$expectedChecksum = “ENTER_EXPECTED_HASH_HERE”
$zipFilePath = “ENTER_ZIP_Path\_.zip”
$expectedChecksum -eq (Get-FileHash -Path $zipFilePath -Algorithm SHA256).Hash
Install VMM
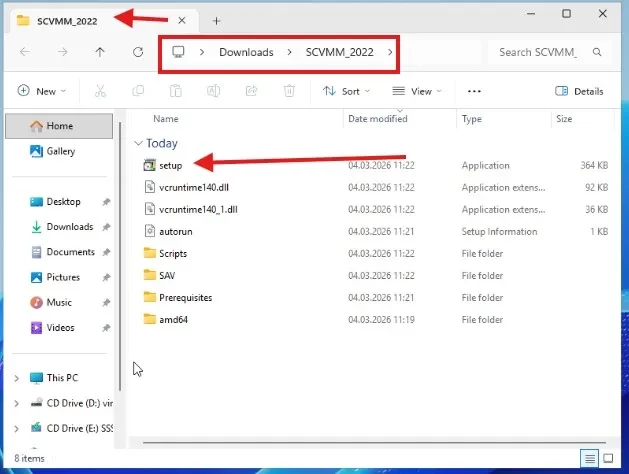
To install SCVMM, we will have to extract the downloaded archive as shown below.

Upon extraction, click on the setup file as shown below.
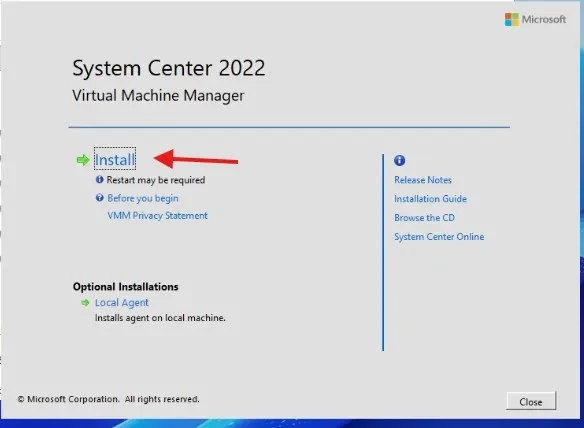
On the System center 2022 splash screen, click on Install.
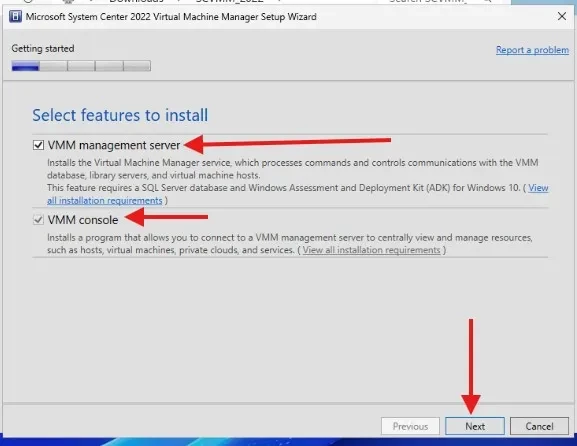
Select the VMM Management Server and the VMM Console and click Next
On the getting started page, please populate according to your Lab or organization need and click on Next.

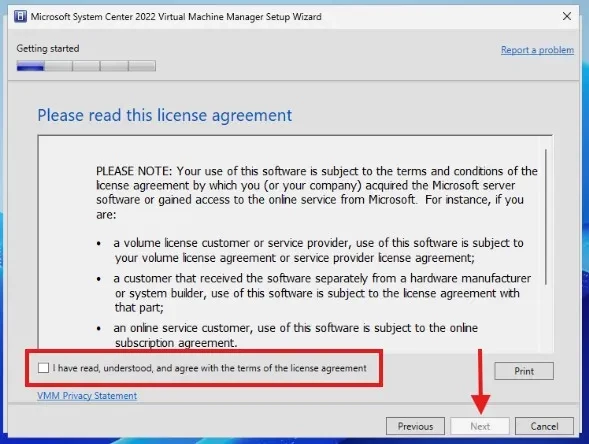
Accept the license terms
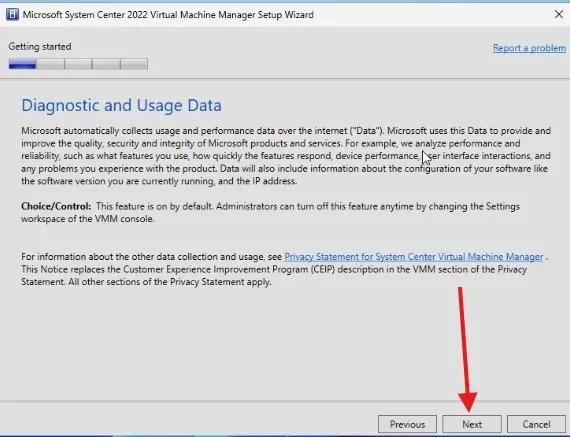
On the Diagnostic and Usage Dat, click on Next
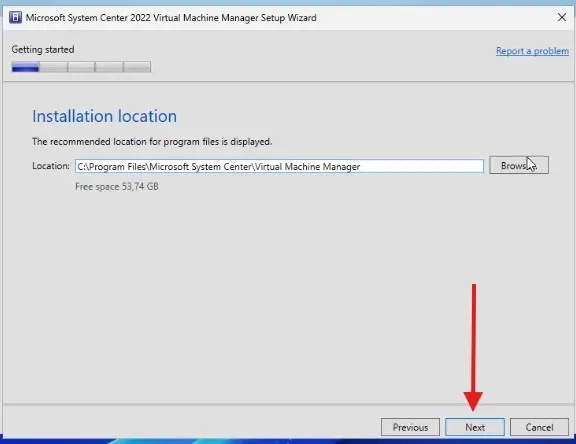
You can choose to change the installation location by using the browse button. But I am fine with the defaults as I have enough disk space.
For the database configuration, please specify the information such as the domain username and password and SQL instance, and click on Next

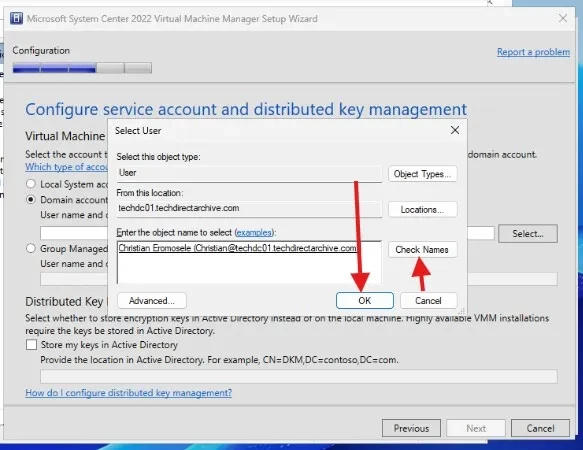
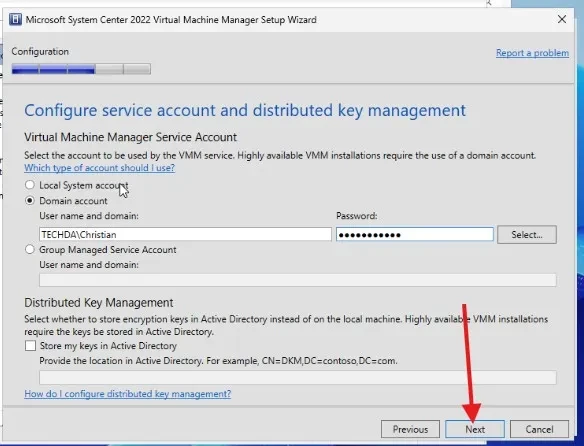
On the Configure Service Account and Distributed Key Management, I will select a domain account as well.
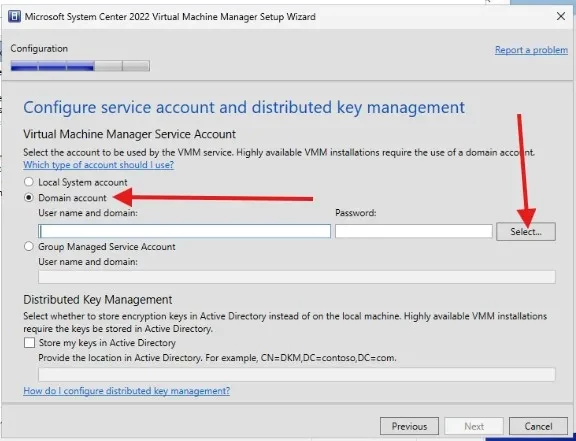
Note: Specify the account that the VMM service uses. You can’t change the identity of the VMM service account after installation.
Note: This is a lab environment and I do not care about having a dedicated service account for this. I will fix this in the future and create a blogpost for this. In order not to be prompted wit the “Error 10421: The specific user account cannot be the same as the VMM Service account”. Ensure a different account is used here as a service.
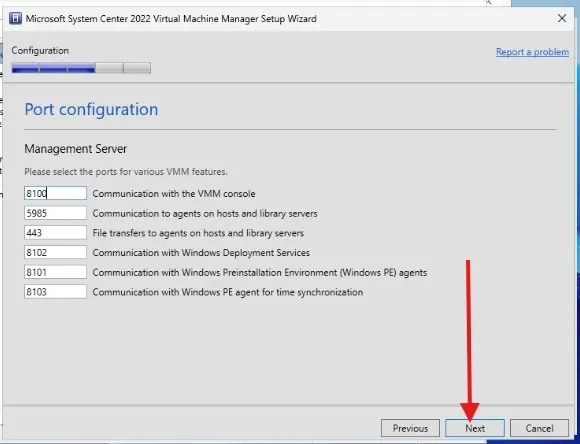
Regarding the Port configuration wizard. Use the default port number for each feature or provide a unique port number that’s appropriate in your environment.
Note: You can’t change the ports that you assign during the installation of a VMM management server unless you uninstall and then reinstall the VMM management server. Also, don’t configure any feature to use port 5986 because that port number is preassigned.
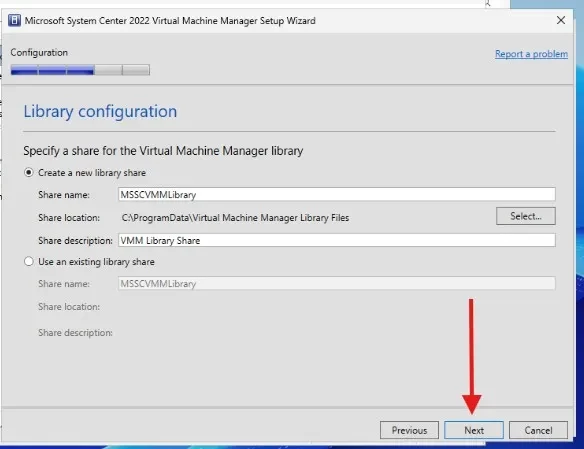
Select whether to create a new library share or to use an existing library share on the computer. The default library share that VMM creates is named MSSCVMMLibrary, and the folder is located at the location below
%SYSTEMDRIVE%\ProgramData\Virtual Machine Manager Library Files
ProgramData is a hidden folder, and you can’t remove it. After the VMM management server is installed, you can add library shares and library servers by using the VMM console or by using the VMM command shell. To proceed, click on Next
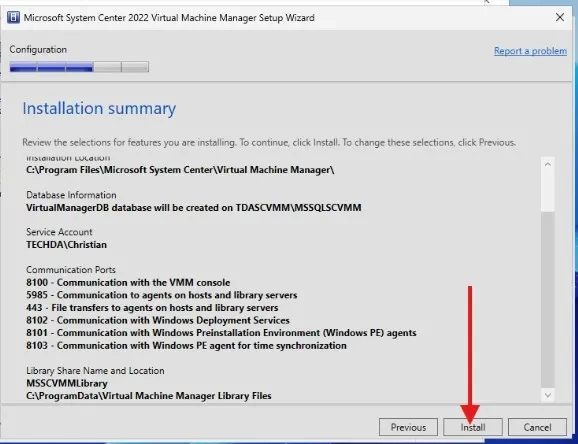
On the SCVMM installation summary, click on “Install”
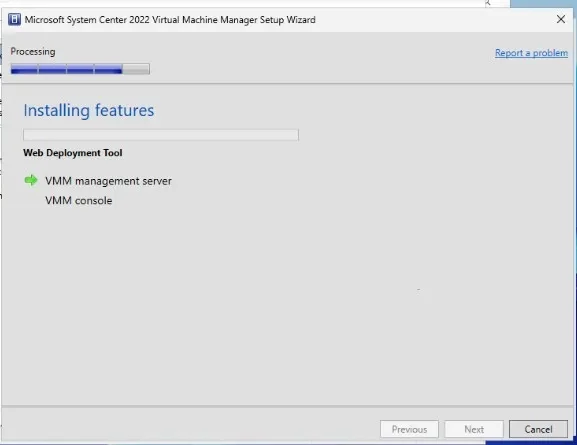
The installation is in progress.
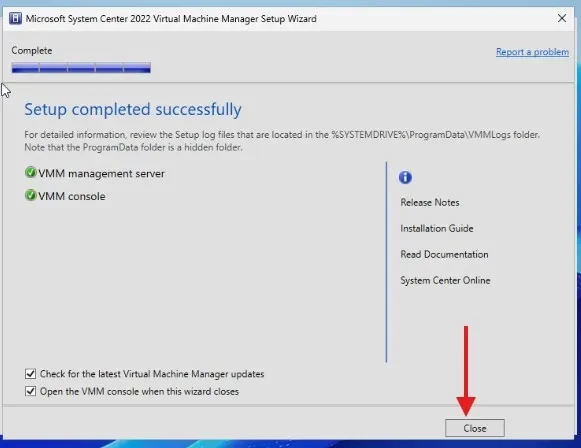
SCVMM has been installed correctly.
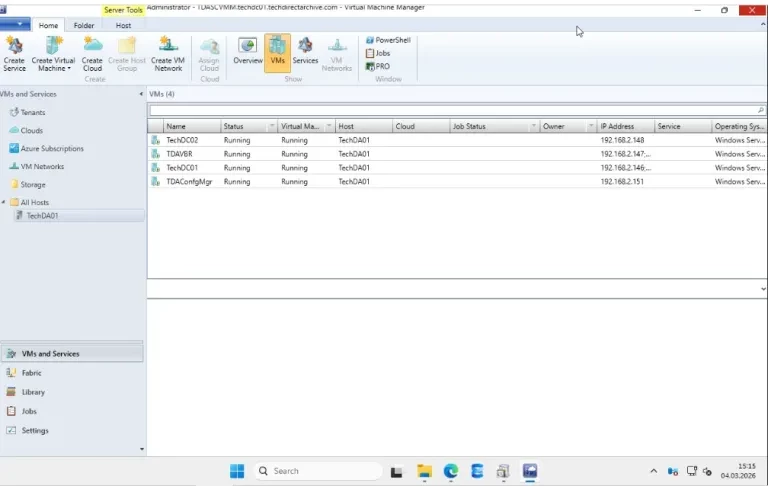
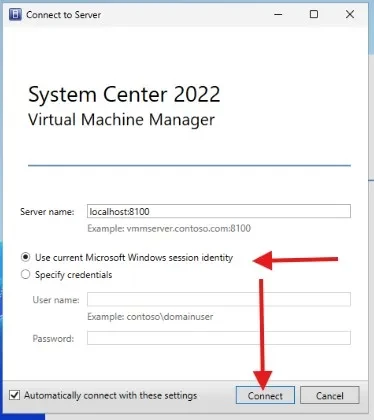
Connect to the VMM Server
On the VMM server, select the VMM console icon as shown below
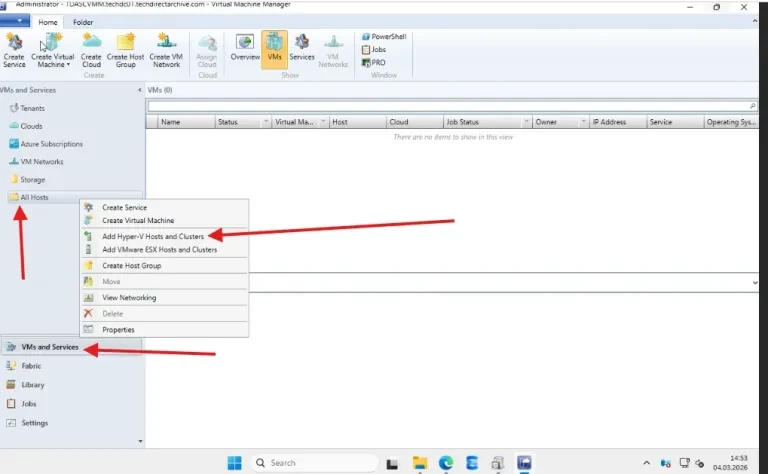
Add Hyper-V Host or Cluster to VMM
SCVMM hosts can be added via either Fabric (Servers > All Hosts) or VMs and Services (All Hosts). Both fully functional since they install the same VMM agent and add to the same management database.
Via the Fabric
Note: Fabric is preferred for complete infrastructure management (storage discovery, logical networks, patching orchestration); VMs/Services offers quick VM-focused access. Either works because the underlying host object is identical across views
This section discusses the steps to add an existing Windows Server as a Hyper-V host server or cluster to the System Center Virtual Machine Manager (VMM) fabric. In the VMM console, open Fabric > Servers.
- Select Add group > Add Resources > Hyper-V hosts and Clusters.
- In the Add Resource Wizard > Resource location, select where the server you want to add is located
Please, follow the steps or the method discussed under the VM and Services section as they are the same.
Via the VM and Services
To do this via the VM and Services, right click on All Hosts and select “Add Hyper-V and Clusters”.
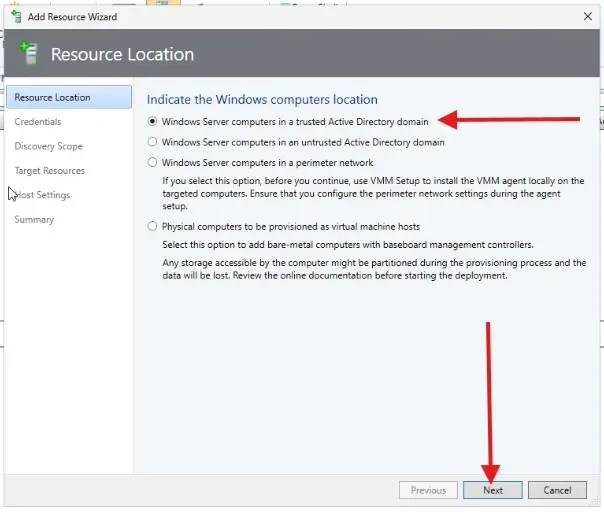
In the resource location, select “Windows Server Computers in a Trusted Directory domain” and click Next.
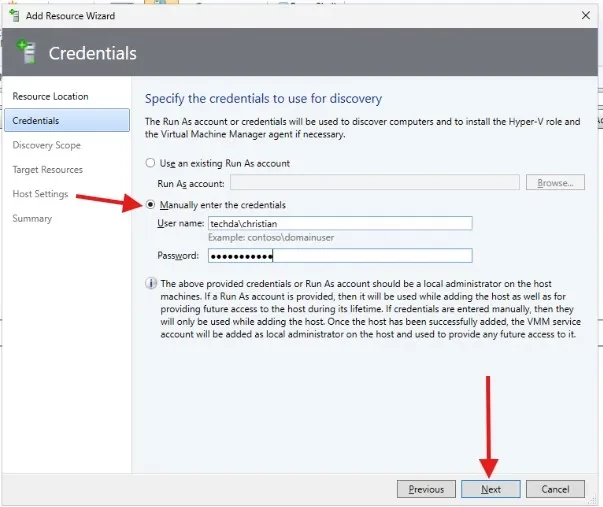
Specify credentials for a domain account that has administrative permissions on all hosts that you want to add
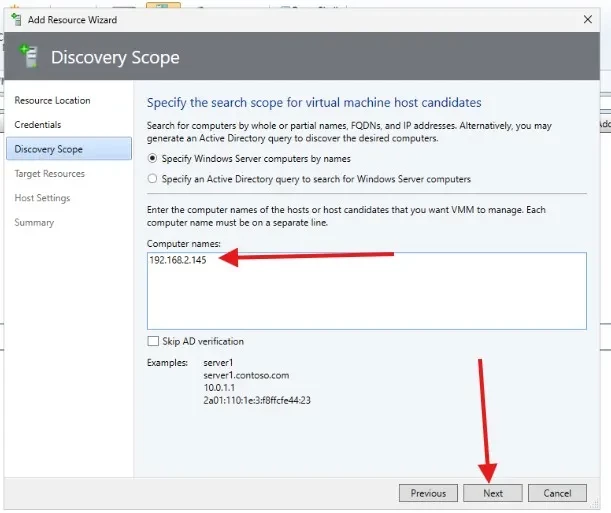
Specify Windows Server computers by names, in Computer names enter names or IP addresses, one per line. If you’re adding a Hyper-V host cluster, specify the name or IP address of the cluster or of any cluster node.
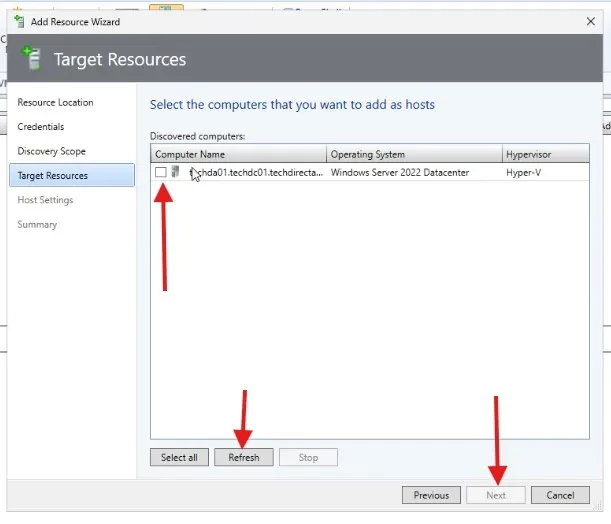
On the Target resources, specify the computers you want to add. Repeat for all hosts. If discovery succeeds, the host will be listed under Computer name as shown below.
For Trusted domain or disjointed namespace, elect the checkbox next to each computer that you want to add, and select Next. If you specified a cluster name or cluster node in the previous step, select the checkbox next to the cluster name. But for untrusted domain, enter the FQDN or IP address of the server or cluster that you want to add. For workgroup devices, enter the NETBIOS name or IP address of the host in the perimeter network.
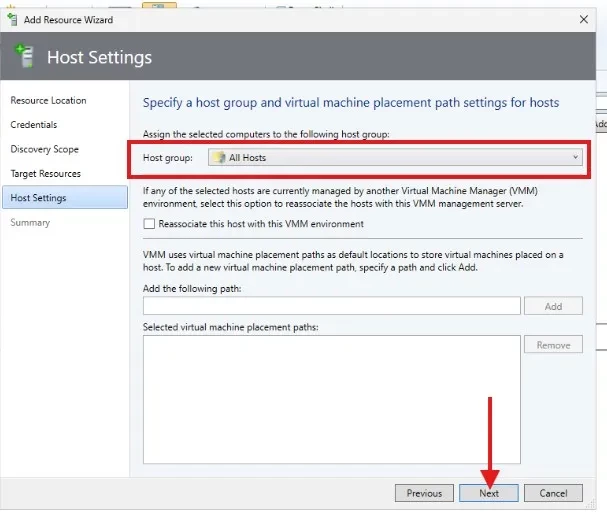
In the Host Settings, I am fine with the default and will not check the “Reassociate this host with this VMM environment” because it has not been associated with any other VMM Server previously.
On the Summary page, confirm the settings, and select Finish. The Jobs dialog appears to show the job status. Wait for a Completed status. Verify that the host or cluster was added in the host group > host or cluster name. The status must be OK.
Note: Once the host has been successfully added, the VMM service account will be added as local administrator on the host and used to provide any future access to it.

As you can see, the Hosts and VMs are well discovered in VMM. In the ext guide, we will integrate SCVMM with VRO a