

The Veeam Plug-in for Microsoft SQL natively integrates with Microsoft SQL Server Management Studio. It transfers database and transaction logs to backup repositories associated with Veeam Backup & Replication.
Compared to image-level backups created by Veeam Backup & Replication, Veeam plug-ins can offer more flexible scenarios for database backup.
This plug-in’s users can backup and restore individual Microsoft SQL Server databases and configure independent backup scheduling for full, differential, and log backups using the native SQL Agent Job functionality.
Some highlights about the Veeam Plug-in for Microsoft SQL:
- SQL administrators have complete control over backup and recovery processes;
- User interface (UI) integrated directly into Microsoft SQL Server Management Studio;
- Scalability and performance: up to 2,000 databases per SQL server and up to 10,000 databases per backup server;
- Possibility to perform database backups without waiting for the image-based backup (backup of the entire appliance/VM);
- Support for SQL Always-ON;
- Support making a copy of SQL backups to secondary repositories.
How does it work?
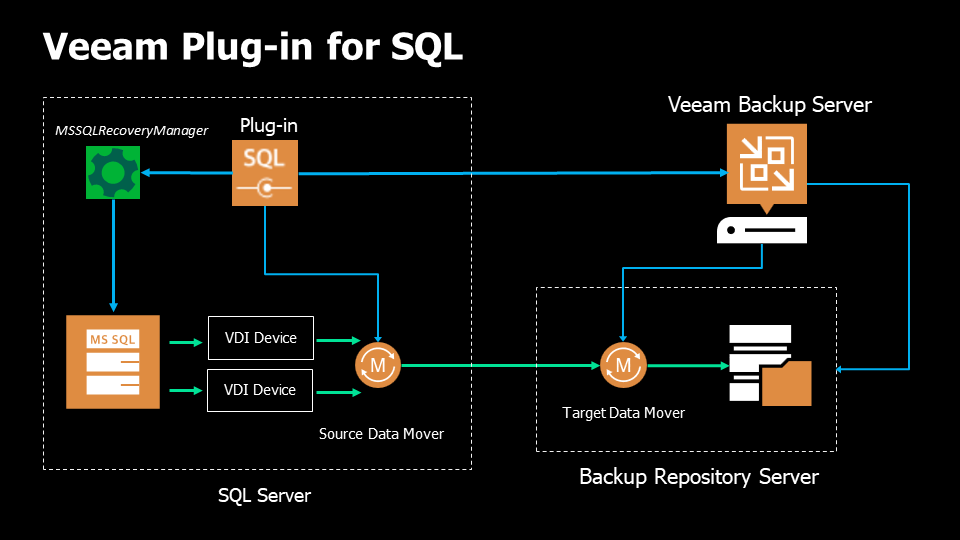
1. When the backup process starts for the first time, the plug-in connects to the Veeam Backup & Replication server and creates the backup job.
2. At the beginning of the backup process (either by schedule or manually), the Veeam Plug-in “MSSQLRecoveryManager” service instructs Microsoft SQL Server to back up a database.
3. The “MSSQLRecoveryManager” service starts the source Veeam Data Mover on the SQL server, and the VBR Veeam Backup Manager starts the target Veeam Data Mover in the Veeam backup repository.
4. Microsoft SQL Server starts the database backup process directed to a VDI device, a virtual device that acts as a backup repository. A dedicated VDI device is created for each database. The number of VDI devices also depends on the number of parallel data streams you specify when configuring the backup settings.
5. The source Veeam Data Mover reads the backup data from the VDI devices and transfers it to the destination Veeam Data Mover.
6. The target Veeam Data Mover writes the backup data to the backup repository
How are VDI devices created?
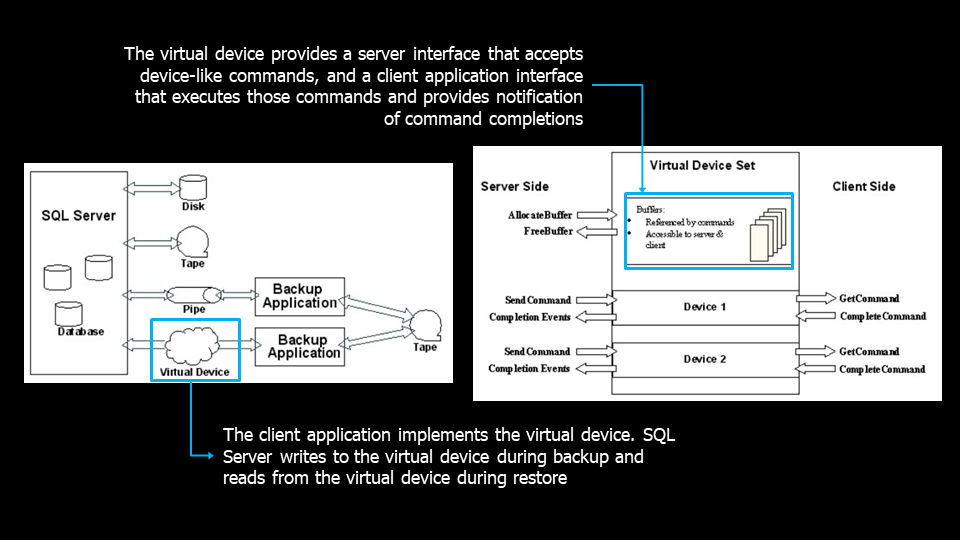
The client application always creates the VDI Devices. In this case, the Veeam plug-in.
A VDI device acts as an intermediary between SQL Server and the Veeam platform; SQL writes the backups to the VDI device, and at the time of restoration, the data is read from it.
Furthermore, it is responsible for intermediating the exchange of commands, using a buffer, between SQL Server and the client application.
To access the technical specification for Microsoft SQL Server Virtual Backup Device, click on the link below:
https://documentation.help/MS-SQL-Server-Virtual-Backup/documentation.pdf
Architecture
The architecture is the same as that used by other Veeam plug-ins.
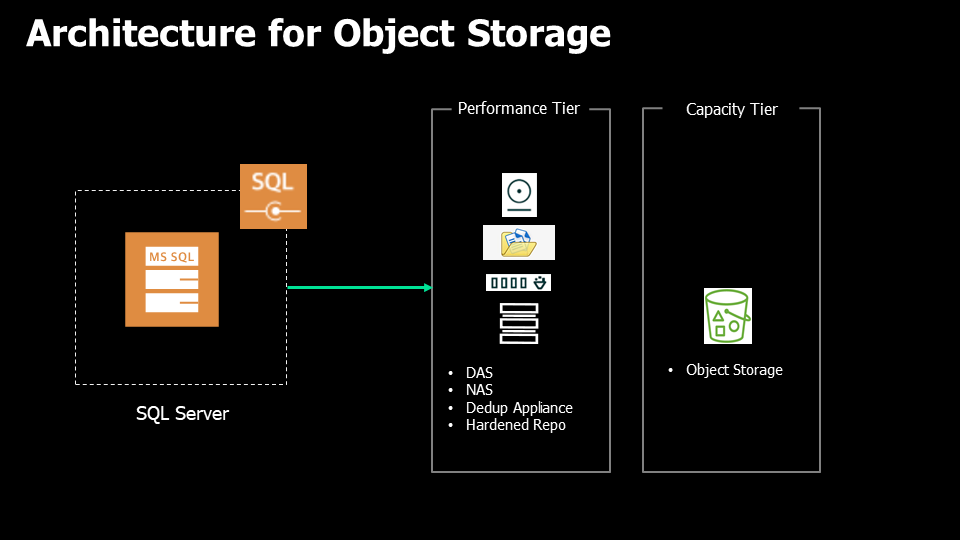
One point of attention is that, at this time, it is not possible to perform a backup job directly to an Object Storage. To get around this, it is possible to implement a Scale-out Backup Repository structure as follows:
Performance Tier:
- Microsoft Windows Server
- Linux Server
- SMB (CIFS) Share
- NFS File Share
- Dell Data Domain with Data Domain Boost (DDBoost)
- HPE StoreOnce
- Exagrid
- Hardened Repository
Capacity Tier:
- Object Storage
Installation and use
The following videos demonstrate installation and use in a laboratory environment and can be reproduced anywhere.
https://helpcenter.veeam.com/docs/backup/plugins/mssql_plugin.html?ver=120
Step 1: Backup Repository Permissions
You must ensure that the Plug-in has access to the desired backup repository.
Step 2: Plug-in Installation on SQL Server
For installation, follow the procedure below:
Step 3: Management Studio and Backup Procedures
In this example, the following software was used:
• SQL Server 2022 Evaluation Edition
• SSMS version 19.1
• AdventureWorks 2022 Database.
Attention: the database recovery mode must be FULL, in order to enable the transaction logs to be backed up:
The following procedure performs a first full database backup and creates a SQL Server Agent. Through this, we define the schedule for the automatic backup job.
It will also be from there that, when necessary, we will manually start full backup jobs.
Step 4: Checking files and jobs in VBR
The next step is to repeat the differential and transaction log backup procedure. We can see that we have a dedicated folder for the plugin's jobs. Additionally, we have server backup at the image level.
Thus, we can restore only the desired information from the database, through the plug-in backups, or restore the entire server from the image backup.
Step 5: Differential and Transaction Logs Backup
The next step is to repeat the procedure for differential and transaction log backups.
Step 6: Creating transactions in the database
The queries below are used to create transactions in the AdventureWorks 2022 database.
Query to insert a name into the “Person” table:
SET IMPLICIT_TRANSACTIONS ON
use AdventureWorks2022
INSERT INTO [Person].[Person]
([BusinessEntityID], [FirstName], [MiddleName], [LastName], [PersonType])
VALUES
(20780, 'Luiz', 'E', 'Serrano', 'SC')
GO
Insert into person.BusinessEntity(rowguid)
Values (newid())
SAVE TRANSACTION InsertStatement
select * from person.BusinessEntity
select * from person.Person
COMMIT TRANSACTION
* Each time a name is entered, increment the Business ID by 1 – starting at 20780 – to avoid errors
Query to read Business IDs and names:
use AdventureWorks2022
select BusinessEntityID, FirstName, LastName from [Person].[Person]
WHERE FirstName = 'Luiz' AND LastName ='Serrano'
Below is the video with the steps for this procedure:
Step 7: Point-in-time Recovery
In the video below we recover an immediately previous transaction (based on transaction logs), using the plug-in's point-in-time recovery functionality.
I hope this post was helpfuk! Thanks!


