First of all : Wishing you a happy new year with the hope that you will have many blessings in the year to come.
1. Objective
The objective of this deep dive is to detail the steps to follow to activate the Inline Malwares Detection feature.
2. Introduction
2.1 Description of Inline Malwares Detection
Veeam Backup & Replication 12.1 introduces a new security feature called “Encryption Detection”. It is an online entropy analysis that uses artificial intelligence and machine learning (AI/ML) to detect previously unencrypted data that becomes encrypted in processed disk images.
This allows for the detection of a potential ransomware attack. “Inline Entropy” analyzes data on the fly during backups.
Veeam is not intended to replace detection tools (EDR/XDR, Antivirus) that must be installed and configured on production environments, but rather complements them to facilitate forensic analysis and determine healthy backup points.
Detecting data encryption as quickly as possible is a key element in your protection against ransomware. Online entropy analysis as well as suspicious activity detection features are of great help in combating ransomware and ensuring that you are not backing up systems that are already partially corrupted.
2.1.1 Malware Detection Events
- Files encrypted by malware: Online analysis triggers a malware detection event if the encrypted data exceeds predefined analysis sensitivity limits.
Text artifacts created by malware:
- Detection of V3 onion addresses (56 symbols in the format [a-z2-7]{56}.onion) and ransomware notes triggers a malware detection event, providing a proactive defense mechanism against potential threats.
- A malware detection event will be created if at least one ransomware note is found (Clop, Medusa)
3. Activation and Configuration
Note: An Enterprise Plus or Veeam Universal License (VUL) is required.
By default, online analysis is disabled in Veeam Backup & Replication 12.1, given its potential resource consumption. Users wishing to take advantage of this feature should evaluate their system resources accordingly. 25 to 30% additional CPU load per proxy.
3.1 Support Compatibility and Limitations
This feature can be used to analyze backups of:
- VMware virtual machines, including VMware Cloud Director virtual machines
- Hyper-V virtual machines
- Machines with Veeam Agent for Microsoft Windows in managed mode (volume-level backup only)
Supported file systems include NTFS, ext4, ext3, and ext2.
Text artifacts are detected only if the following conditions are met:
- The file system block size is 4 KB.
- The text file size is not less than 4 KB.
- The text file has UTF-8 encoding.
- The text file is not stored in the Master File Table (MFT).
- Dynamic disks and BitLocker-encrypted disks are not supported.
3.2 How it Works?
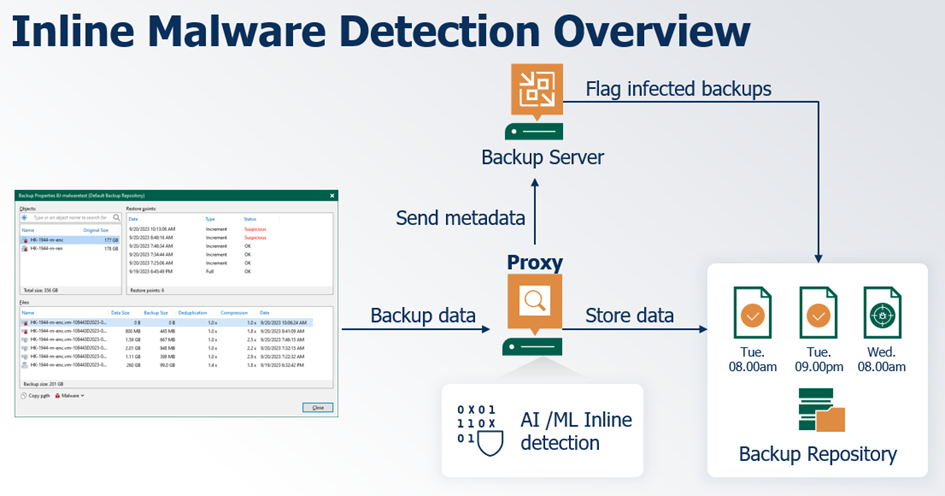
- Data analysis during backup: Veeam Backup & Replication analyzes metadata of data blocks during backup task, recording ransomware data in a temporary folder on the backup proxy.
- Data Storage: A RIDX file is created for each disk and contains the following information: o Disk metadata (disk name, creation time, disk size, used size, sector size, partition table)
o Ransomware data for each data block (amount of encrypted data, abnormal file type magic numbers, onion addresses, and ransomware notes) - Finalizing the backup: After the backup task, ransomware data is transferred to the VBRCatalog folder on the backup server. The Veeam Guest Catalog Service informs the Veeam Data Analyzer service of new data requiring analysis.
- Launching the analysis: The Veeam Data Analyzer service checks the results of the last analysis in the RansomwareIndexAnalyzeState.xml file located in the VBRCatalog folder and starts a new analysis session. The Veeam Data Analyzer service compares the latest and previous RIDX files and updates the RansomwareIndexAnalyzeState.xml file. If malware activity is detected, the service will create a malware detection event and mark the objects as suspicious. Note: Malware metadata in the VBR catalog is relatively small. Less than 1 MB for 1 million files.
3.3 Inline Scan Configuration
The setup is relatively simple:
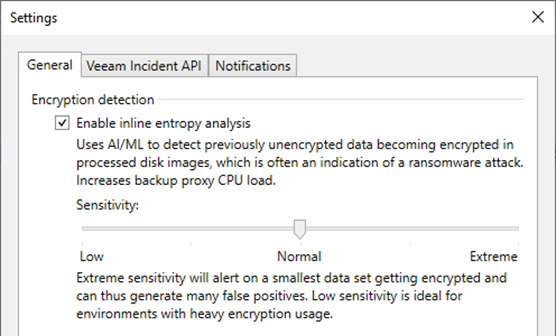
- In the main menu, select Malware Detection > General
- In the Encryption detection field, check the Enable inline entropy analysis box
- Specify the analysis sensitivity according to your backup data and infrastructure capabilities. The default value is Normal. There are 5 levels.
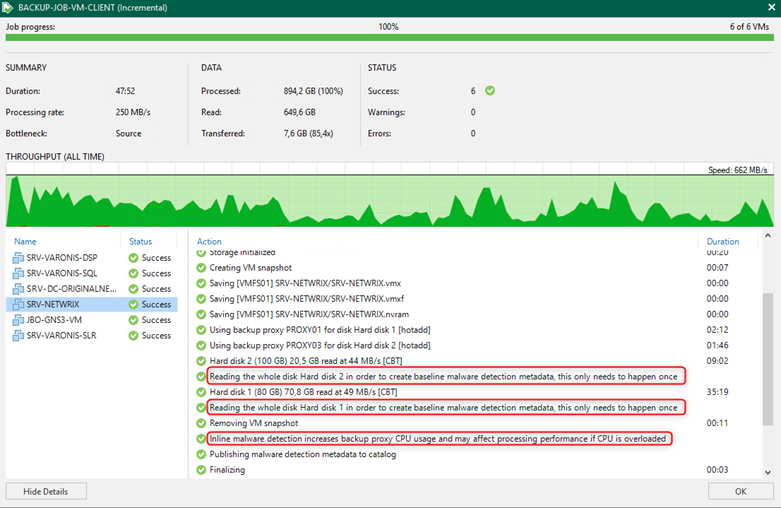
- Once validated, a pop-up mentions that activation requires a complete read of the disks to establish the reference, the backup window will therefore be larger. This will only be done the first time or when adding a new disk to a machine.
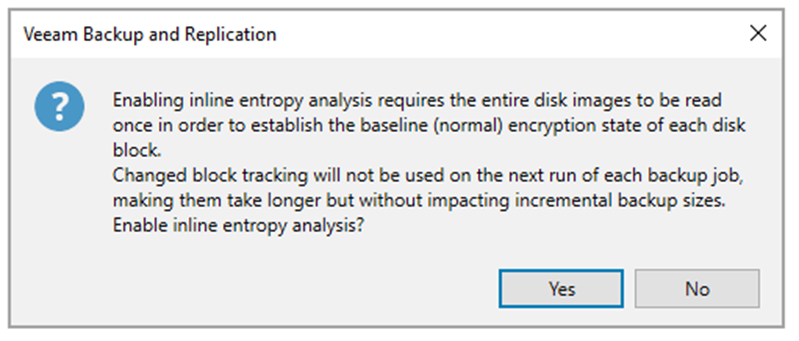
Attention: activating this feature activates it for all backup jobs. In case of an important production environment and to avoid an overload due to a complete read of the disks, it is possible to exclude machines from the scan.
Workaround: add all machines to malware exclusions and remove (a few) hundreds per day.

-
In Powershell
• Add-VBRMalwareDetectionExclusion
• Get-VBRMalwareDetectionExclusion
• Set-VBRMalwareDetectionExclusion
• Remove-VBRMalwareDetectionExclusion
3.4 Results
Once activated, a new line appears in the backup job logs:
During the next backup, only the catalog is sent for comparison.

To test the detection, we will encrypt a backed-up VM (using "Wanacry").
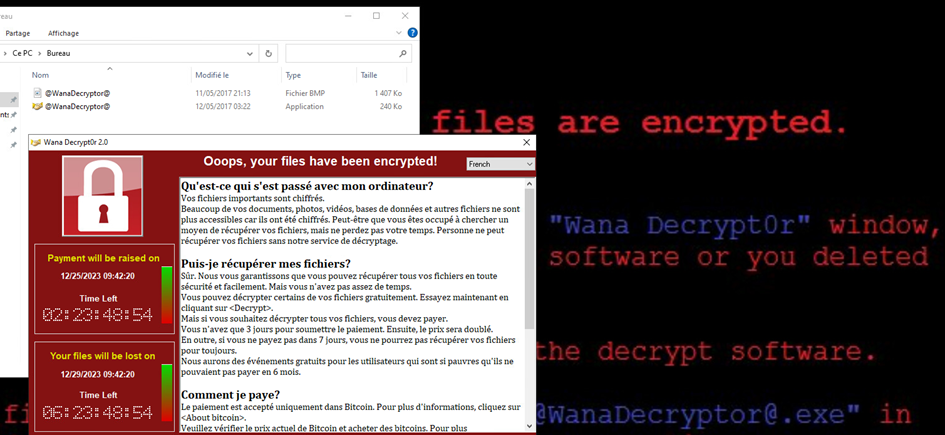
Once the VM is encrypted, launch a new backup. The catalog data is compared and Veeam raises a warning.
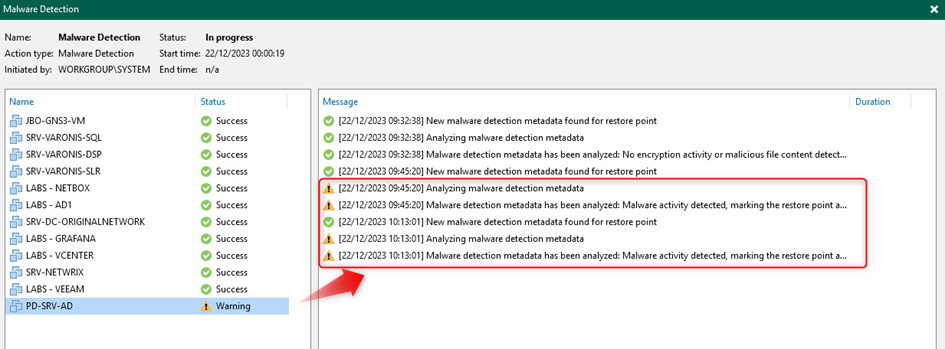
Once the backup is complete, if notifications are configured, an email is sent, otherwise you can find the information at several levels:
In the “Malware Events” view in the history
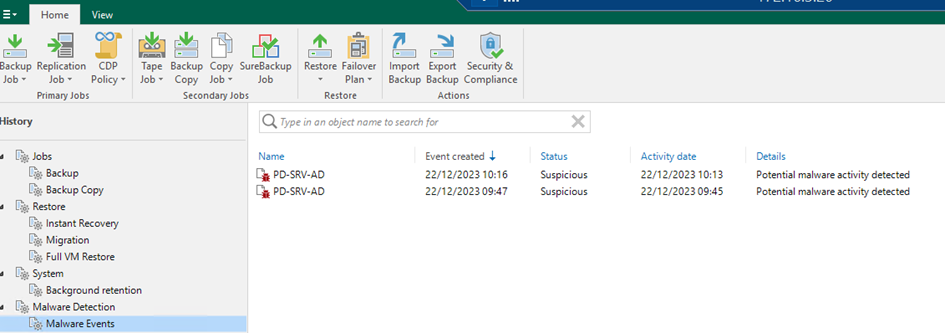
You can obtain details on the event
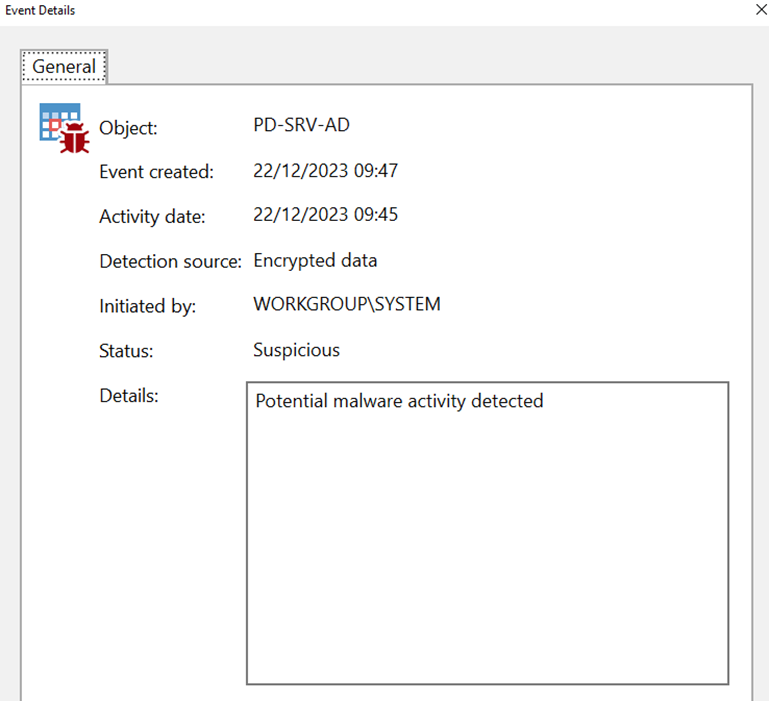
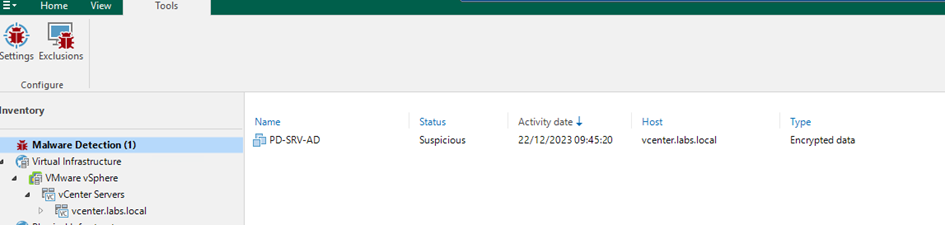
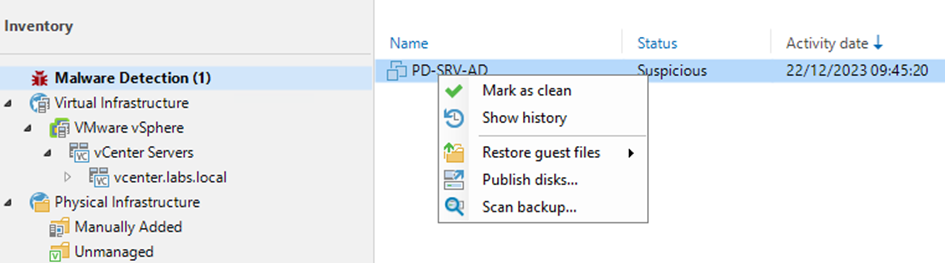
In Inventory, in the “Malware Detection” tab, you have the complete list of VMs with an alert.
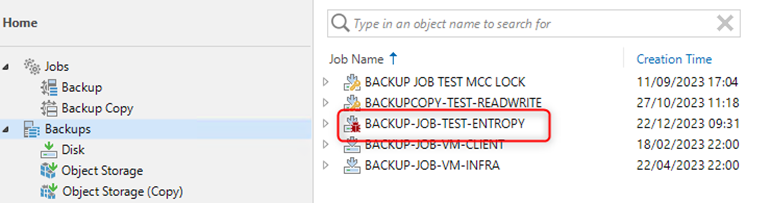
In the Backups view, a job with a potentially infected machine is easily identifiable using a logo.
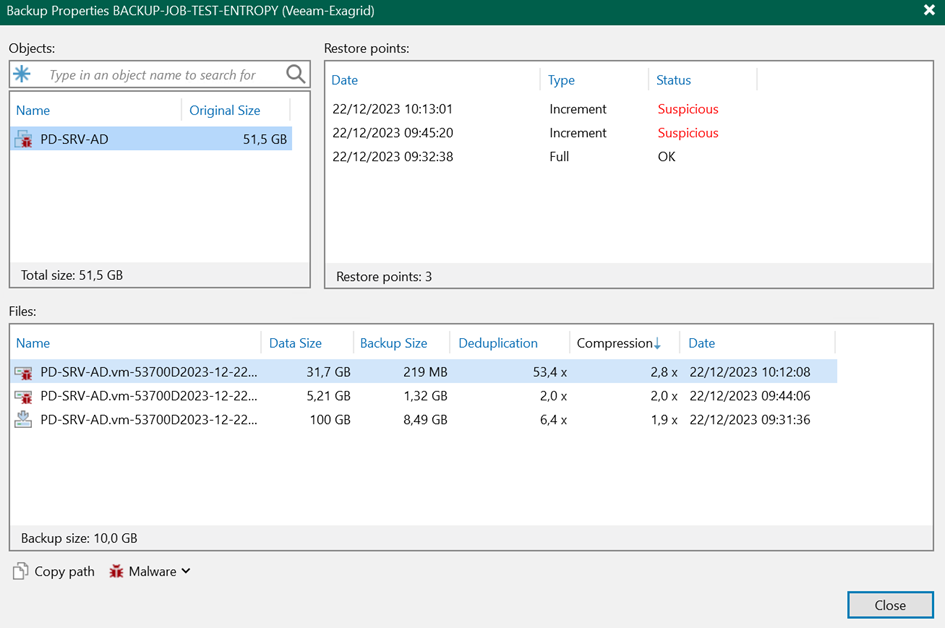
If you look at the details, you can see all the backup points that have an anomaly or not.
4. Manage the status of malware alarms
4.1 Mark machine as “clean”
All machines marked by malware detection as suspicious or infected can be found in the Inventory view in the Malware Detection tab. If you have cleaned the machine of malware or if the malware detection event was a false positive, you can mark the machine as clean.
Specify a reason. In case of false positives, it is possible to mark all the points in the chain as clean by checking the box “Mark restore points affected by corresponding detection events as clean”.
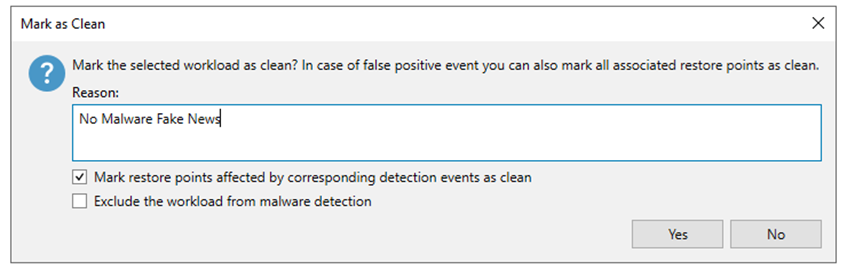
It is also possible to exclude the machine from future scans if necessary by checking “Exclude the workload from malware detection”. The machines will be added to the exclusion list.
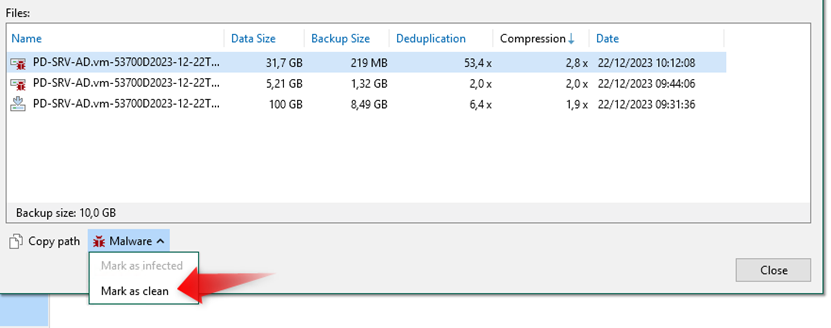
4.2 Managing Malware Status of Specific Restore Points
To manage the state for specific restore points, if you know that a specific machine is infected but the malware detection analysis has not detected any suspicious activity, you can manually modify the malware state of the specific restore point. Go to the “Home” view and then the “Backup” tab. In the properties of a job, select the point in question and right-click or use the drop-down menu with the “Mark as infected” option.
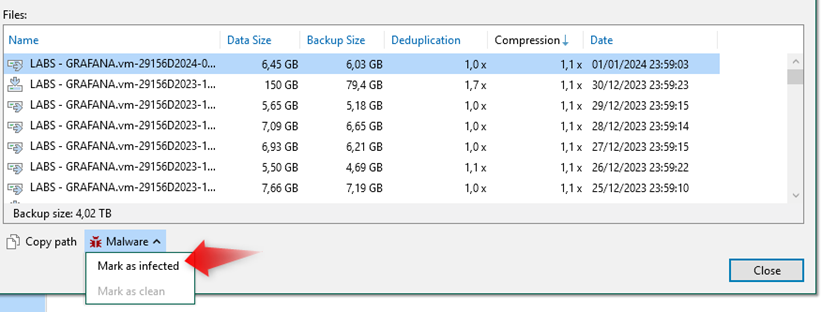
Conversely, if a point has been marked but it is a false positive, it is possible to mark it as clean by choosing “Mark as clean”