Background
With the release of VB365 v8, several awesome features (NATs, Proxy Pools, PostgreSQL cache DB, etc) were added to the product that add performance benefits and high availability for VB365 Proxy deployments. These features open the door to some possible proxy automations. The main benefit that came to mind and started this project is about efficiency and minimizing costs for deployments in the cloud. This has been a multi-part project that I hope will start the ball rolling for some even greater community projects to fully take advantage of these capabilities.
The focus of this “Part 3” of the project is to automate VB365 proxies in AWS EC2. If you have followed along for Part 1 or Part 2 of this project, most things will be repeated except for the parts that specifically pertain to AWS. You can review the previous posts for VMware and Azure proxy automations here:
How the Proxy Automation works
Since there is no pre or post job options in VB365, the script is designed to run at intervals and check for running job sessions. If a running job session if identified, the proxy automations will launch and the script will then monitor the running session waiting for its completion. The proxy automation tasks are launched as background PowerShell jobs so that we can process multiple proxies in parallel. When the running job session is completed the script will run a check again for a timeout period to make sure that we do not stop the proxies if another job is running or starts within the timeout period. Then we will revert the proxy changes by applying maintenance mode and powering off any proxies that we designate to automate.
Since we are using AWS EC2 proxies, the script uses AWS Tools for PowerShell to check and modify the VM powerstates.
Script logic flow
Start
- Initialize Parameters
- Define script variables: check time, buffer time, output file path, proxy pool name, and proxy VM information.
- Check for Running VBO Job Sessions
- Use GetVBOSession to check for running sessions within the specified CheckTime.
- If Running Job Found:
- Start VBO proxies if needed (using StartVBOProxies).
- Monitor the VBO job session until completion (using MonitorVBOSession).
- If No Running Job Found:
- Check VBO proxy states (using CheckVBOProxies).
- This will check proxy maintenance mode and power states and change as needed.
- Check VBO proxy states (using CheckVBOProxies).
- Stop Additional Proxies (if needed):
- If any "Auto" proxies were started, stop them (using StopVBOProxies)
End
To run the script at intervals, we use a Windows scheduled task on the VB365 server to manage the script execution and to relaunch it daily in case of any errors or reboots, etc.
Github Project- https://github.com/VeeamHub/powershell/tree/master/VBO-ProxyAutomation/AWS
Configure
Requirements
-
Veeam Backup for Microsoft 365 v8 or later
- Proxies must be part of a Proxy Pool that you designate in the script to be automated
-
Install AWS Tools for Powershell on the VB365 server (EC2 module is the only one required)
- For AWS Tools for Powershell installation:
- The following commands are used to verify the installation in the script:
- Install-Module AWS.Tools.Installer
- Install-AWSToolsModule AWS.Tools.Ec2
- Documentation:
- The following commands are used to verify the installation in the script:
- For AWS Tools for Powershell installation:
-
Create an AWS Service Role for the VB365 server
- This Service Role will need permissions to get and set the power state for the proxy VMs
- For testing, I created a role with 'customer inline permission' to only be able to power on/off instances matching a specified tag (see inline_policy.json for an example)
- This Service Role will need permissions to get and set the power state for the proxy VMs
IAM Role and Permissions
Here are the steps you can use to create the Role and permissions that the VB365 server will use to automate the proxies:
*NOTE* - These steps follow the way I set up the IAM Role and Permissions as an example. These steps can be modified to meet your needs.
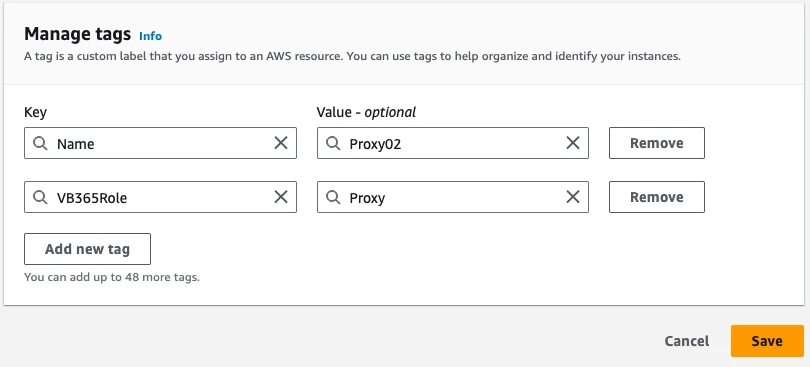
- Add a tag to the Proxy instances that will be used as a condition for the IAM Role permissions
- Go to the EC2 service and view instances
- For each VB365 proxy
- Select the proxy
- Go to the “Tags” tab
- Click on “Manage tags” on the right-hand side
- Create a tag of “VB365Role” with a value of “Proxy”
- Select “Save”
- Go to AWS IAM service
- Select “Roles” on the left-hand side
- On the top-right of the window, select “Create role”
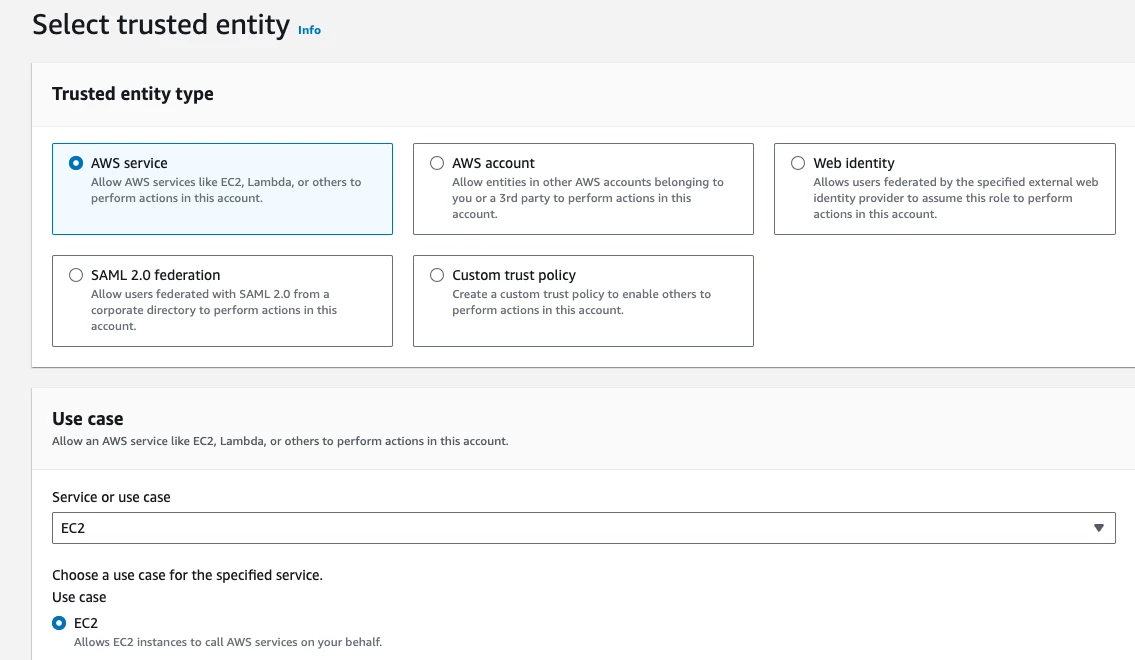
- Select “AWS service as the Role type and then type EC2 and select it for the service
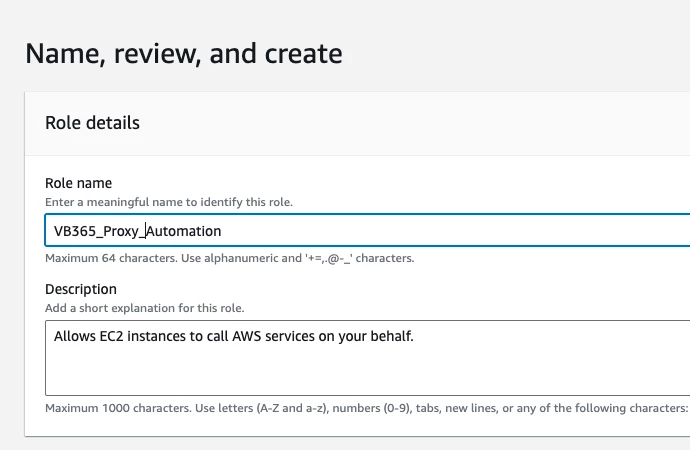
- Give the role a descriptive name
- on the bottom-right select “Create role” to finish the wizard
- On the “IAM > Roles” page, select the link for the Role that was just created
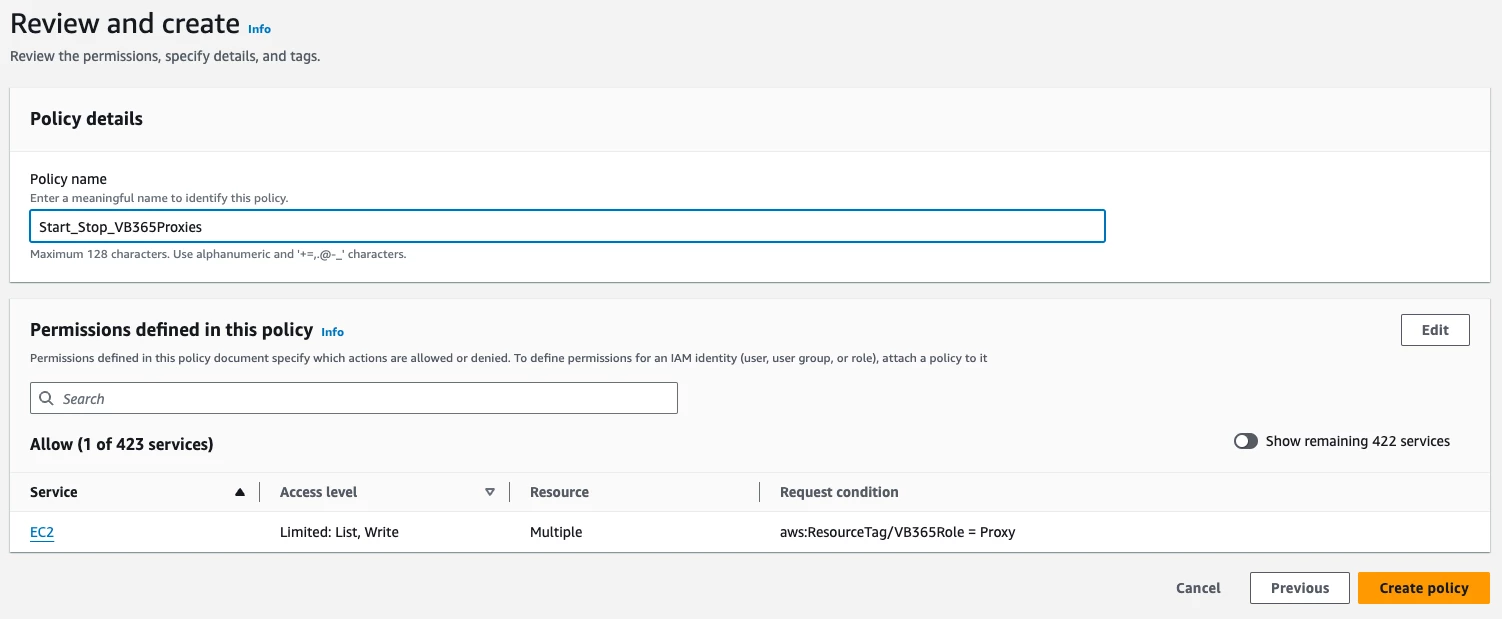
- Under the “Permissions policies” section, click on the “Add permissions” dropdown and select “Create inline policy”

- On the top-right select JSON and paste in the inline policy text from the JSON provided.
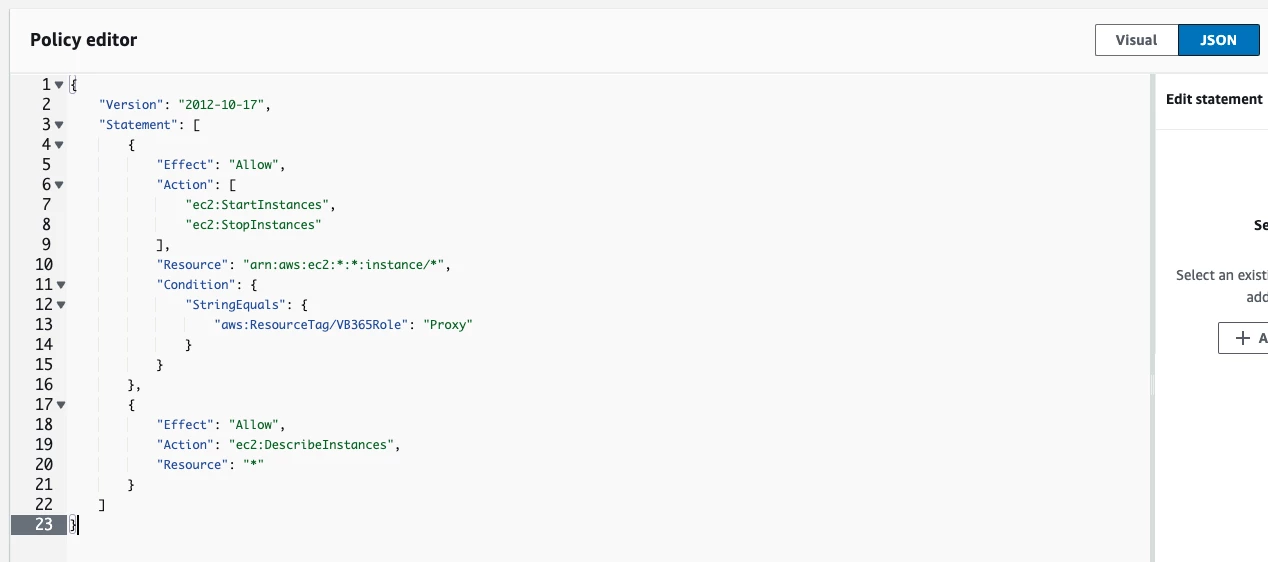
- Name the inline policy and select “Create policy”
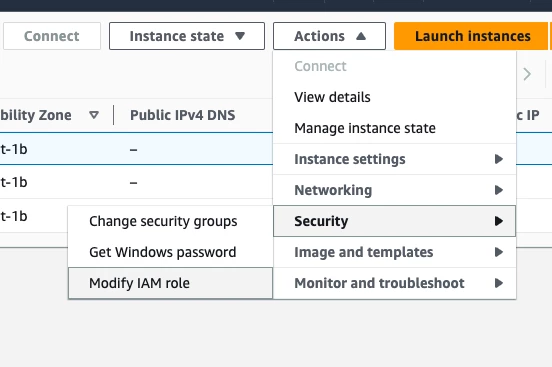
- Go to the EC2 service and view instances. Select the VB365 server instance and then select “Actions > Security > Modify IAM Role”
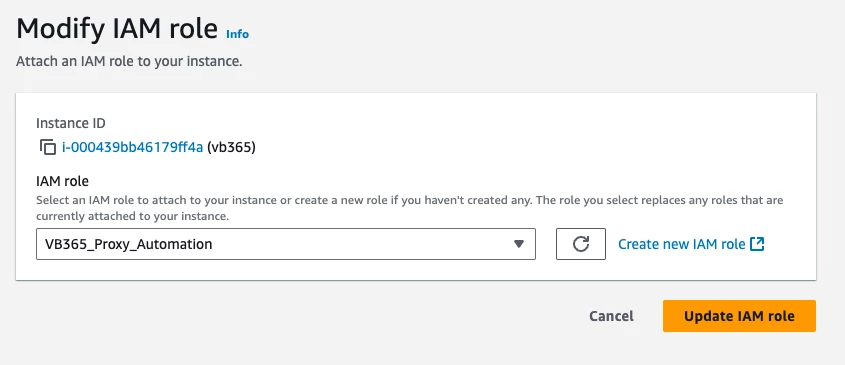
- Select the Role that was created and then click on “Update IAM Role”
Script Parameters
- You will need to either download or copy the script and place it on the VB365 server.
- You can find the AWS Proxy Automation script here: https://github.com/VeeamHub/powershell/blob/master/VBO-ProxyAutomation/AWS/AWSProxyAutomation.ps1
- The script has several parameters that will need to be modified to work in your environment
- The required variables that will need to be configured are the vCenter server name and credentials, the output (log) file location, the proxy pool name that we are running the automation against, and the proxy information found in the $VBOAutomatedProxies array.
** You will find these variables at the top of the script under the "** Parameters **" comment heading. Anything found below the "** Functions **" heading should not need to be modified.
** The script is commented with explanations of each variable and property that needs to be added.
#   ** Parameters **

# Time, in minutes, to run GetVBOSession (will check for running jobs every 30 seconds for the duration specified)
$CheckTime = 4

# Time, in minutes, to check for additional sessions before ending
$BufferTime = 1

# Filepath for logging - Valid path on the VB365 Server
$OutputFile = "<String>" # Ex. C:\Path\to\file.log

# Name of proxy pool to be automated
$ProxyPoolName = "<String>"

<#
List of Proxy VM attributes used to manage proxy power and maintenance mode operations
    ProxyVMName:
        Name of the VM in Azure
    ProxyVMIPv4:
        The local IPv4 address of the proxy (potentially used to add proxy to VBO)
    ProxyMode:
        Set which proxy is to stay online ('Primary') and which are to be stopped after jobs complete ('Auto')
    ProxyBootTime:
        Sets the wait time (in seconds) after starting the VM for the guest OS to be up before sending proxy commands
    PoxyUserName:
        Windows- Start a local account username with "`.\" The period must be escaped with a back tick character. Domain account can use "domain\username" format.
        Linux - no domain needed
    ProxyUserPass:
        Password string
    ProxyRootPass:
        Root password string which may be required for Linux proxies.
#>
$VBOAutomatedProxies = @(
    [PSCustomObject]@{
        ProxyVMName = "<String>";
        ProxyVMIPv4 = "<String>";
        ProxyMode = "Primay";
        ProxyOS = "<Windows/Linux>";
        ProxyBootTime = 120;
        ProxyUserName = '<String>';
        ProxyUserPass = '<String>';
        ProxyRootPass = '<String>'
    }
    [PSCustomObject]@{
        ProxyVMName = "<String>";
        ProxyVMIPv4 = "<String>";
        ProxyMode = "Auto";
        ProxyOS =  "<Windows/Linux>";
        ProxyBootTime = 120;
        ProxyUserName = '<String>';
        ProxyUserPass = '<String>';
        ProxyRootPass = '<String>'
    }
)- The $CheckTime and BufferTime variables can either be left with the defaults or modified as desired.
Scheduled Task
- Launch Task Scheduler, right-click on the "Task Scheduler Library" and select "Create Task"
- Name your task. The naming can be whatever you choose. For my testing I named it VBOJobMonitor.
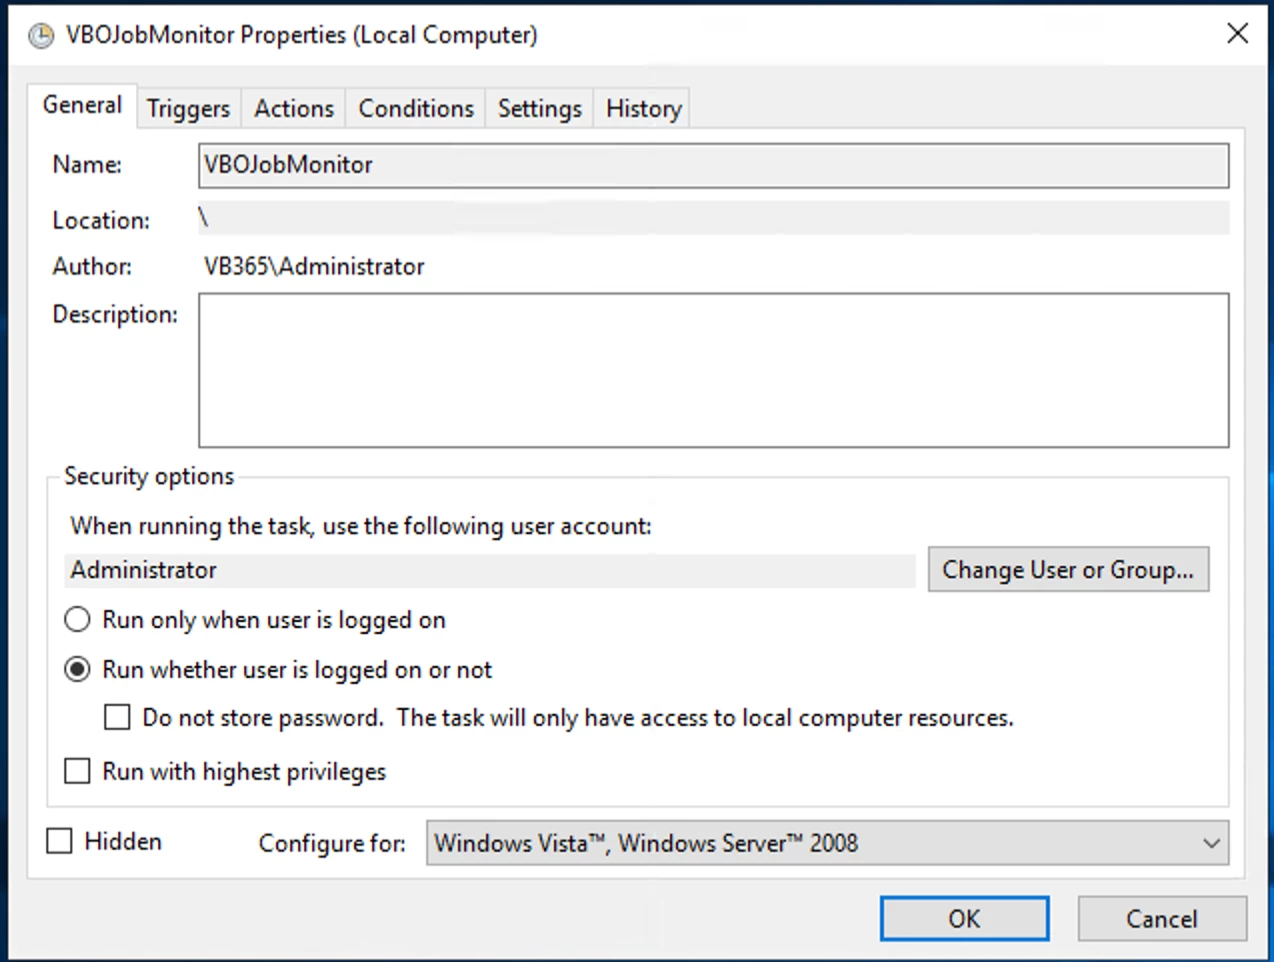
- On the "Triggers" tab, create a new trigger to launch the script once daily and at intervals that fit with your $CheckTime value. Example - $CheckTime of 4 minutes would fit nicely with a repeat interval of 5 minutes.
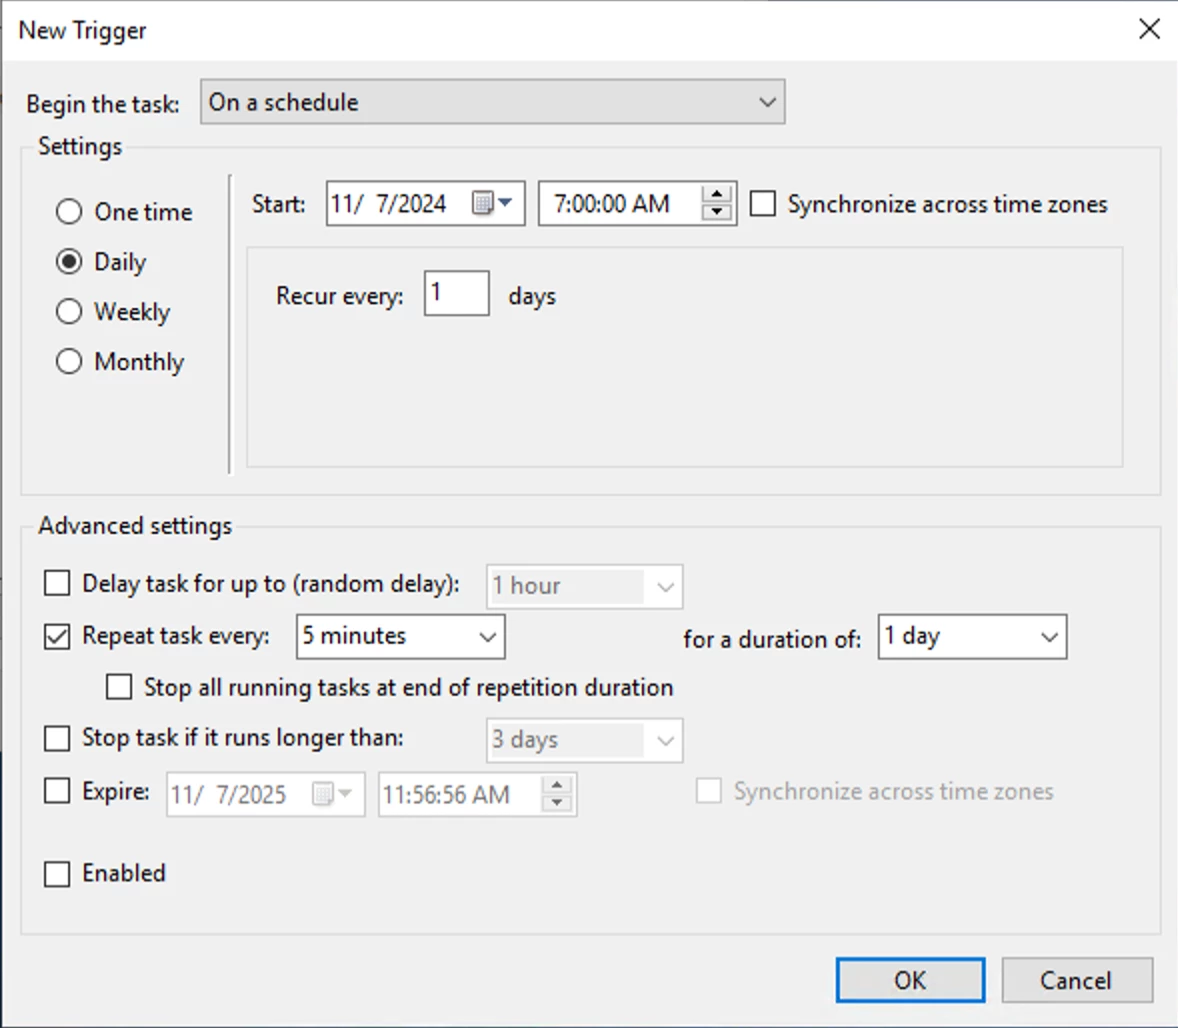
- On the "Actions" tab, create a new action with the following settings:
- Program/script:
- Powershell.exe
- Add arguments (optional):
- -ExecutionPolicy Bypass -File "C:\Path\To\File.ps1"
- Replace the file path with the file path of the ps1 script on the VB365 server
- You can remove the "-ExecutionPolicy Bypass" if that is not needed.
- -ExecutionPolicy Bypass -File "C:\Path\To\File.ps1"
- Program/script:
- The rest of the settings can stay with the defaults and save the task.
With all of this completed, you should be able to watch the proxy automations in action! The last item to cover is how to monitor the automation progress.
Monitor
The script has been designed to log throughout it's execution. It will write these logs to the log file that you designated in the script parameters. Here are some excerpts from the script execution as an example:
Running job session found and automations launched -

Rechecking for additional jobs:

Once all jobs are completed automate proxies again:

Troubleshooting
There is some "Self-healing" built into the script to try and correct potential manual changes to the proxies or if a failure occurs during a previous run. So some errors or warnings encountered in the logging can be resolved without intervention. However, if some troubleshooting is needed the logs should show you where in the execution any failures occurred.
Self-healing in the logs:


