

I finally had some time to wire in the Veeam Ports MCP server into GPT. It works but has a number of steps in the process. If you are like me you watch the token burn in Claude for projects like these.
This started with EdxH’s post on the Veeam Ports MCP server introducing the project & GitHub repo.
The repo is @ https://github.com/shapedthought/veeam-ports-mcp. I wanted to see what it took to make that same idea work /w GPT.
Claude Desktop can launch a local MCP server /w STDIO. The Veeam Ports MCP repo already shows that path well. GPT expects an MCP endpoint instead. On my end that meant I had to put a bridge and a tunnel in the middle before GPT could make use of the tool correctly.
Once that was running, I could describe a VBR v13 layout in plain language and get back firewall rules, topology output, and a Magic Ports import file (yea).
The painful part was useful as well. I learned that a topology JSON and a Magic Ports import JSON are not the same thing. They look close enough that it will trip you up if not paying attention to it. They are not close enough for the Magic Ports import and will fail the import.
This was the chain that worked for me:
uvx veeam-ports-mcp
to
mcp-proxy listening on 127.0.0.1:8080
to
ngrok public HTTPS tunnel
to
GPT Dev connector at https://example.ngrok-free.app/sse
Tools I used:
- uv and uvx
- Veeam Ports MCP server
- MCP Inspector
- mcp-proxy
- ngrok
- GPT /w access to Dev Mode and custom MCP connectors
- Magic Ports frontend
One note before setup. Dev Mode access in GPT depends on your plan and workspace controls.
Step 1: Install uv
The Veeam Ports MCP server runs through uvx. On Windows I used PowerShell.
powershell -ExecutionPolicy ByPass -c "irm https://astral.sh/uv/install.ps1 | iex"
After install, close and reopen PowerShell.
Step 2: Validate the MCP server before involving GPT
Do not start with GPT.
MCP Inspector is the easiest way to prove the server is healthy before you add the proxy and tunnel bits.
npx @modelcontextprotocol/inspector uvx veeam-ports-mcp
In the Inspector UI I used the following:
Transport Type: STDIO
Command: uvx
Arguments: veeam-ports-mcp
After clicking connect, inspector showed the Veeam Ports server and exposed the tools.
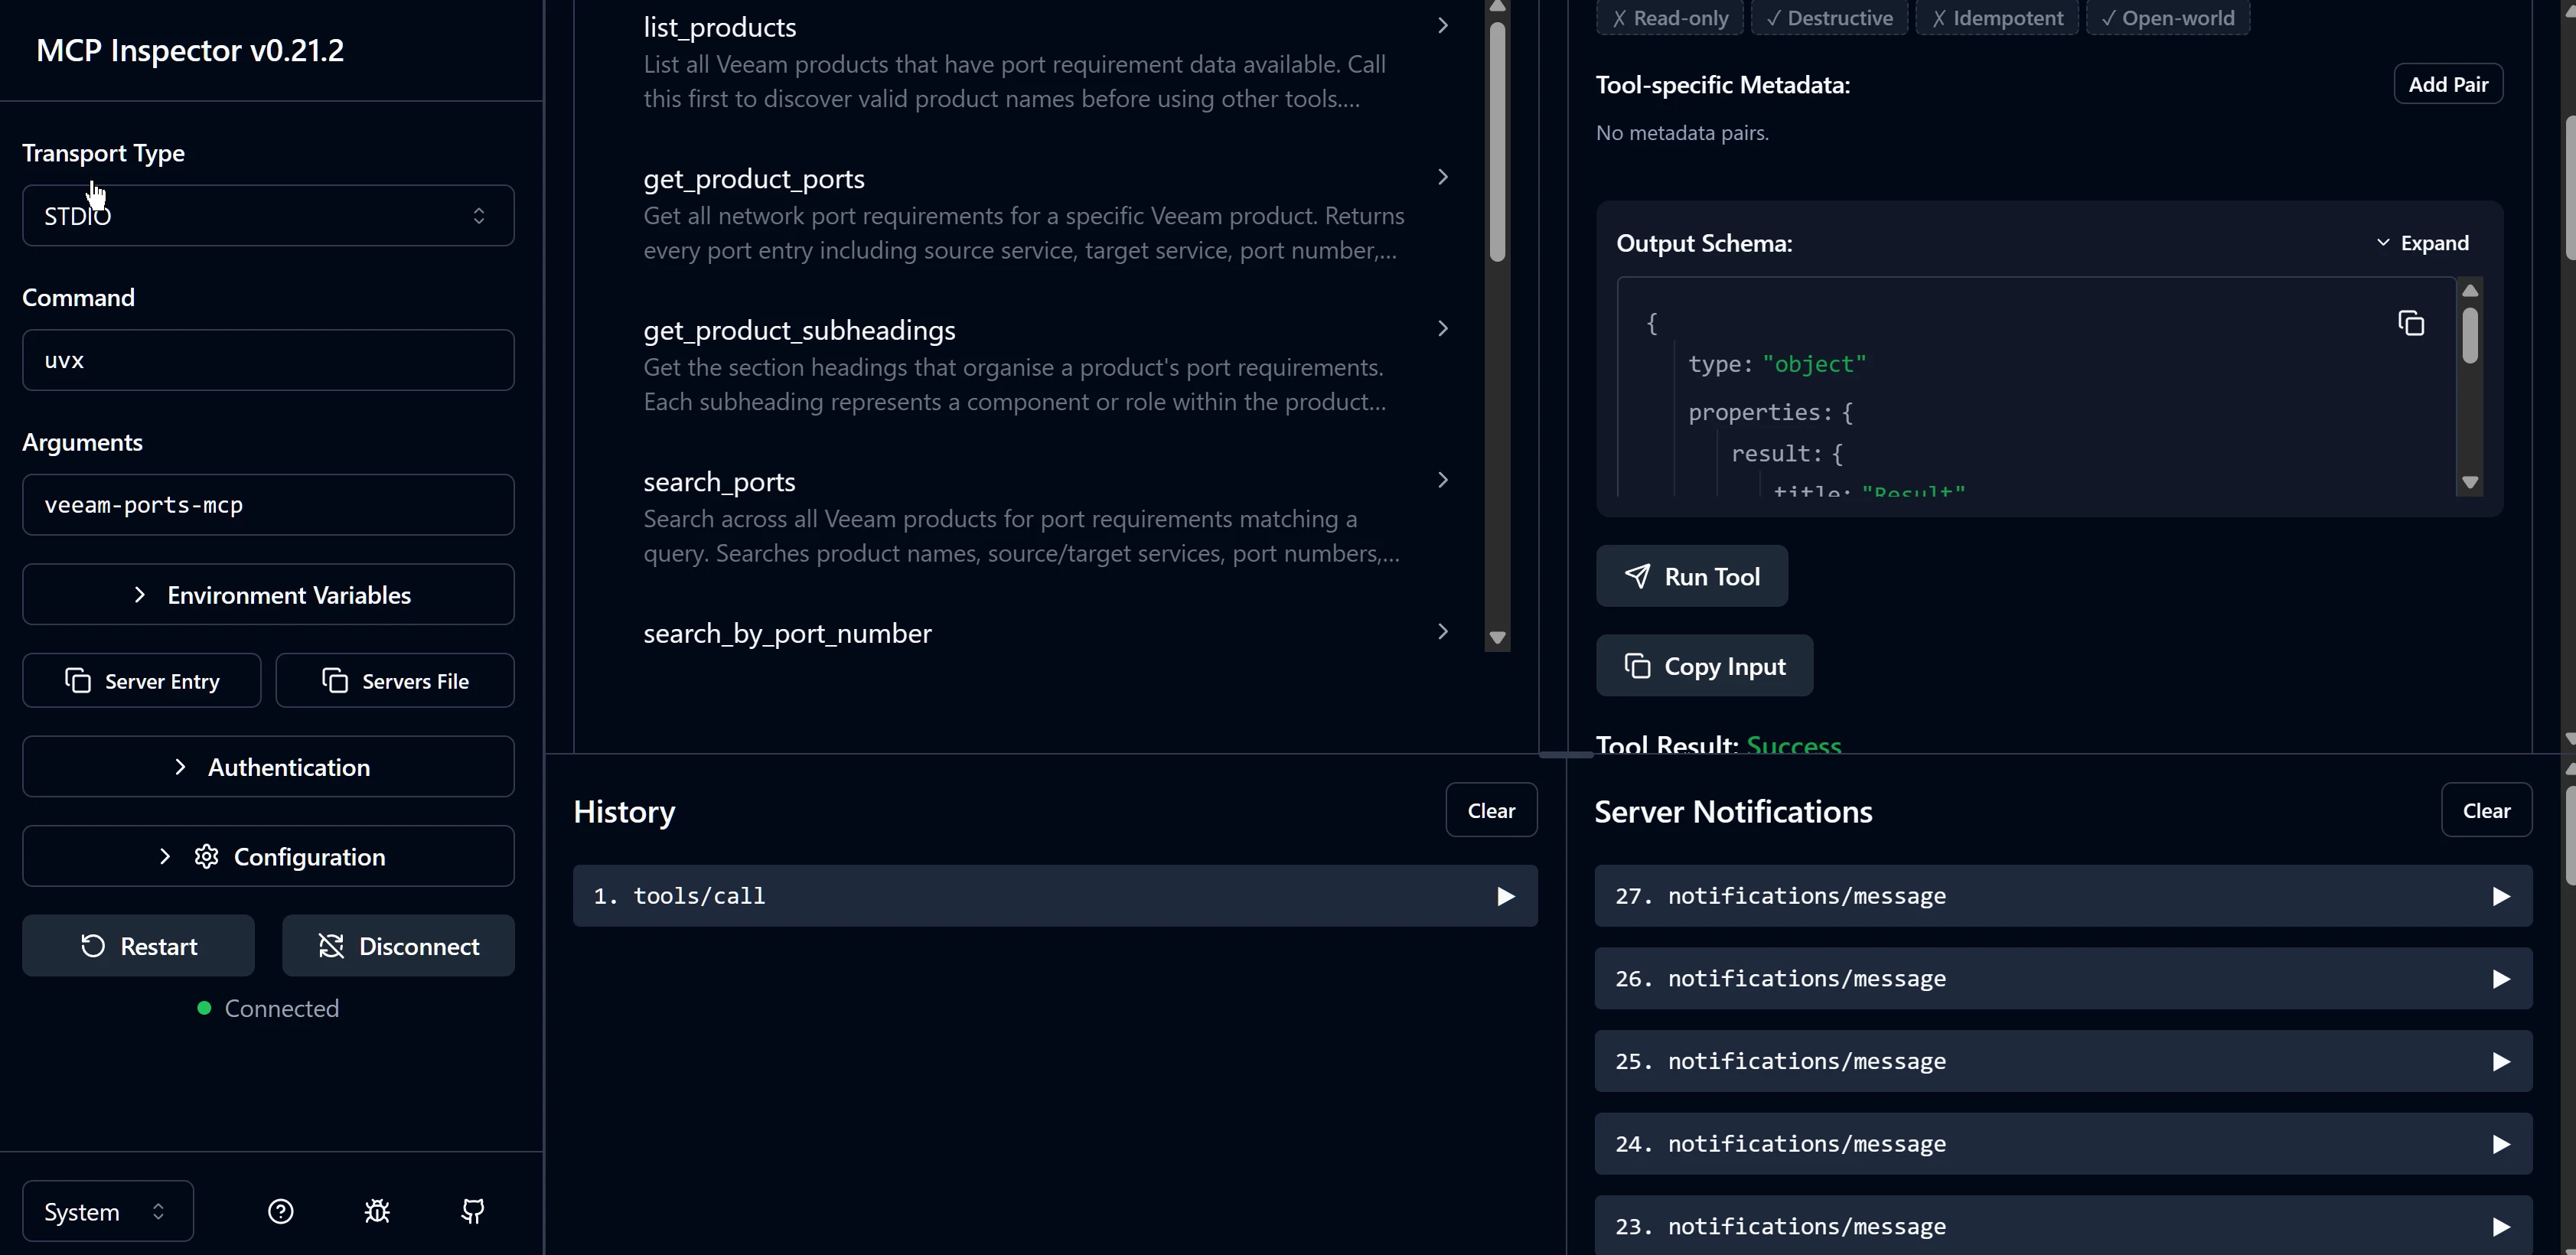
MCP Inspector connected to the Veeam Ports MCP server with the Veeam tools visible.
Useful tools you can test with:
- list_products
- list_services
- search_by_port_number
- generate_topology
- generate_app_import
I tested calls first. Listing products and checking TCP 902, boring tests but want you want at this stage..
Step 3: Bridge STDIO to SSE with mcp-proxy
The Veeam MCP server is a local STDIO server. GPT needs an MCP endpoint.
I used mcp-proxy for that bridge.
Install it:
uv tool install mcp-proxy
Run it:
mcp-proxy --host 127.0.0.1 --port 8080 -- uvx veeam-ports-mcp
That should expose the MCP server on localhost for you. I checked it in a browser,
http://localhost:8080/sse
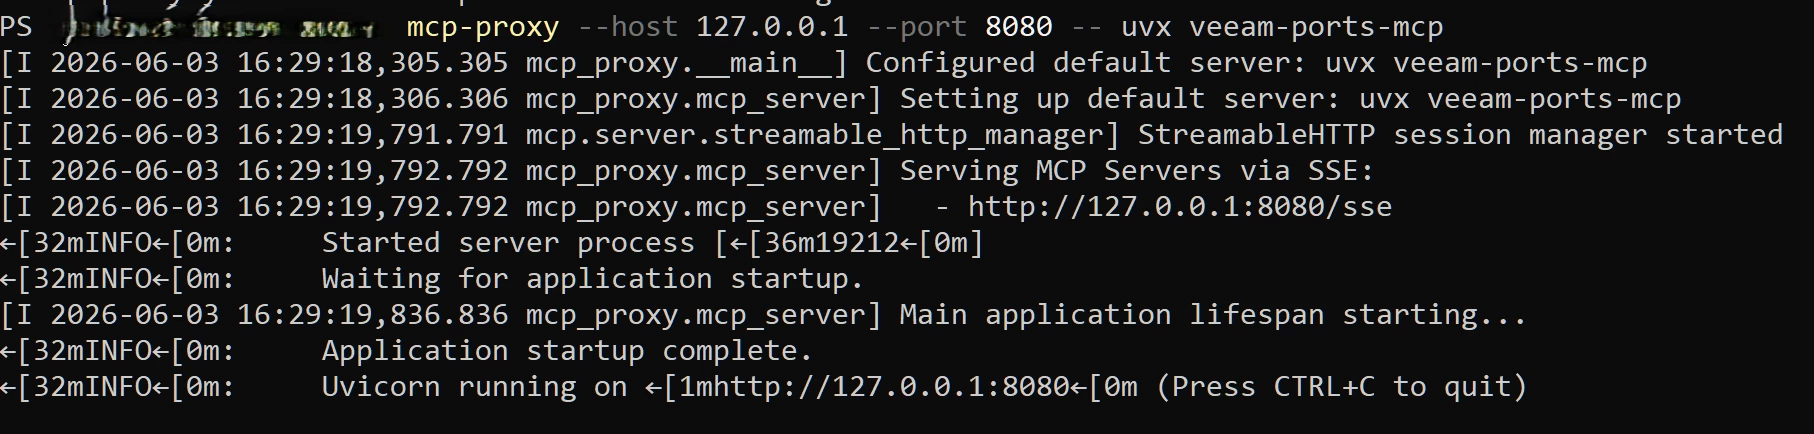
mcp-proxy running the STDIO to SSE bridge on 127.0.0.1:8080.
Keep this terminal window open. If it closes, so does the server.
Step 4: Expose it with ngrok
GPT cannot hit your localhost directly. I used ngrok to give the local proxy a public HTTPS URL.
Install ngrok if it is not already on the machine. On Windows:
winget install --id Ngrok.Ngrok -e
Then add the authtoken from your ngrok account:
ngrok config add-authtoken <your token>
Start the tunnel after you have configured your token setup.
ngrok http 127.0.0.1:8080
Watch for the forwarding target. My first good looking tunnel pointed to localhost port 80. That was wrong. The target needs to be 127.0.0.1:8080 because that is where mcp-proxy is listening.
Keep this terminal window open too. If you restart ngrok and get a new URL, you’ll need to update the GPT connector once again with the new URL.
Step 5: Add the connector in GPT
In GPT web, I created a custom connector in Dev Mode.
The connector URL was the ngrok URL with /sse added:
https://example.ngrok-free.app/sse
For my lab, I used no authentication. That is fine for a short test. It is not fine as a standing service. (Don’t do this for solution outside of testing, use auth /w it.) I’ll be moving this to a secure setup at a later date when time allows.
After saving the connector, I scanned tools and confirmed the Veeam tools appeared. Then I started a new chat and enabled the connector.
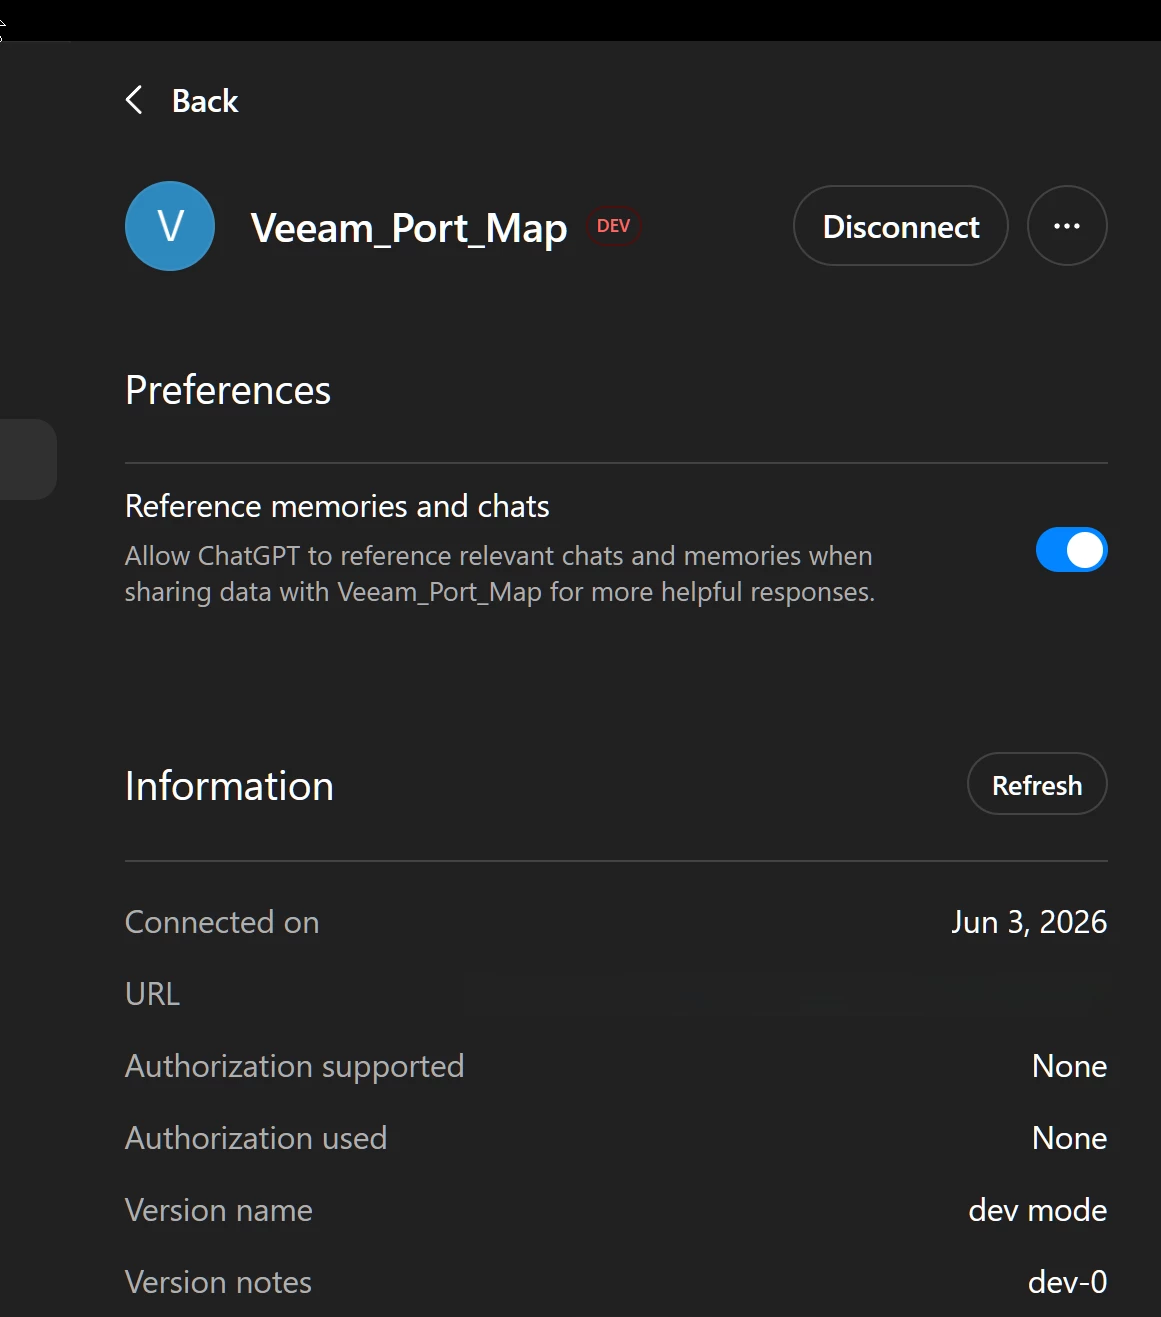
GPT Dev Mode connector for Veeam_Port_Map connected to the ngrok /sse endpoint.
At that point GPT could call the Veeam Ports MCP tools. (Nice!)
What worked...
The first useful test was a firewall rule prompt:
“Using Veeam_Port_Map, generate firewall rules for a VBR v13 environment with one backup server, two Linux proxies, one hardened repository, vCenter, and ESXi hosts.”
GPT called the tool and it came back with source, destination, protocol, port, and purpose.
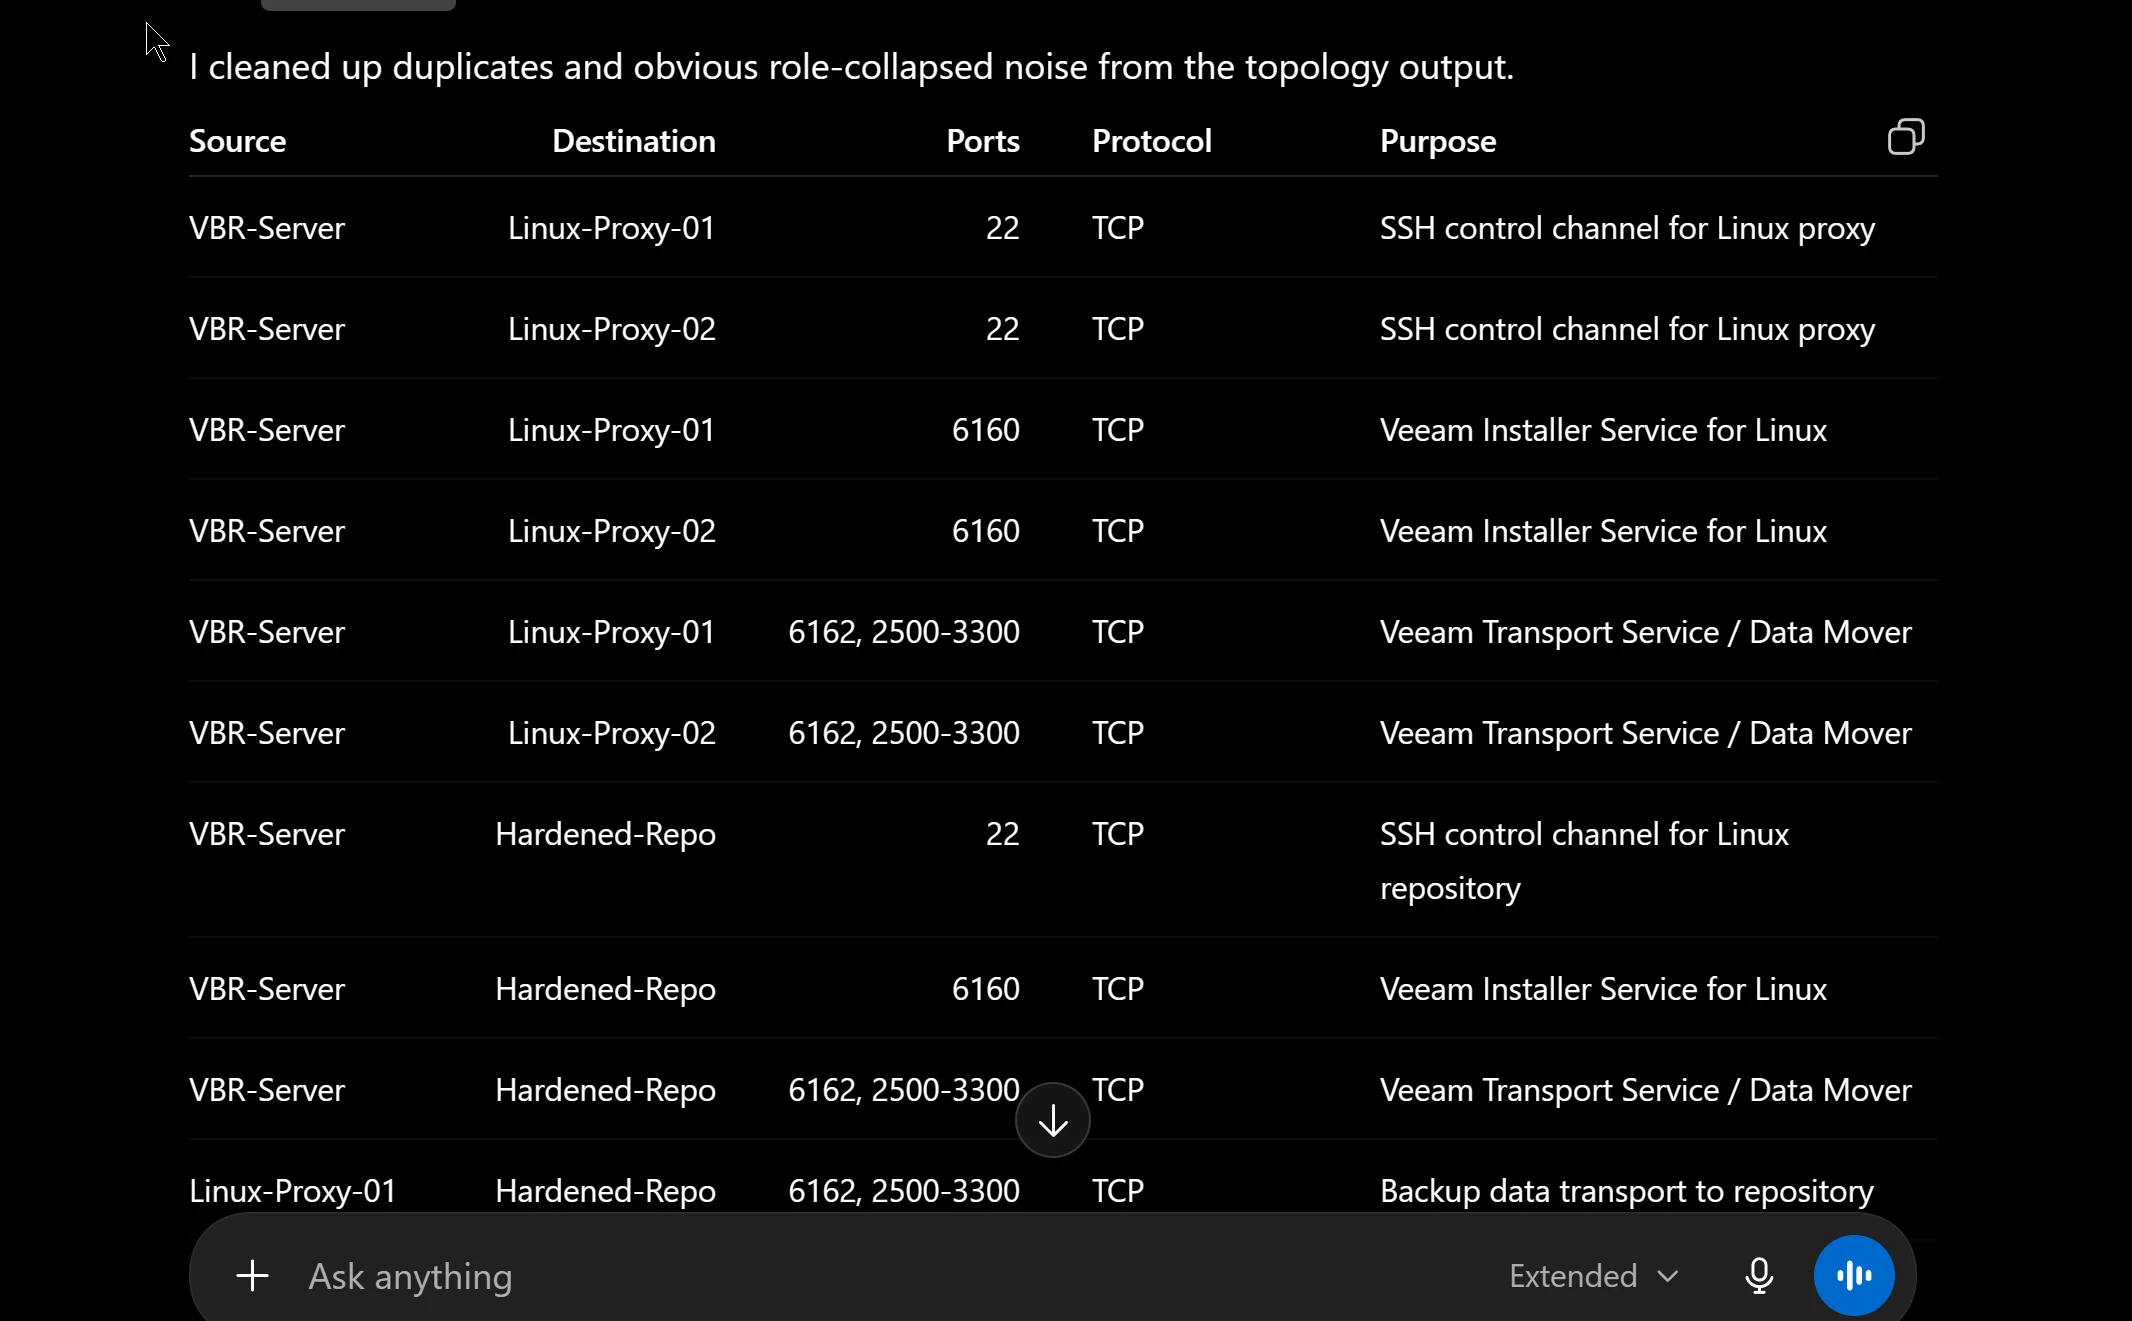
GPT formatted the Veeam Ports MCP output into a firewall rule table.
I then tried a smaller import test with these systems.
VBR01: Backup server
VBRPROXY01: Backup proxy
VBRREPO01: Backup repository
VCSA01: vCenter Server
ESXI-CLUSTER: ESXi host
The topology output was easy to follow. It showed the VBR v13 flows between the backup server, proxy, repository, vCenter, and ESXi hosts.
That was the happy path, neat.
Now the gotchas i bumped into:
The Magic Ports import file is where it got me.
At first I let GPT take topology outputs and rebuild a downloadable JSON file (wrong). The file looked right at first glance. It had servers, nodes, edges, ports, protocols, and a schema. It looked like something a frontend would import fine.
Magic Ports rejected it, no dice.
The reason was simple. It was not the native Magic Ports import format. It was a rebuilt topology document GPT thought it was doing correctly.
The fix was to use the MCP tool that writes the correct file:
generate_app_import
Not this:
generate_topology
Generate_topology is for review, rules, and topology work. generate_app_import is for the uploadable Magic Ports frontend file.
That distinction matters. The working import from the tool was an array of mapped server objects. The bad file was a custom graph style JSON document with nodes and edges. Similar idea but enough difference to cause issues.
The working tool returned a file like this:
magic-ports-vbr-v13-import.json
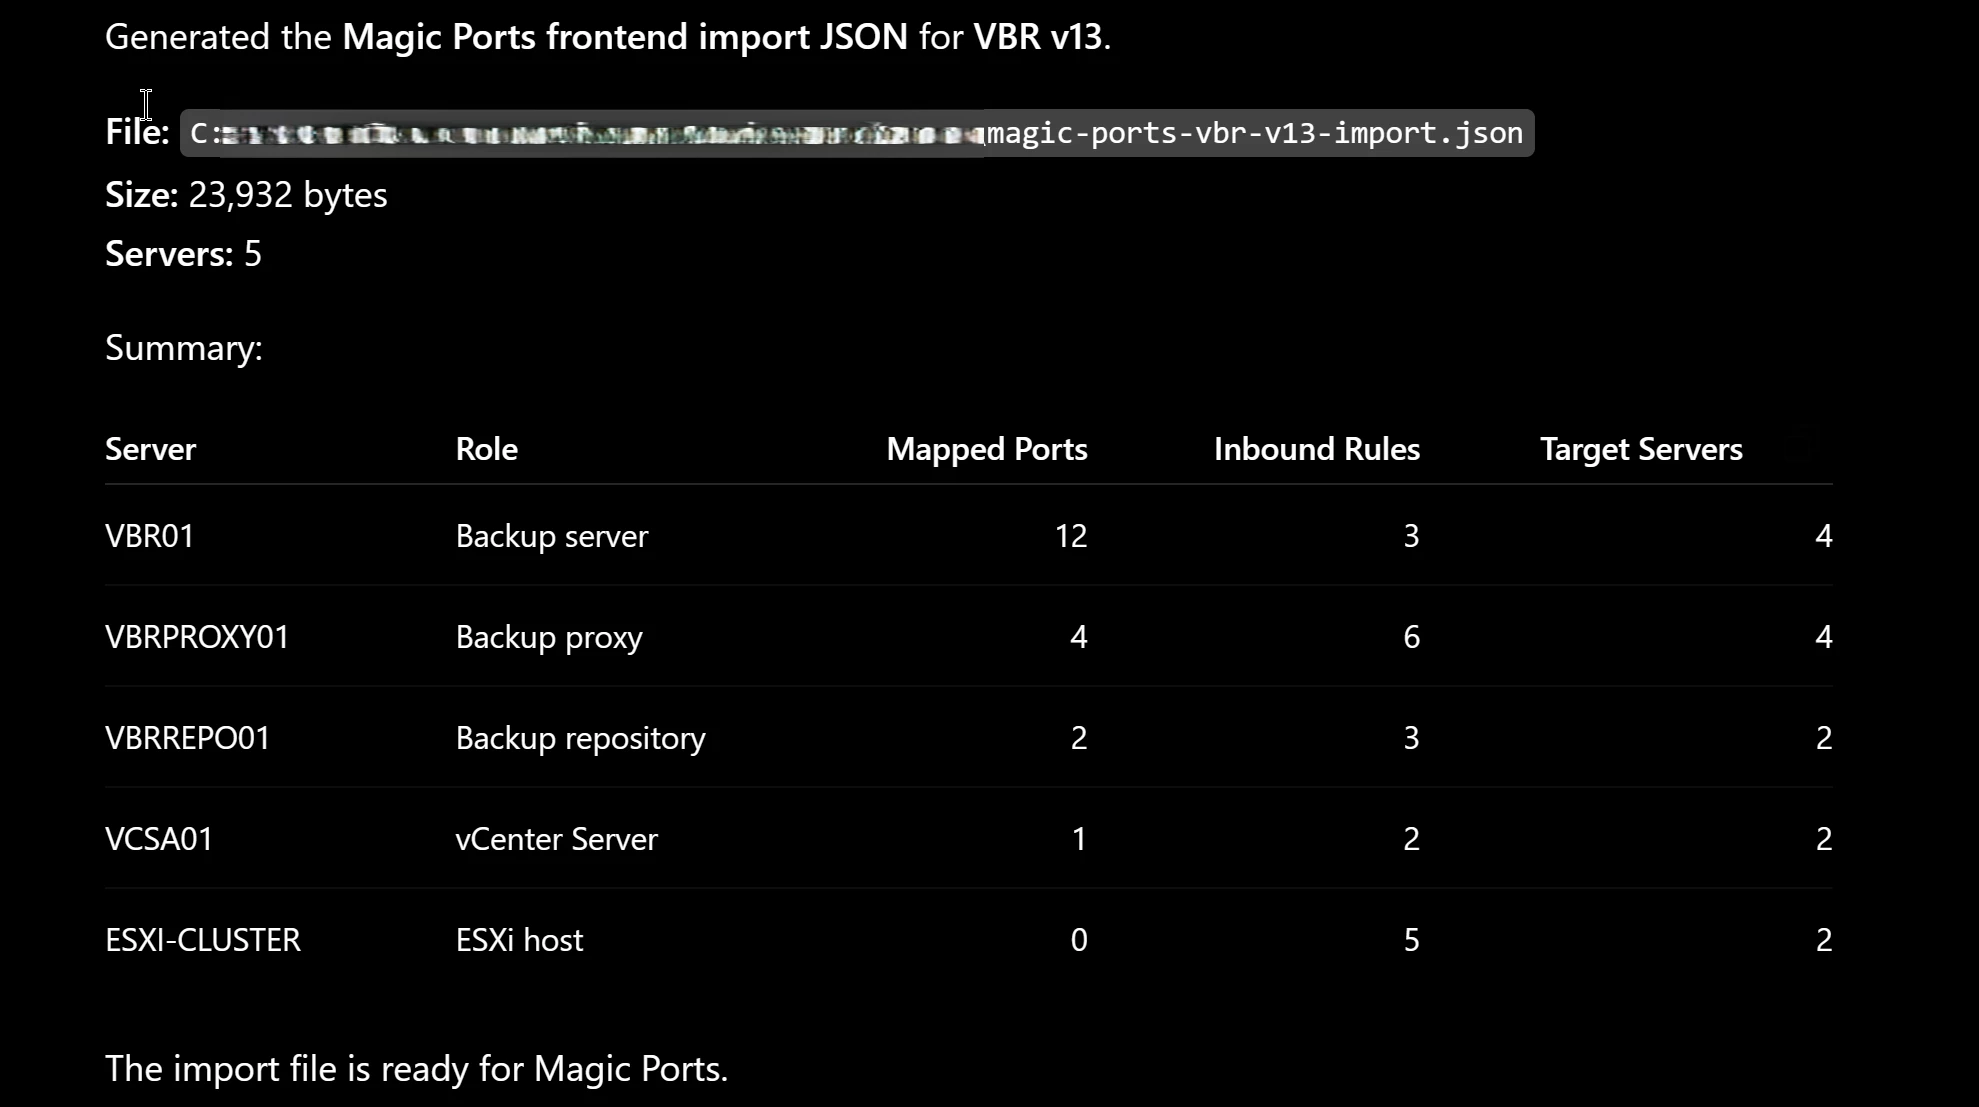
Generate_app_import returning the Magic Ports frontend import file path and server summary.
Use that file. Do not ask GPT to recreate it, it can’t correctly at least with minimal prompting from testing.
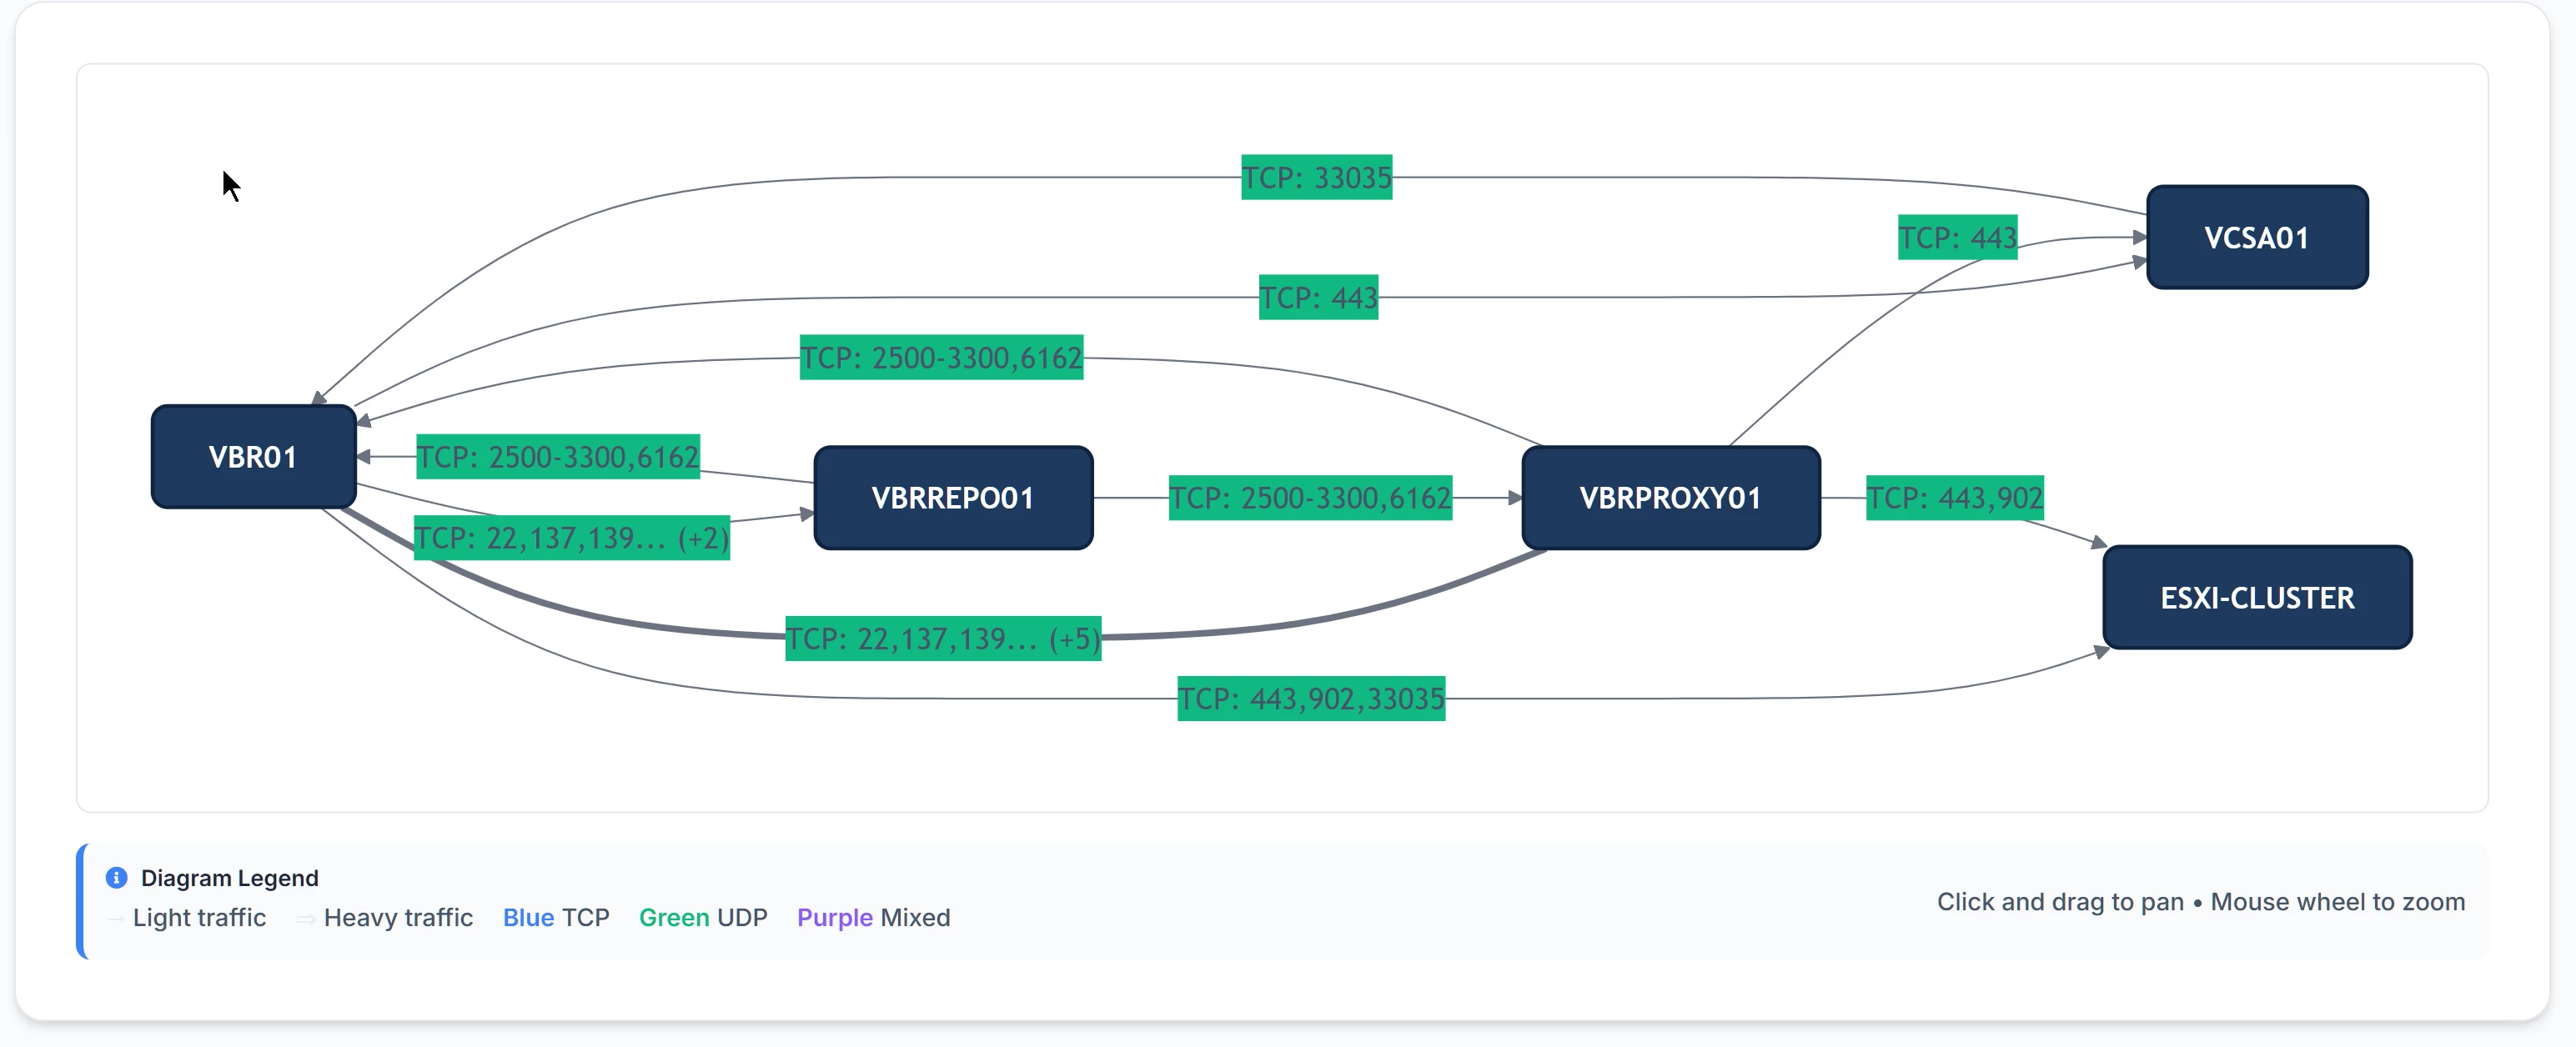
Magic Ports after importing the native JSON, showing the topology map.
This is the prompt I would keep around so I do not repeat the mistake:
/////////////////////////////////////////////////////////////////////////////////
Using Veeam_Port_Map, create a Magic Ports import file for VBR v13.
Important:
* Use list_services first to validate exact service names.
* Use generate_app_import for the final output.
* Do not use generate_topology as the source for an import file.
* Do not manually recreate, transform, or synthesize the JSON.
* Return the exact local file path generated by the MCP server.
* Confirm the output is intended for Magic Ports import, not just topology review.
Servers:
* VBR01: Backup server
* VBRPROXY01: Backup proxy
* VBRREPO01: Backup repository
* VCSA01: vCenter Server
* ESXI-CLUSTER: ESXi host
/////////////////////////////////////////////////////////////////////////////////
Security note
Do not leave this running on the internet.
The lab version has a public ngrok URL pointed at the MCP endpoint. I used no auth while testing. That is acceptable for a short lab where you are in front of the terminal.
When you are done, stop ngrok. For anything longer, put the service behind real auth and access controls.
Links
Original Veeam Community post by EdxH.
https://community.veeam.com/blogs-and-podcasts-57/veeam-ports-mcp-server-12921
Veeam Ports MCP GitHub repo.
https://github.com/shapedthought/veeam-ports-mcp
Veeam Ports MCP on PyPI:
https://pypi.org/project/veeam-ports-mcp/
Magic Ports frontend:
https://magicports.veeambp.com/
mcp-proxy:
https://github.com/sparfenyuk/mcp-proxy
MCP Inspector:
https://modelcontextprotocol.io/docs/tools/inspector
uv install docs:
https://docs.astral.sh/uv/getting-started/installation/
OpenAI Dev Mode docs: