

BR v.11 - Step by step Install & Configure (Best Practice) | Veeam Community Resource Hub
#########################################################
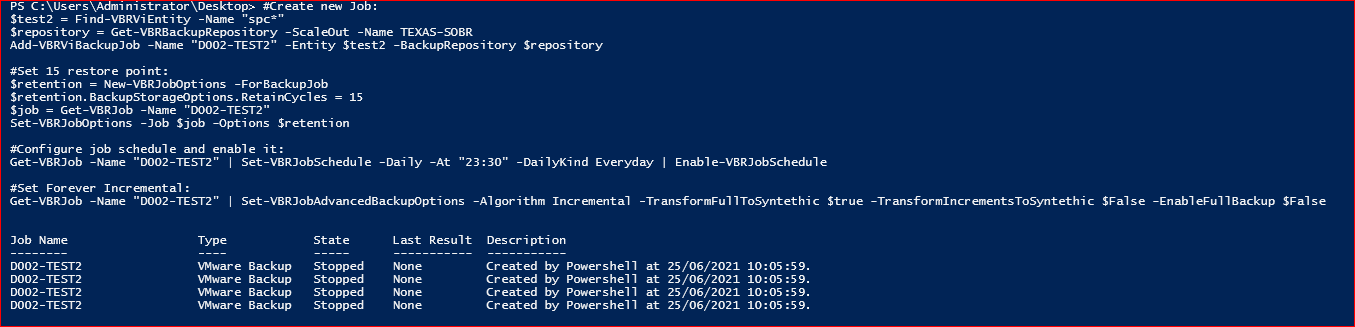
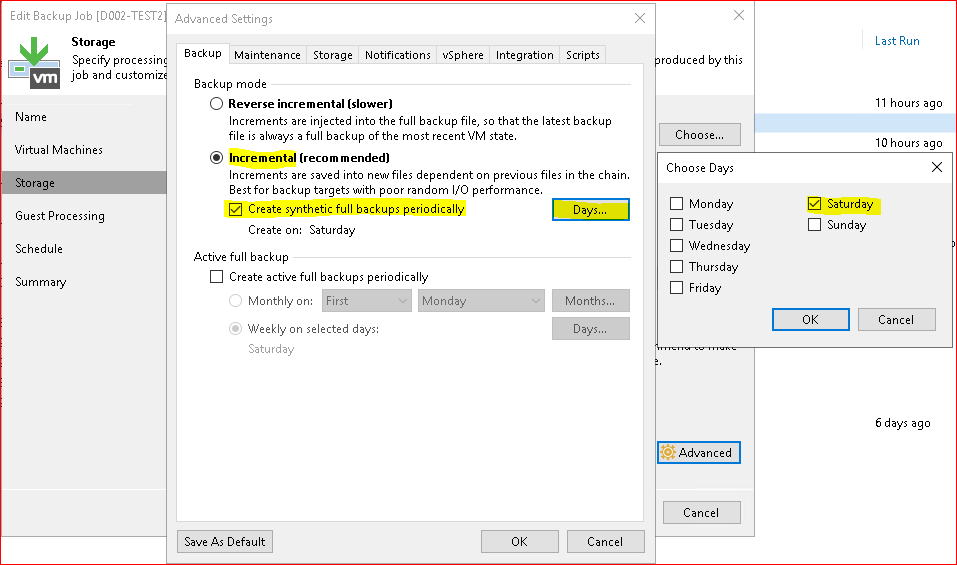
CREATE NEW JOB add multiple VM 15 restore point Incr Weekly sinth full Saturday
#########################################################
#Create new Job:
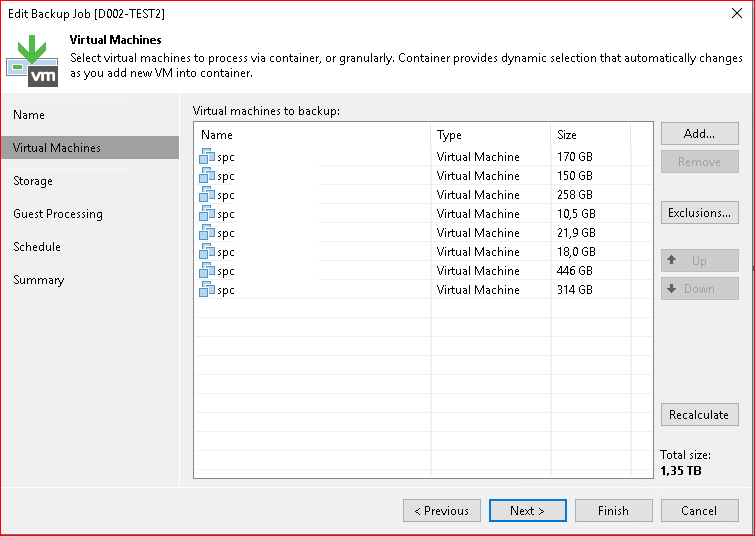
$test2 = Find-VBRViEntity -Name "spc*"
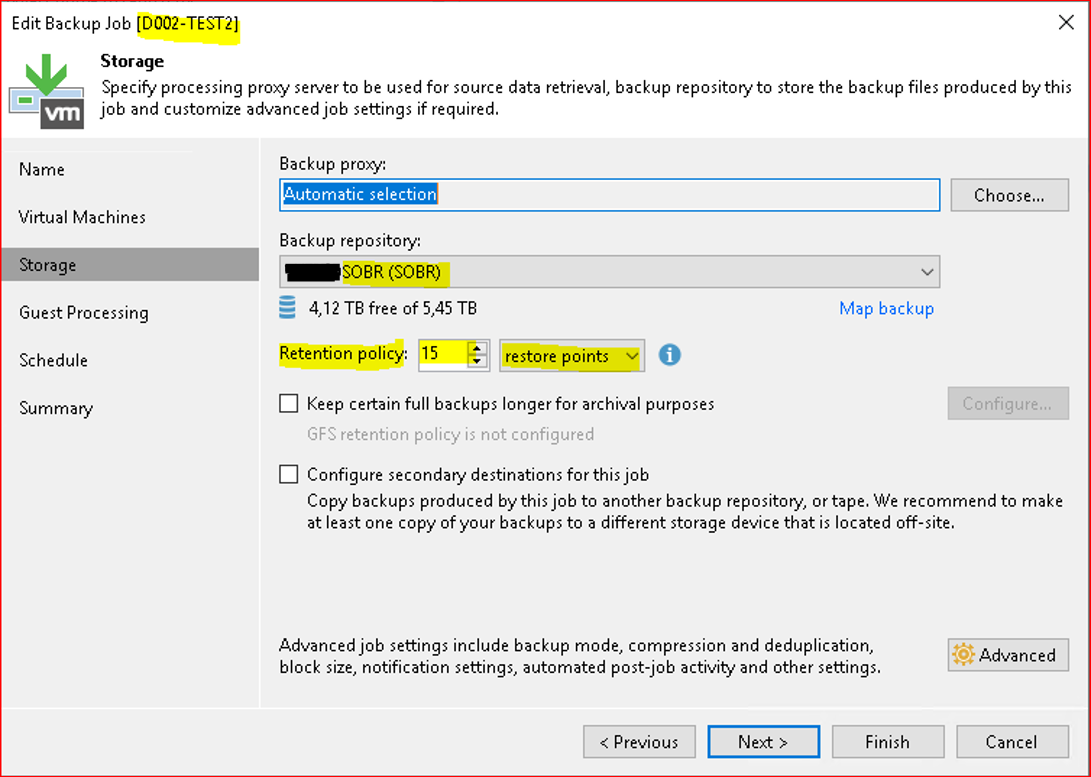
$repository = Get-VBRBackupRepository -ScaleOut -Name *****-SOBR
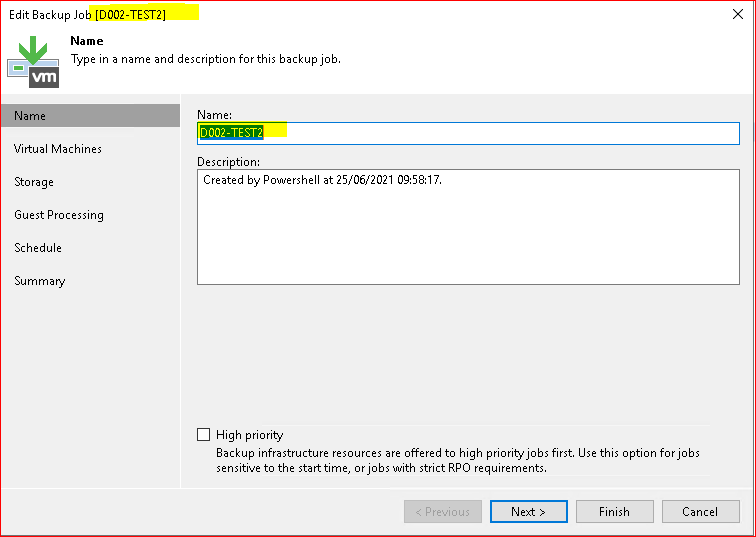
Add-VBRViBackupJob -Name "D002-TEST2" -Entity $test2 -BackupRepository $repository
#Set 15 restore point:
$retention = New-VBRJobOptions -ForBackupJob
$retention.BackupStorageOptions.RetainCycles = 15
$job = Get-VBRJob -Name "D002-TEST2"
Set-VBRJobOptions -Job $job -Options $retention
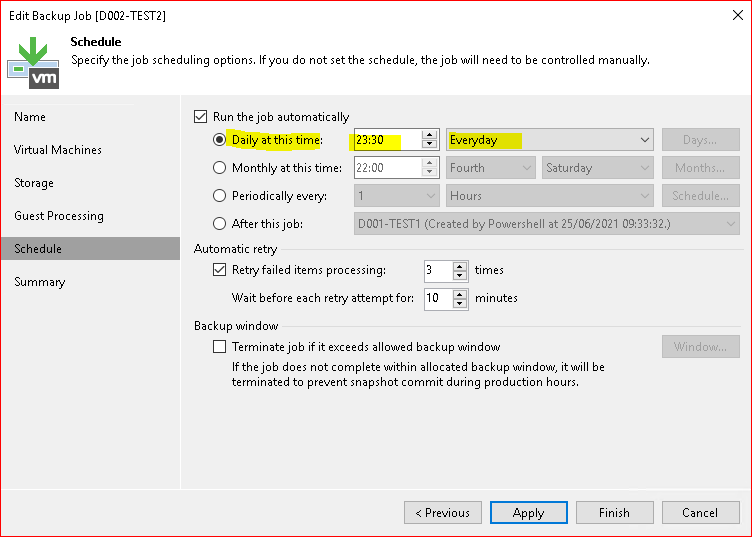
#Configure job schedule and enable it:
Get-VBRJob -Name "D002-TEST2" | Set-VBRJobSchedule -Daily -At "23:30" -DailyKind Everyday | Enable-VBRJobSchedule
#Set Forever Incremental:
Get-VBRJob -Name "D002-TEST2" | Set-VBRJobAdvancedBackupOptions -Algorithm Incremental -TransformFullToSyntethic $true -TransformIncrementsToSyntethic $False -EnableFullBackup $False

Exemples
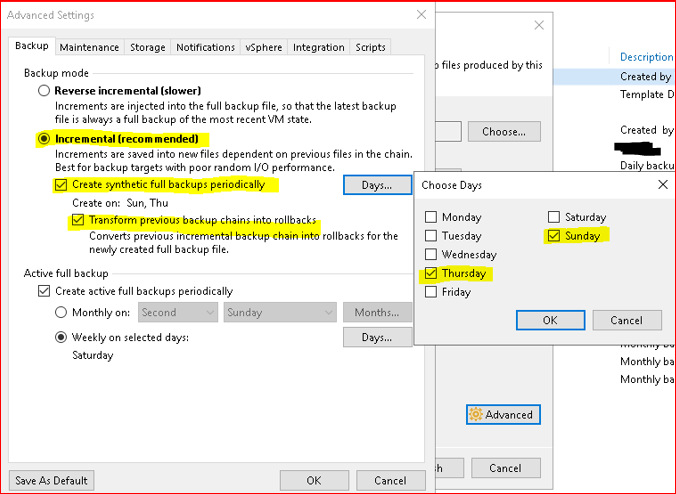
# Set The backup algorithm is set to Incremental
# Set The synthetic full backup is enabled on every Sunday and Thursday.
# Set The previous fulls are set to rollback to chain of increments to save disk space.
# Set The active full backup schedule is set to every second Sunday monthly.
Get-VBRJob -Name "D000-TEST" | Set-VBRJobAdvancedBackupOptions -Algorithm Incremental -TransformFullToSyntethic $True -TransformIncrementsToSyntethic $True -TransformToSyntethicDays Sunday, Thursday -EnableFullBackup $True -DayNumberInMonth Second -FullBackupScheduleKind Daily -DayOfWeek Sunda

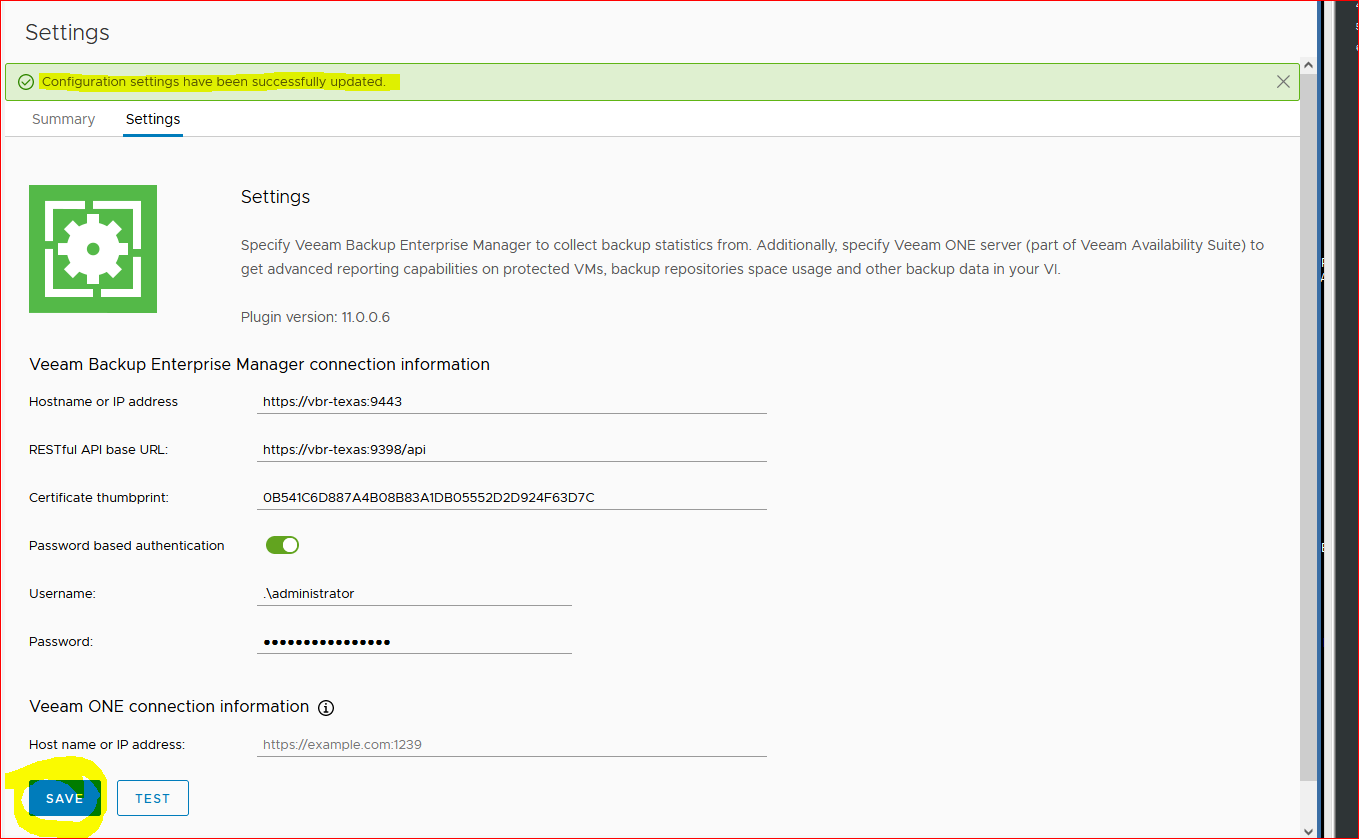
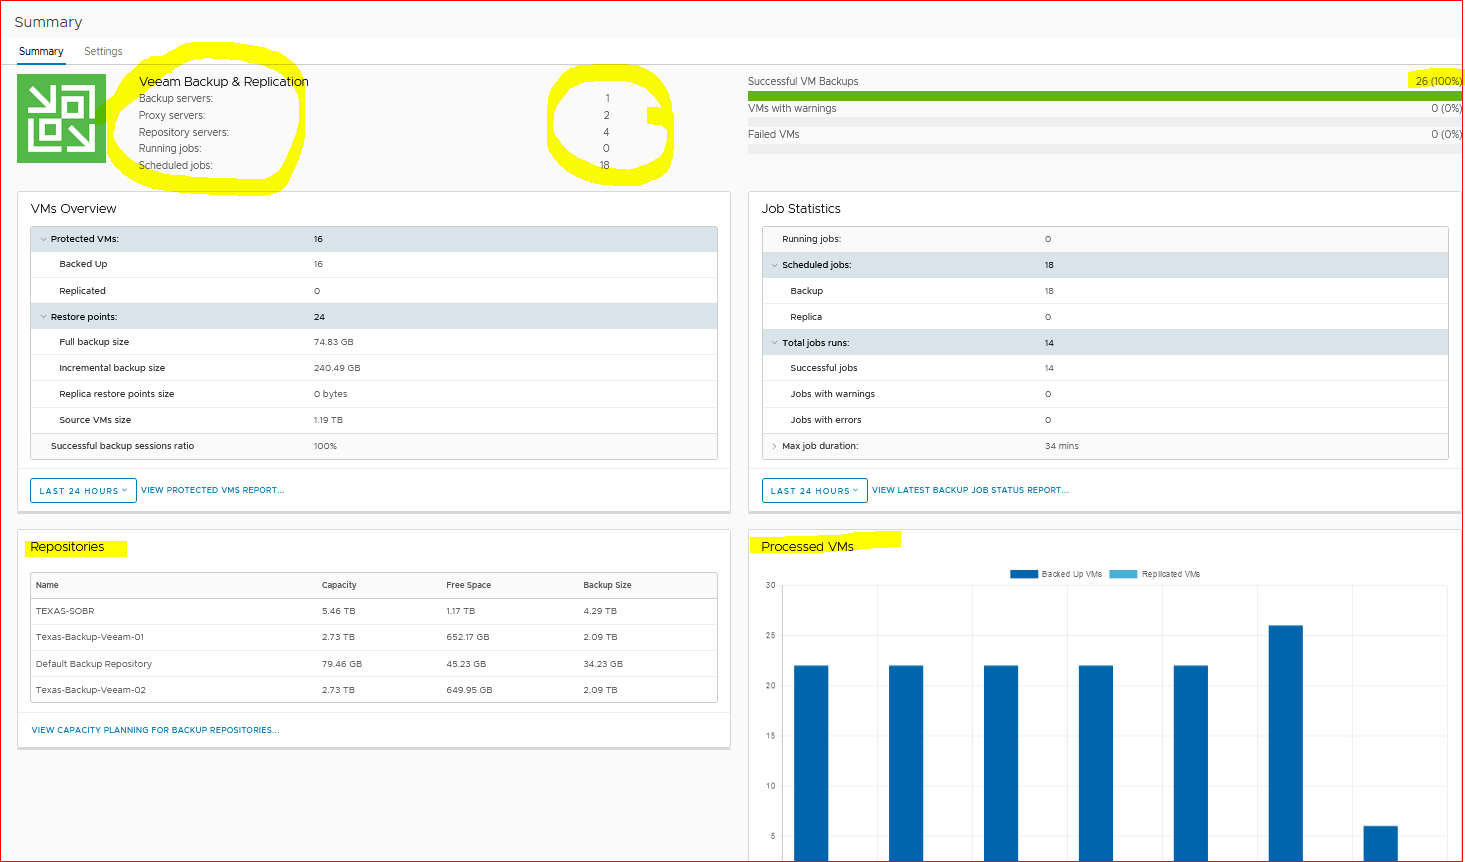
Configure Veeam Enterprise Manager
Initial Configuration - Veeam Backup Enterprise Manager Guide
Lunch SETUP!
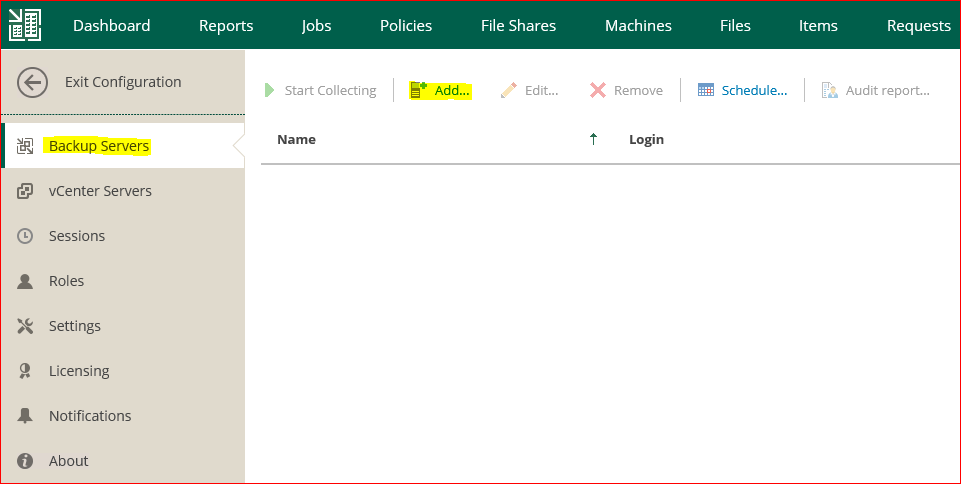
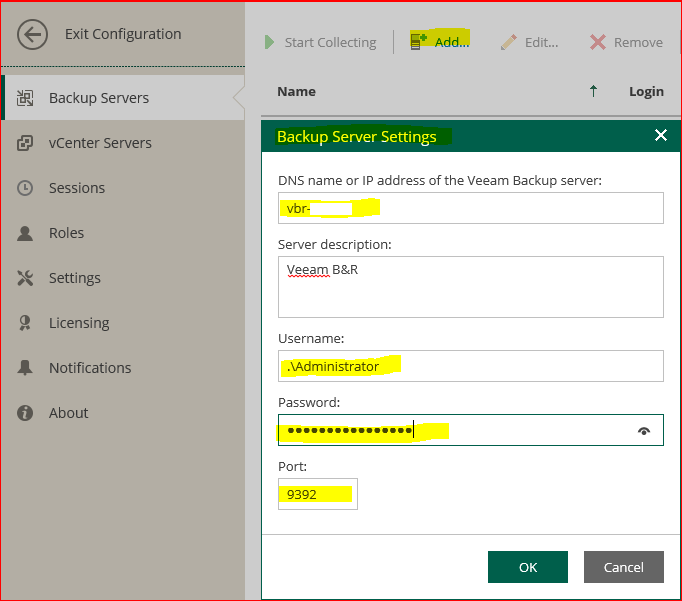
Configuration
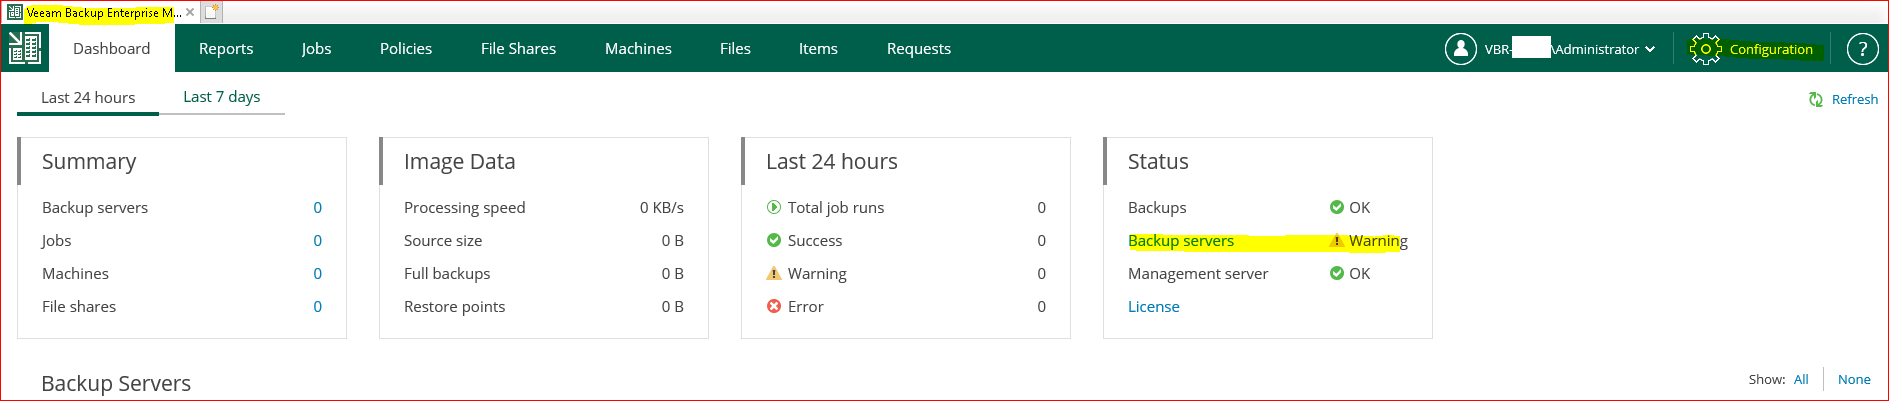
Adding Veeam Backup Servers
Getting Started - Veeam Backup Enterprise Manager Guide

- Configure vCenter Server
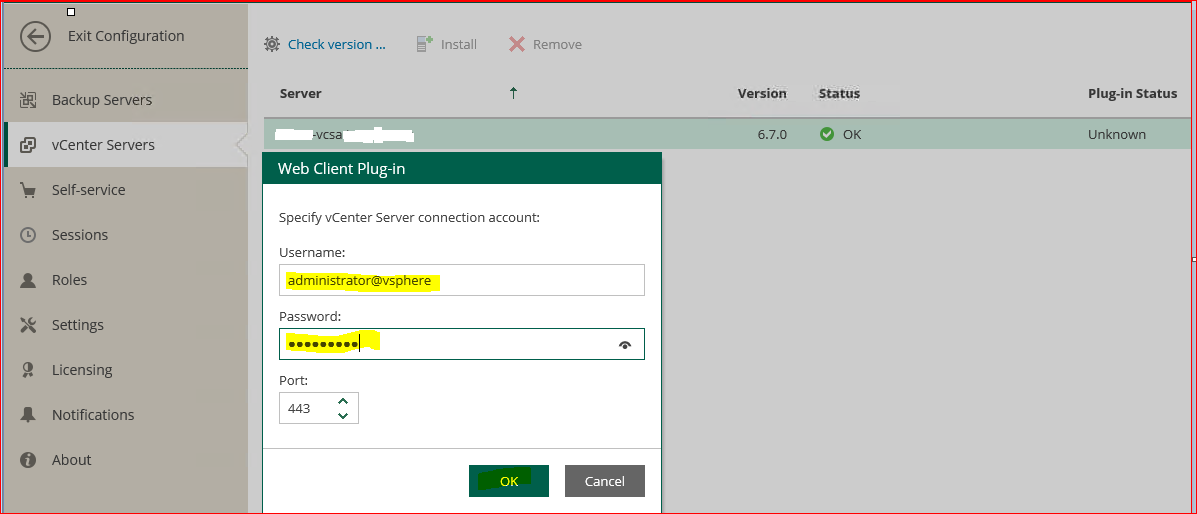
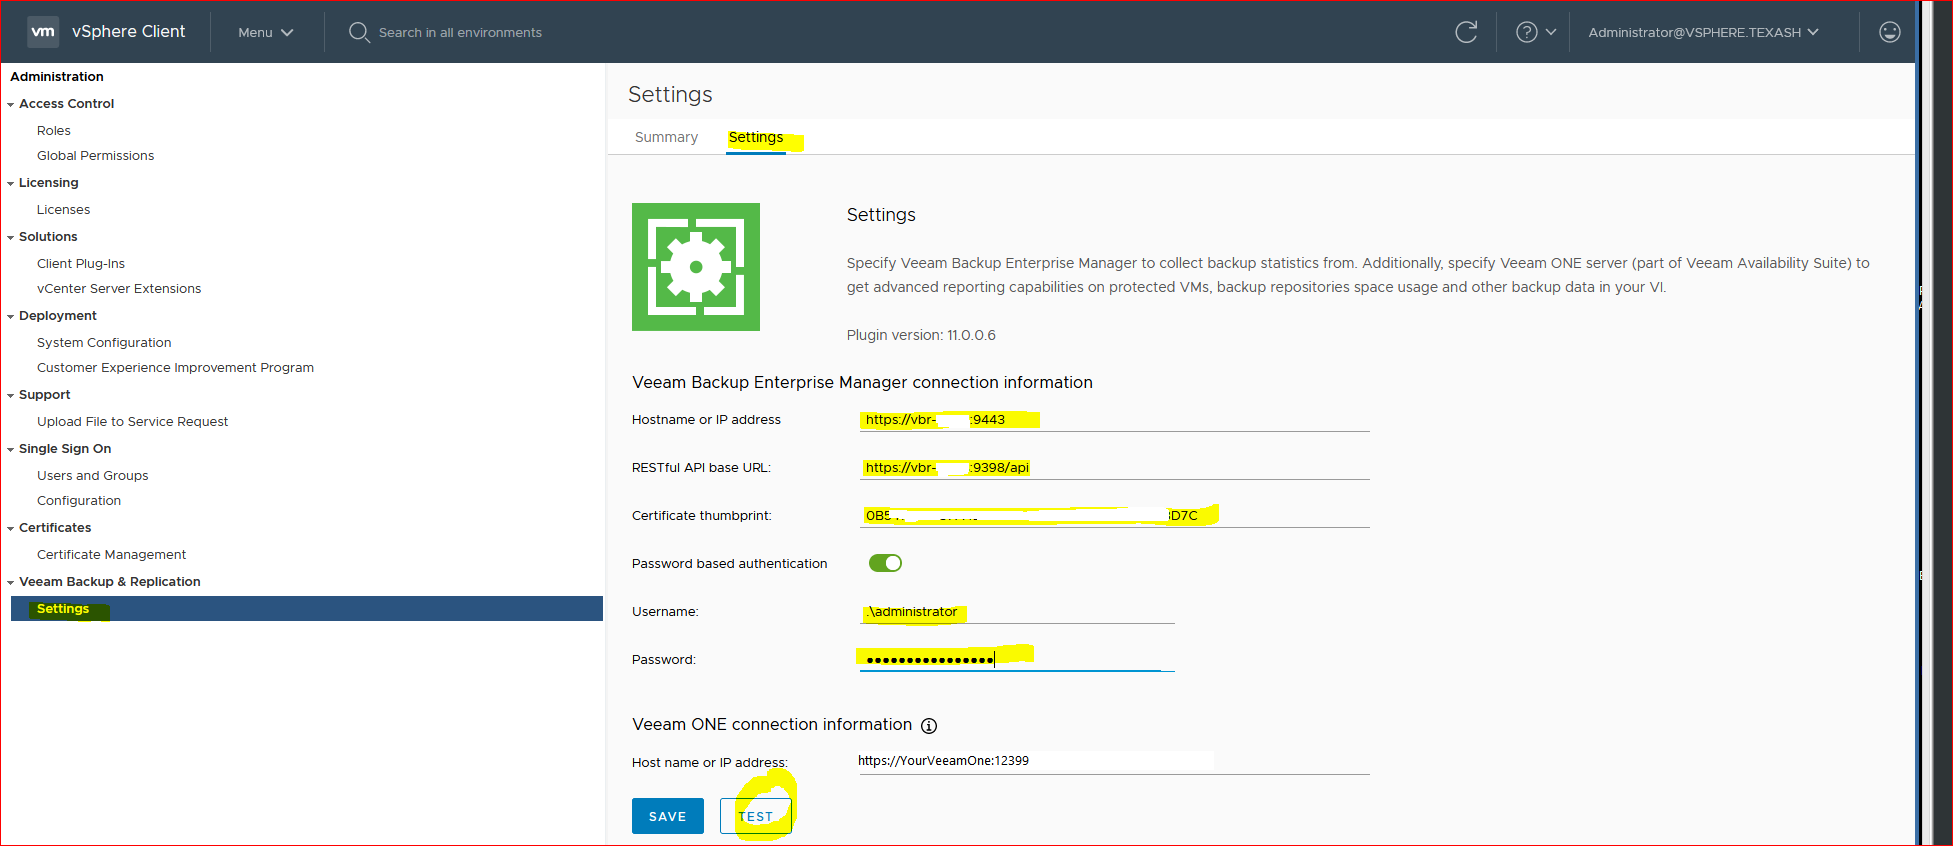
Configuring Plug-in Settings - Veeam Backup Enterprise Manager Guide


Before installing the plug in: Check the correct resolution from the Veeam EM of the VCSA server, Check the correct resolution of the Veeam EM server on the VCSA side.

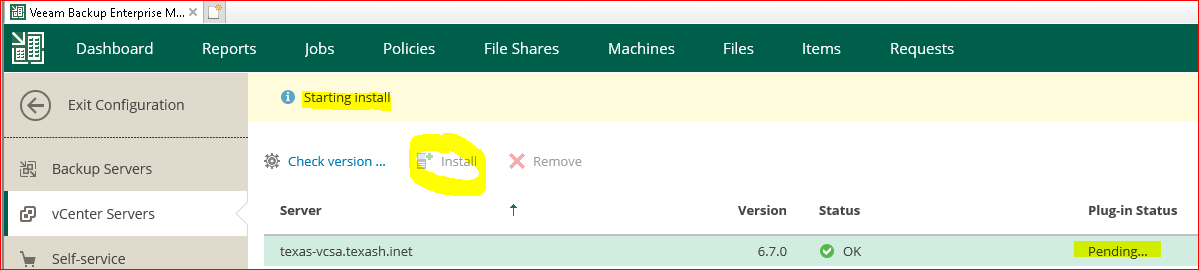
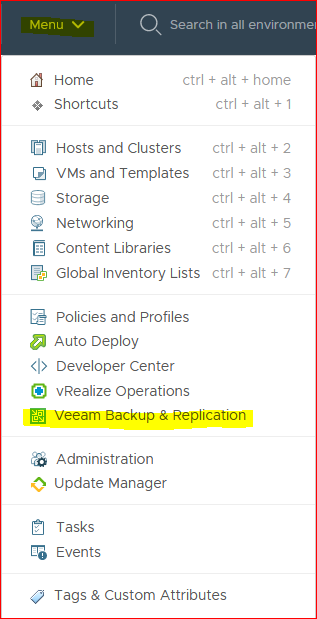
- Check correct installation of plug-in side VCSA HTML

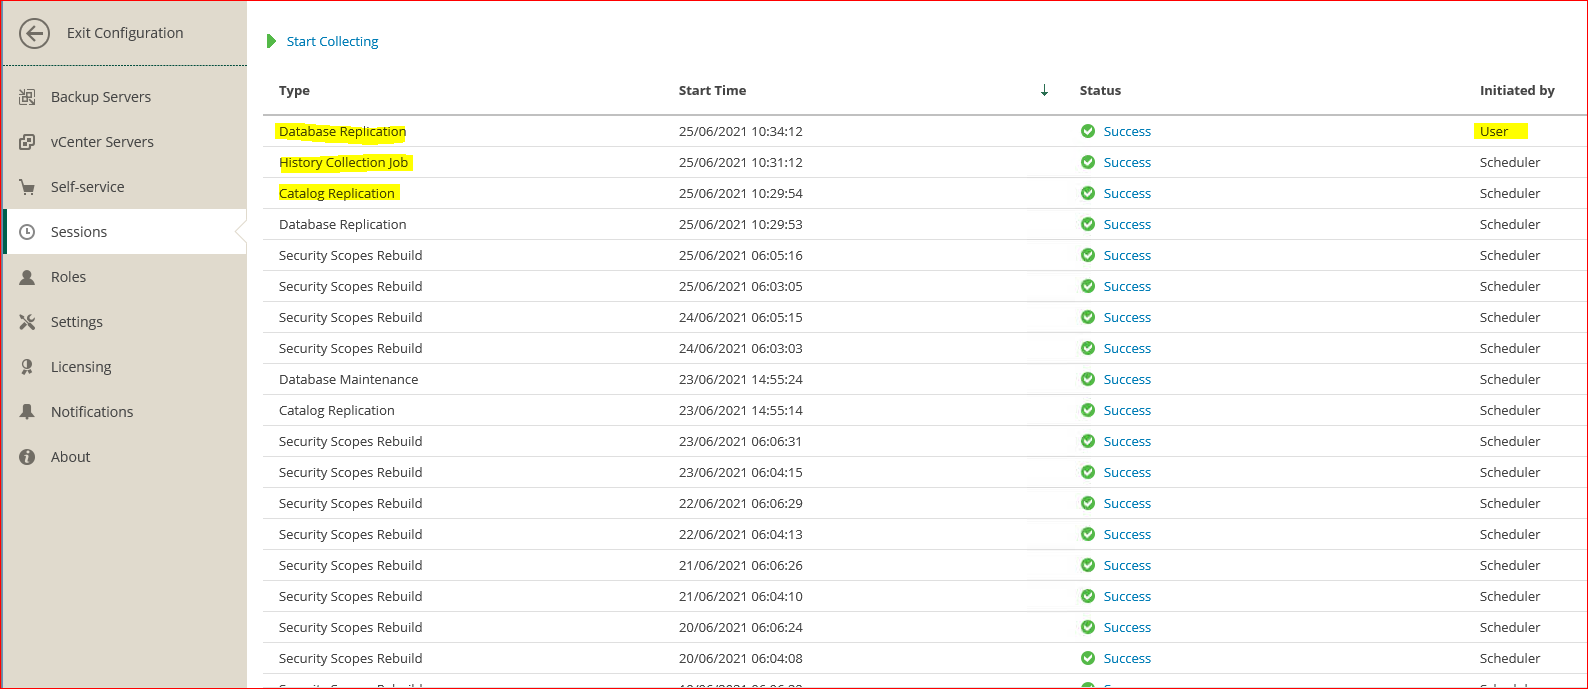
- Collecting Data from Backup Servers
- Default schedule time
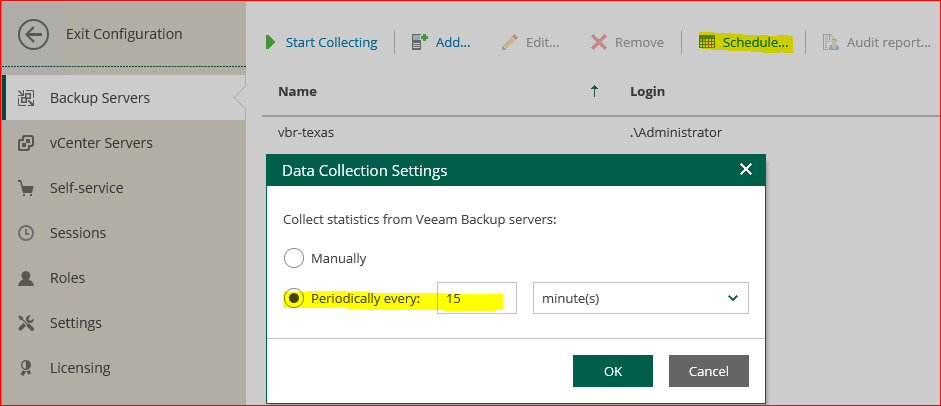
- Manually start Collecting

- Data Collection Job Session
- Configure Accounts and Roles


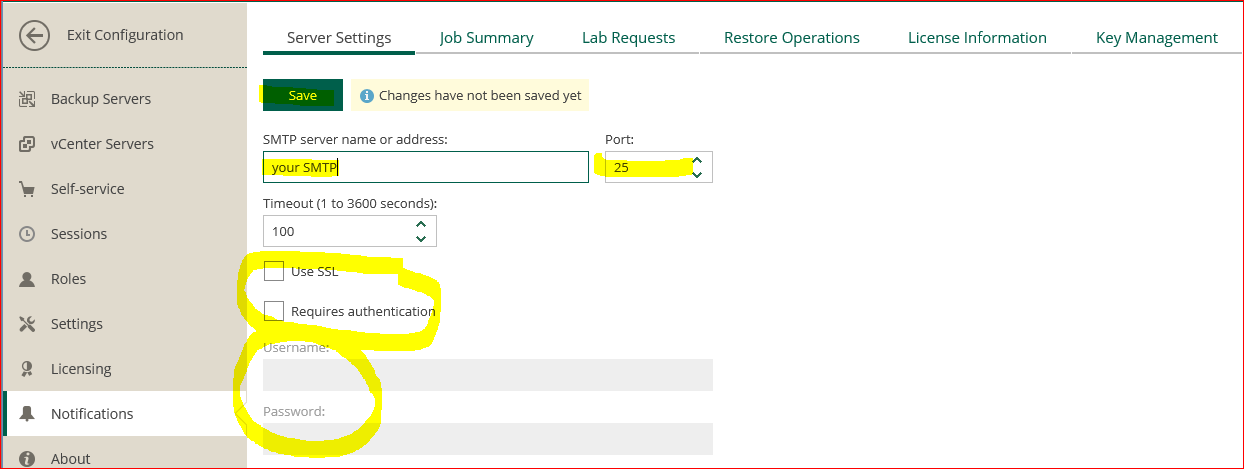
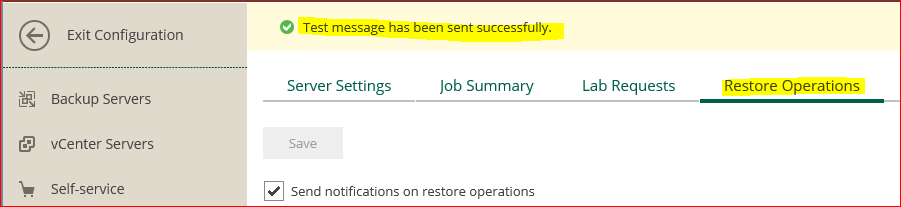
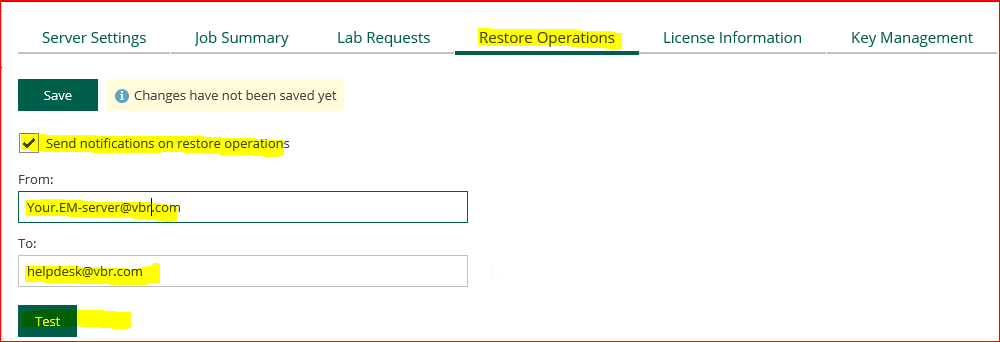
- Configuring Notification Settings
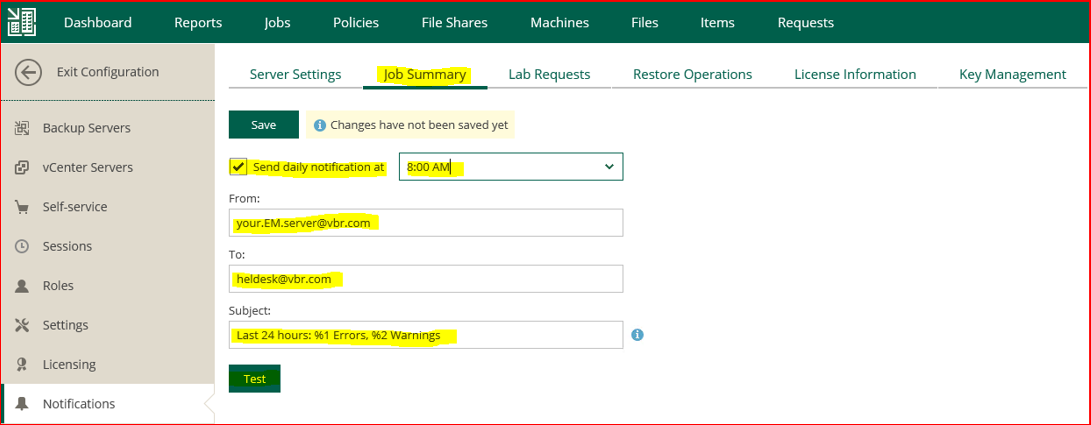
- Jon Summary
- License Information
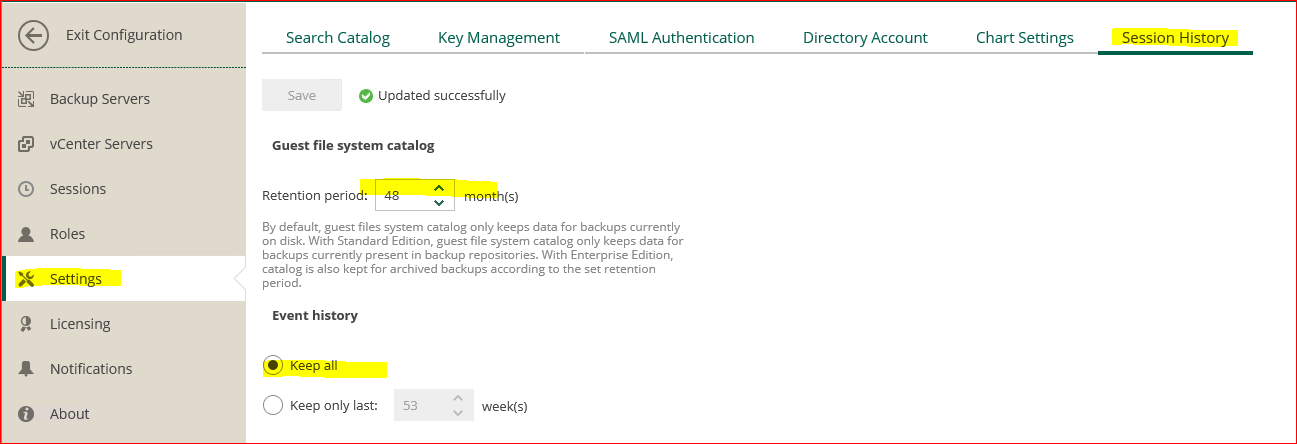
- Key managment
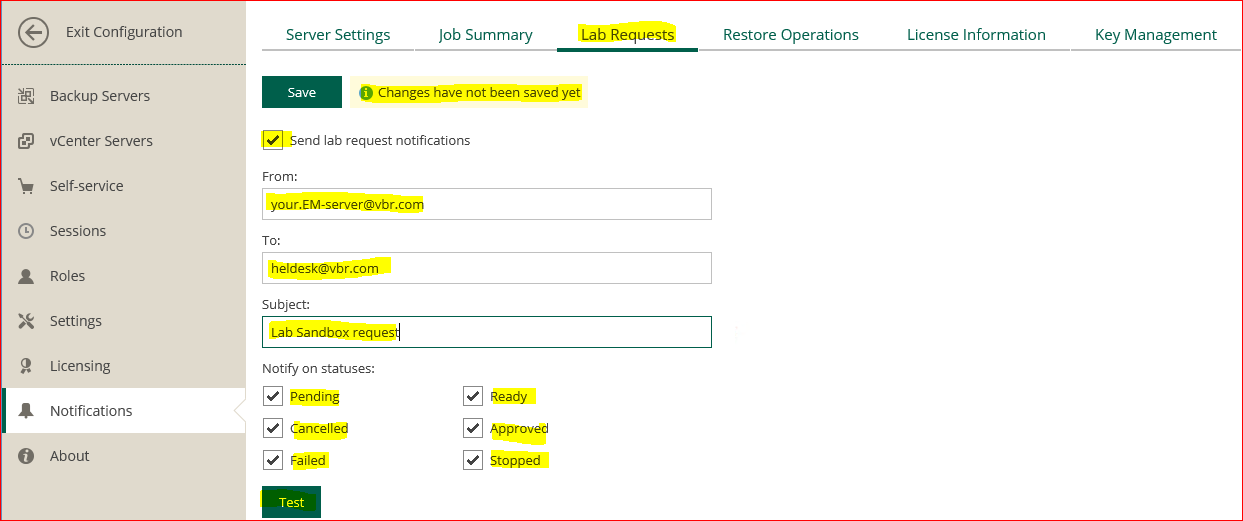
- Lab Request
- If you have configured the virtual Lab and\or sandbox to run Secure backup job, you can use this feature
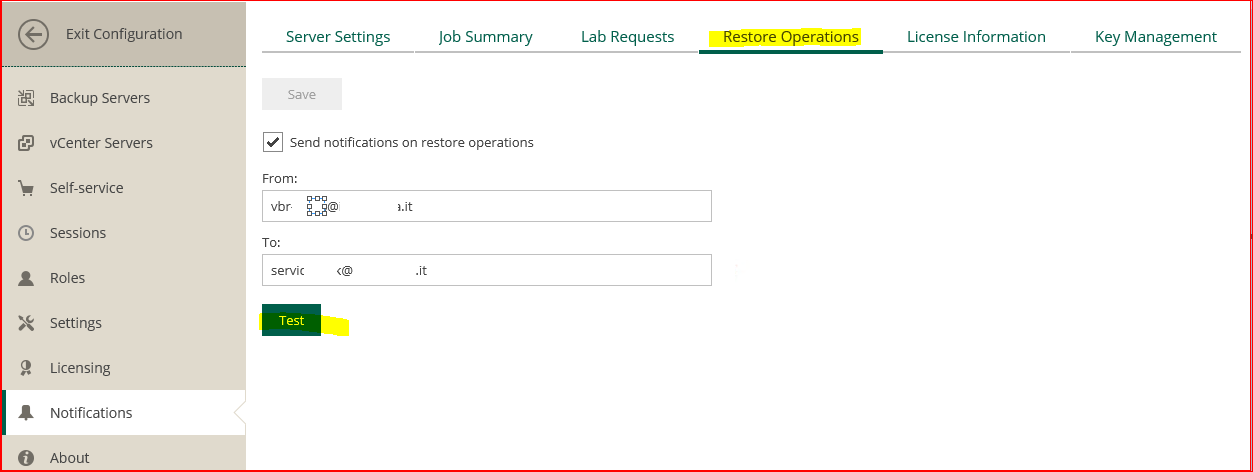
- Restore Option

Managing Encryption Keys - Veeam Backup Enterprise Manager Guide
- Configuration backup encryption
Check on Veeam EM “Enable encryption password loss protection”

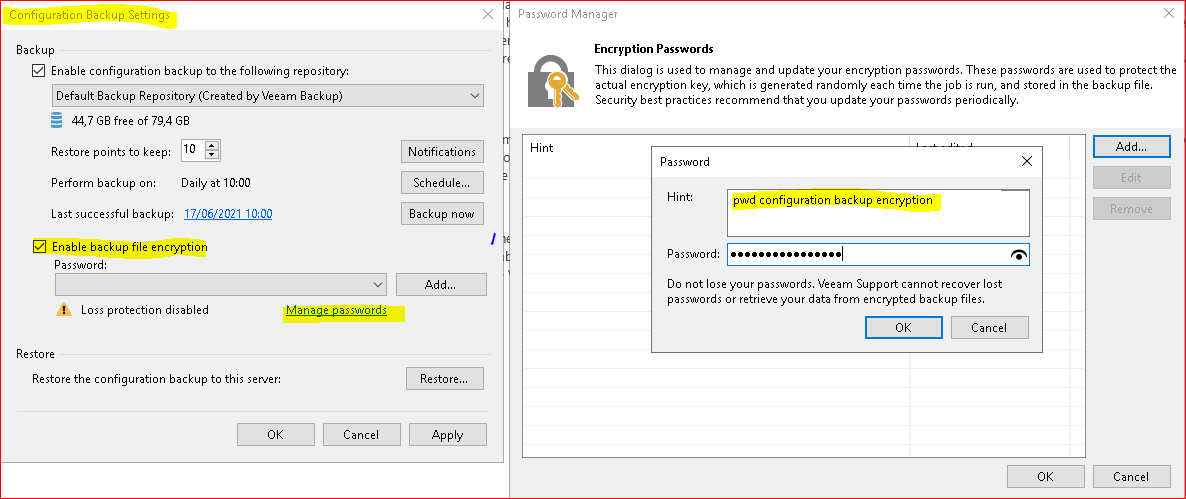
Creating Encrypted Configuration Backups - Veeam Backup Guide for Hyper-V
Handling Password Recovery Requests - Veeam Backup Enterprise Manager Guide
Conf Veeam post installation!
- Enable SQL Database exclusions from application-aware image processing
1. Close the Veeam Backup & Replication console.
2. Open Regedit.exe
3. Navigate to the key HKLM\SOFTWARE\Veeam\Veeam Backup and Replication\
4. Add a new DWORD ‘EnableDBExclusions’
5. Set the Value to 1

- How to enable advanced space control for Scale-Out Backup Repository
Update 2 for Veeam Backup & Replication introduces new space update logic. When extent is assigned to a new task, service cache updates free space information with the real one and subtracts it with estimated sizes of all the tasks currently going to this extent.
You can switch to new logic by creating the following registry key:
Key: HKLM\SOFTWARE\Veeam\Veeam Backup and Replication\SobrForceExtentSpaceUpdate
Type: DWORD
Default Value: 0 (Disabled) and setting value to 1 (Enabled).
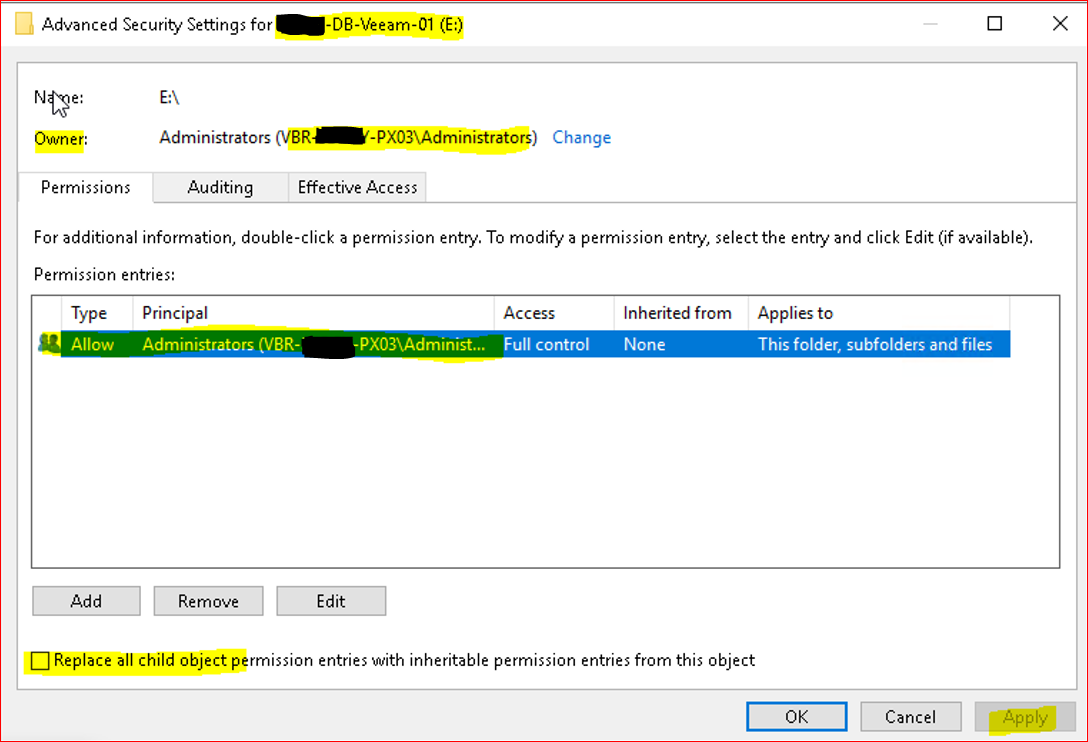
Hardening Repository
Set Permission on the Repository Volume
Best Practices for Hardening the Veeam Backup Repository (Windows) (vmguru.com)
- Modify the Firewall
You have three options to make the first install of Veeam components, pushed from the Veeam Backup & Replication server, a success. From most preferred to least preferred option:
- Keep Windows Firewall On and add three new firewall rules.
- Keep Windows Firewall On and manual install the Veeam Installer Service (VeeamDeploySvc)
- Switch Windows Firewall Off and enable File and Printer Sharing during the first install
Option 1 – Keep the Windows Firewall On and add three new firewall rules.
From a command prompt run the following three commands to add three new rules to the Windows Firewall:
netsh advfirewall firewall add rule name="Veeam (DCOM-in)" dir=in action=allow protocol=TCP LocalPort=135 enable=yes program="%systemroot%\system32\svchost.exe" service=RPCSS remoteip=<VBR Server IP-address>

netsh advfirewall firewall add rule name="Veeam (SMB-in)" dir=in action=allow protocol=TCP LocalPort=445 enable=yes program=”System" remoteip=<VBR Server IP-address>

netsh advfirewall firewall add rule name="Veeam (WMI-in)" dir=in action=allow protocol=TCP LocalPort=RPC enable=yes program="%systemroot%\system32\svchost.exe" service=winmgmt remoteip=<VBR Server IP-address>
After adding these firewall rules nothing else has to be done to the Windows server to be added to the Veeam Infrastructure components. You also do not have to switch on File and Printer Sharing specifically. By using these commands on a Veeam Infrastructure template in your infrastructure you can make sure any VM which you are going to deploy to be added to the Veeam Infrastructure is ready for installation, while being fully protected.
Note: You can also store these three commands in a windows .bat file and run that on every Windows server you are preparing to use as a Veeam Infrastructure component.
Option 2 – Keep Windows Firewall On and manual install the Veeam Installer Service.
Open the CMD utility on the repository server and create a folder C:\Windows\Veeam\Backup
mkdir C:\Windows\Veeam\Backup
Copy two files named: VeeamDeploymentDll.dll & VeeamDeploymentSvc.exe from the Veeam Backup & Repository server path C:\Program Files\Veeam\Backup and Replication\Backup\Packages to the newly created folder on the repository server C:\Windows\Veeam\Backup.
You can use the <TAB> key for auto completion.
Drop to a command window on the Veeam repository server in the directory C:\Windows\Veeam\Backup the following command: VeeamDeploymentSvc.exe -install this way the Veeam installer service will be installed. Veeam will add Firewall rules for Veeam during installation, which are visible as Veeam Networking in the firewall under Allowed apps and features. When using the -uninstall flag the installed service will be gracefully be uninstalled.
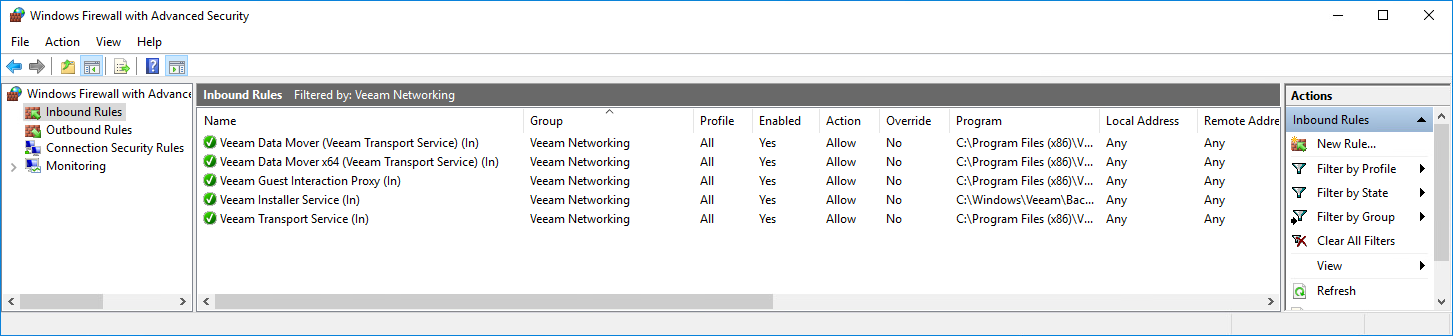
This manual install process can be interesting when the repositories are situated in a zone where you have no internet or other network access to download the needed program files.
Option 3 (Not recommended) – Turn Windows Firewall Off and Enable File and Printer Sharing during the first install
This option is not recommended from a security standpoint! You can disable the Windows Firewall and enable File and Printer Sharing for the Private Networks during the initial Veeam installation. This way the right binaries gets pushed to the Windows Veeam Backup repository server. Veeam will add Firewall rules for Veeam during installation, which are visible as Veeam Networking in the firewall under Allowed apps and features. After the process completed successful make sure you enable the Windows Firewall again!
Disable remote RDP services to the repository servers
Veeam Backup Repositories are (most) often physical. An extra security measure is to disable any remote RDP access towards that Windows Machine in Windows and use a KVM-over-IP switch to access this machine remotely in the datacenter.
Use Veeam encryption
Backup and replica data can be intercepted in-transit, when it is communicated from source to target over a network. To secure the communication channel for backup traffic, consider these guidelines:
- Isolate backup traffic. Use an isolated network to transport data between backup infrastructure components — backup server, backup proxies, repositories and so on. (also see segmentation)
- Encrypt network traffic. By default, Veeam Backup & Replication encrypts network traffic traveling between public networks. To ensure secure communication of sensitive data within the boundaries of the same network, you can also encrypt backup traffic in private networks. For details, see Enabling Network Data Encryption.
To make sure that an unauthorised person is not able to read and abuse anything in the backup files, use Veeam Backup & Replication inbuilt encryption to protect data in backups. To guarantee security of data in backups, follow the Veeam Encryption Best Practices.
Setup My Veeam weekly Report Scheduled + Validator
How to atomate & schedule Veeam.Backup.Validator.exe | Veeam Community Resource Hub
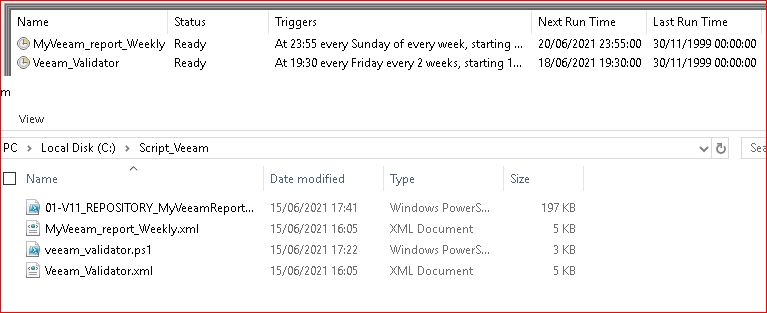
Veeam Backup Validator - User Guide for VMware vSphere

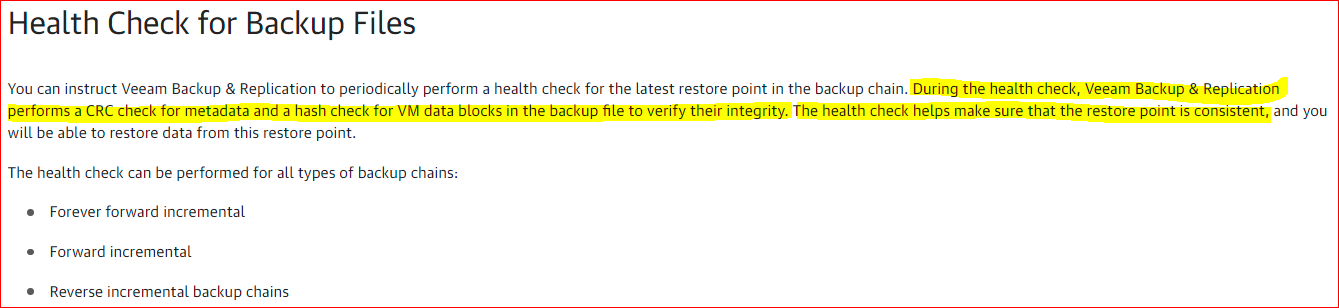
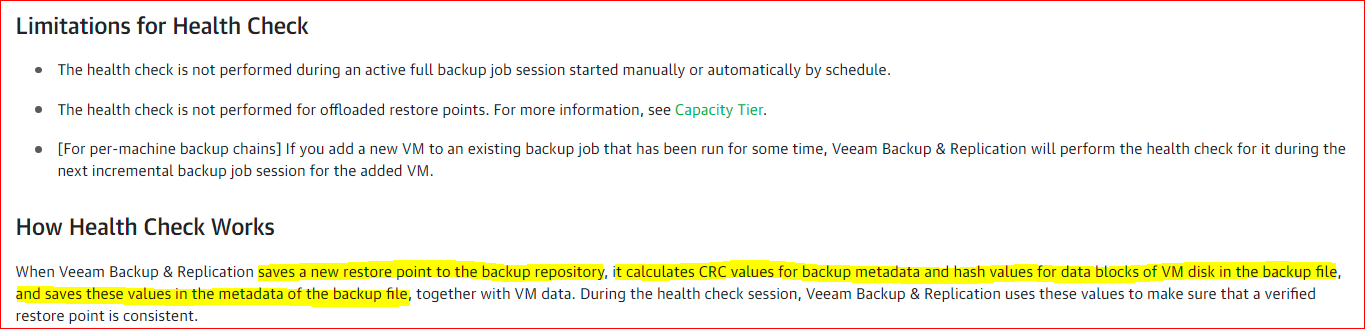
Health Check for Backup Files - User Guide for VMware vSphere (veeam.com)

Antivirus Exclusions
KB1999: How to configure antivirus exclusions to prevent interaction with Veeam Backup & Replication
KB3074: How to Configure Antivirus Exclusions for Veeam Backup for Microsoft Office 365
KB2034: How to add Veeam Agent for Microsoft Windows to antivirus exclusions list
that's all people, I tried to make a specific guide step by step to make better know the product and its number of features.
If you can merge the guide into one post that would be great.
Otherwise can some moderator kindly rename the title the part.01?
Thanks
thanks for your attention.
Please let me know if there are any inaccuracies and/or typos.
Thank you
