

Hello Community!
If you’re a Veeam Cloud Service Provider (VCSP), you know the challenges of handling licenses for tenants. The old way of emailing .lic files, waiting for tenants to install them, and then verifying everything worked correctly is time consuming and prone to errors. It may work for a few customers, but as you scale, it quickly becomes unmanageable.
This is where the Veeam Service Provider Console (VSPC) changes the game. By integrating VSPC with the Veeam ProPartner Pulse portal, you can manage license distribution, usage reporting, and billing in a centralized, automated way. No more manual file exchanges and licenses are pushed directly into tenant environments with minimal effort. Think of Pulse as the master licensing database and VSPC as the control plane that brings those licenses to life in your tenants’ environments.
In this post, I’ll walk through how this works and why it’s a game-changer for service providers
- How to connect Veeam VSPC Console to Pro Partner Pulse portal
- how to manage your license keys (creating, assigning, revoking)
- Company mapping (auto-map, manual, merge)
- Install the Veeam license to tenant VBR using VSPC console.
Prerequisites
Before this integration can work smoothly, a few conditions must be met on the tenant side:
- On the Tenant VBR side add the Cloud connect account in Veeam Service Provider
-
Enable Allow this VBR to be managed by the Service provider.
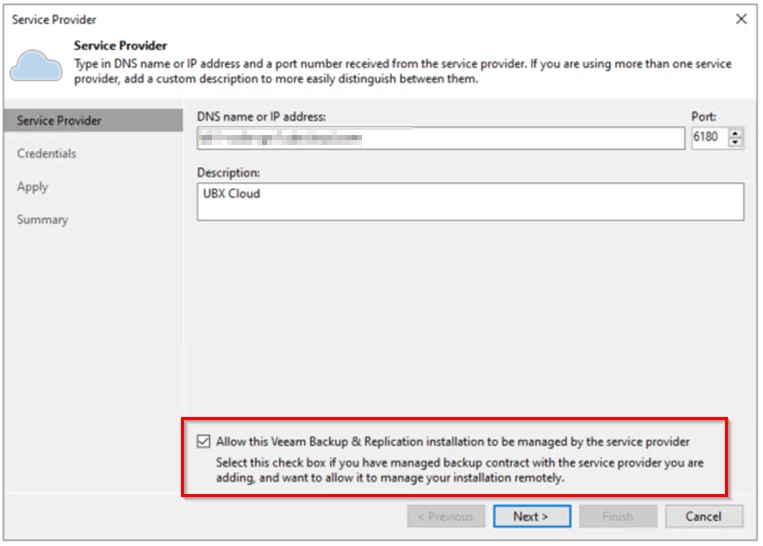
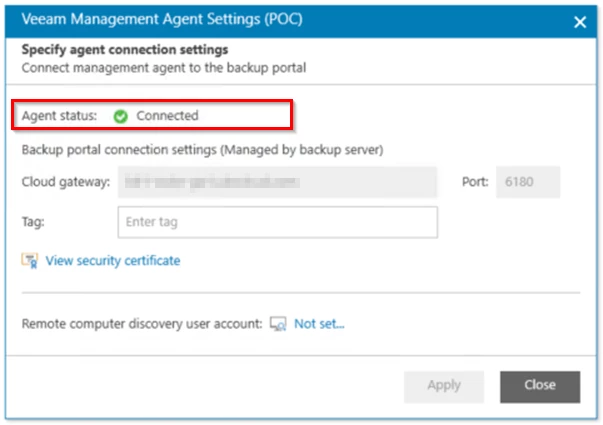
- Once the Configuration Completed, Confirm the Veeam Management Agent is connect with Service provider gateway
- Any SSL/TLS inspection on network security devices must be disabled for Veeam gateways to allow uninterrupted communication
These steps ensure that VSPC can fully manage the tenant’s environment and push licenses without hiccups.
Step 1: Connecting VSPC to Pulse
Pulse is part of Veeam pro partner portal where you manage licensing and submit monthly usage to your aggregator. Pulse is the central place for managing your contracts, generating licenses, and reporting usage. By default, you might log in manually, download a license, and send it off. But with VSPC integration, this entire process becomes seamless
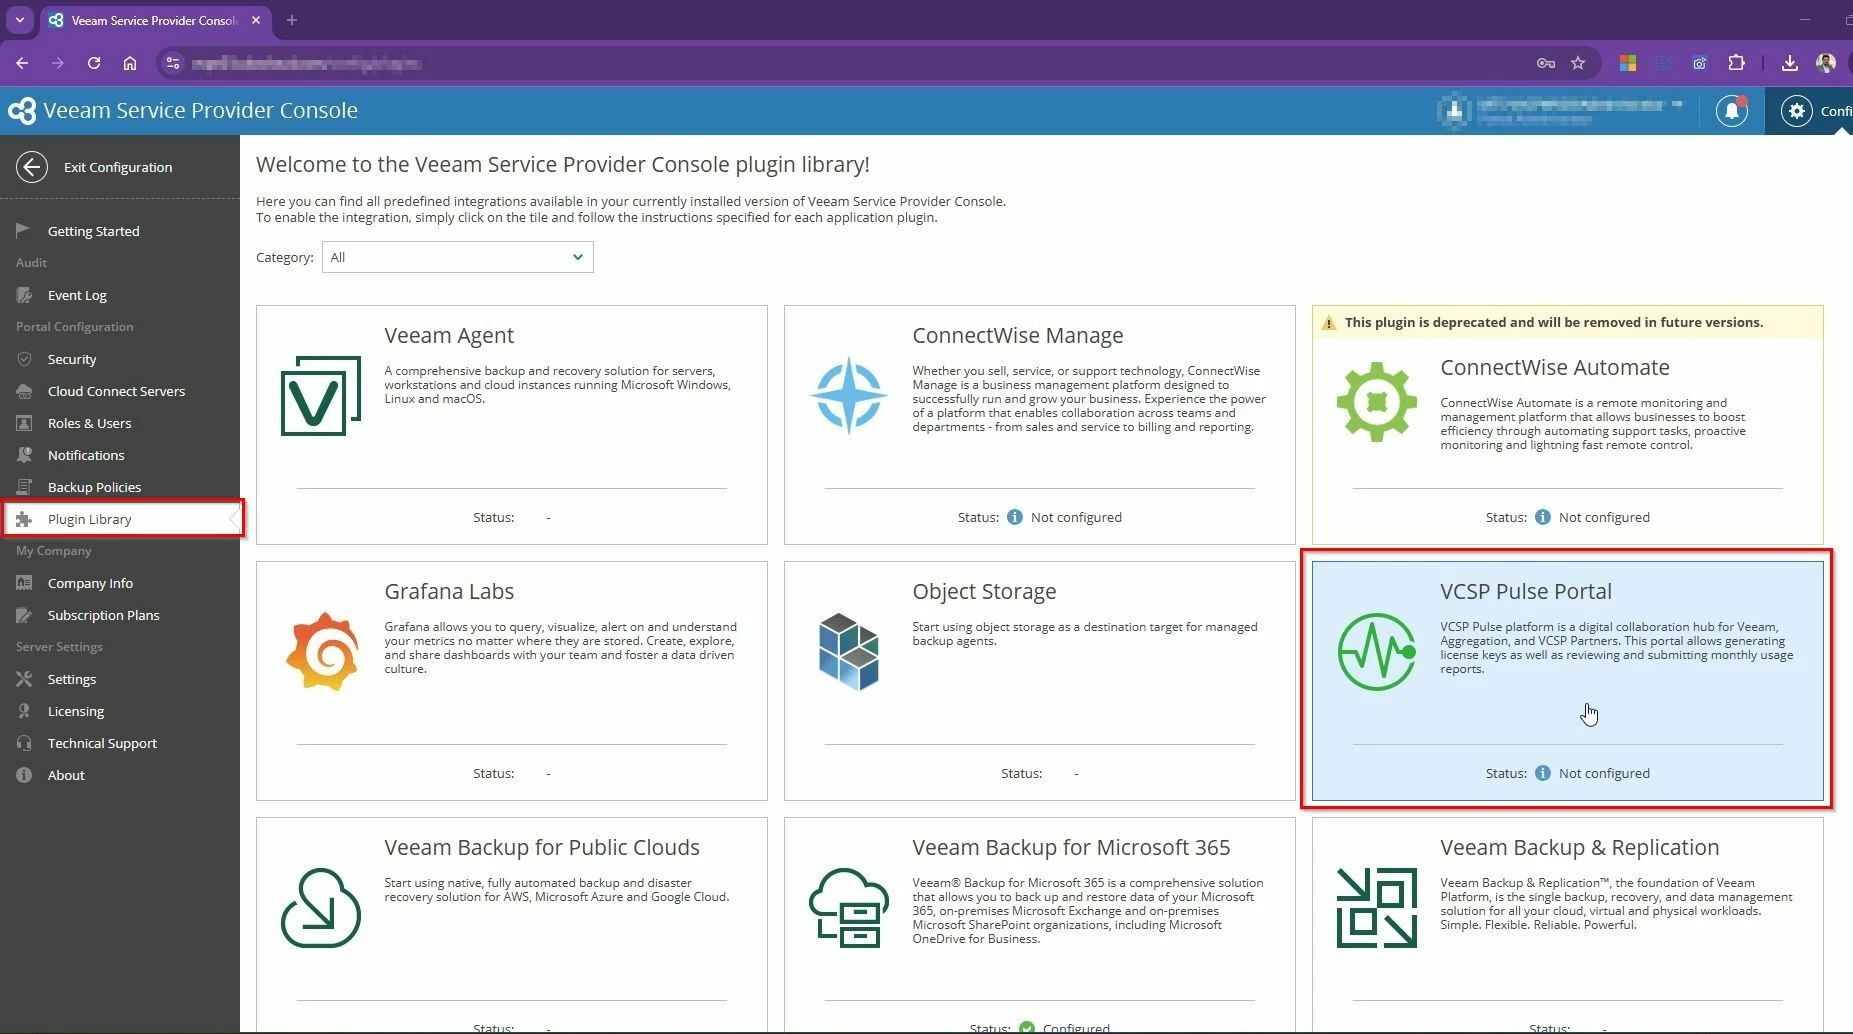
- In VSPC, open Configuration → Plugin Library → VSPC Pulse Portal.
- Generate a token in Pulse (using your Pro Partner credentials).
- Log in to Veeam ProPartner portal. --> Open the Propartner API (https://propartner.veeam.com/swagger/) for Partners.
- Generate API token.
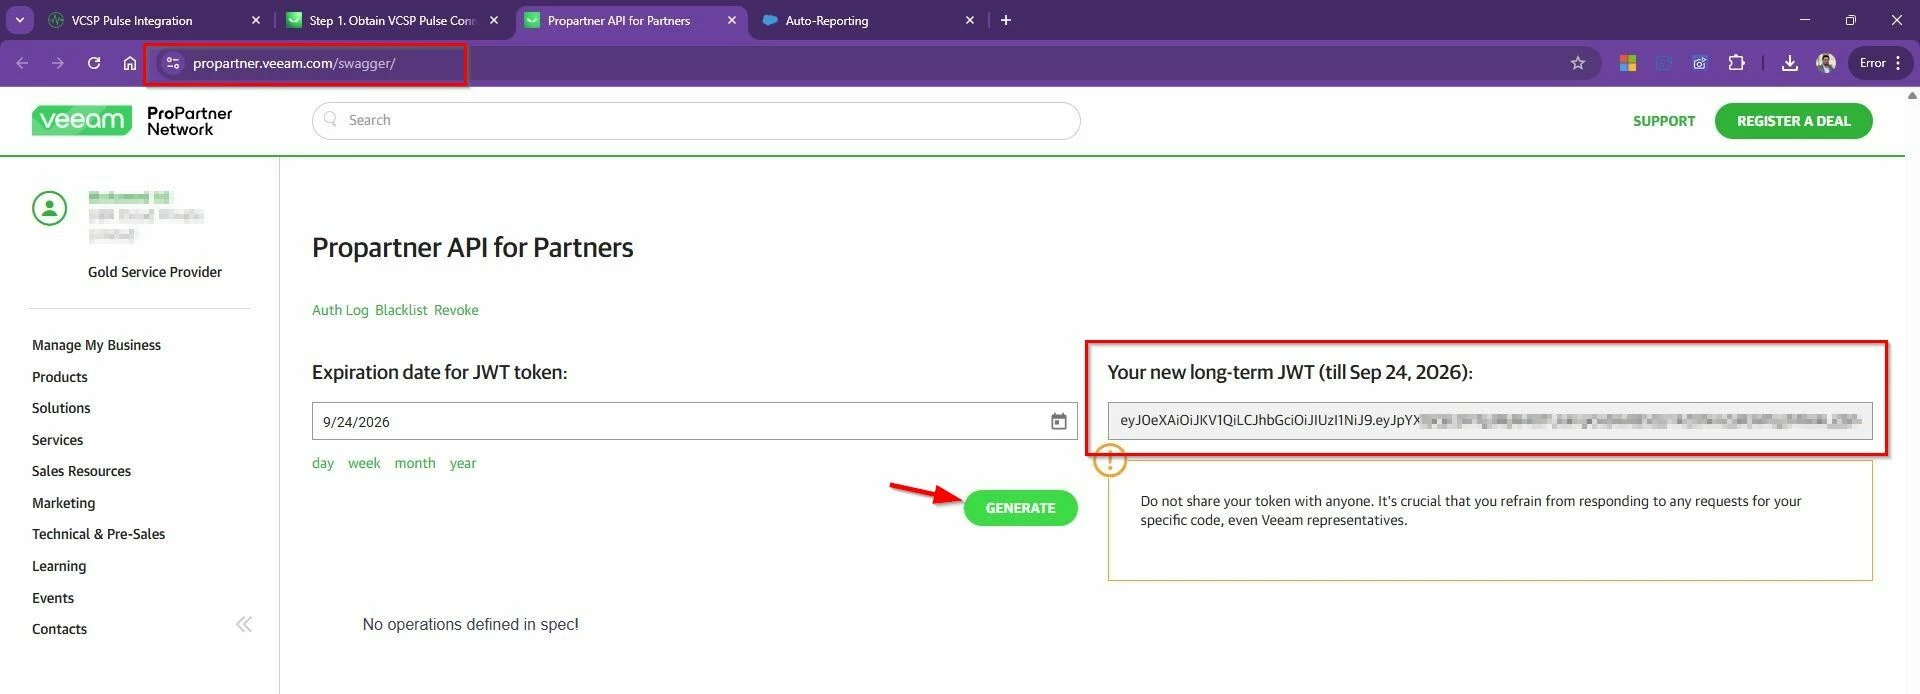
- Copy the API token into VSPC and connect.
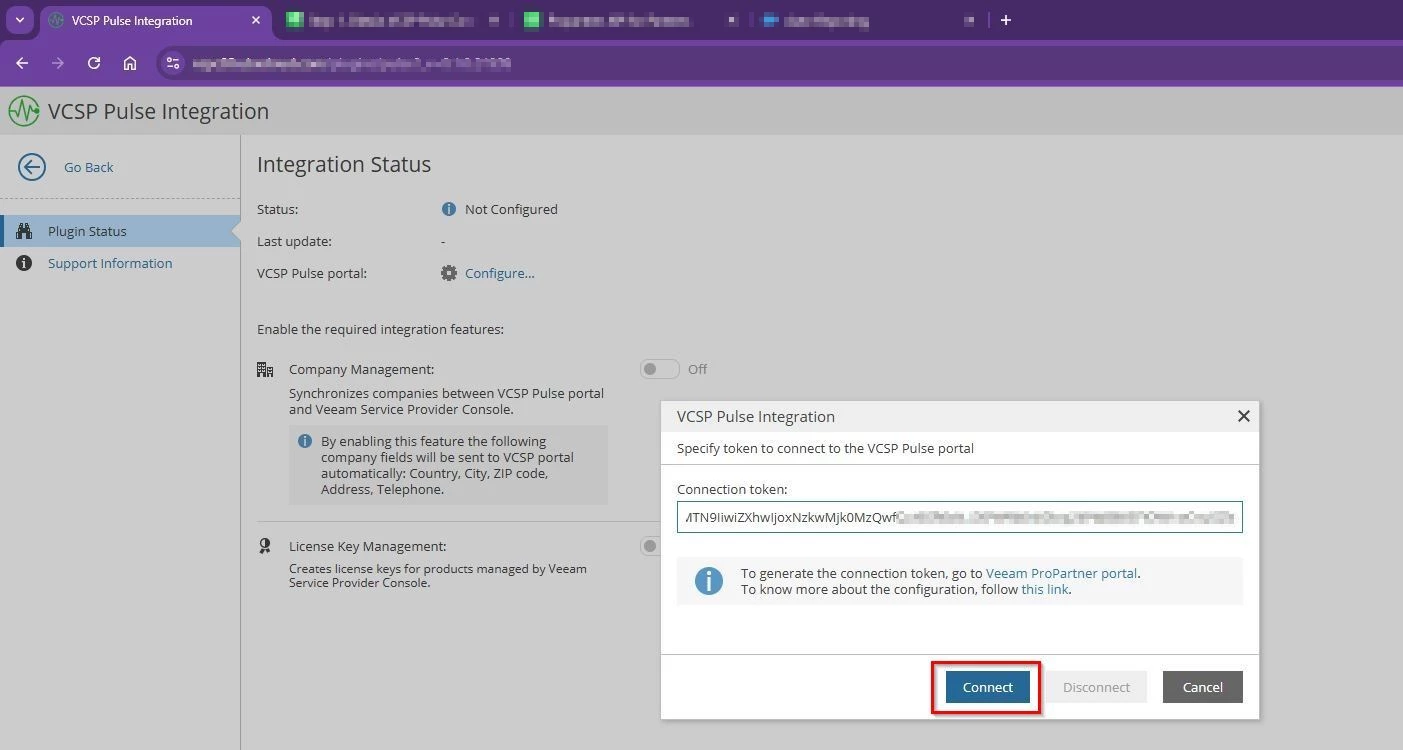
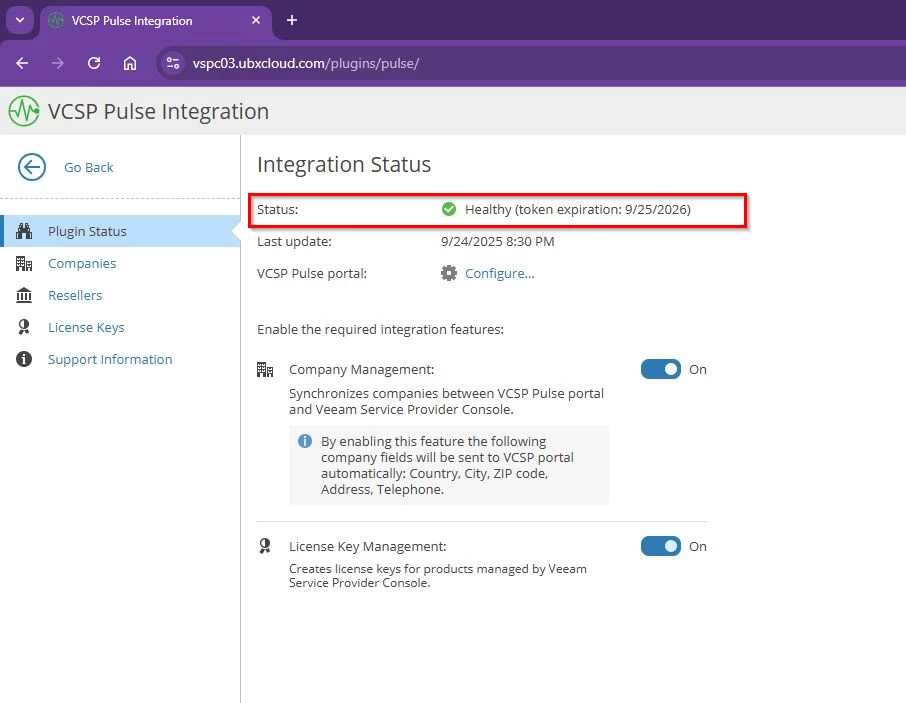
Once connected, you’ll see a green checkmark for health status. From there, you can enable pulse integration features:
- Company Management – Map and Synchronizes companies between VCSP Pulse portal and Veeam Service Provider Console.
- License Key Management – lets you create, assign, and push licenses from the console to the tenants.
Step 2: Company Management
Service Provider Console company is a company in the Veeam Service Provider Console (VSPC) that you manage and offer backup services to. They have a profile associated with whatever Veeam products that they may have, while the Pulse company is a way to create a license and assign it to that company. So really Pulse is just a place for you to be able to create an entry and create a key and assign it to the company in VSPC portal.
You must configure mapping in Veeam Service Provider Console and Mapping triggers synchronization of companies contact information, and enables further integration and provision the license in pulse portal. This mapping makes it painless to assign the right license to the right customer.
- Auto-map - If customer names match or are similar in Pulse and VSPC portal, it will automatically links them in Pulse.
- Manually map - This method when you have company already created or exist in Veeam Service Provider Console but the name in VCSP Pulse do not match then you can use this option to map the company with company already created in pulse portal
- Merge companies - If a customer has multiple entries (head office + branches), you can consolidate them into one.
- Create Company - If the company doesn’t exist in one system, you can create it directly
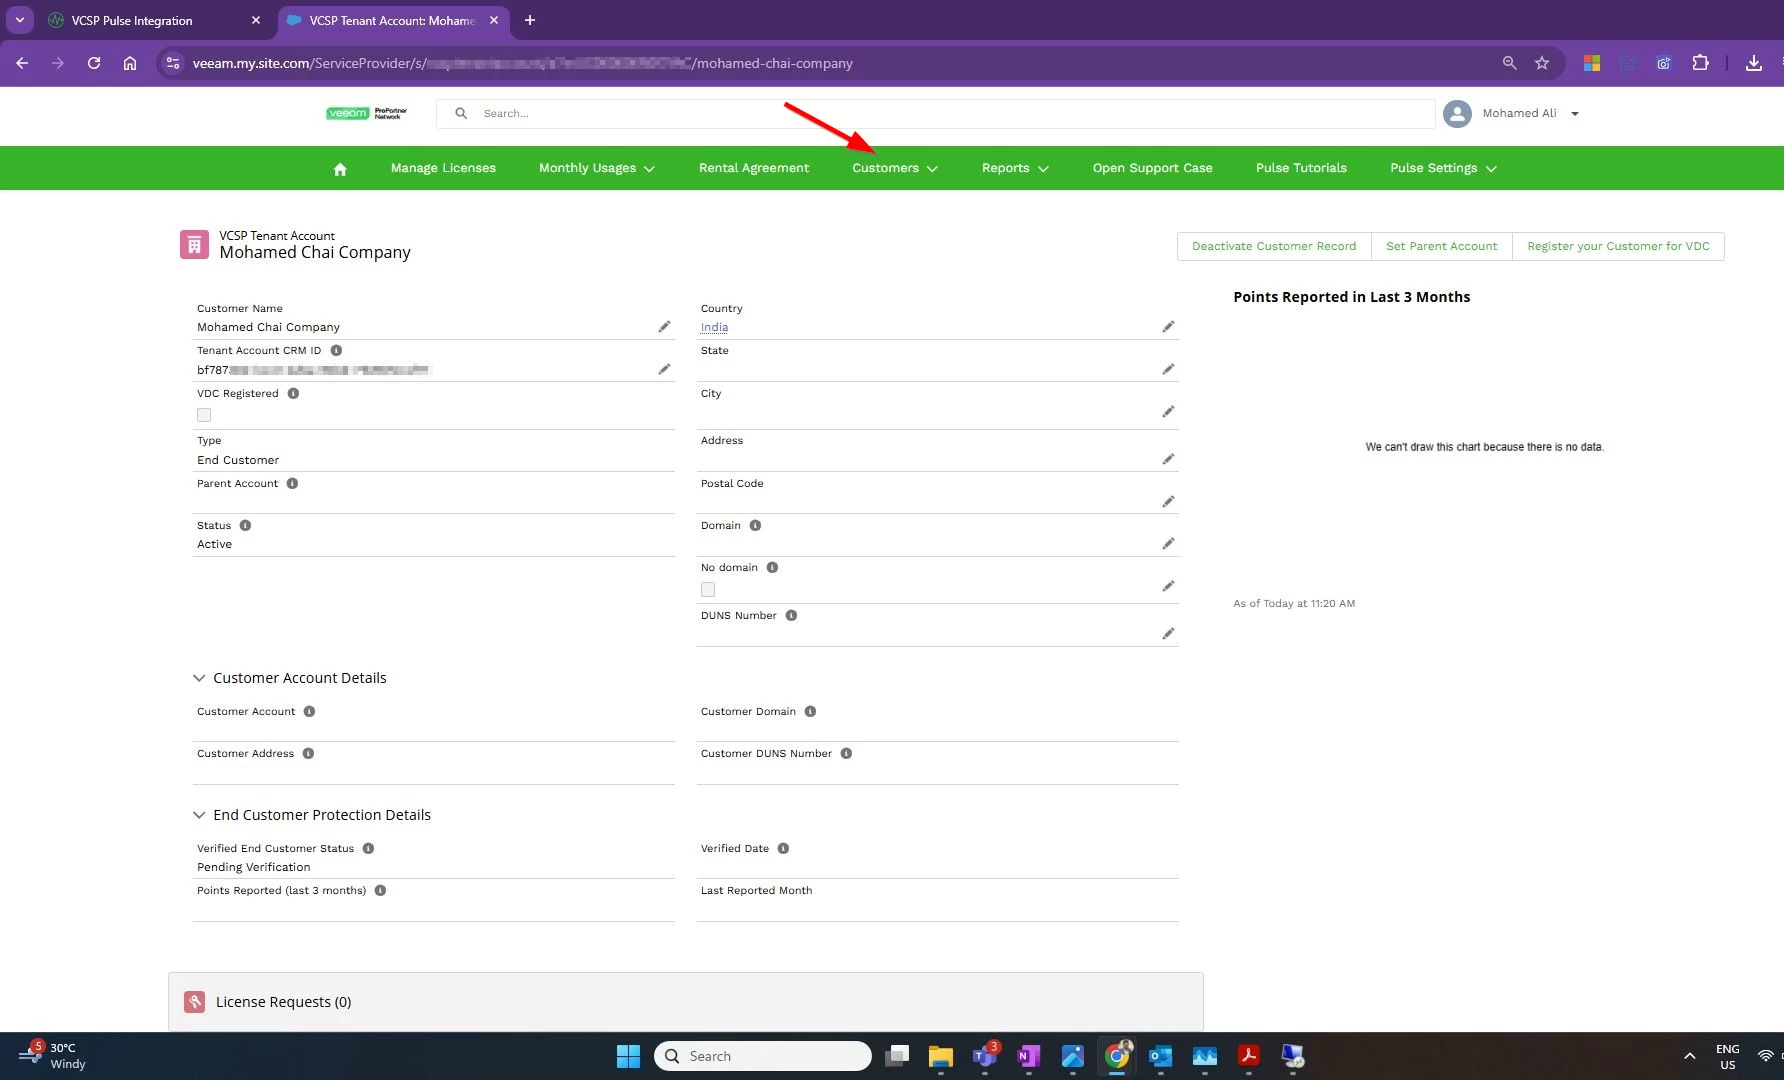
Example: In my setup, “Mohamed Chai Company” already exists in VSPC but not in Pulse. When I choose Create Company, it is created in Pulse and instantly VSPC marks it as Mapped. This mapping also generates a CRM ID in Pulse, tying the records together for reporting and licensing. The reverse is also true: if a company exists in Pulse but not in VSPC, you can create it in VSPC and the mapping is established automatically.
- Select the Company that needs license to be assigned → Select Create Company In VCSP Pulse
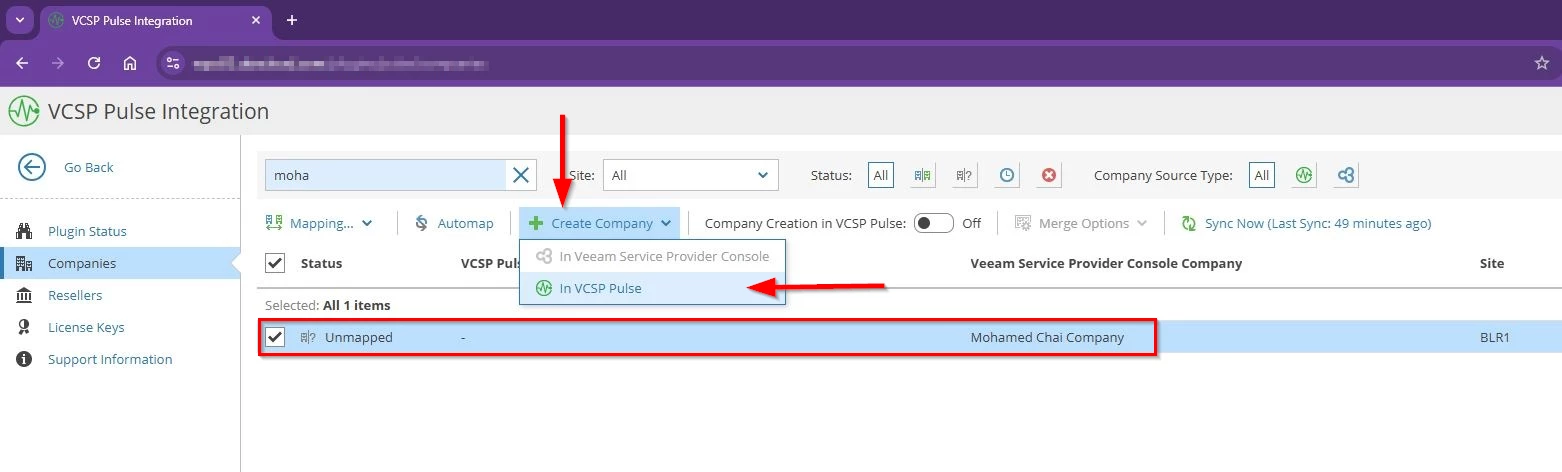
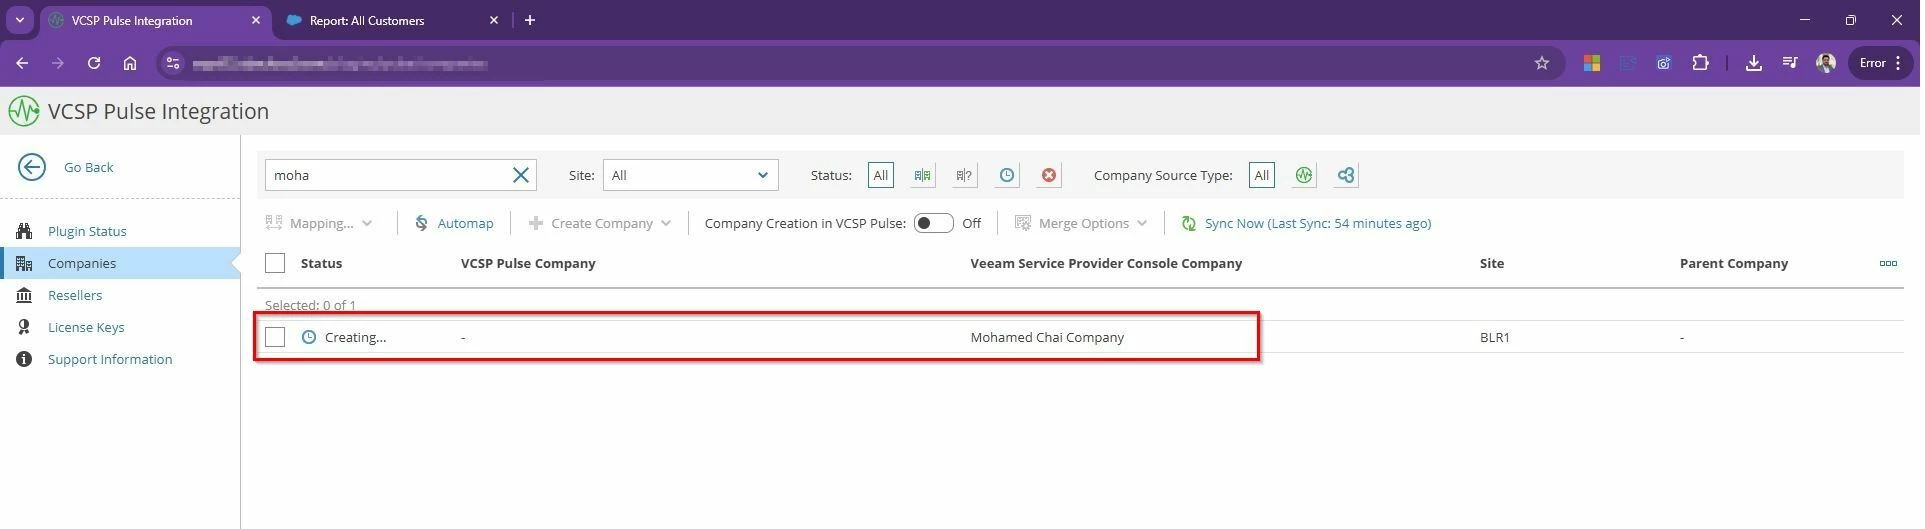

Once the company created in Pulse portal you will see the status changed from unmapped to Mapped.
Without this mapping, licenses can’t be accurately assigned. With mapping, everything lines up correctly, making usage reporting effortless.
You can see the VSPC tenant account created in Pulse portal as well and got the Tenant Account CRM ID. You can access the companies from Pulse portal --> Customers --> All customers.
Step 3: Create License Keys
Once company mapping is complete, license creation is straightforward:
- Go to VCSP Pulse integration page --> License keys --> New License
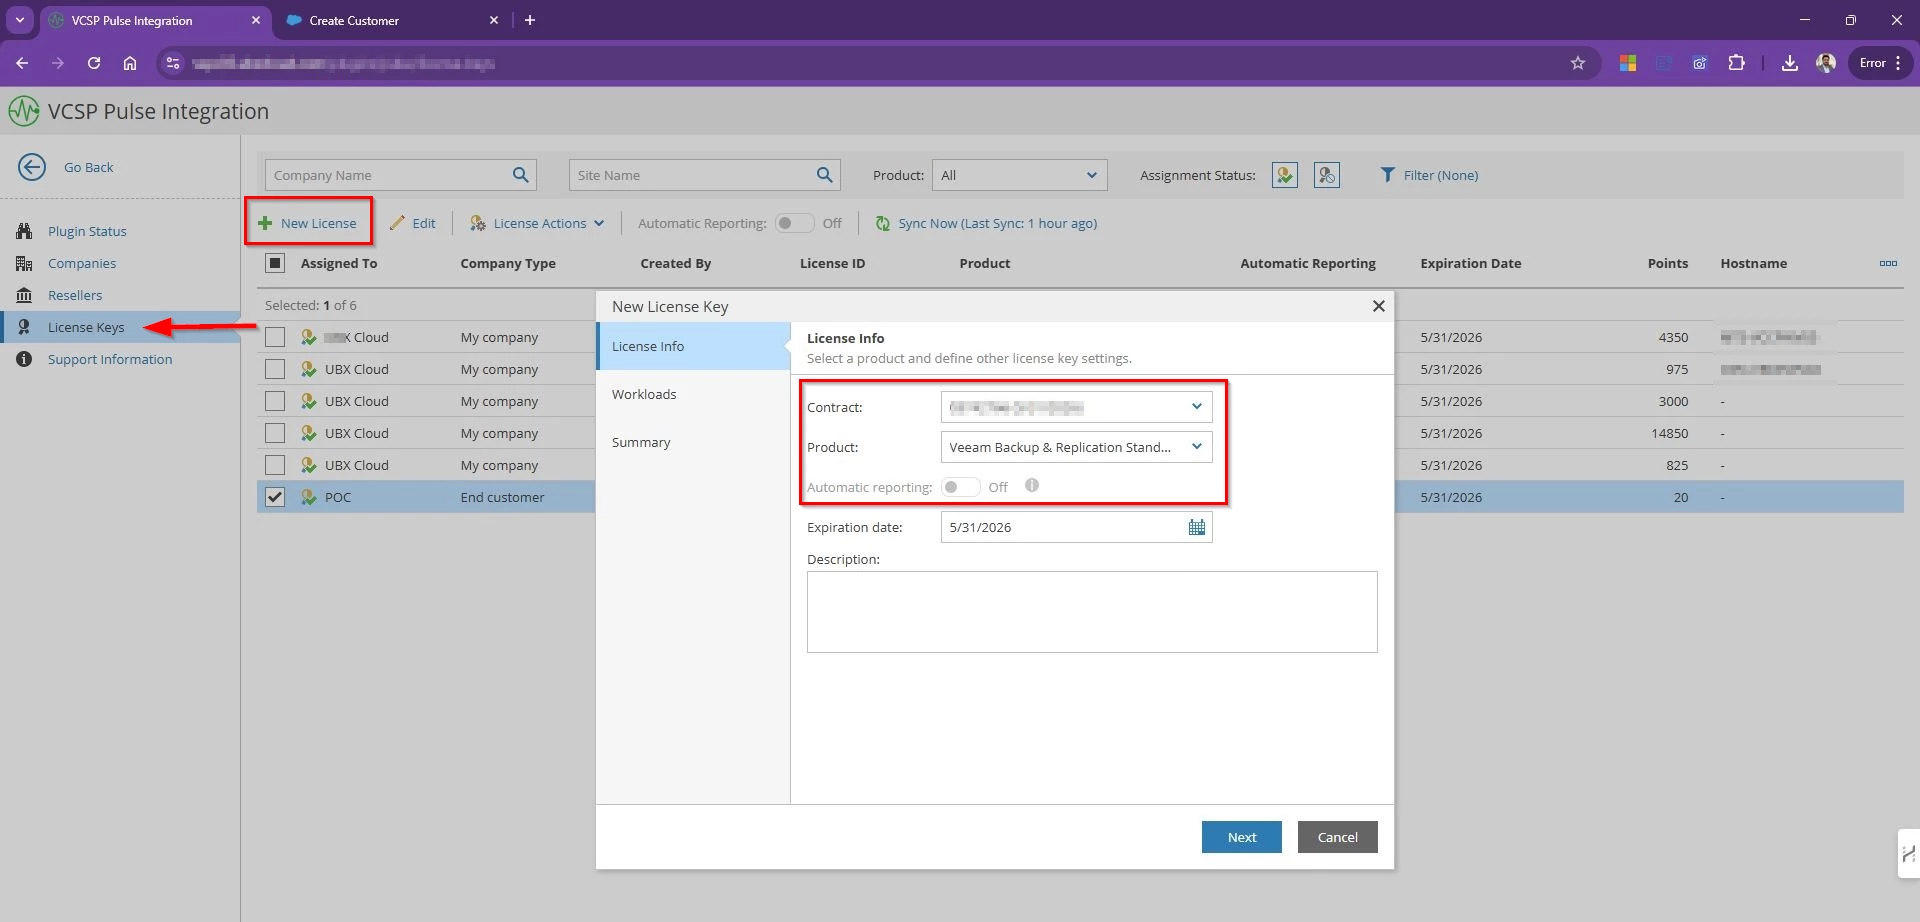
- Select the contract, the product (such as VBR or Veeam Agent), and the edition.
- Choose the workload type (VMs, servers, workstations) and specify the numbers
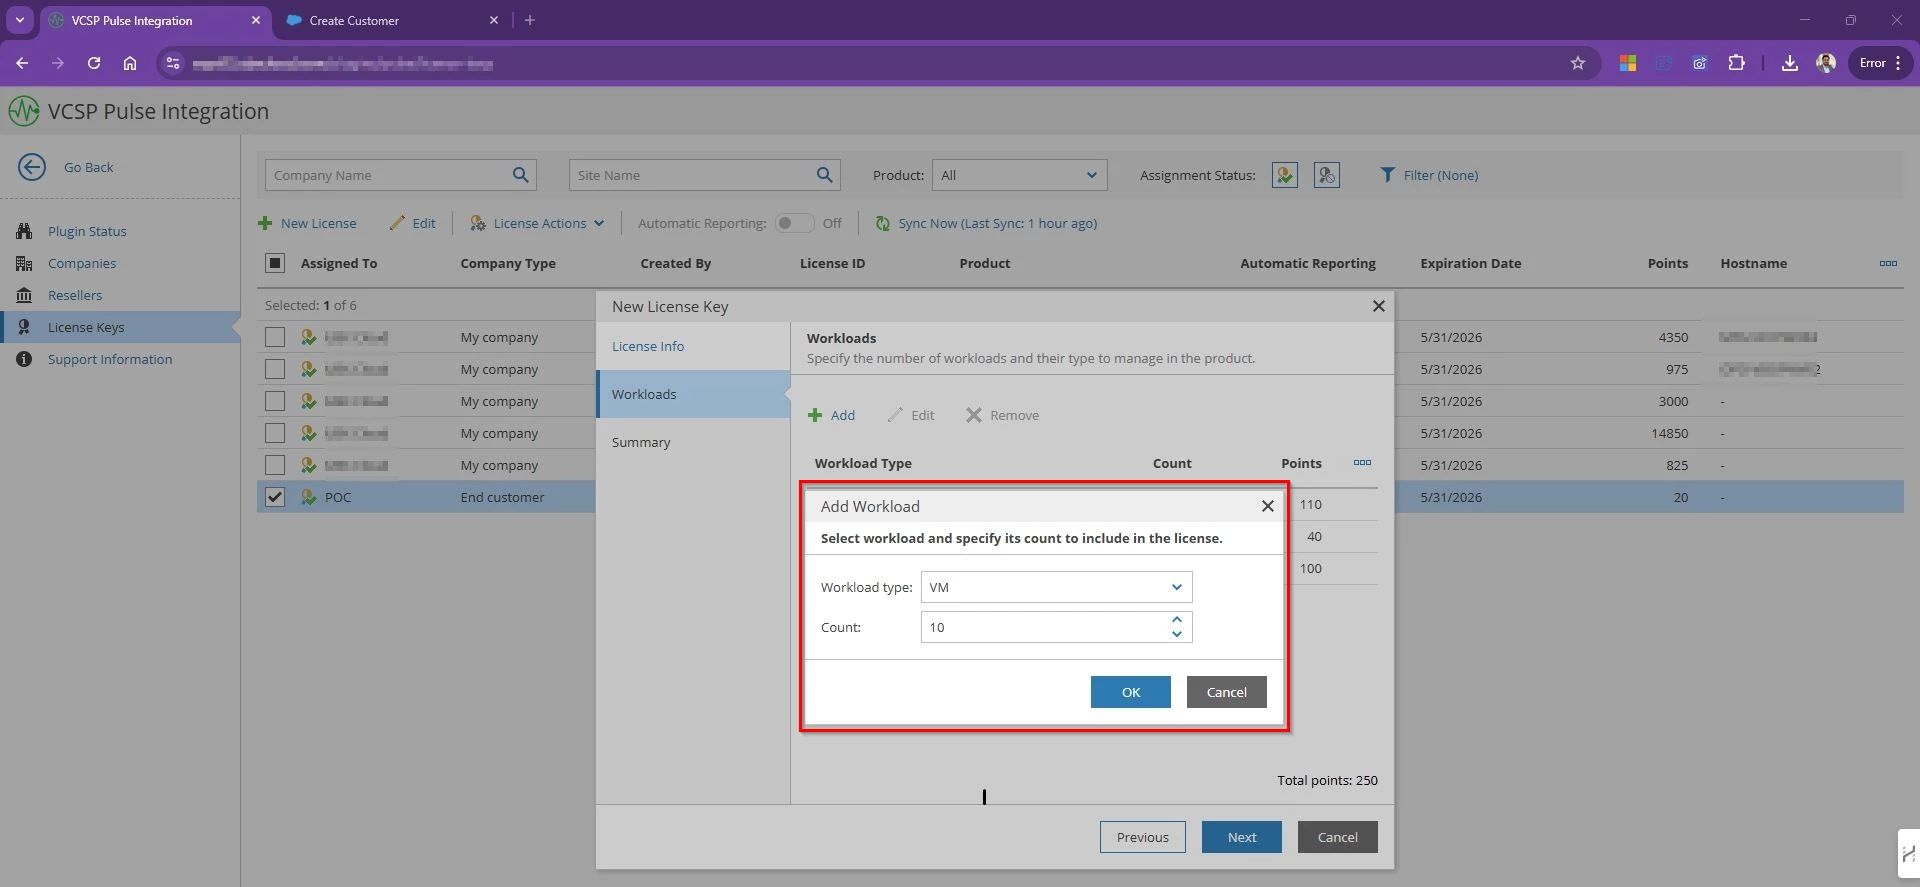
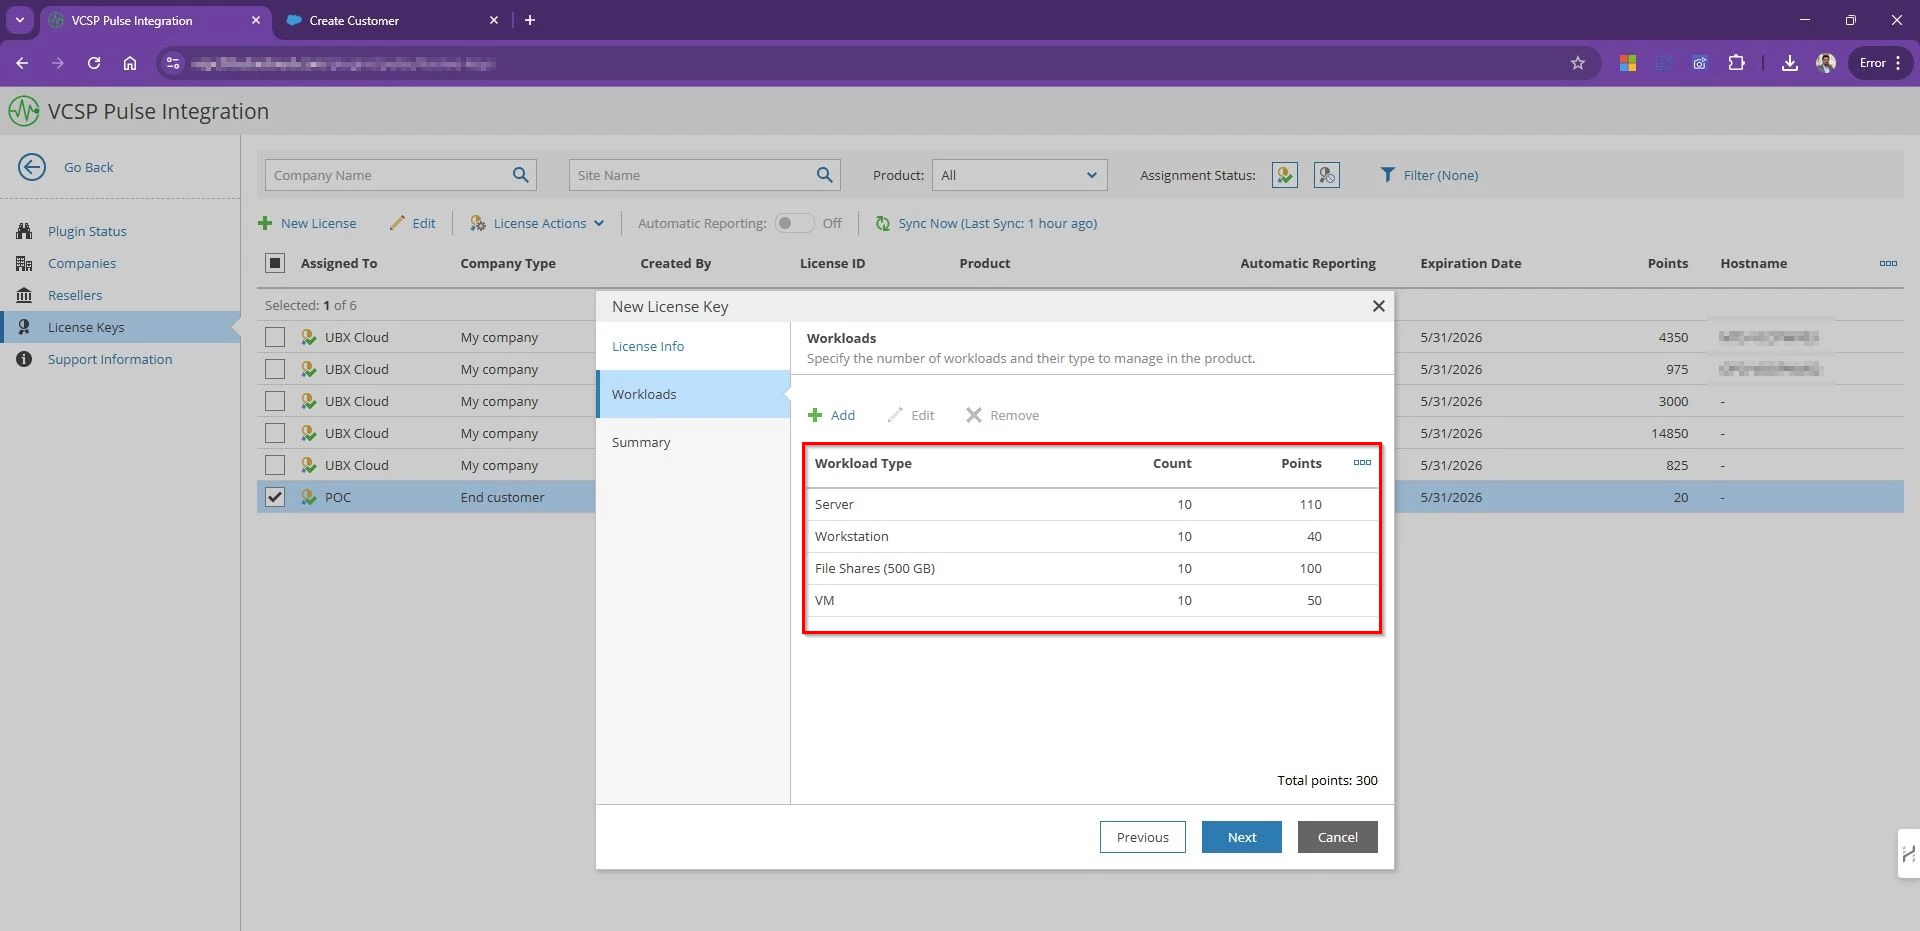
- Review the summary and license Info and Finish to create license.
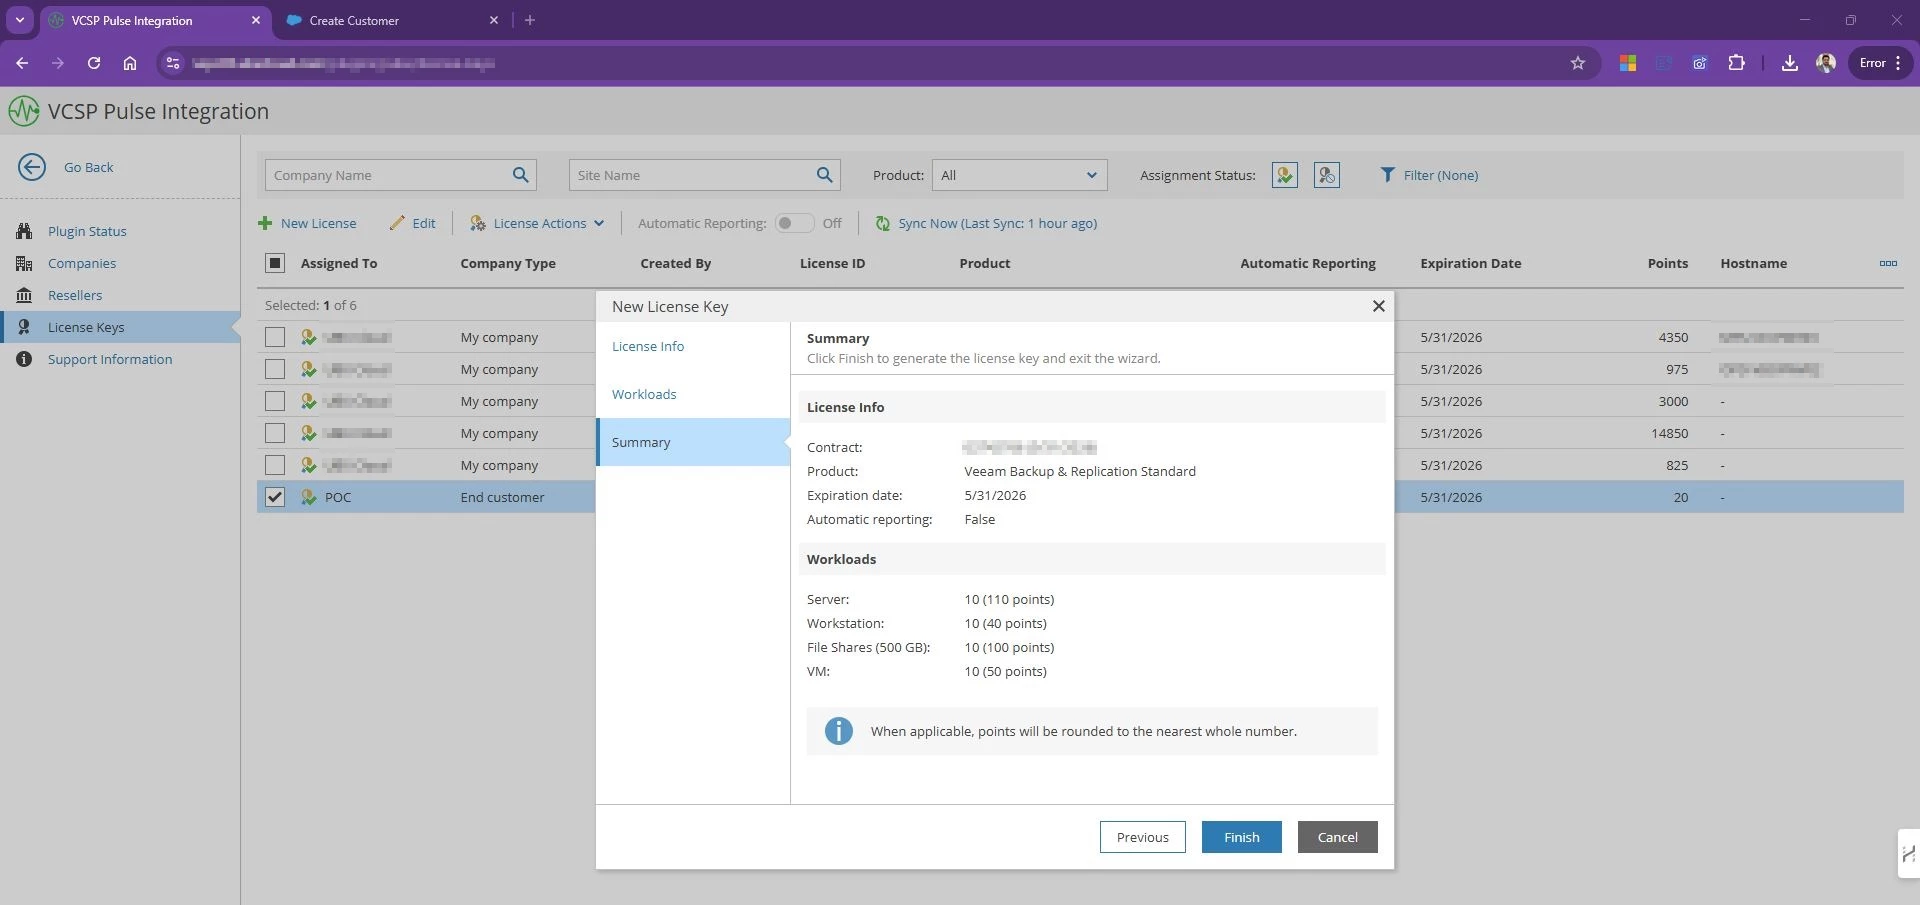
- The new license appears in VSPC, ready for assignment.
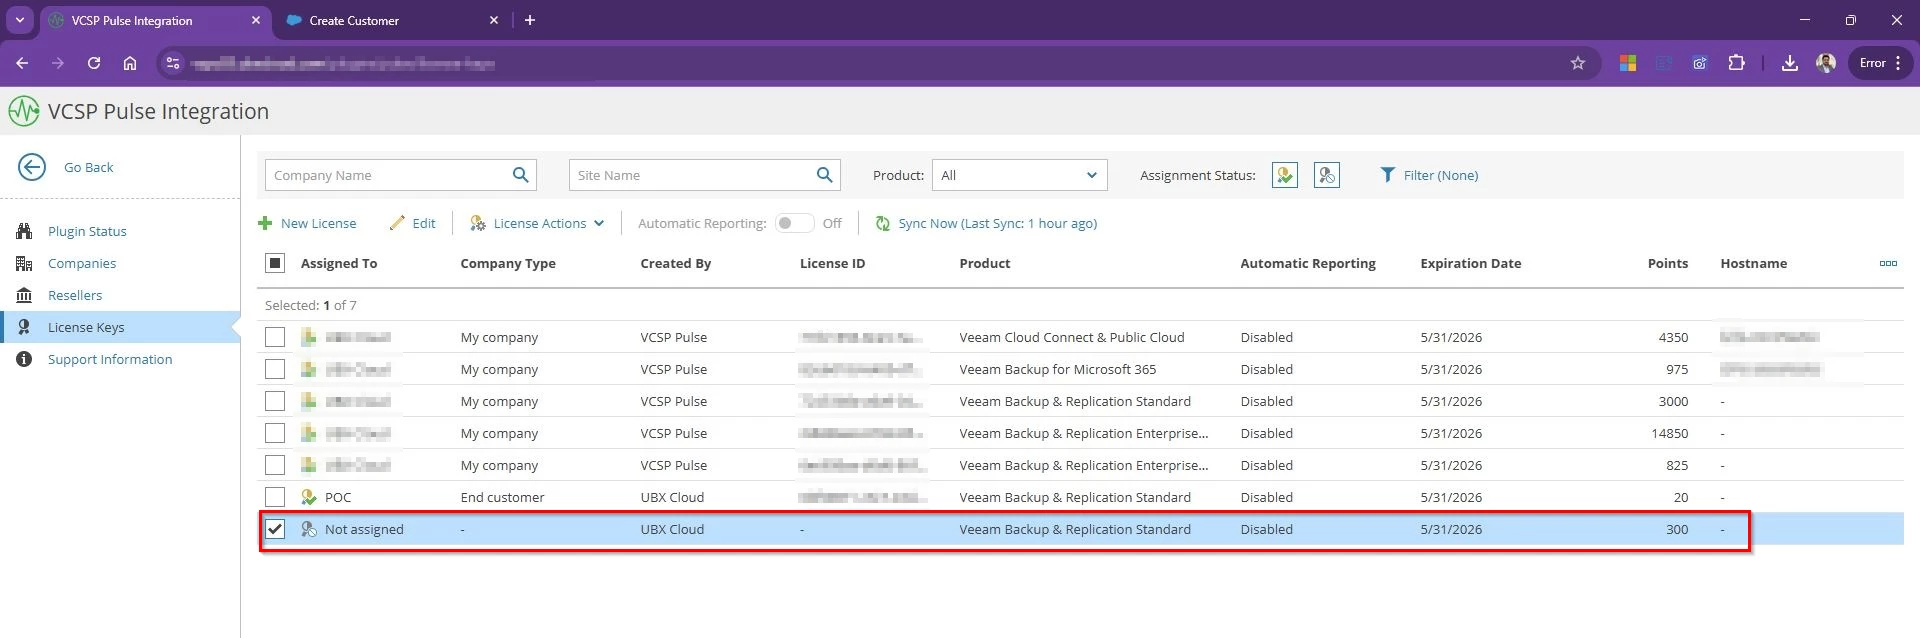
- Select the License → License Action → Assign
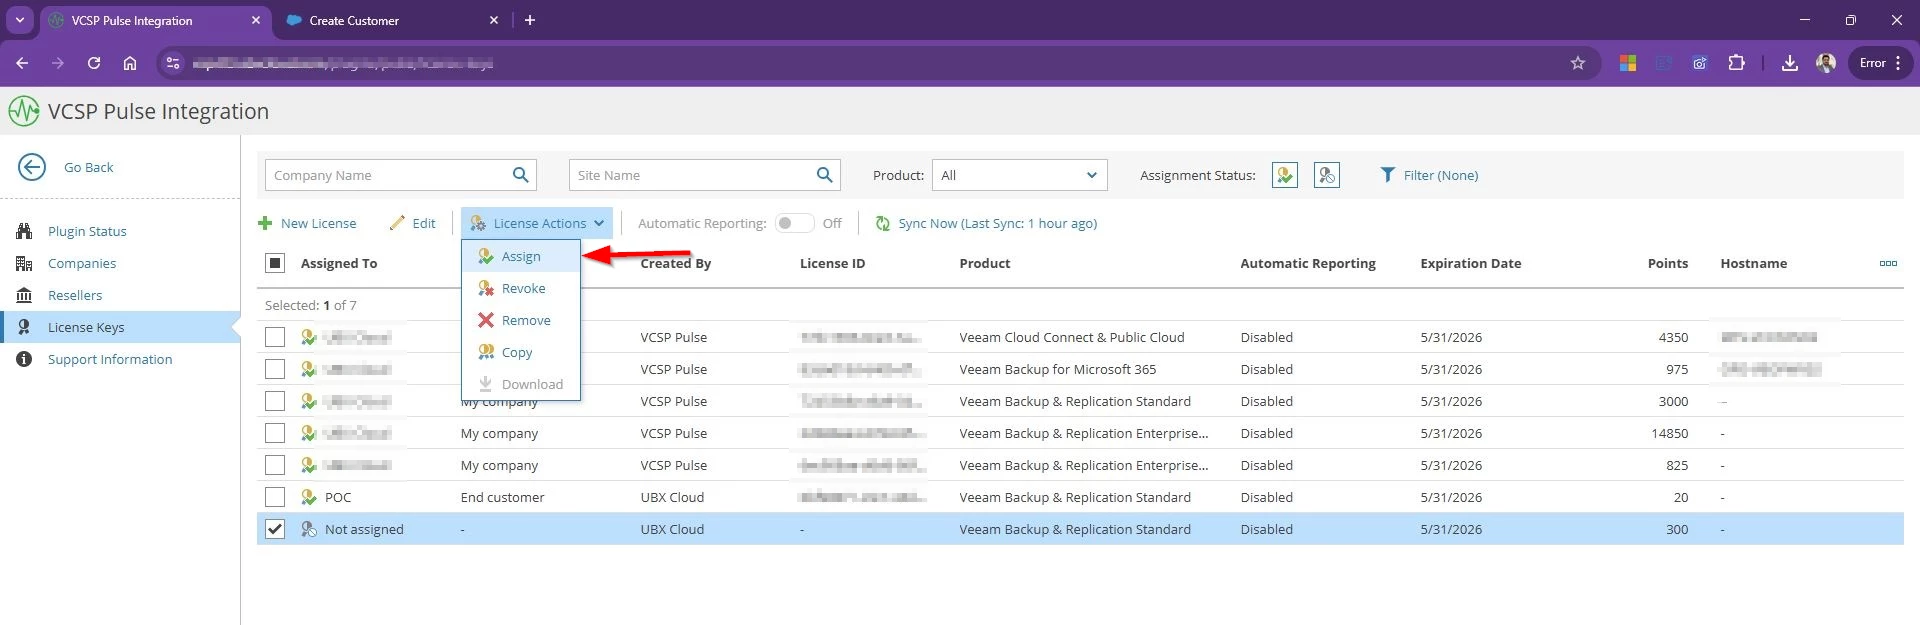
- Select the Type End Customer --> Choose the Company ("Mohamed Chai Company")

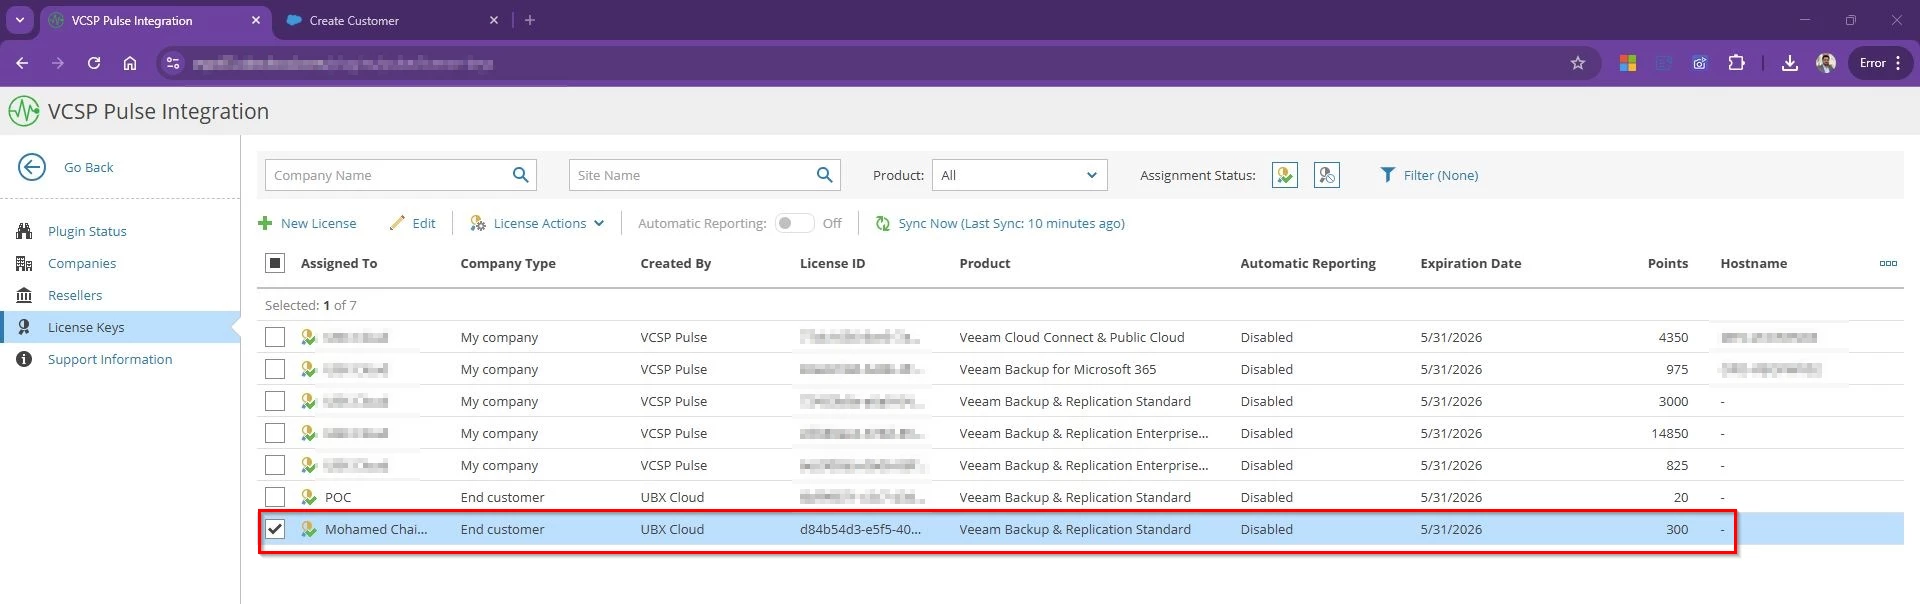
Now the license file is assigned to the company and ready to be installed.
Step 4: Install the license keys to Tenant VBR
Once the license is assigned to a tenant, the final step is installing it on the VBR server. This is where VSPC saves you from the old copy-paste hassle.
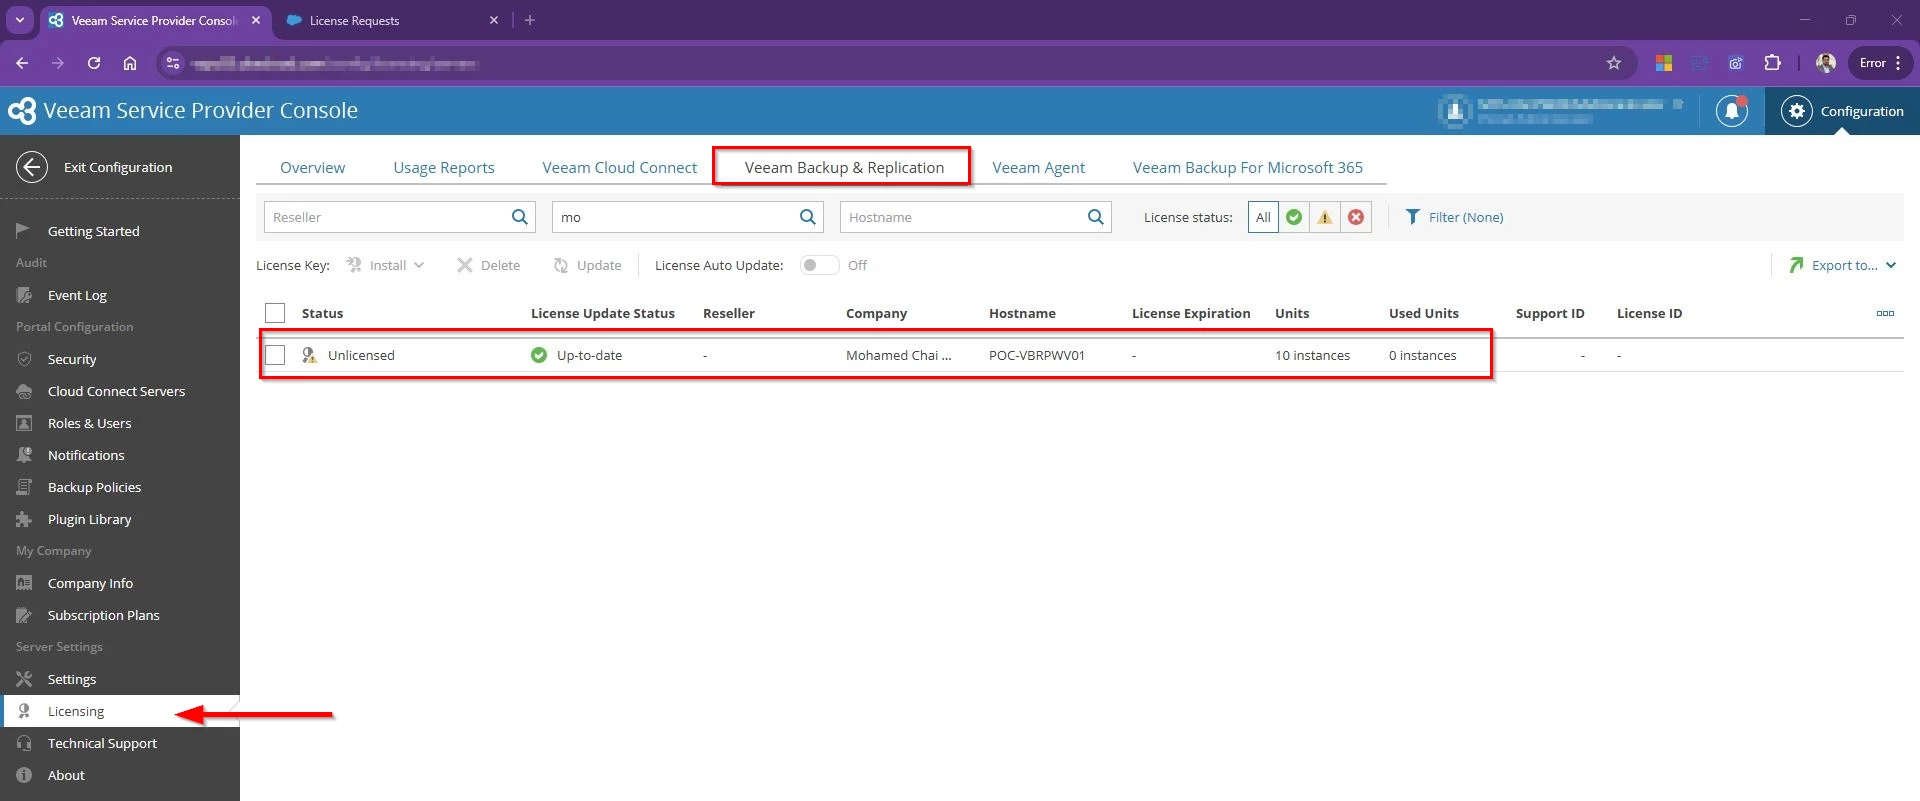
- Go to Configuration --> Licensing --> Select Veeam Backup & Replication Tap
- Find the Company name which we assigned the license to and you will see the tenant’s VBR server status listed as Unlicensed.
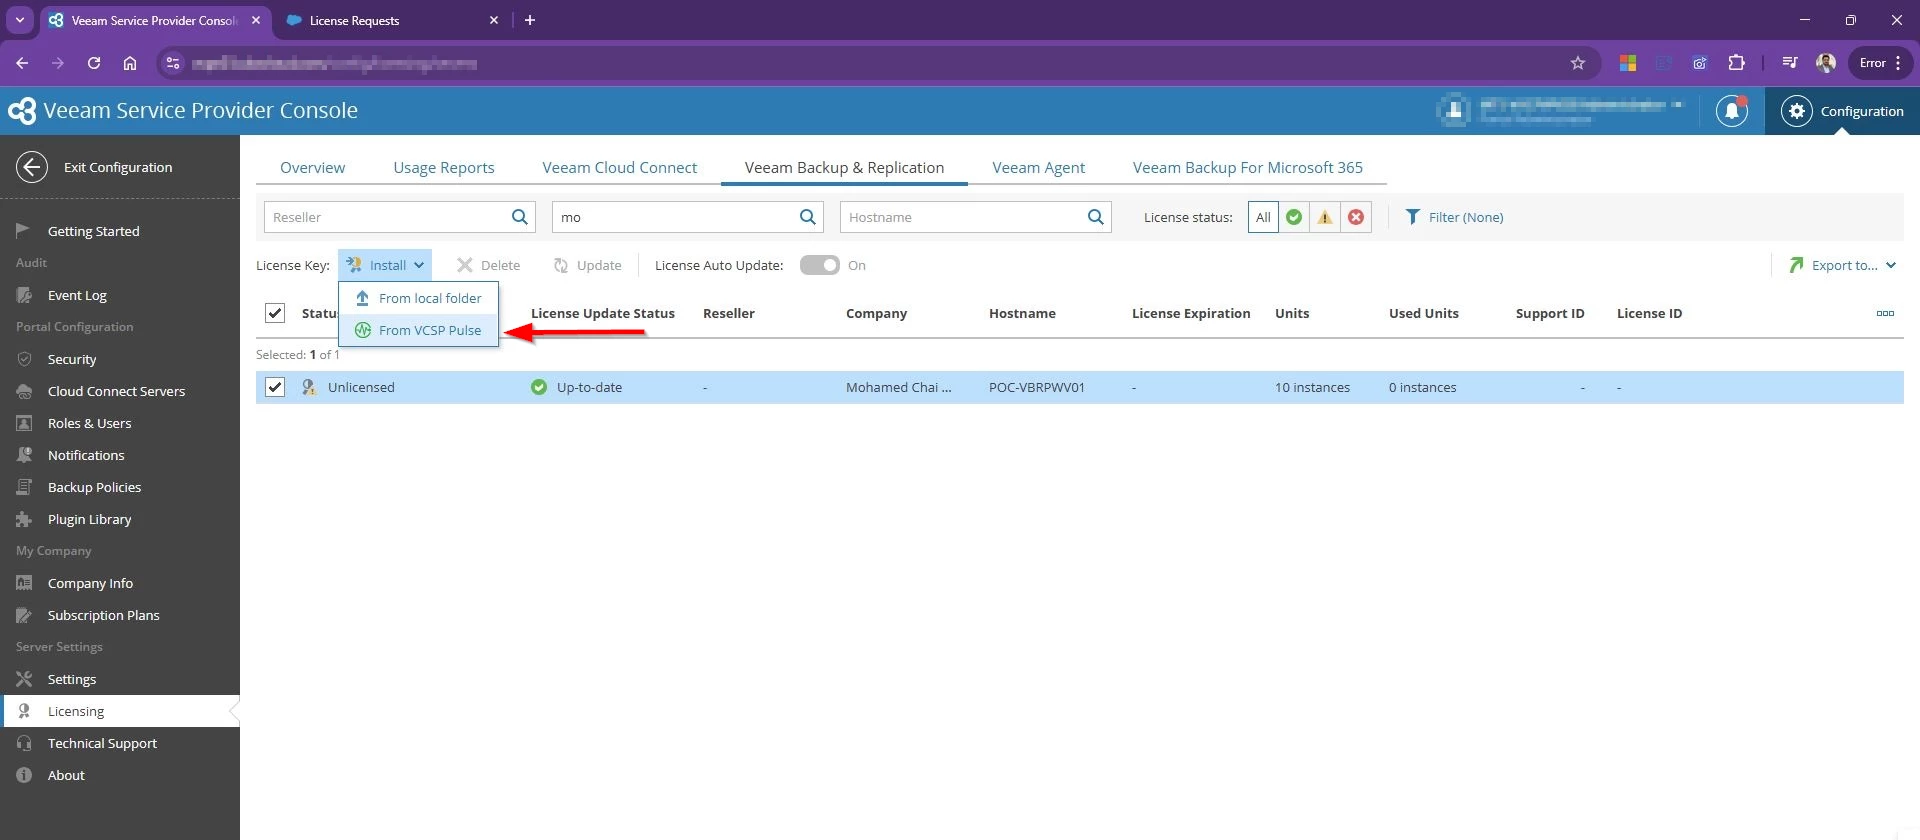
- Choose Install license Key --> From VCSP Pulse
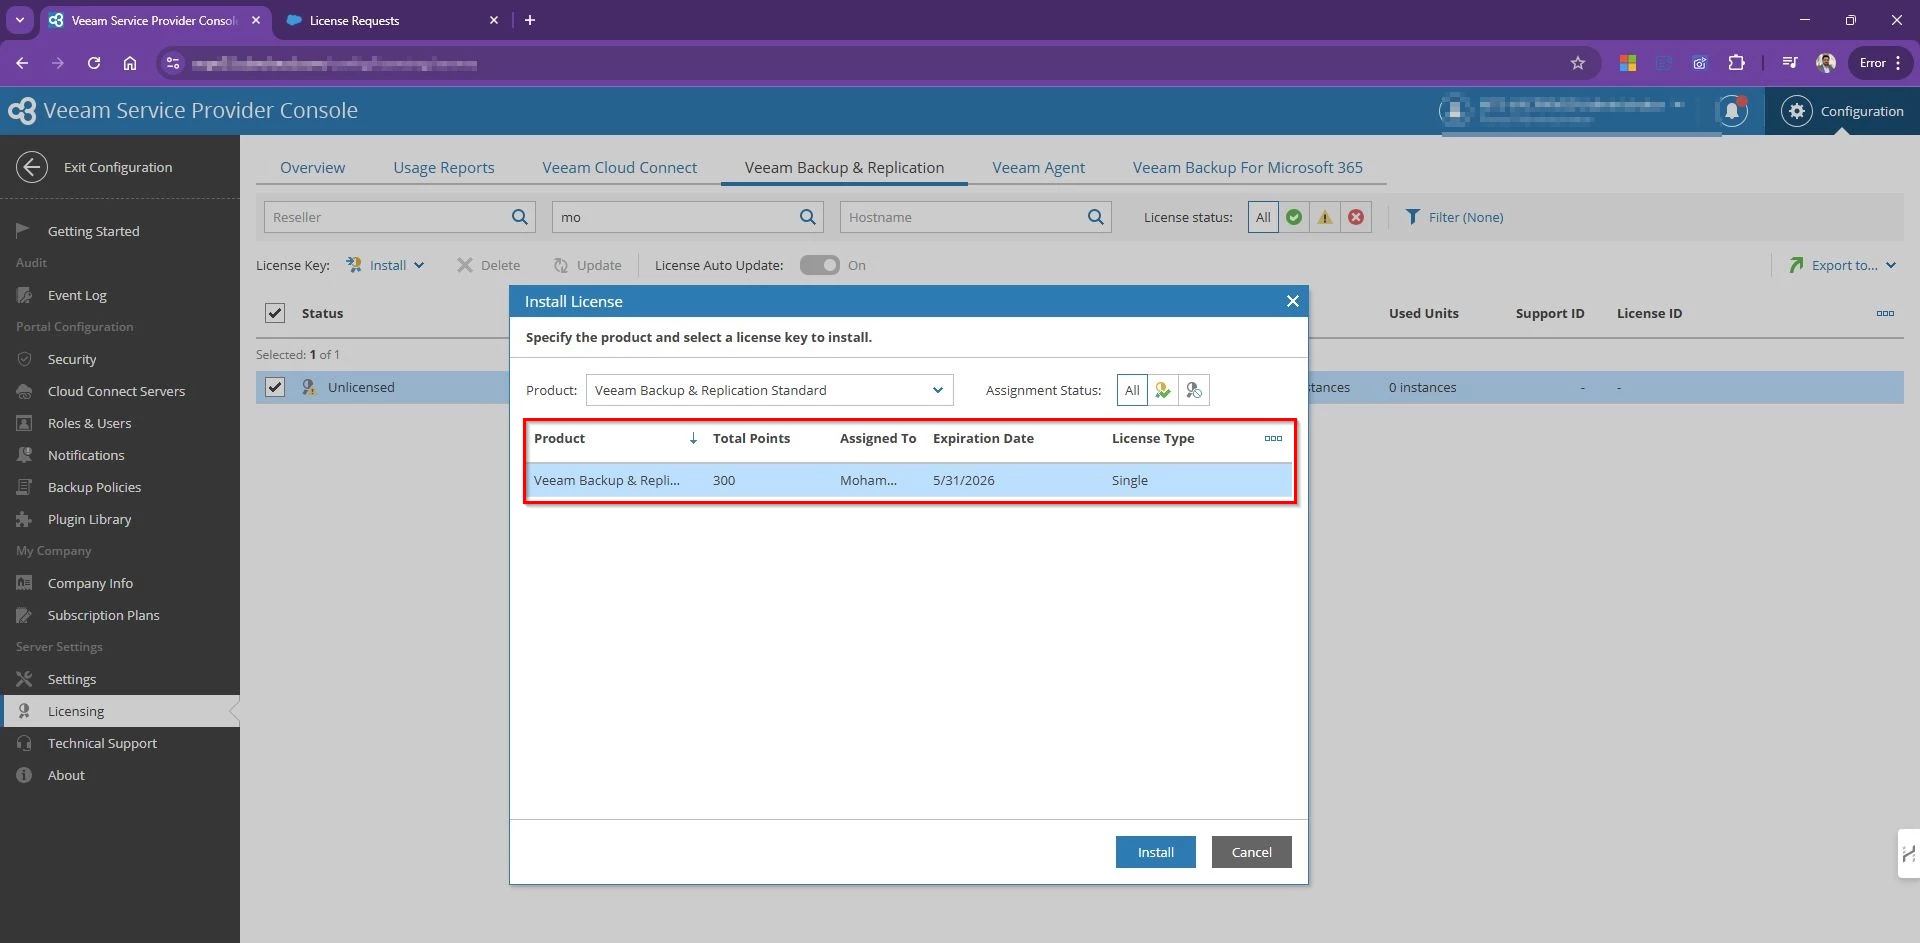
- Select the Product and available license Key to install
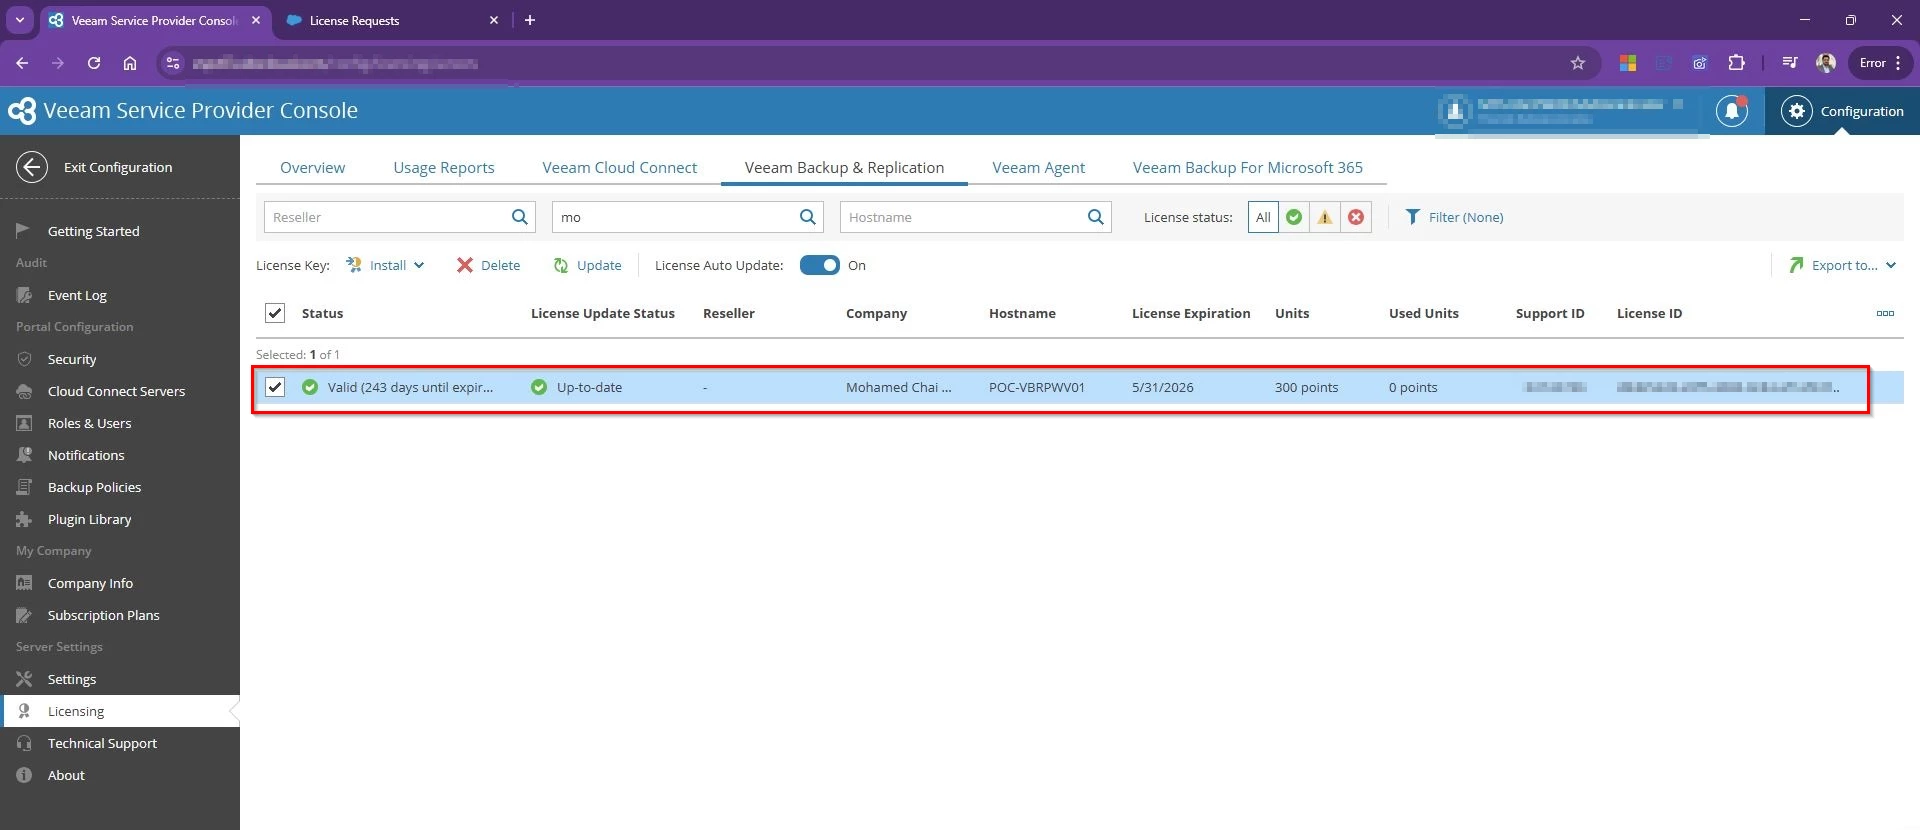
VSPC will now push the license directly to that VBR instance. No downloads, no email attachments, no jumping into RDP!
Bingo! Tenant VBR is activated now!
If the tenant server is offline at the time, The moment it comes back online and reconnects with VSPC, the license install will complete automatically.
In my previous post I have explained how VSPC portal can help to streamline support process and log collection from the tenant VBR for Veeam Service provider
