

One of the standout features in Veeam’s arsenal is the ability to verify backups in an isolated VMWare and / or Hyper-V environment using SureBackup and DataLabs. These tools allow organizations to automatically spin up virtual machine and agent-based backups in a secure, sandboxed network…. often referred to as a “Clean room”, where Veeam can (but not limited to):
- Ensure the backup does not contain any malware / ransomware / virus’
- Check for file system consistency
- Verify application services start as expected
- Perform custom script checks to validate functionality
While these capabilities shine in an on-premises VMware and Hyper-V environment, verifying backups in Azure brings a different set of technical challenges:
- No vSwitch / vRouter control in Azure
- Lack of deep VM network customization
- No ability to intercept or NAT Traffic
- Azure resource constraints and API Gaps
While Azure presents challenges, the importance of verified, clean backups remain critical. Even with these challenges, why would you want to leverage Microsoft Azure to verify your virtual machine and agent based backups?
- Limited on-premises resources
- Disaster recovery testing
- Migration testing
- Avoid egress fees if backups are stored in a Microsoft Azure storage account
- The on-premises environment does not leverage VMWare and / or Hyper-V
- Utilize Microsoft Azure commitments
While Veeam cannot currently perform full SureBackup orchestration in Azure (based on the above Azure technical challenges) the same way it does for on-premises, that doesn’t mean a clean room-style validation is off the table. With the right architecture, you can still build an isolated environment in Azure that achieves similar goals—secure, segmented, and safe for testing restores.
The goal of this post is to provide the steps to configure and automate Veeam backup verification leveraging Veeam Recovery Orchestrator and Microsoft Azure.
To summarize the steps:
- Configure a separate subscription or non-peered vNet where backups will be restored
- Add Microsoft Azure Compute Account to Veeam Backup and Replication
- Configure an Azure Recovery Location in Veeam Recovery Orchestrator
- Configure Plan Steps script(s)
- Verification Steps
- Delete resources in Azure in specific Resource Group used for restore
- Configure Recovery Plan
Configure an isolated network in Microsoft Azure where backups will be tested
When restoring workloads for backup testing, it’s not enough to simply have an isolated environment. For meaningful validation, that environment often needs to mimic your production network’s IP address scheme. Here’s why it matters:
- Application dependencies on Static IPs
- Domain-joined systems and Active Directory Trust relationships
- Accurate, real-world testing
Using the same network range as production ensures that you're replicating the real operational environment, not just testing whether a workload boots up. This allows you to detect issues with application startup, service dependencies, or network ACLs that might otherwise go unnoticed.
To safely use the same IP range as production without risking conflicts in Azure you have a couple of options:
- Create a separate Azure Subscription
- Create a new Azure Subscription
- There are various ways that this can be done depending on your relationship with Microsoft
- Create a Resource Group
- Create a vNet in Resource Group
- Ensure the address space matches the source / production network
- Create a new Azure Subscription
- Within an existing Azure Subscription
- Create a Resource Group
- Create a non-peered vNet in resource group
- Ensure the address space matches the source / production network
In either option, you also have the ability to create / leverage non-default subnets and security groups.
Now you will create a resource group where Azure resources will be created as part of the restoration process. For example, the name of the resource group could be “Veeam Clean Room”. This is not the same resource group where the vNet was created earlier. The resource group will be selected when configuring an Azure Recovery Location (step 3).
Although the steps to create a separate subscription and / or non-peered vNet is outside the scope of this post, I felt it was important to discuss the options available.
Add Microsoft Azure Compute Account to Veeam Backup and Replication
Once you have created / configured a separate subscription or will leverage an existing subscription with a non-peered vNet, you will need to add the subscription(s) into the Veeam Backup and Replication console:
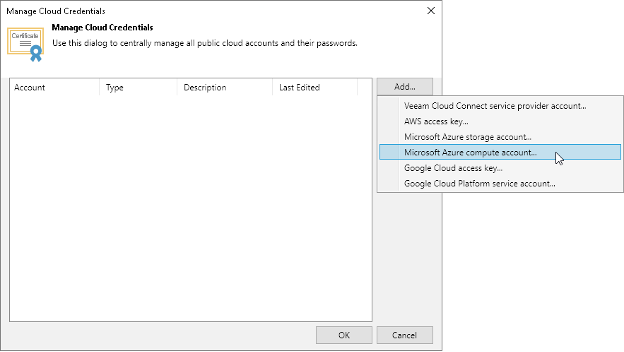
If creating a separate subscription for restore testing, you will have at least two entries:
- Production subscription(s)
- Veeam Clean Room subscription
Configure Azure Recovery Location in VRO
To add an Azure Recovery Location in VRO, you will follow the steps in the User Guide. However, I would like to highlight a couple of items for specific steps:
- Choose Backup Servers: Ensure you select the Veeam Backup and Replication Server the Microsoft Azure subscription(s) were added in the previous step
- Choose Cloud Subscription: Select the subscription where you would like to perform the restore to
- Choose Regions: If the backups already exist in Microsoft Azure / Veeam Data Cloud Vault, for best performance and to minimize costs, ensure that you select the same region where the backups reside
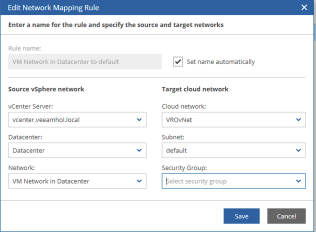
- Configure Network Mapping: When configuring VM network mapping, you can select the following Azure resources created in step 1:
- vNet (Cloud network)
- Subnet
- Security Group
Configure Plan Steps script(s)
Plan Steps provide the ability for PowerShell scripts to validate and test the backups. In addition, Plan Steps can also be used to remove up the Azure resources after the recovery and validation has been completed.
For the PowerShell script to execute, it will need to login non-interactively into Microsoft Azure. There are several ways to accomplish this and to go through each is beyond the scope of this post. However, I will share the method that I am using in my lab… login with a Service Principal. These are the steps I used:
- Create the service principal and record the:
- Application (client) ID
- Tenant ID
- Client secret
IMPORTANT: Placing client secrets directly in a PowerShell script, especially for non-interactive Azure logins using a service principal, is strongly discouraged due to multiple security risks. The following are a sample of alternatives to hardcoding secrets into a script:
- Azure Key Vault
- Managed Identities
- Assign required permissions to the service principal
- The permissions required will depend on what the script is doing
- The service principal will need the Contributor role at the applicable scope (subscription / resource group) to create VM objects and dependencies
- Assign required permissions to the service principal
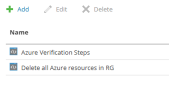
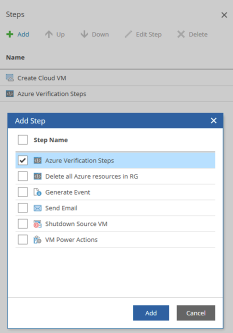
The following is an example of two Plan Steps created to verify the backups and remove the resources when completed:
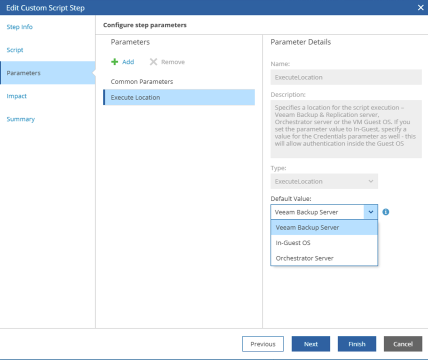
These Plan Steps / scripts can be executed in one of these locations:
- Veeam Backup Server
- VRO Server
- In-Guest operating system
Configure Recovery Plan
Now that all the components are in place, you can bring them all together with a Recovery Plan.
During the creation of the Recovery Plan or once the Recovery Plan is created, you will be able to customize and add the Plan Steps created in step 4. To accomplish this, perform the following:
- During Recovery Plan creation:
- When editing a Recovery Plan:
- Edit the Recovery Plan
- Select the VM(s) from the inventory group(s) that you wish to add the planned step(s) to
- Add the Plan step(s) created to perform the backup verification
- In addition, you can add a Plan Step to the “Post-plan steps” to remove the restored Azure VMs
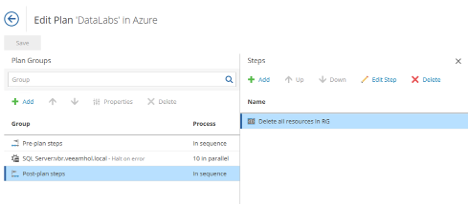
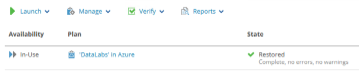
The Recovery Plan is now ready to restore and verify the backups along with removing the resources from Azure once testing is completed.
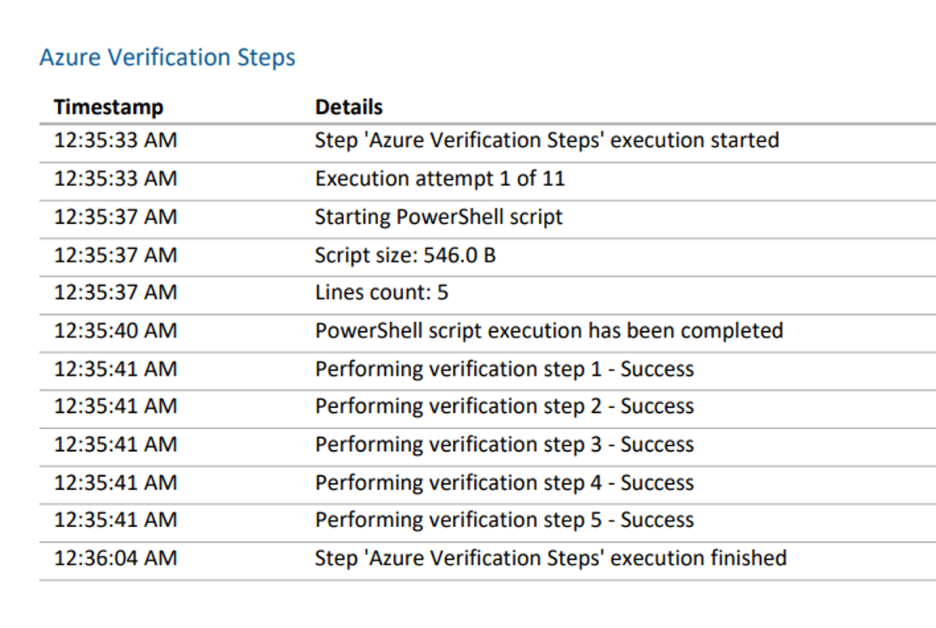
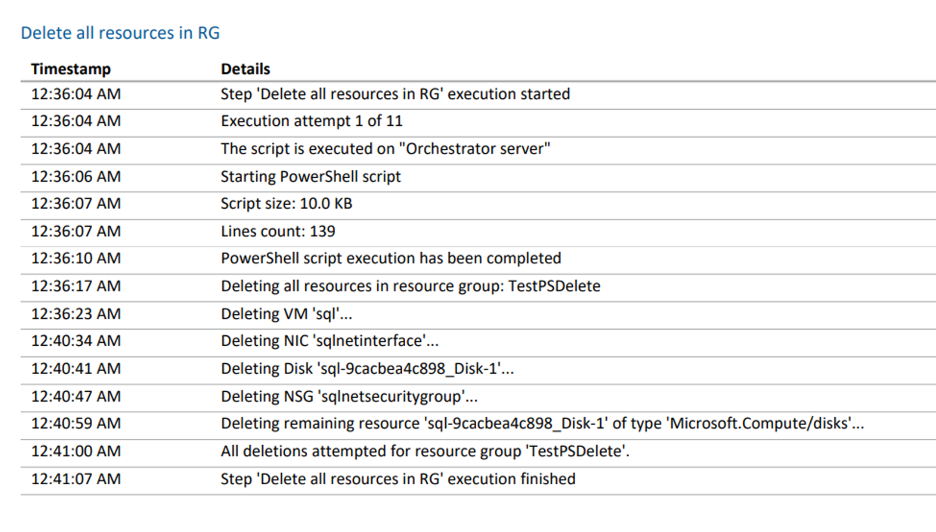
Here is an example of the output generated in VRO from the Plan Steps / scripts:
Backup Verification Testing:
Removing Azure Resources after verification completed:
While Azure presents certain limitations compared to on-premises environments, it’s entirely possible to build an effective, automated backup verification workflow using Veeam Recovery Orchestrator. By architecting an isolated network in Azure that mirrors production, integrating with Veeam Backup & Replication, and leveraging Plan Steps with service principals for automation, organizations can validate their backups with confidence—even in the cloud. This approach not only ensures data integrity and recoverability, but also maximizes cloud investments, supports DR testing, and enhances cyber resilience without impacting production systems.


