



There is something satisfying about getting a new piece of hardware into the lab.
You can read documentation, look at architecture diagrams, and talk about specifications all day, but I always prefer getting my hands on the actual hardware. Unbox it, rack it, cable it, configure it, integrate it, and then see how it performs.
Recently, I had the opportunity to add a new Dell PowerProtect Data Domain DD3410 to our lab.
The goal was simple:
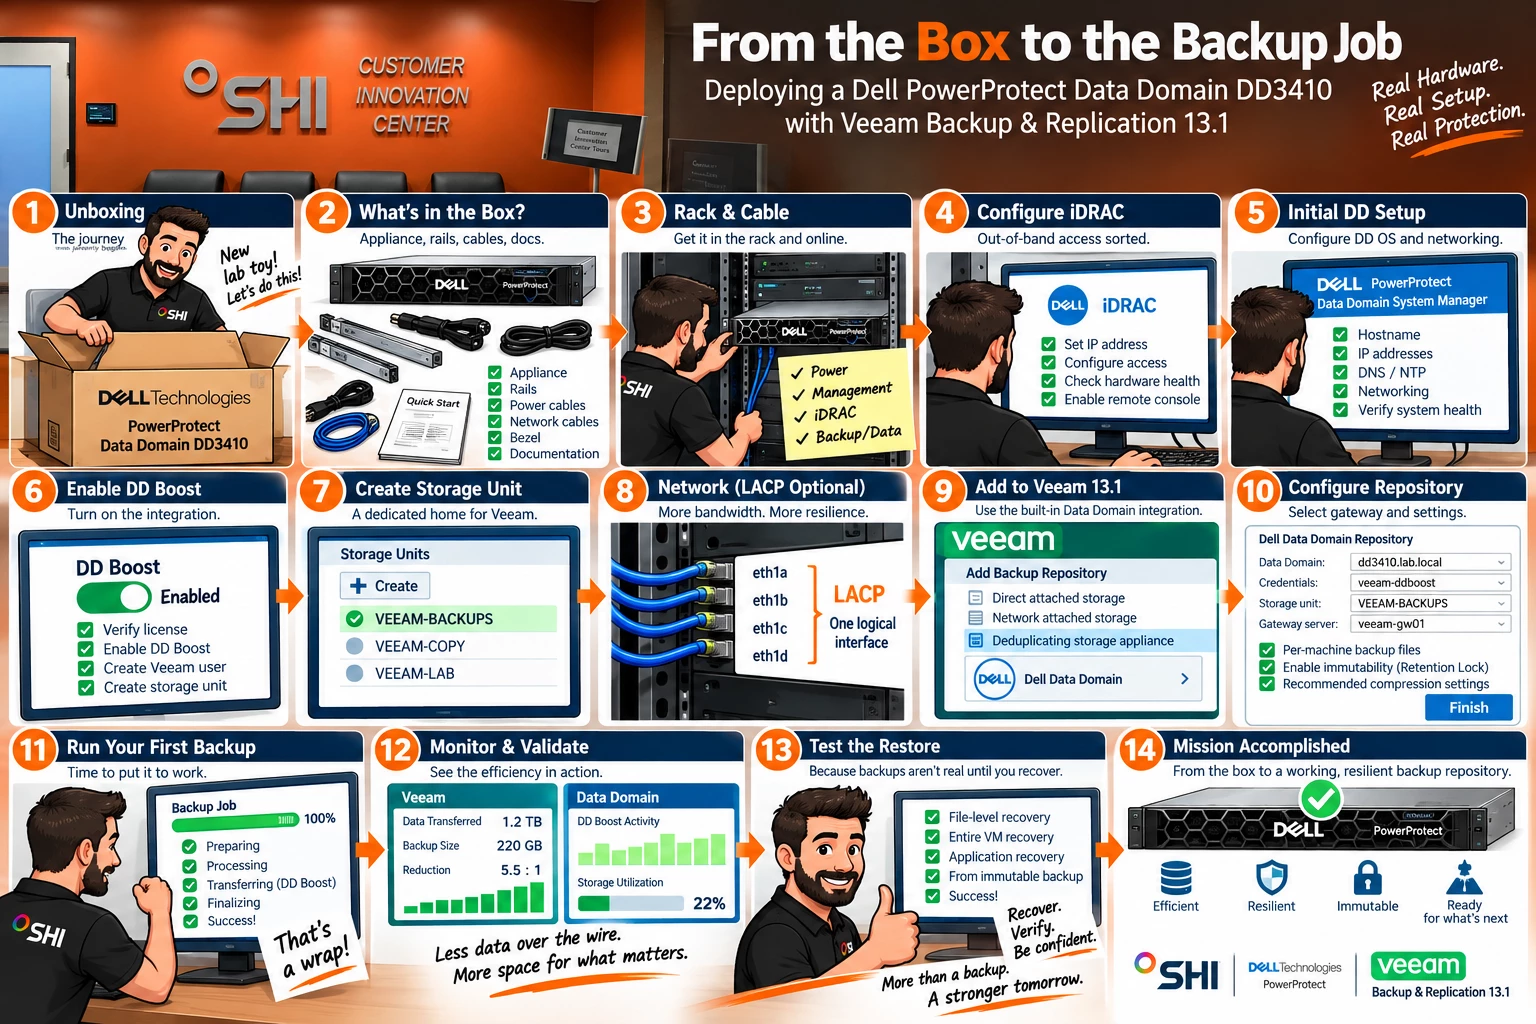
Take the DD3410 from the shipping box to a working Veeam Backup & Replication 13.1 repository.
In this blog, I’ll walk through the process I used:
- Unboxing and installing the DD3410
- Initial hardware and iDRAC setup
- Configuring DD OS
- Configuring networking
- Preparing storage
- Enabling DD Boost
- Creating the Veeam storage unit and account
- Adding the DD3410 to Veeam Backup & Replication 13.1
- Creating and running the first backup job
- A few configuration and performance considerations I found along the way
This isn't intended to replace the Dell or Veeam documentation. Instead, this is a practical look at what the deployment actually looks like in the lab.
Meet the DD3410
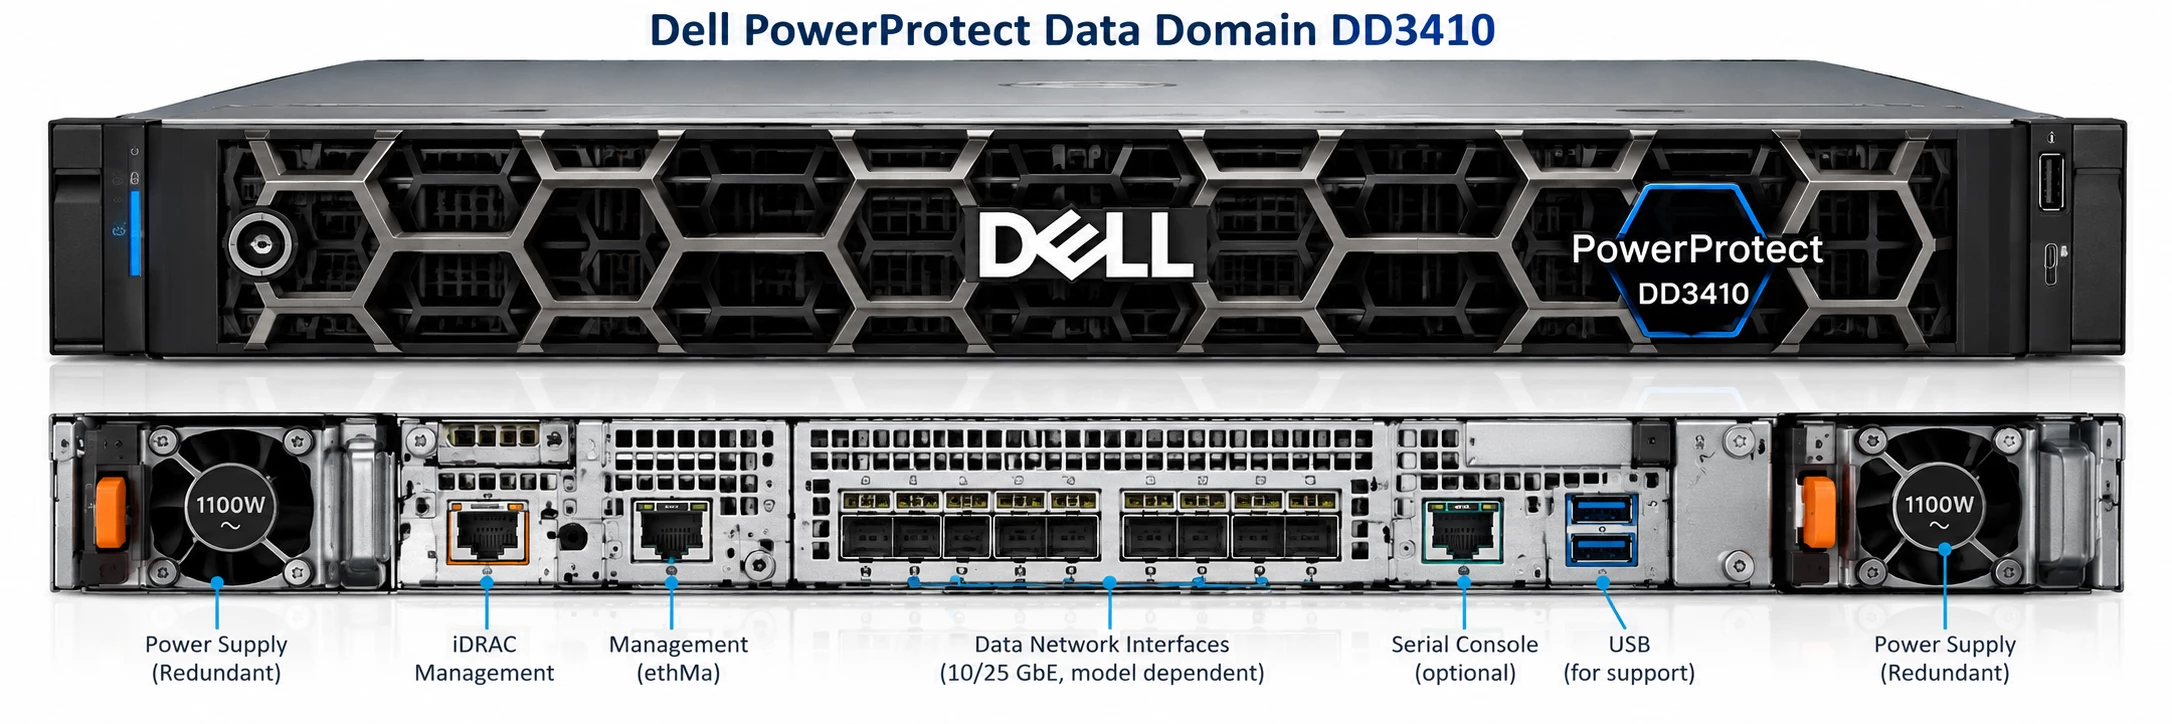
The Dell PowerProtect Data Domain DD3410 is an entry-level purpose-built backup appliance designed to bring Data Domain deduplication and cyber-resilience capabilities into smaller environments, remote locations, and other deployments that don't require one of Dell's larger Data Domain platforms.
Don't let the "entry-level" description fool you.
The DD3410 still provides the technologies that make Data Domain interesting as a Veeam repository, including:
- Inline deduplication
- Compression
- DD Boost
- Retention Lock
- Encryption
- Data integrity capabilities
- Replication
- Integration directly with Veeam Backup & Replication
My DD3410 configuration supports up to 40 TB of usable Active Tier capacity.
Under the hood, the platform includes:
- 128 GB RAM
- Dual CPUs
- 8 TB HDDs
- SSD-based operating system disks
- SSD cache
- Multiple networking options
Depending on the configuration ordered, networking can include 10 GbE and 10/25 GbE SFP28 connectivity, in addition to management connectivity.
For a Veeam environment, that makes the DD3410 an interesting option when storage efficiency, long-term retention, and immutability are important design requirements.
Step 1 – Unboxing the DD3410
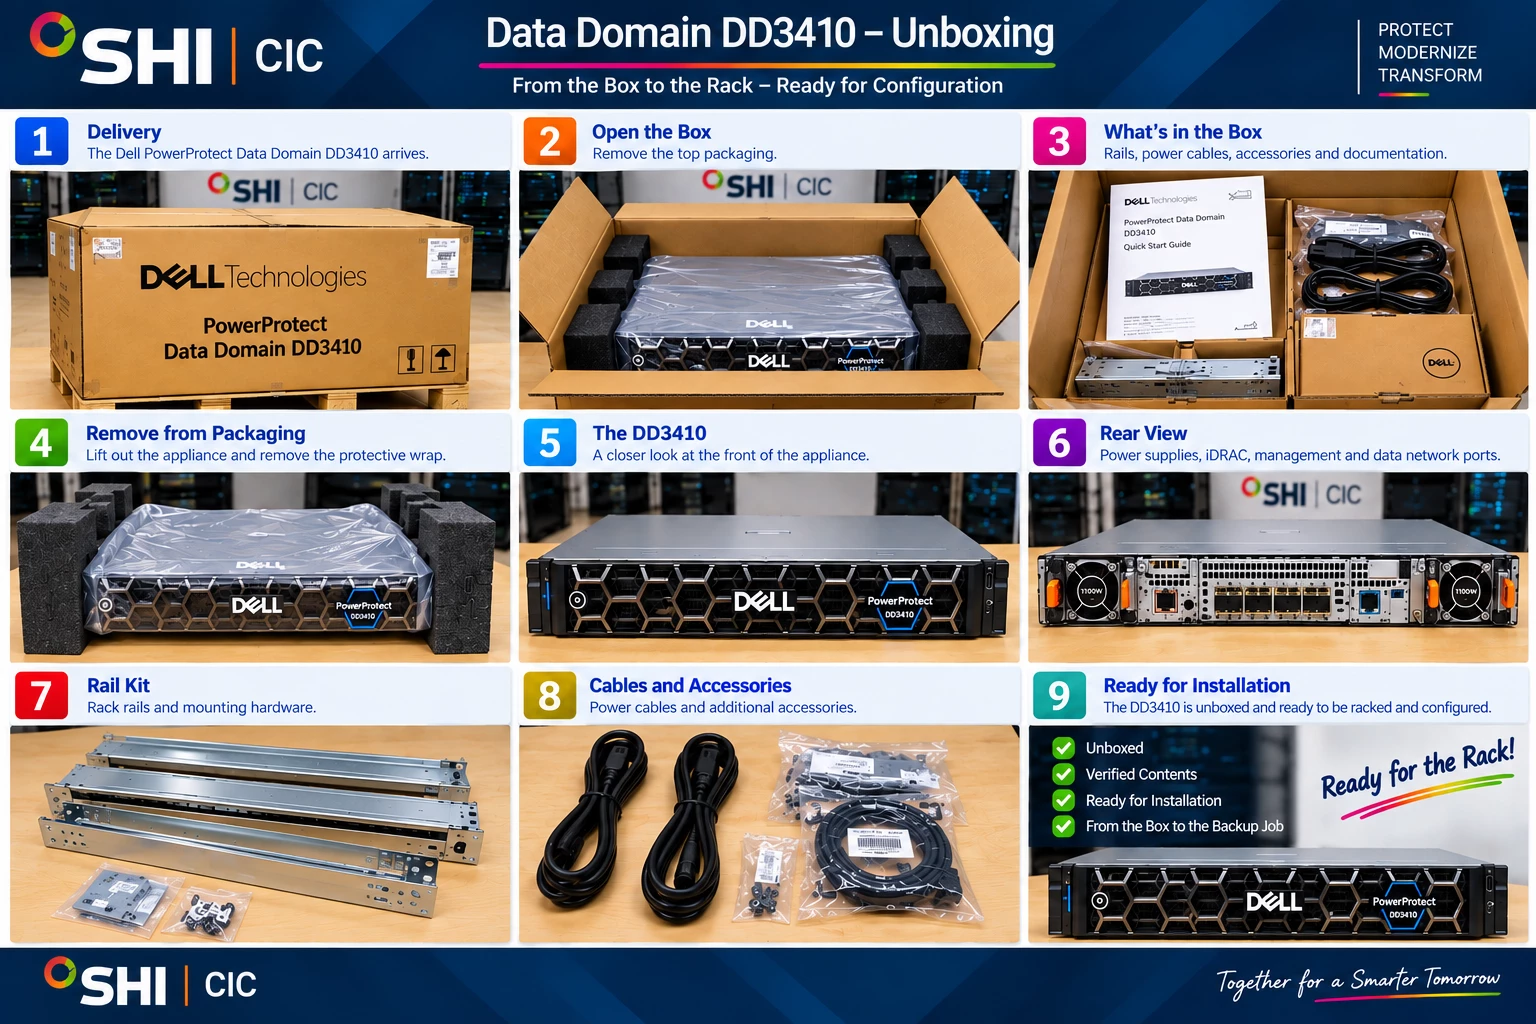
First things first: let's open the box.
As expected with an enterprise appliance, there is considerably more packaging than you would see with a normal server.
Inside you'll find the DD3410 appliance along with the associated rails, power cables, and installation materials depending on the configuration ordered.
Before putting anything into the rack, I recommend doing a quick inventory.
I checked:
- Appliance for shipping damage
- Power supplies
- Network adapters
- Rail kit
- Power cables
- Bezel
- Service tag
- Any included documentation
I also verified that the networking configuration matched what had been ordered.
That last one is important.
You don't want to rack and cable everything expecting 25 GbE only to discover that the system was ordered with a different network configuration.
Step 2 – Rack and Cable the Appliance
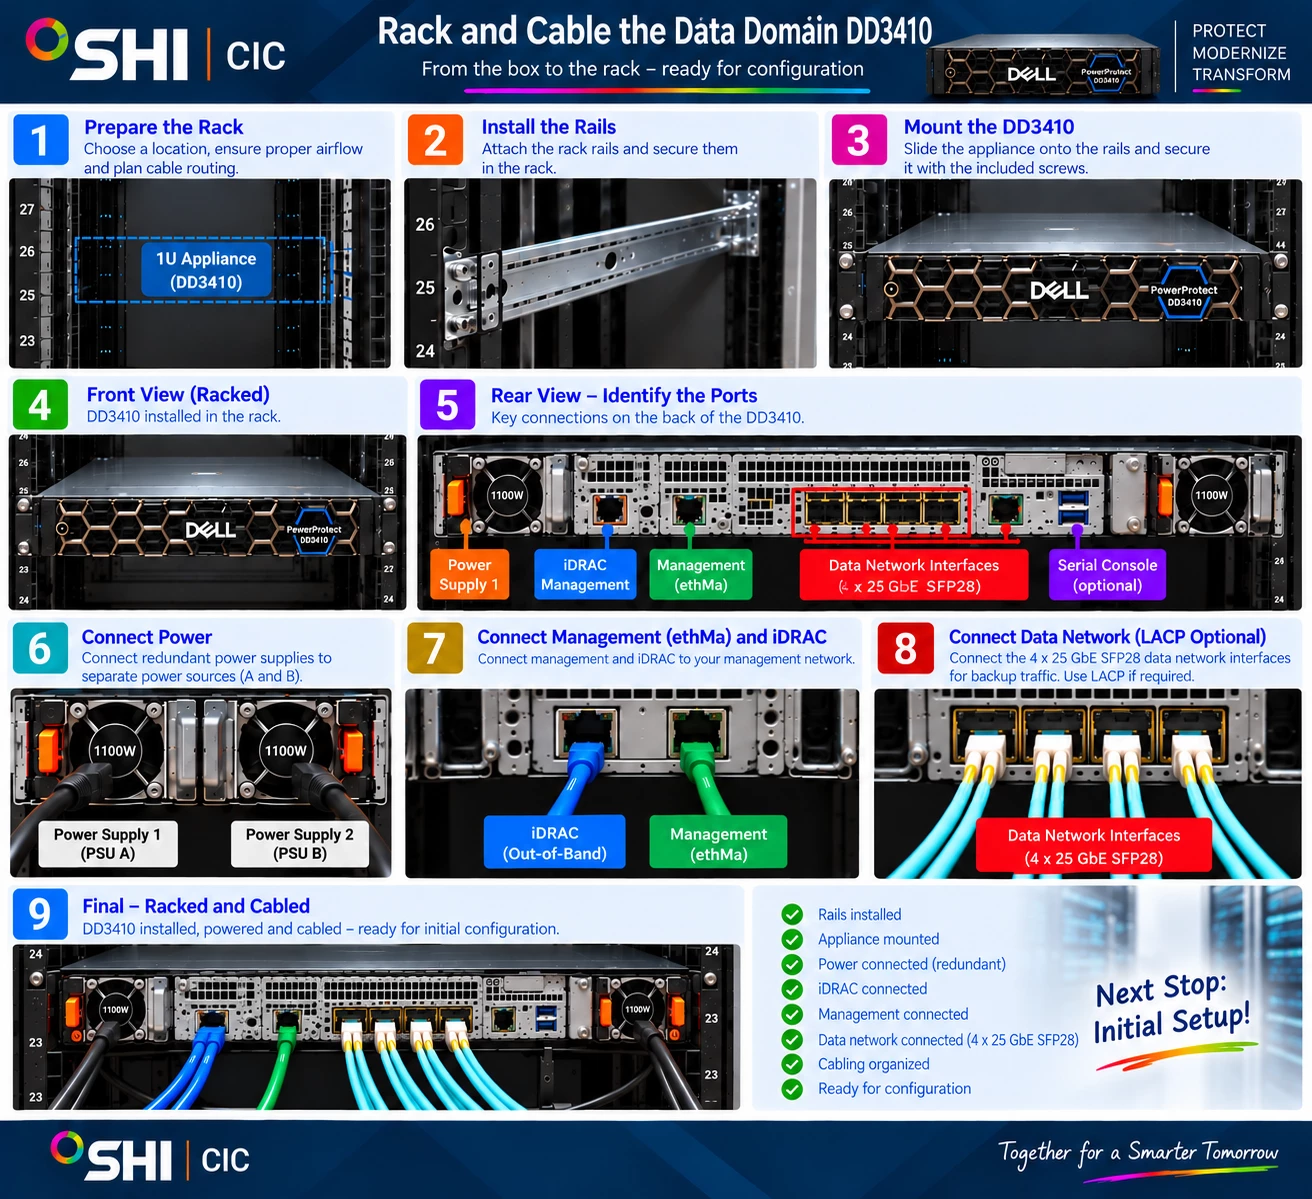
Next, I installed the rails and mounted the DD3410 into the rack.
Once installed, it was time for cabling.
At minimum, I needed connectivity for:
Management
This provides administrative access to the appliance.
iDRAC
The DD3410 includes Dell's out-of-band hardware management capabilities. I always configure this because it gives me remote access to the physical appliance without relying on DD OS being available.
Backup/Data Network
This is the important network from the Veeam perspective.
This interface, or group of interfaces, will carry the DD Boost traffic between the Veeam gateway infrastructure and the Data Domain.
Power
The redundant power supplies were connected to separate power sources in the rack where possible.
For production environments, redundant power and network paths should obviously be part of the design rather than an afterthought.
Step 3 – Configure iDRAC
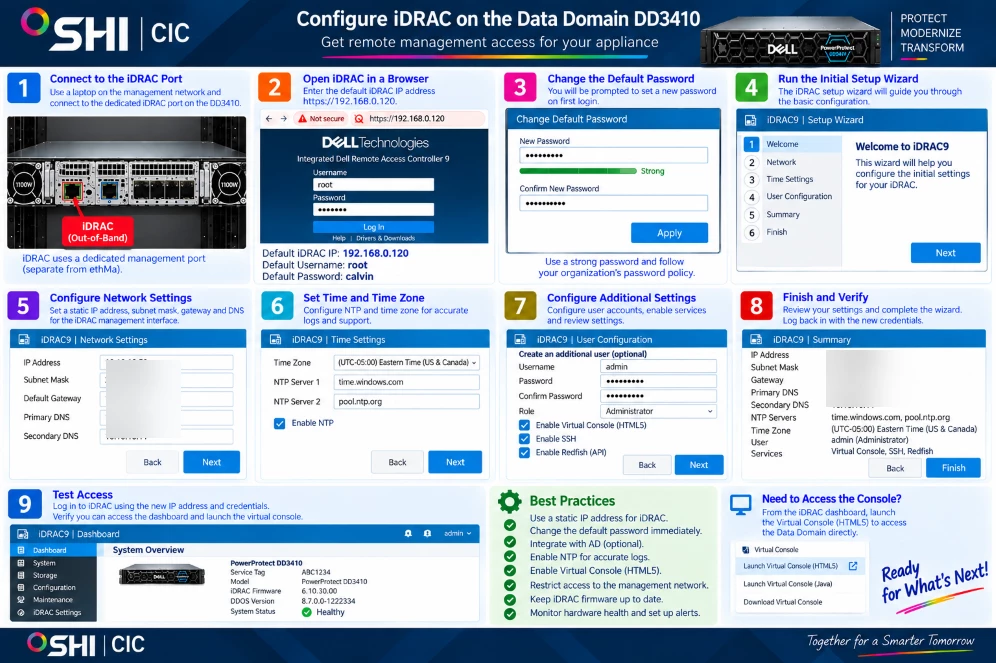
Before getting into Data Domain configuration, I configured iDRAC.
Why?
Because if something goes wrong during the initial deployment, I want remote console access to the hardware.
Through iDRAC I can monitor things such as:
- Hardware health
- Power supplies
- Fans
- Memory
- Storage
- Network adapters
- System logs
It also gives me remote console capabilities, which can be extremely useful when troubleshooting.
Once iDRAC had an IP address and I verified connectivity, I moved on to configuring the Data Domain itself.
Step 4 – Initial DD3410 Setup
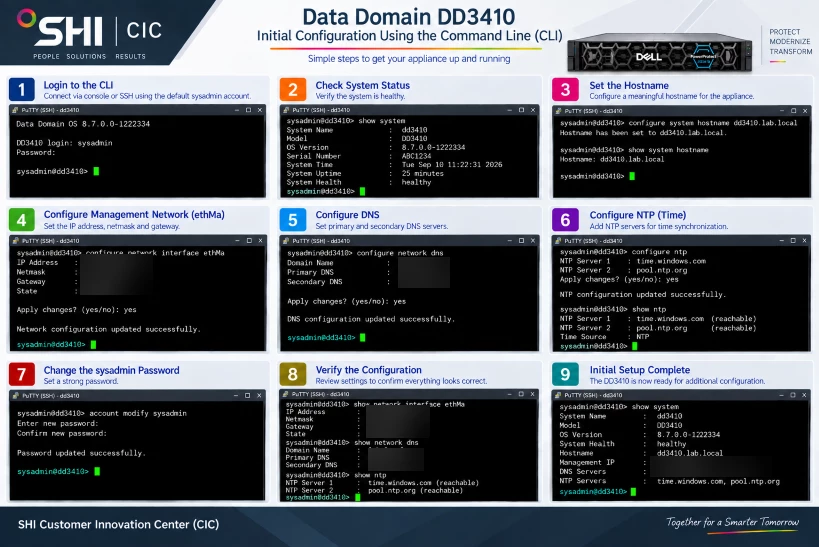
The next step was configuring the management interface for DD OS.
For my environment I needed the usual network information:
- Hostname
- IP address
- Subnet mask
- Default gateway
- DNS servers
- DNS domain
- NTP servers
I strongly recommend having all of this information documented before beginning the deployment.
It makes the setup considerably easier.
Once the management interface was configured, I could access Data Domain System Manager through a browser.
This is where most of the remaining configuration can be performed.
Step 5 – Verify the System
Before configuring anything for Veeam, I wanted to make sure the appliance itself was healthy.
From System Manager I verified:
- System health
- Installed disks
- Storage capacity
- Network interfaces
- Alerts
- DD OS version
- Licensing
This is also a good time to verify that there aren't any unexpected hardware alerts from shipping or installation.
There is little value in spending an hour troubleshooting Veeam connectivity only to discover that the underlying appliance wasn't completely configured.
Step 6 – Configure Networking
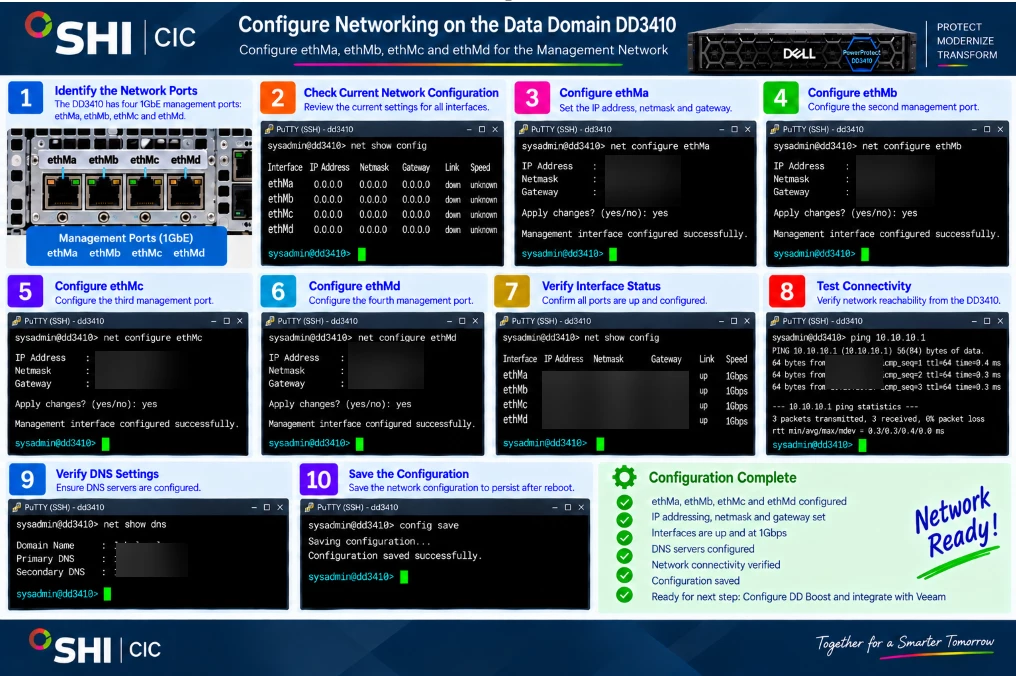
Networking deserves some planning because backup performance will ultimately depend on the entire data path.
The DD3410 can be configured with multiple Ethernet interfaces depending on the hardware configuration.
For my deployment, I wanted the Veeam backup traffic separated from management traffic.
Conceptually, my design looked like this:
VMware / Production Storage
↓
Veeam Backup Proxy
↓
Veeam Gateway
↓
DD Boost
↓
DD3410
One thing that often creates confusion when first configuring Data Domain is the interface naming.
You'll see Data Domain interfaces represented using names such as:
ethMa
and interfaces such as:
eth1a / eth1b / eth1c / eth1d
depending on the hardware configuration.
The exact interfaces available will depend on the NICs installed in the appliance.
LACP – One Logical Interface
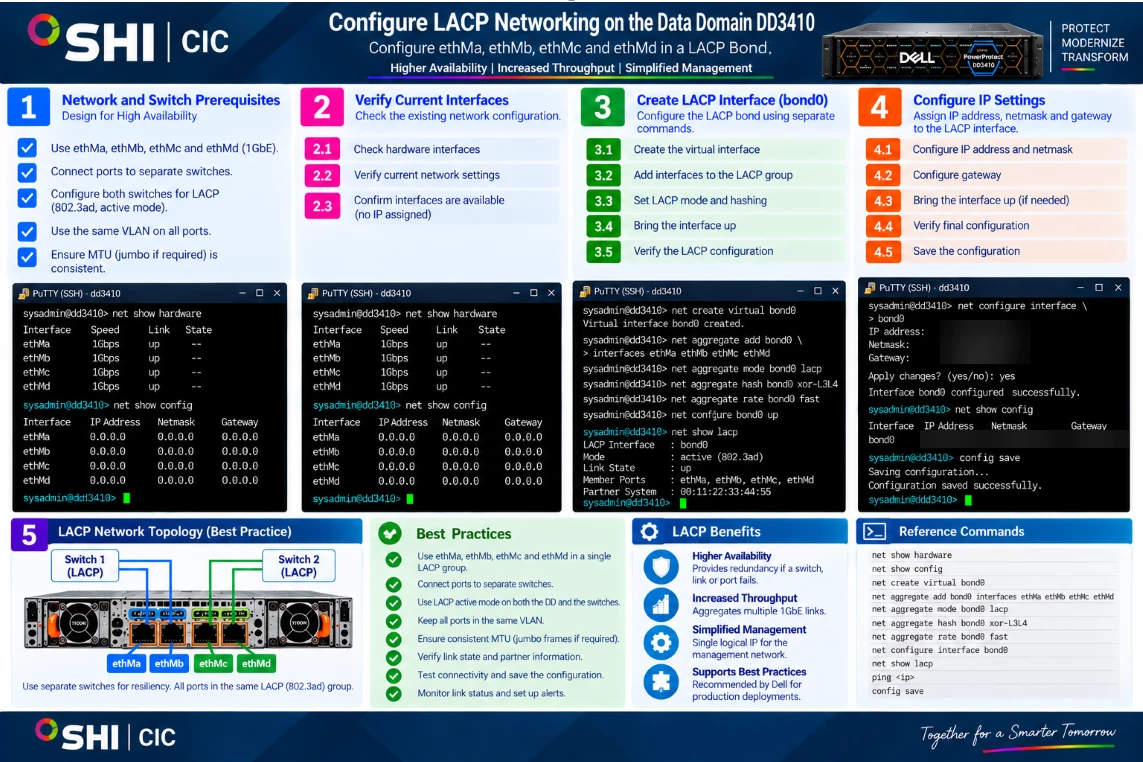
Data Domain also supports aggregating network interfaces.
If you configure LACP, multiple physical interfaces participate in the aggregate while the aggregate itself uses a single logical IP address.
For example:
NIC 1 ─┐
NIC 2 ─┼── LACP Aggregate ── 10.x.x.x
NIC 3 ─┤
NIC 4 ─┘
This provides additional network resiliency and can provide increased aggregate bandwidth across multiple connections.
One important consideration is the upstream switching configuration.
If the physical Data Domain interfaces connect to different switches, those switches must support the appropriate multi-chassis aggregation technology and operate as a single logical LACP peer.
Don't simply connect the interfaces to two independent switches and expect a standard LACP configuration to work.
Step 7 – Prepare the Data Domain for Veeam
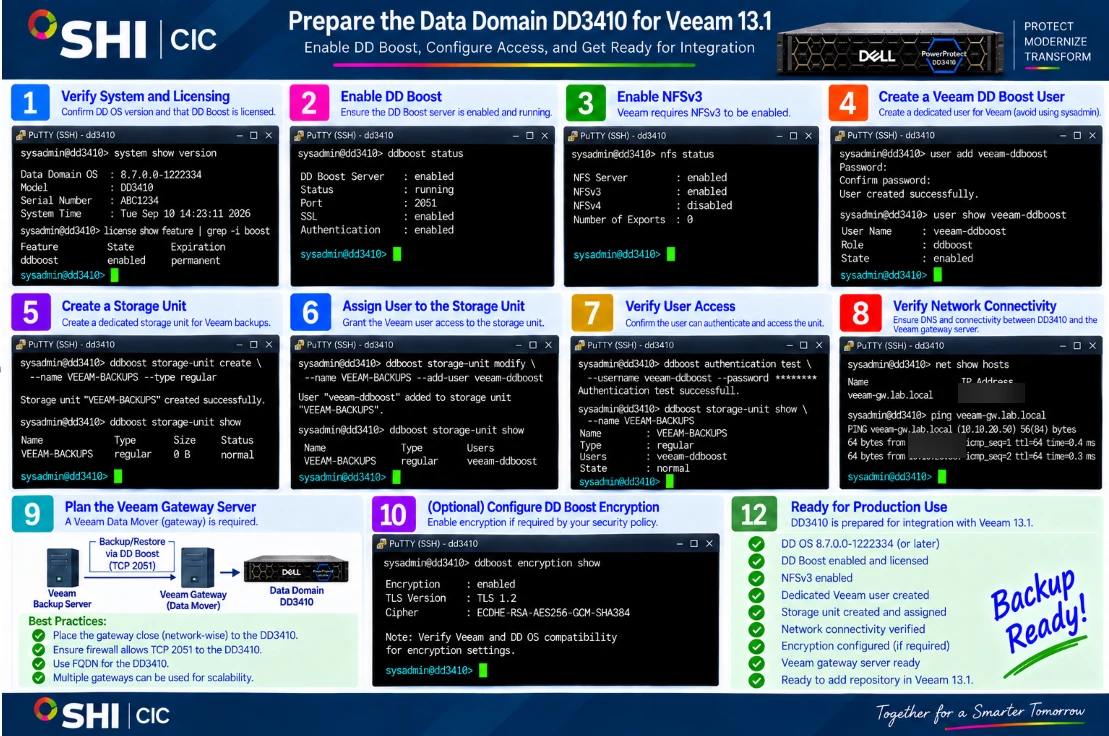
Now we get to the interesting part.
Rather than presenting the DD3410 to Veeam as a generic SMB or NFS repository, I wanted to use the native DD Boost integration.
That's important.
Veeam has direct support for Dell Data Domain using DD Boost.
With DD Boost, some of the data processing can occur on the Veeam gateway side instead of sending every block across the network and letting Data Domain handle everything.
The result can be:
- Less network traffic
- Better throughput
- More efficient data transfer
- Faster synthetic operations
- Better integration between Veeam and Data Domain
This is one of the biggest reasons I recommend using the native integration instead of simply creating a network share on Data Domain.
Step 8 – Enable DD Boost
From Data Domain System Manager, I navigated to the DD Boost configuration.
Before Veeam can use Data Domain as an integrated repository, DD Boost must be enabled and configured.
I verified that:
DD Boost was licensed
and
DD Boost was enabled.
This activates the DD Boost server component on the Data Domain.
Veeam provides the other side of the integration through the DD Boost libraries used by the Veeam Data Mover.
There is no separate DD Boost plug-in that I needed to manually install on the Data Domain for Veeam.
Step 9 – Create the Veeam DD Boost User
Next, I created a dedicated account for Veeam.
I prefer using a dedicated service account rather than sharing an administrative account between products.
For example:
veeam-ddboost
The exact naming convention isn't important.
What is important is making it obvious what the account is being used for.
The DD Boost user will eventually be associated with the storage unit that Veeam uses.
Step 10 – Create the Storage Unit
Next, I created the DD Boost storage unit for Veeam.
Conceptually:
DD3410
→ DD Boost
→ Veeam Storage Unit
→ Veeam Backup Repository
This creates a dedicated logical storage location for the Veeam backups.
Depending on the environment, you may decide to create multiple storage units.
For example:
VEEAM-PROD
VEEAM-COPY
VEEAM-LAB
This provides additional separation between workloads.
For my initial testing, I kept things simple and created a dedicated storage unit for Veeam.
I then assigned the DD Boost user to that storage unit.
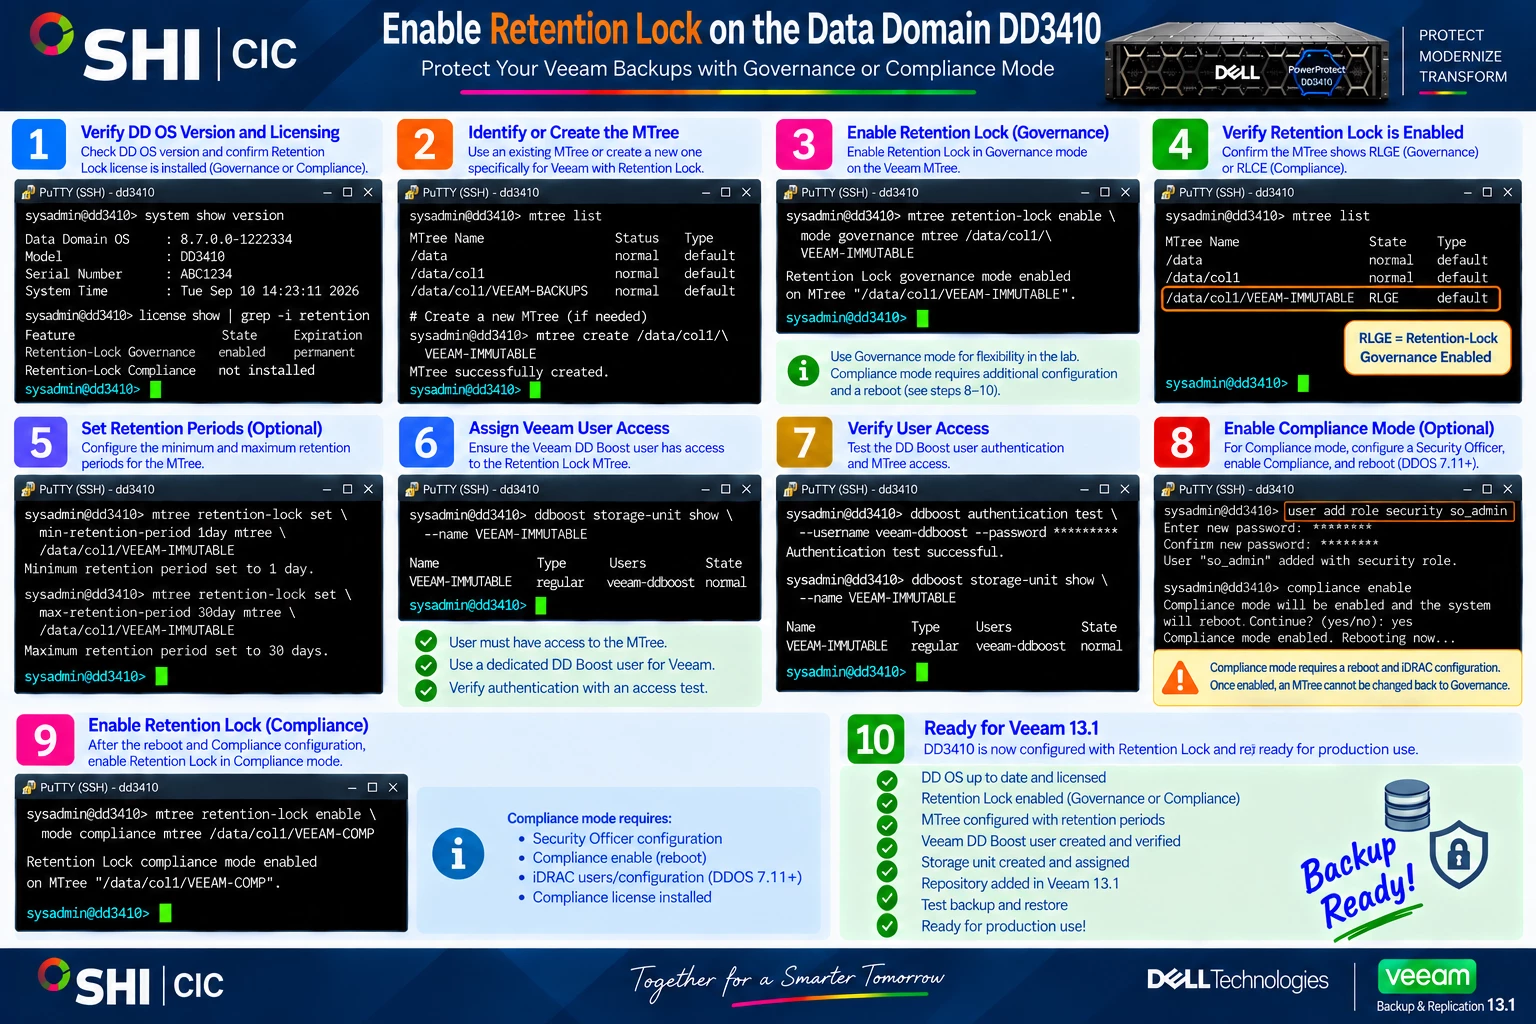
Step 11 – Retention Lock and Immutability
This is where Data Domain becomes especially interesting from a cyber-resilience perspective.
Data Domain supports Retention Lock, and Veeam can leverage Data Domain immutability when using the integrated repository.
This means backup data can be protected from deletion until the configured immutability period expires.
That includes deletion attempts resulting from:
- Compromised administrative credentials
- Malware
- Ransomware
- Accidental deletion
- Malicious administrative activity
This should be designed carefully.
Immutability isn't something I recommend enabling without first understanding the retention requirements.
Once data is locked, that's the point.
You shouldn't be able to simply delete it because someone changed their mind.
For production environments, the Veeam retention policy and Data Domain retention configuration need to be designed together.
Step 12 – Add the DD3410 to Veeam 13.1
With the Data Domain configuration complete, it was time to move over to Veeam.
In the Veeam console:
Backup Infrastructure
→ Backup Repositories
→ Add Repository
Then select:
Deduplicating Storage Appliance
followed by:
Dell Data Domain
This is important.
I am not adding the DD3410 as a generic SMB repository.
I want Veeam to understand that this is a Data Domain system and use DD Boost.
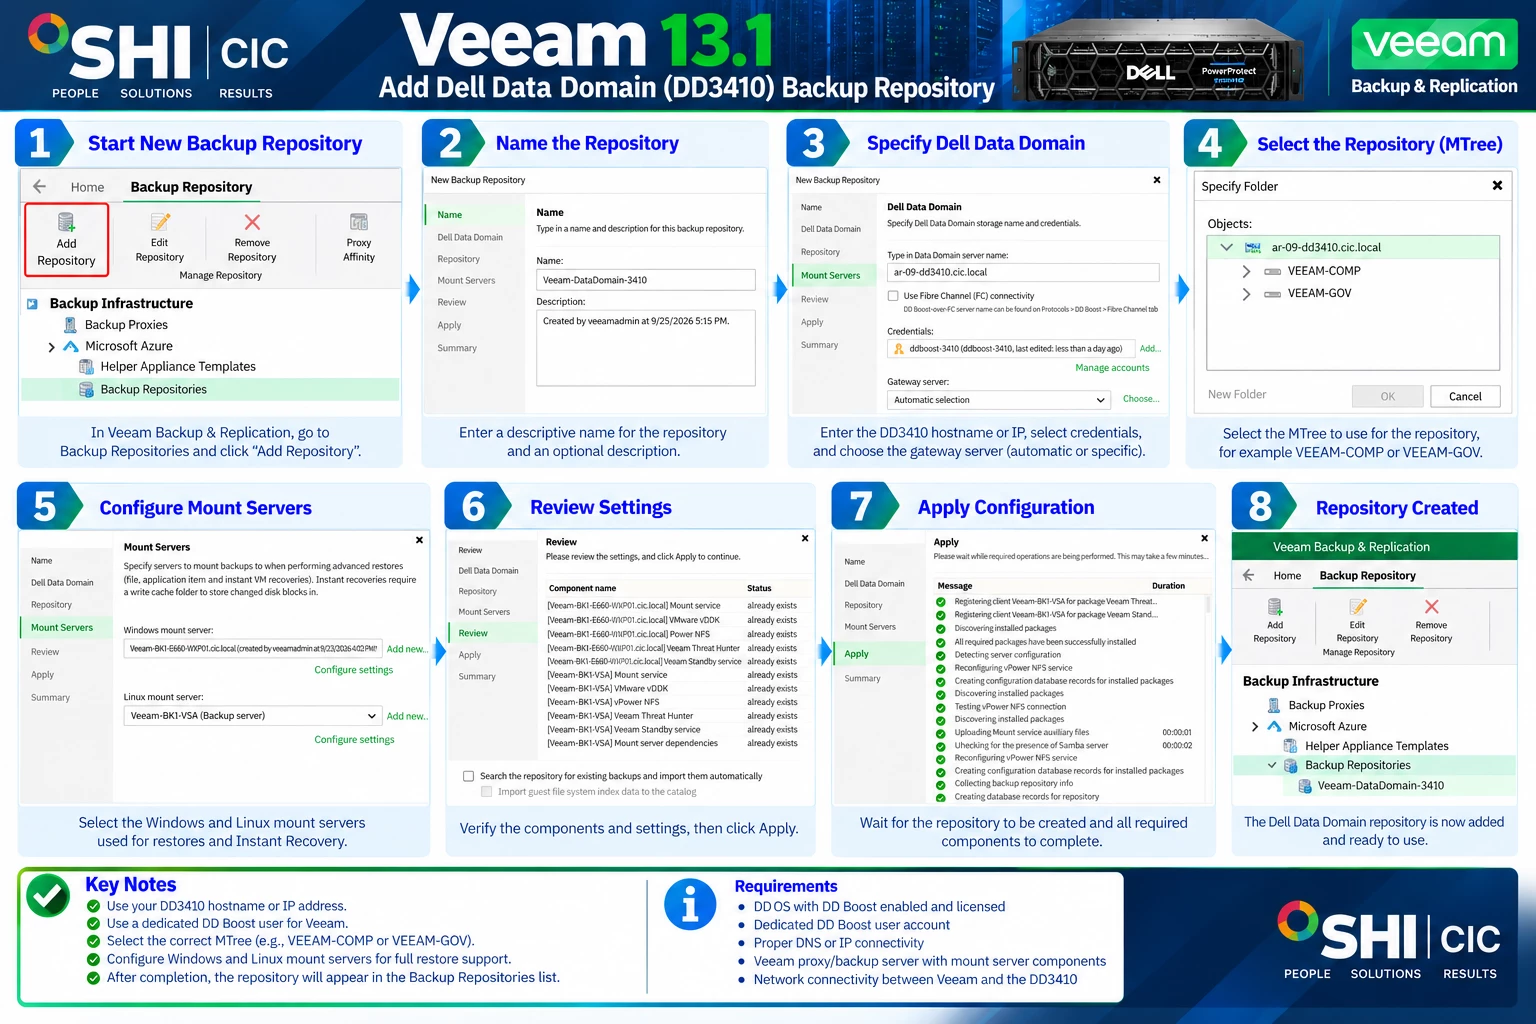
Step 13 – Connect Veeam to the DD3410
Next, I entered the Data Domain:
- DNS name or IP address
- DD Boost credentials
I prefer using DNS whenever possible.
For example:
dd3410.lab.local
rather than hard-coding an IP address everywhere.
Veeam then connects to the Data Domain and discovers the available DD Boost storage units.
I selected the storage unit created earlier for Veeam.
Step 14 – Select the Gateway Server
This part of the architecture is important to understand.
The Data Domain itself does not run the Veeam Data Mover.
Veeam therefore uses a gateway server to communicate with the Data Domain.
The data path essentially becomes:
Source
→ Veeam Proxy
→ Veeam Gateway
→ DD Boost
→ DD3410
The gateway is doing real work here.
It shouldn't be treated as an insignificant component.
Gateway CPU, memory and network performance can directly affect repository performance.
With DD Boost Distributed Segment Processing, some segmentation, filtering and compression operations can be performed on the gateway before the data is sent to Data Domain.
Instead of transmitting all incoming backup data across the network, the system can send the unique data that Data Domain actually needs.
That can significantly reduce network traffic.
Step 15 – Repository Added Successfully
After completing the wizard, the DD3410 appeared in:
Backup Infrastructure → Backup Repositories
At this point, Veeam could see:
- The Data Domain
- The DD Boost storage unit
- Repository capacity
- Available capacity
- Repository configuration
The hardware installation was complete.
The network configuration was complete.
DD Boost was running.
And Veeam could communicate with the appliance.
There was only one thing left to do.
Back something up.
Step 16 – Create the First Backup Job
For the initial test, I created a small VMware backup job.
I intentionally started small.
Whenever I'm testing new backup infrastructure, I don't immediately throw several hundred VMs at it.
First I want to validate:
Backup
Restore
Performance
Immutability
Data path
Once those work correctly, then I'll scale up.
For the repository, I selected the newly created:
Dell PowerProtect DD3410
repository.
Then I started the job.
Watching DD Boost Work
Once the backup started, I monitored both sides.
From Veeam I watched:
- Processing rate
- Bottleneck statistics
- Proxy utilization
- Gateway utilization
- Repository activity
From Data Domain I monitored:
- DD Boost activity
- Network throughput
- Storage utilization
- Active connections
- Deduplication statistics
This is one of my favorite parts of testing new backup infrastructure.
Seeing a job say Success is good.
Understanding how it got there is much more useful.
The Deduplication Effect
The other interesting metric to watch is Data Domain storage efficiency.
A Veeam job may process a significant amount of logical backup data while Data Domain physically stores considerably less data.
That's the entire point of the architecture.
Data Domain performs inline deduplication before writing data to disk.
As additional backups are written, duplicate blocks don't need to consume additional physical capacity.
The amount of reduction will obviously vary depending on workload.
Virtual machines with similar operating systems and applications generally provide much better opportunities for deduplication than highly compressed or encrypted data.
So I wouldn't design capacity around a magical deduplication ratio.
Measure your environment.
Backup Successful. Now Restore It.
I say this in almost every backup conversation:
A successful backup job doesn't prove that you can recover.
So after completing my first backups to the DD3410, I immediately moved on to restore testing.
My initial tests included:
- File-level recovery
- Entire VM recovery
- Application recovery
- Multiple restore points
- Recovery from an immutable backup
For more extensive testing, I would also look at:
- Instant Recovery
- Parallel restores
- Large VM recovery
- Backup Copy
- Data Domain replication
- Recovery after simulated infrastructure failure
That's where a lab becomes extremely valuable.
A Few Things I Learned
After getting the DD3410 deployed and integrated with Veeam 13.1, a few things stood out.
1. DD Boost Should Be the Default Choice
If you're using Data Domain with Veeam, I would use the native DD Boost integration unless there is a specific technical reason not to.
Treating Data Domain as a generic SMB share leaves a lot of capability on the table.
2. Pay Attention to the Gateway
The gateway server is an important part of the architecture.
Size it appropriately and make sure it has sufficient network connectivity to the Data Domain.
3. Networking Matters
A fast backup appliance connected through a poorly designed network is still a slow backup repository.
Look at the complete path:
Source → Proxy → Gateway → Data Domain
not simply the NIC speed printed on the Data Domain spec sheet.
4. Deduplication Changes the Storage Conversation
Don't compare logical Veeam backup capacity directly to physical Data Domain consumption.
One of the main reasons for deploying Data Domain is storage efficiency.
5. Immutability Needs Planning
Retention Lock can provide a powerful layer of protection, but the Veeam retention configuration and Data Domain retention configuration should be designed together.
6. Test Recovery Immediately
Don't wait for ransomware or a production outage to discover how your repository behaves during recovery.
Back it up.
Lock it.
Delete the original.
Recover it.
That's a much more useful test.
Final Thoughts
Going from an unopened shipping box to a functioning Veeam repository gave me a much better understanding of where the DD3410 fits.
The deployment itself was straightforward:
Rack it.
Cable it.
Configure networking.
Configure DD OS.
Enable DD Boost.
Create the storage unit.
Add it to Veeam 13.1.
Run the backup.
Test the restore.
But the interesting part isn't simply getting a green check mark from the first backup job.
It's understanding the architecture behind it.
Veeam provides the orchestration, backup and recovery workflows.
DD Boost optimizes the data path.
Data Domain provides deduplication, storage efficiency, data integrity and immutable retention capabilities.
Put together correctly, the combination gives you more than somewhere to store a VBK file.
It gives you a backup architecture designed around efficiency, resiliency and recovery.
And that's ultimately what matters.
Because the question isn't:
"Did my backup job finish successfully?"
The question is:
"When everything goes wrong, can I get my data back?"
That's the test that counts.