


What is SAML?
It stands for Security Assertion Markup Language (SAML). It is a standardized way to tell external applications and services that a user is who they say they are. SAML makes single sign-on (SSO) technology possible by providing a way to authenticate a user once and then communicate that authentication to multiple applications.
Veeam Software Appliance 13.1 supports SAML 2.0 single sign-on for the backup server level.
This technical guide helps to configure it: we start from an empty Windows Server and a fresh appliance and ends at a working SSO login, with an AD FS server, exchanging metadata with the appliance, adding claim rules, and signing in with a domain account.
SSO/SAML can't be used in the Host Management Console WebUI (port 10443) - it only uses local accounts by design.
Local logins also remain always enabled alongside SAML, which is failback option if SAML stops operating, otherwise you would lock yourself out.
Active Directory itself is NOT a SAML identity provider (IdP). Phase "SAML against the domain" in practice means a federation service in front of AD, and Active Directory Federation Services (AD FS) is the one, built-in in Windows already and for free.
If you prefer to use Entra ID instead, there is a separate community guide for that.
The steps below were validated on VBR 13.1 against AD FS on Windows Server 2025, on a standalone appliance and on
a VSA HA cluster. Where the cluster behaves differently, it is additionally mentioned.
Everything below describes only basic settings, which could be further hardened as per need later.
Names used throughout:
the domain is a throw-away test only internal isolated justadomain.win,
the federation service FQDN fs.justadomain.win running on the server vn-adfs01.justadomain.win,
the appliance is vn-vsa-solo.justadomain.win,
the VSA HA cluster vn-vsa-cluster.justadomain.win,
and the AD group that holds backup administrators is GG_BackupAdmin.
Prerequisites
You need:
- a VBR 13.1 appliance, standalone or HA cluster
- a domain-joined Windows Server for the AD FS role (2019 or later works, the screenshots are from 2025)
- Permissions to create a DNS record and a Group Managed Service Account in the domain
One naming rule matters before you start: the federation service name must differ from the AD FS server's hostname. The computer account already owns the HOST/<hostname> service principal name, and AD FS needs HOST/<federation service name> for its own service account. Equal names make the farm configuration fail. That is why this guide runs fs.justadomain.win on a server named vn-adfs01. Before you begin, create a DNS A record for the federation service name that points at the AD FS server.
Step 1 - Install the AD FS role
On the AD FS server, open Server Manager and start the Add Roles and Features wizard. Keep the defaults until the Server Roles page, then select Active Directory Federation Services. No additional features are needed.
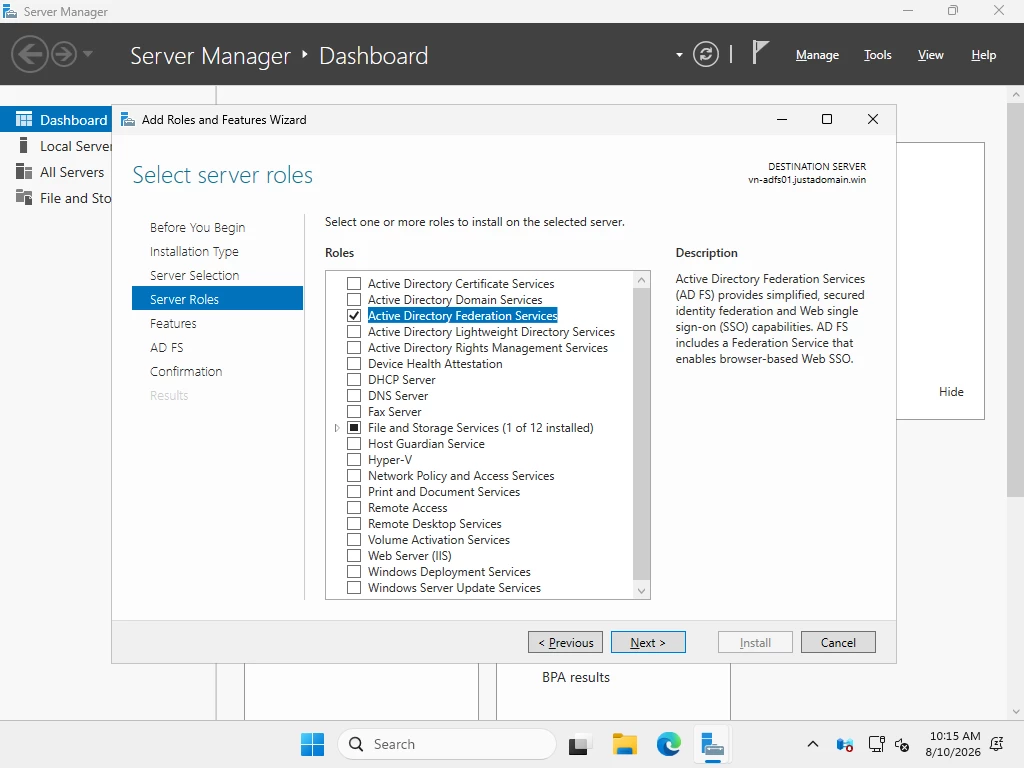
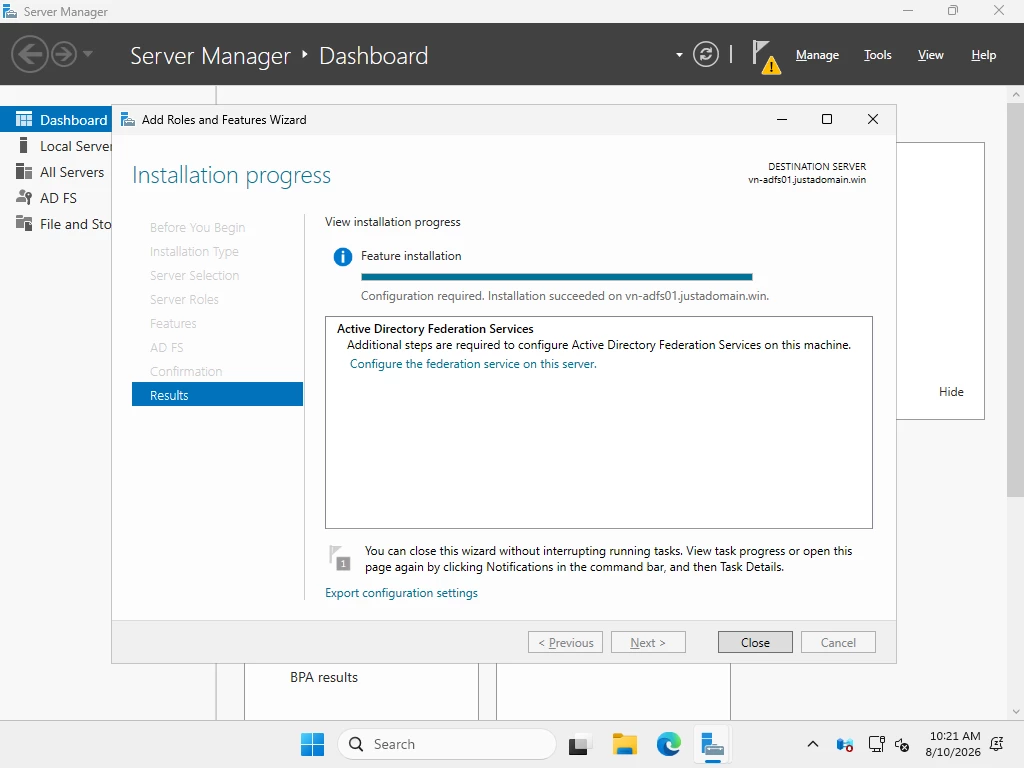
Confirm and let the installation run. When it completes, the results page offers a "Configure the federation service on this server" link. That link is the next step.
Step 2 - Configure the federation service
The configuration wizard needs two things that do not exist yet: a TLS certificate for the federation service name and a service account. Create both first.
For a lab, a self-signed certificate is enough. Run this in an elevated PowerShell on the AD FS server:
New-SelfSignedCertificate -DnsName "fs.justadomain.win" `
    -CertStoreLocation Cert:\LocalMachine\My `
    -KeyExportPolicy Exportable -KeyLength 2048
In production, use a certificate from your CA instead. Either way, every machine that runs the VBR WebUI or desktop console must trust this certificate.
For the service account, use a Group Managed Service Account. A gMSA needs a KDS root key in the domain, and many domains already have one. If yours does not (the wizard will tell you), create the key on a domain controller:
Add-KdsRootKey -EffectiveTime ((Get-Date).AddHours(-10))The AddHours(-10) backdating makes the key usable immediately instead of after the default ten-hour replication wait. That is fine in a lab with a single DC or well-connected DCs.
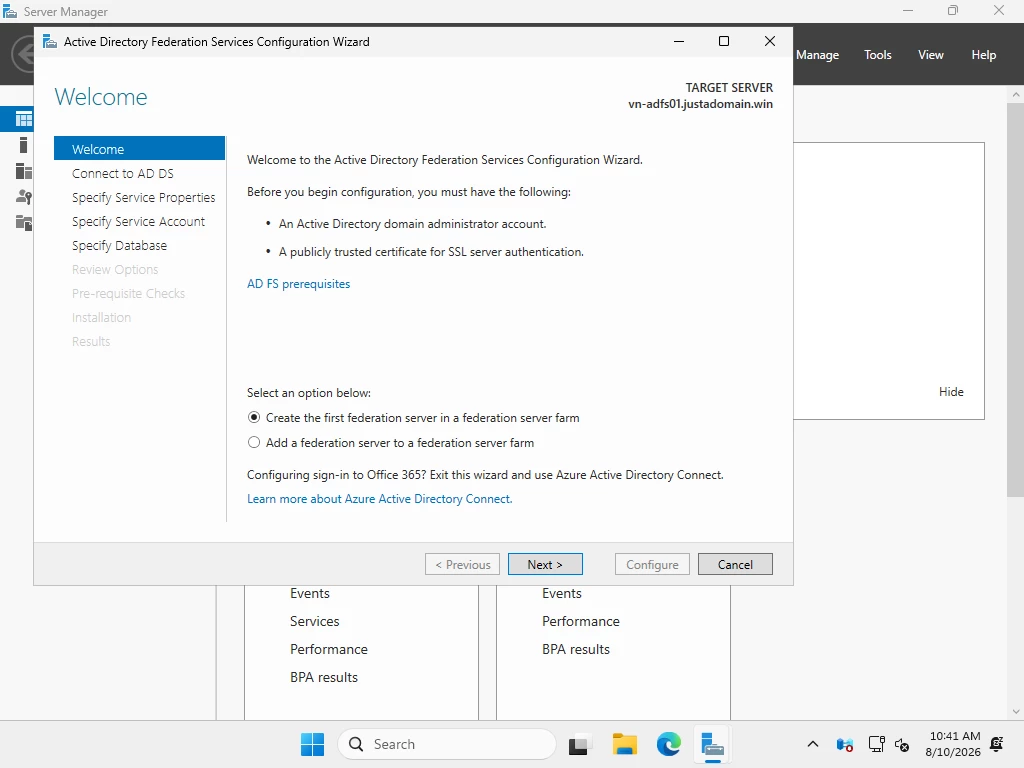
Now start the configuration wizard from the Server Manager notification. Choose "Create the first federation server in a federation server farm".
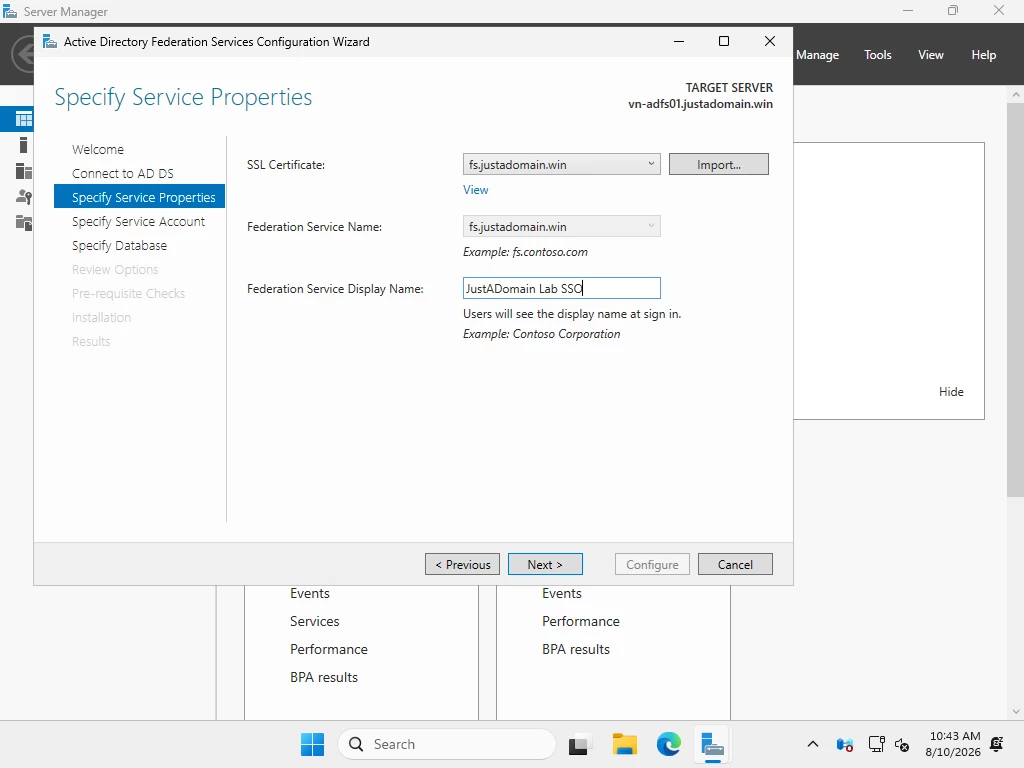
On the Specify Service Properties page, pick the certificate you just created. The federation service name fills in from the certificate. Enter a display name. Users see this name on the sign-in page.
On the service account page, select "Create a Group Managed Service Account" and enter a name, here gmsa-adfs. The wizard creates the account and registers the SPNs for you.
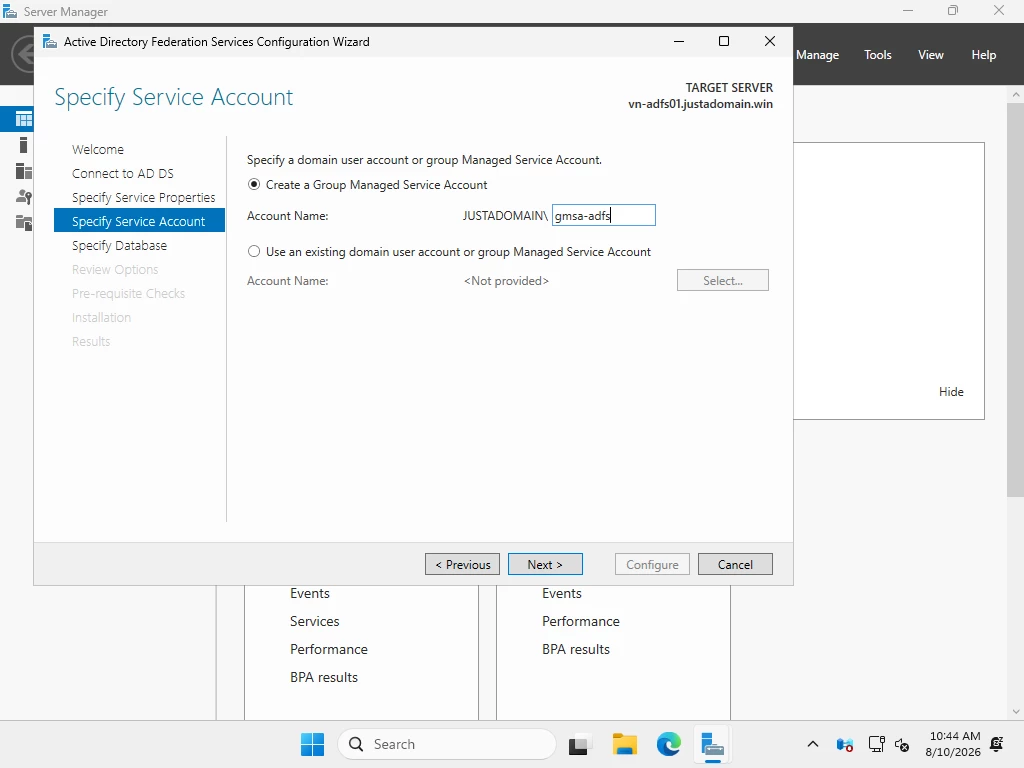
Keep the defaults for the rest of the wizard (the Windows Internal Database is fine for a single-server farm), review, and let it configure the farm. After the service starts, verify it answers: open the federation metadata URL in a browser.
https://fs.justadomain.win/FederationMetadata/2007-06/FederationMetadata.xml
You should see an XML document.
One more setting while you are on the AD FS server. Out of the box, AD FS offers the silent Windows sign-in (Windows Integrated Authentication) only to browsers whose User-Agent matches its WIASupportedUserAgents list, and the defaults cover just Internet Explorer and legacy Edge. Modern Edge (Edg/) and Chrome (Chrome/) are not on it, so their users would see the AD FS sign-in page instead of being signed in silently. Extend the list once:
Set-AdfsProperties -WIASupportedUserAgents ((Get-AdfsProperties).WIASupportedUserAgents + "Edg/" + "Chrome/")
Restart-Service adfssrv
The AD FS side is ready. Keep the federation metadata URL handy, the next step uploads its content to the appliance.
Step 3 - Enable SAML on the appliance
The Identity Provider settings live in the desktop console, not the web UI (not in current version, yet). Connect to the appliance (vn-vsa-solo.justadomain.win) as a veeamadmin default local VSA account . Open the main menu, choose Users and Roles, and switch to the Identity Provider tab. On a fresh appliance the tab looks like this:
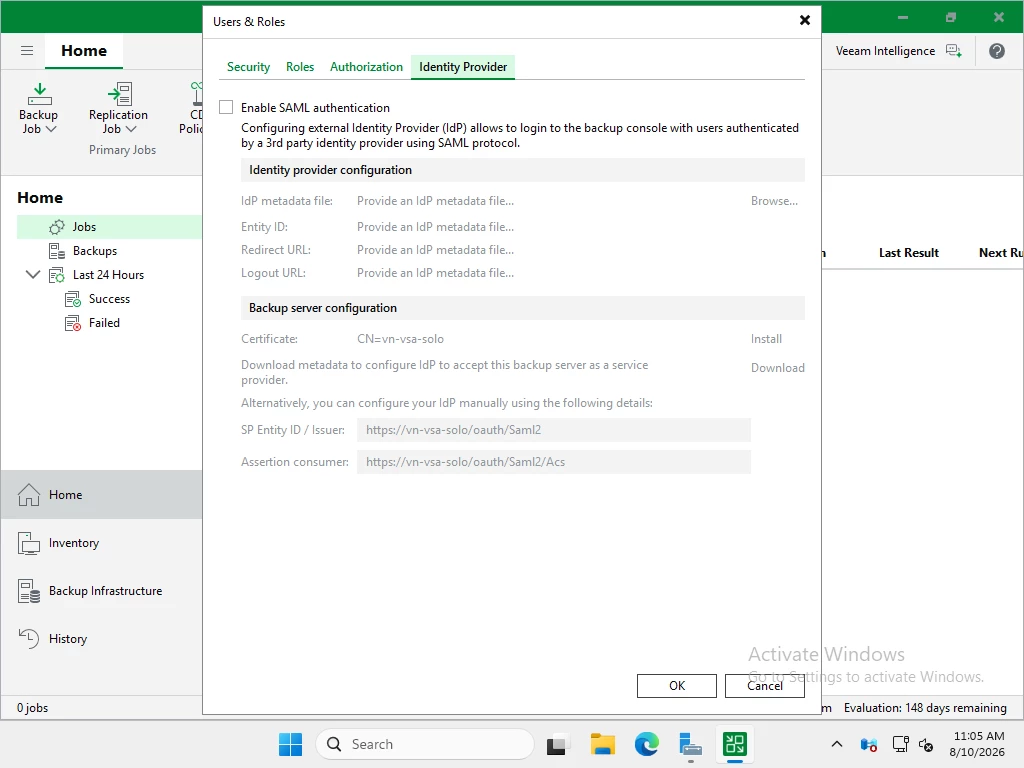
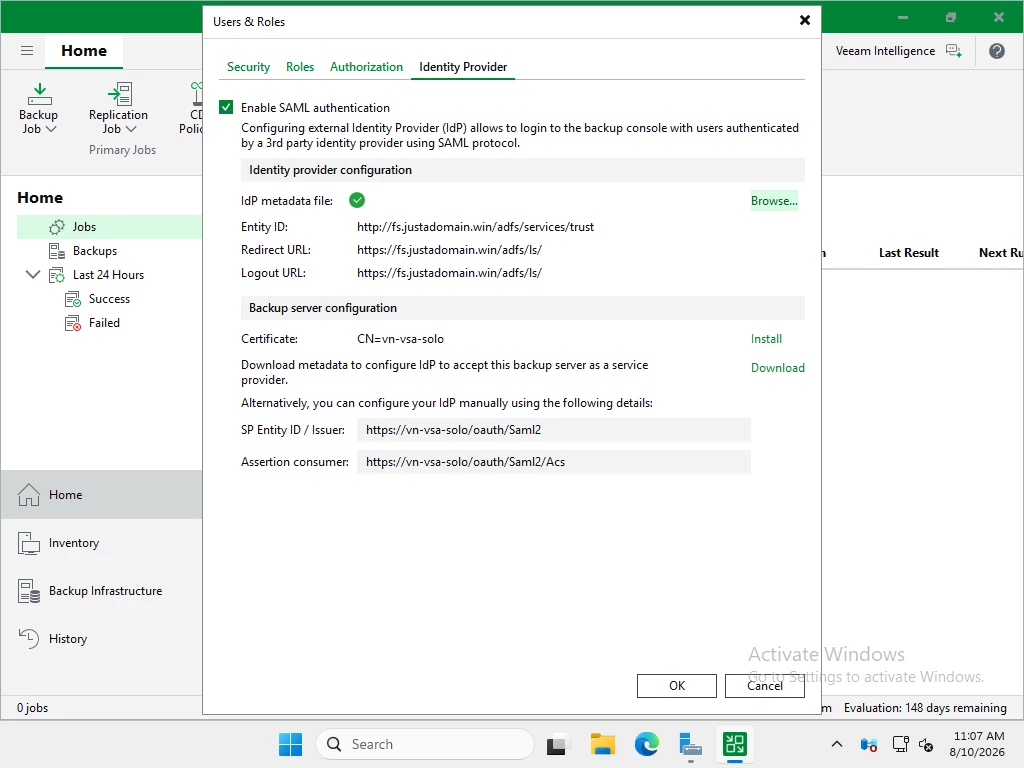
Save the federation metadata XML from the URL above to a file. Tick Enable SAML authentication. Click Browse next to "IdP metadata file" and upload the file. The console parses it and fills in the Entity ID, Redirect URL, and Logout URL from the metadata.
Leave the Service Provider section on the backup server certificate unless your security policy demands a dedicated SAML signing certificate. Click OK to save. Then reopen the tab and click Download next to "Backup server configuration". The download is the appliance's own SP metadata, the other half of the exchange. AD FS needs this file to trust the appliance.
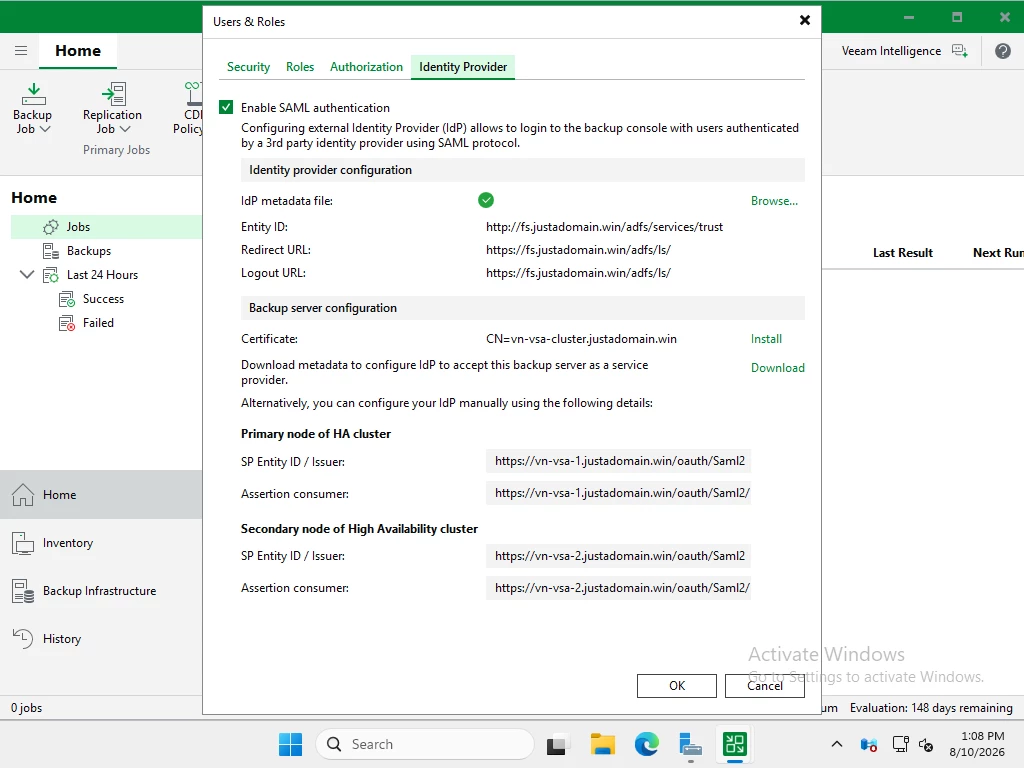
HA cluster callout. On a cluster, this tab lists both nodes, and Download saves two SP metadata files, one per node. That is not a cosmetic detail: the SAML endpoints are per node, so each node is its own service provider. Keep both files. You will register both in the next step. Configure SAML through the cluster address or the leader node, like any other configuration change.
⚠ IMPORTANT the SP identity in that metadata file is derived from the appliance hostname and the backup server certificate. If you later rename the appliance, join it to a domain, or regenerate the backup server certificate, the exported metadata no longer matches reality and SSO silently stops working. The fix is always the same: come back to this tab, download fresh SP metadata, and update the relying party trust in AD FS.
Step 4 - Register the appliance in AD FS
Copy the SP metadata file to the AD FS server and open the AD FS Management console. Under Relying Party Trusts, start the Add Relying Party Trust wizard. Keep "Claims aware", choose "Import data about the relying party from a file", and point the wizard at the SP metadata file.
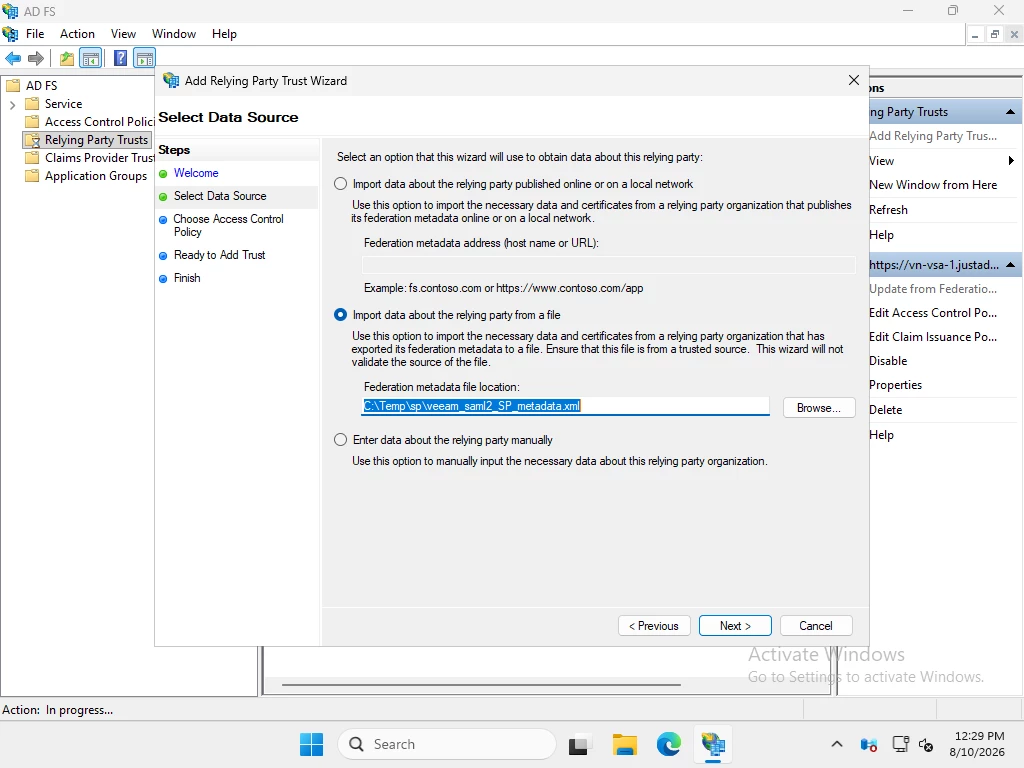
Give the trust a display name you will recognize. Leave the access control policy at "Permit everyone". Authorization happens on the Veeam side through roles, so the IdP can permit broadly. Finish the wizard and leave the option to edit claims policy checked. The claim rules come next.
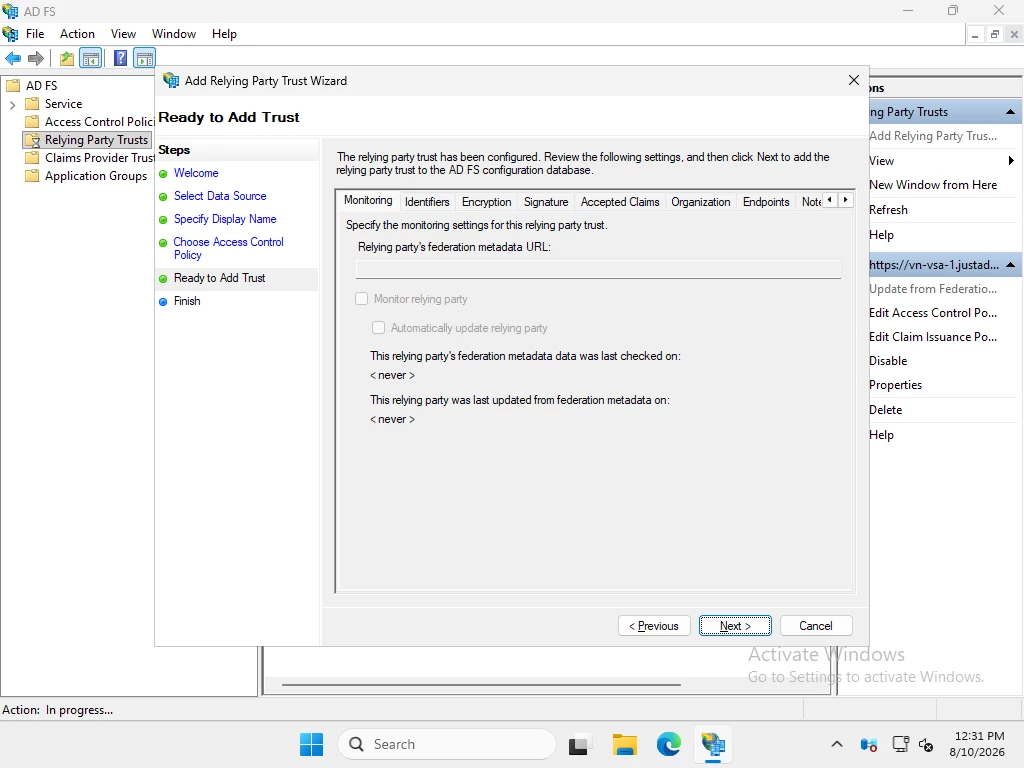
The SP metadata declares that the appliance's authentication requests are unsigned, so do not enable any "require signed SAML requests" option on the trust. The separate SP certificate file that came with the metadata download is not needed in this flow.
HA cluster callout. Two SP metadata files mean two relying party trusts, one per node, with identical claim rules on each. If you register only one node, SSO works right up until the first failover and then dies.
Step 5 - Add the claim rules
The appliance expects two things in the SAML assertion: a Name ID in persistent format that carries the user principal name, and optionally a group claim whose value matches an External Group account name on the Veeam side. (if you also decide to include\use AD groups in VBR).
Two rules cover that, and they are the same two rules Veeam documents in the Enterprise Manager AD FS guide.
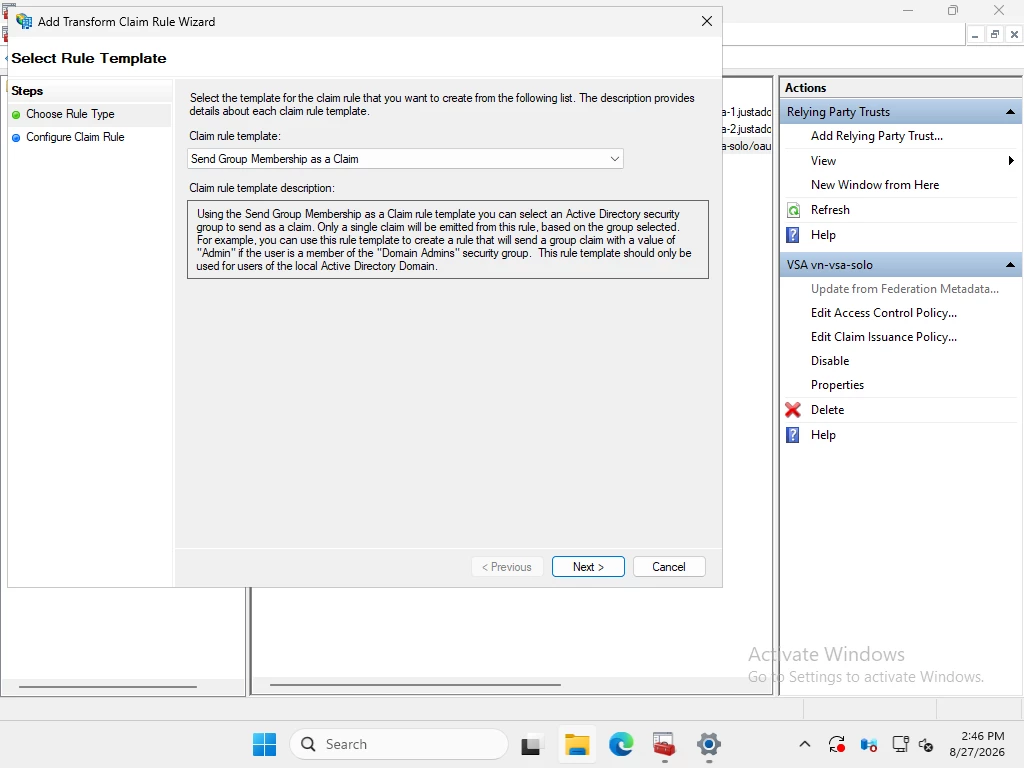
Open Edit Claim Issuance Policy on the new trust and click Add Rule. Each rule starts at the template picker; pick the template named which is specified below for each rule, click Next, fill the Configure Rule page, and click Finish.
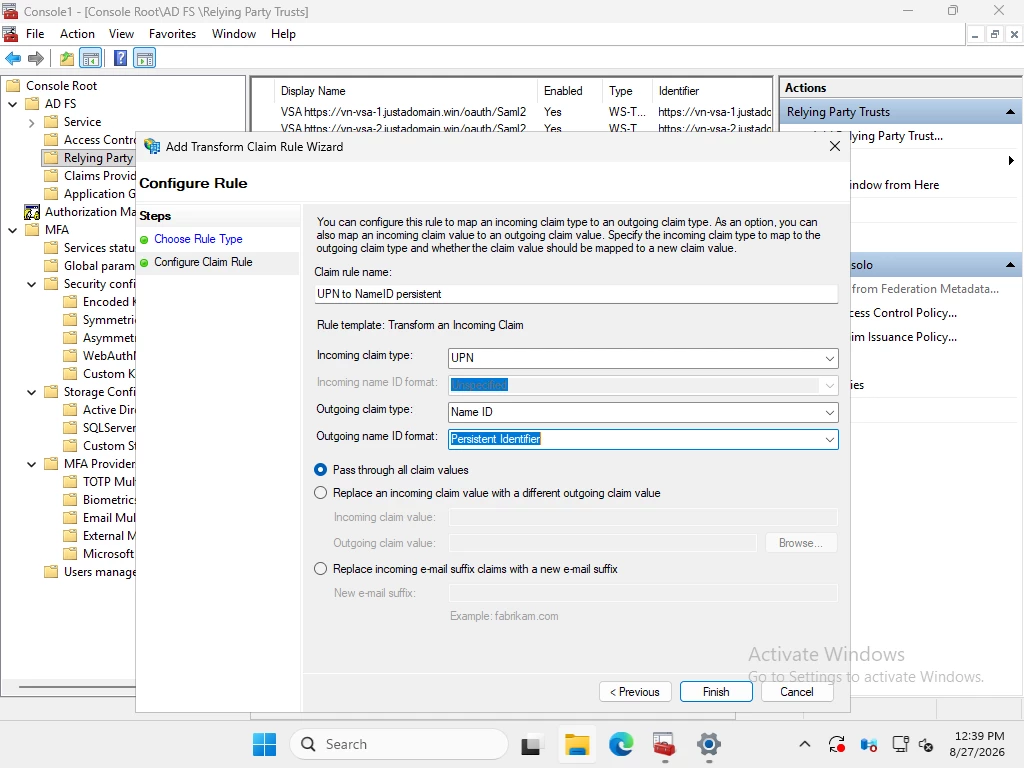
Rule 1 - turn the UPN into a persistent Name ID. Template: "Transform an Incoming Claim". Enter:
- Claim rule name: UPN to NameID persistent
- Incoming claim type: UPN
- Outgoing claim type: Name ID
- Outgoing name ID format: Persistent Identifier
- Leave "Pass through all claim values" selected
You do not need a rule to fetch the UPN first. AD FS issues the user's UPN on every Active Directory login and hands it to rule processing through the default "Pass through all UPN claims" acceptance rule of the built-in Active Directory claims provider trust. This transform rule only converts it into the Name ID the appliance expects.
Rule 2 - send the group membership as a Group claim. Template: "Send Group Membership as a Claim". Enter:
- Claim rule name: GG_BackupAdmin membership as Group
- User's group: click Browse and pick GG_BackupAdmin
- Outgoing claim type: Group
- Outgoing claim value: GG_BackupAdmin
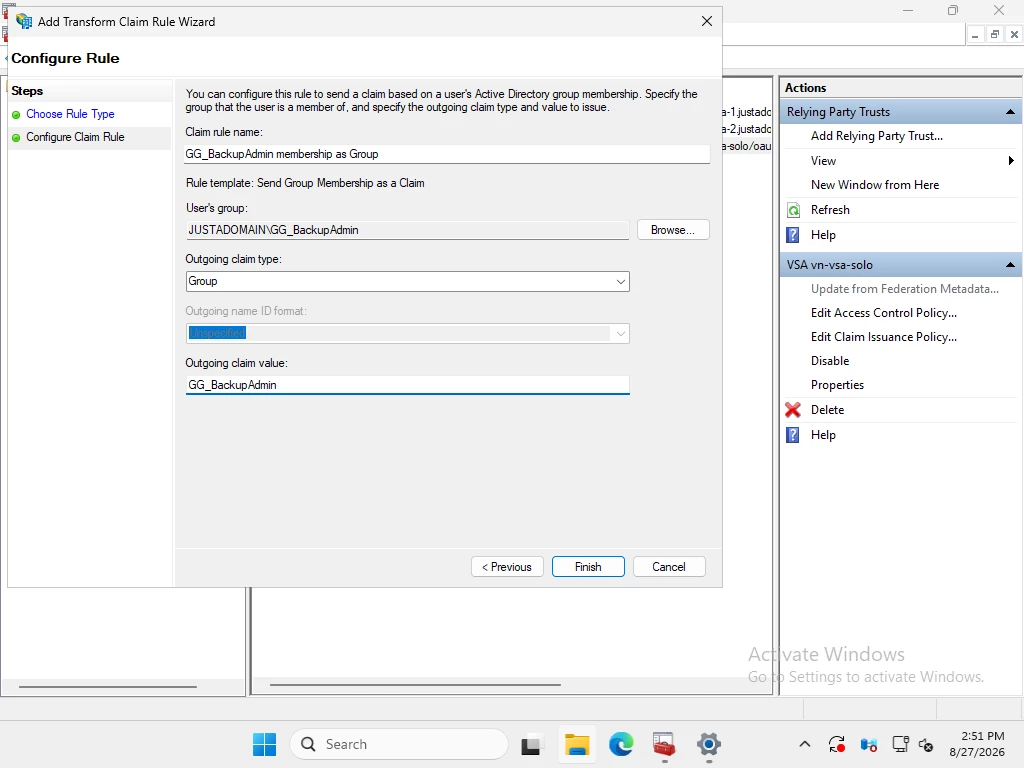
At login AD FS checks whether the user is a member of the selected group and, if so, adds one claim of type Group with the value you set. The appliance compares that value against its External Group account names, so the outgoing claim value must match the External Group account you will add in the next step. The value does not have to be the AD group name: if you prefer not to expose internal group names, send any label you like and create the External Group account under that label.
⚠ IMPORTANT Repeat rule 2 for every AD group you want to publish; each group gets its own rule.
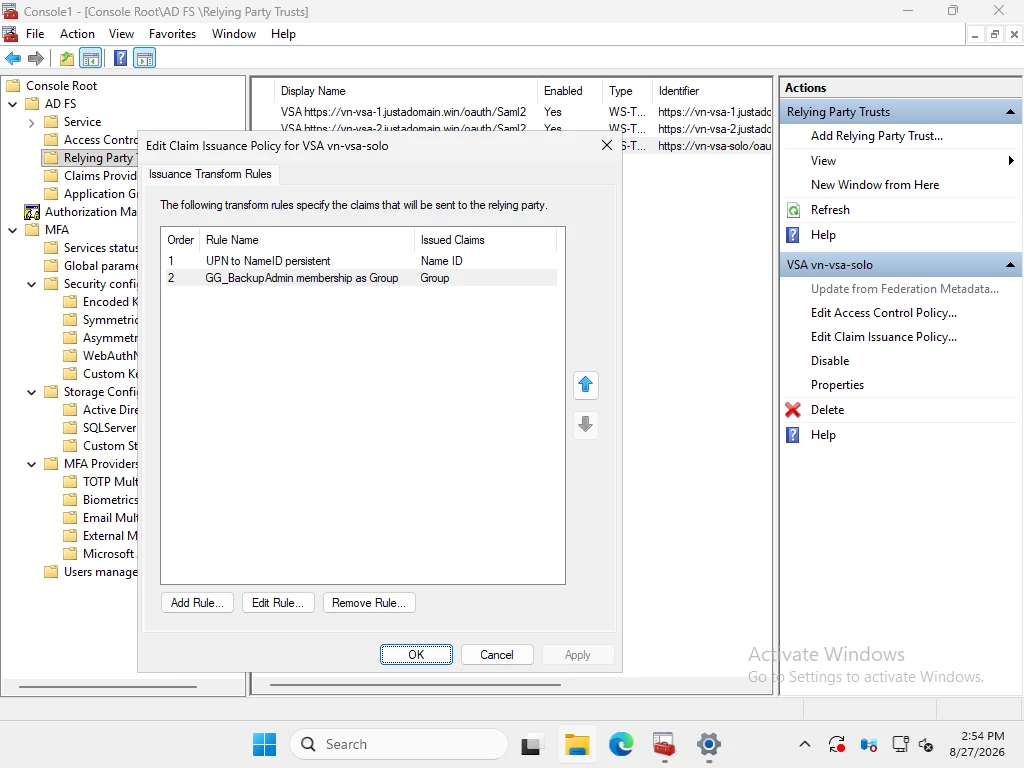
With both rules in place the issuance policy looks like this. Click OK to save it:
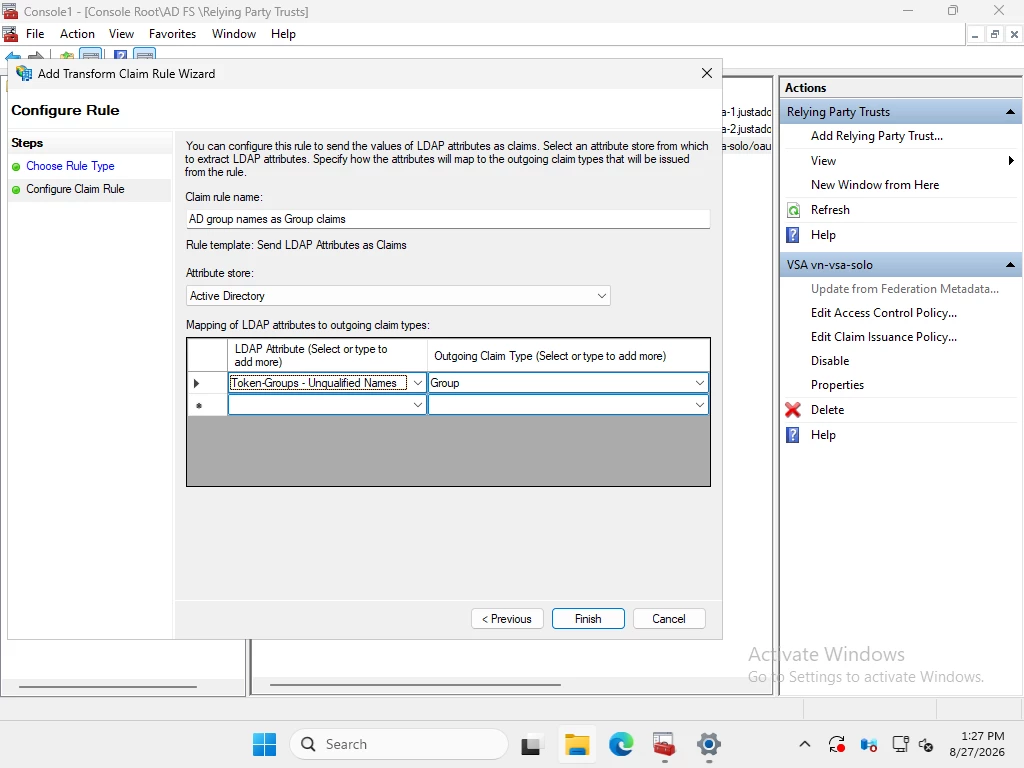
Alternative for many groups. If you want to use a lot of groups in your VBR it is inconvenient to add a new AD FS rule per every group, instead a single "Send LDAP Attributes as Claims" rule could be used, which sends all of the user's group names at once: attribute store Active Directory, LDAP attribute Token-Groups - Unqualified Names, and for the outgoing claim type type the word Group yourself (it is not in the dropdown, the field accepts free text). The appliance filters the incoming names against its External Group accounts and ignores the rest, so publishing another group later is a Veeam-side change only. The trade-off: every login discloses the user's full group list to the appliance.
Claim values are the literal AD group names, so the External Group account names entries in VBR must match them exactly.
Step 6 - Add SSO users and groups on the appliance
Authentication now happens at AD FS, but the appliance still decides who is authorized. The appliance refuses an IdP-authenticated user who has no role. Add the principals before the first login, not after.
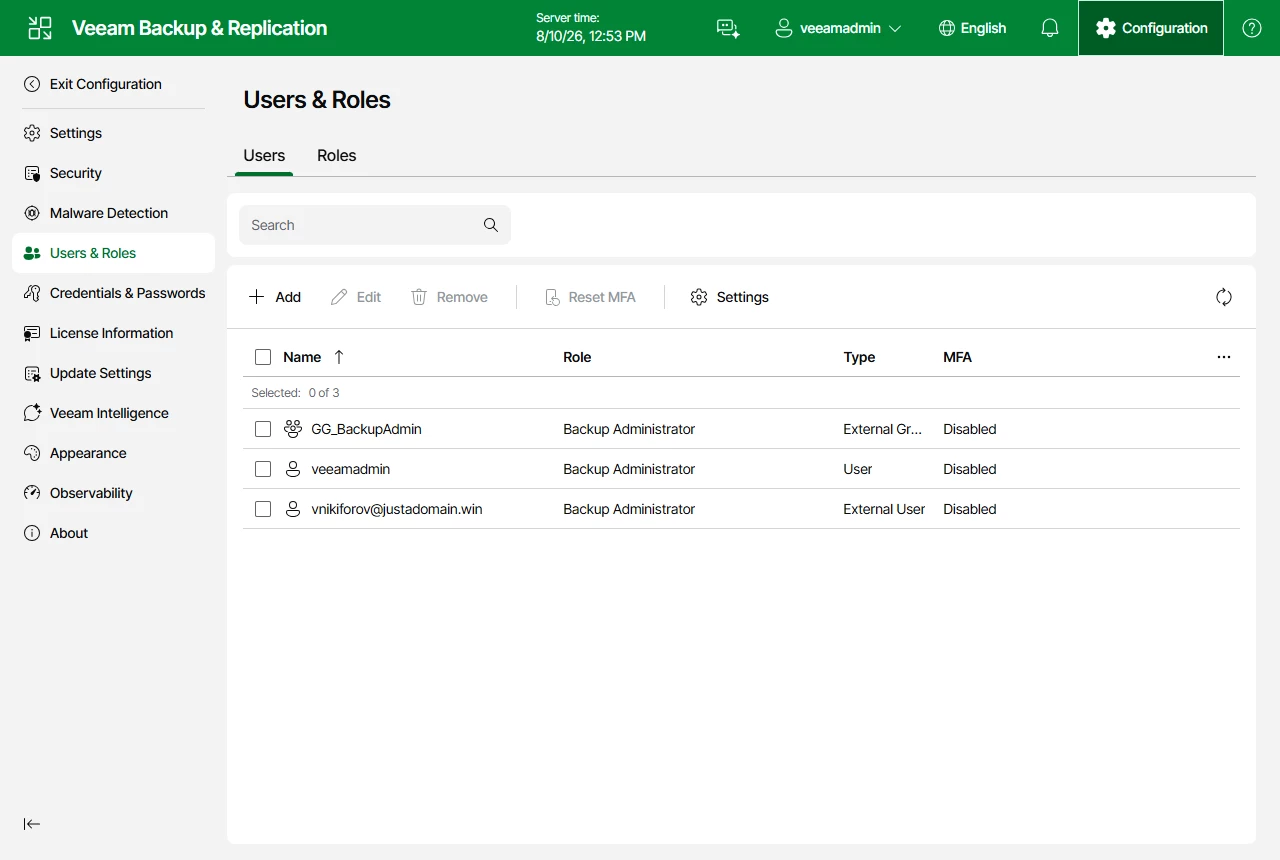
This part works from the web UI as well. Open the appliance web UI, go to Configuration, then Users & Roles, and on the Users tab click Add. Create two entries:
- an external user with the UPN of a test account (type External User, name vnikiforov@justadomain.win)
- an external group named exactly like the AD group (type External Group, name GG_BackupAdmin)
Give each the role it should have. Both principals now sit alongside the local accounts:
Step 7 - Test the login
Open the appliance web UI in a fresh browser session. The login page now shows "Sign in with SSO" under the local login form.
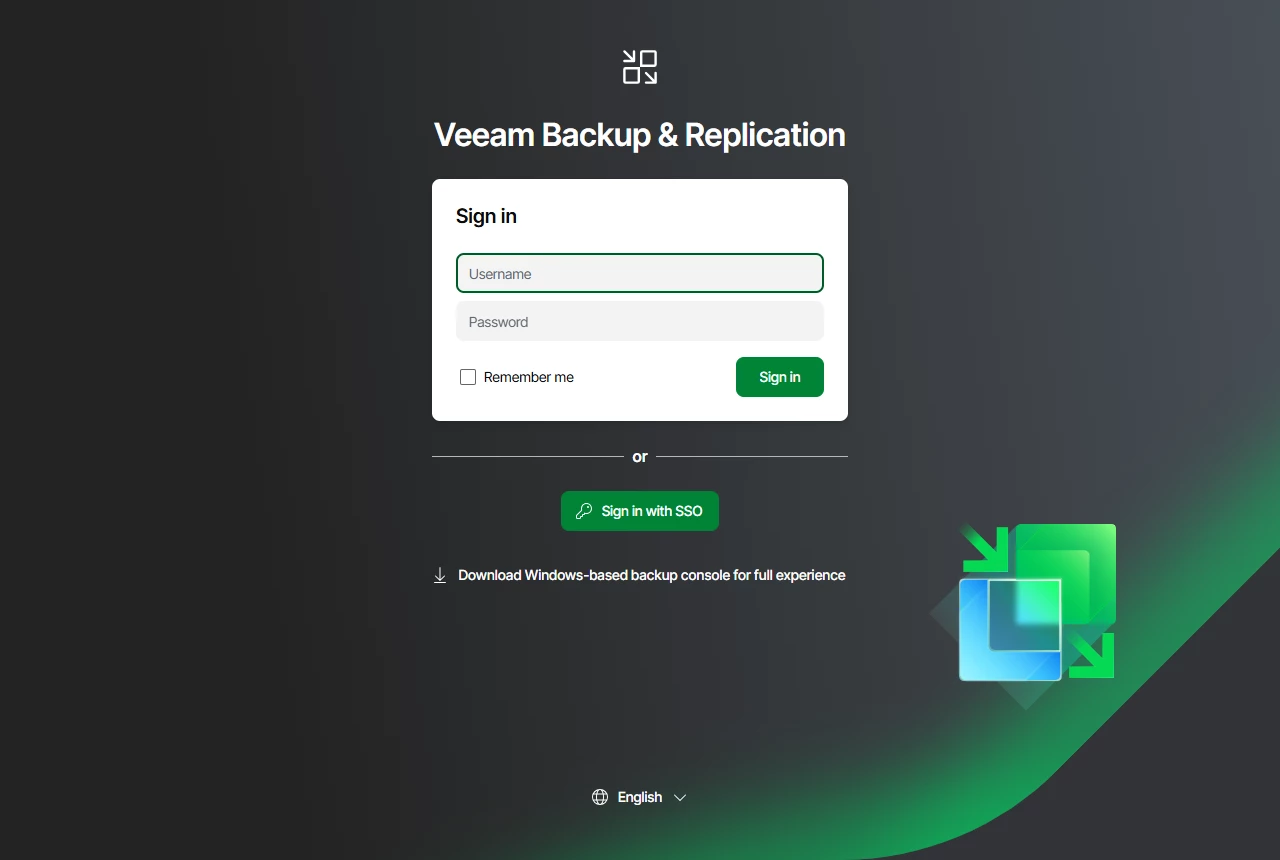
Click it. From a domain-joined machine, nothing visible should happen at all: the browser bounces through the federation service with Windows Integrated Authentication and lands back on the appliance already signed in, no credential prompt. That is the SSO operational for you.
⚠ IMPORTANT It relies on the WIASupportedUserAgents extension command from step 2 above, and on one client-side condition that is easy to miss: Chromium browsers refuse to answer integrated authentication for a host unless machine policy explicitly allows it. Domain membership alone is not enough. The desktop console needs its own copy of the setting, because its "Sign in with SSO" window is a WebView2 control that reads a separate policy key from the Edge browser - without it the console shows a Windows Security credential prompt for the federation host on every login, which defeats the point of SSO. Set both keys on every machine that runs the web UI or the console, from an elevated prompt:
reg add "HKLM\SOFTWARE\Policies\Microsoft\Edge" /v AuthServerAllowlist /t REG_SZ /d "fs.justadomain.win" /f
reg add "HKLM\SOFTWARE\Policies\Microsoft\Edge\WebView2" /v AuthServerAllowlist /t REG_SZ /d "fs.justadomain.win" /f
Note the commands contain your ADFS FQDN - please change accordingly.
Policy is read at startup, so close every browser window and restart the console before retesting. If a credential prompt naming the federation host still appears, the policy has not landed yet - typing domain credentials into that prompt completes the same SAML flow, so the trust itself is fine. To prove the silent path is really Kerberos, run klist on the client after signing in: it should show a service ticket for HTTP/fs.justadomain.win.
From a machine outside the domain, or from a browser AD FS does not do integrated authentication with, AD FS shows its sign-in page once a session:
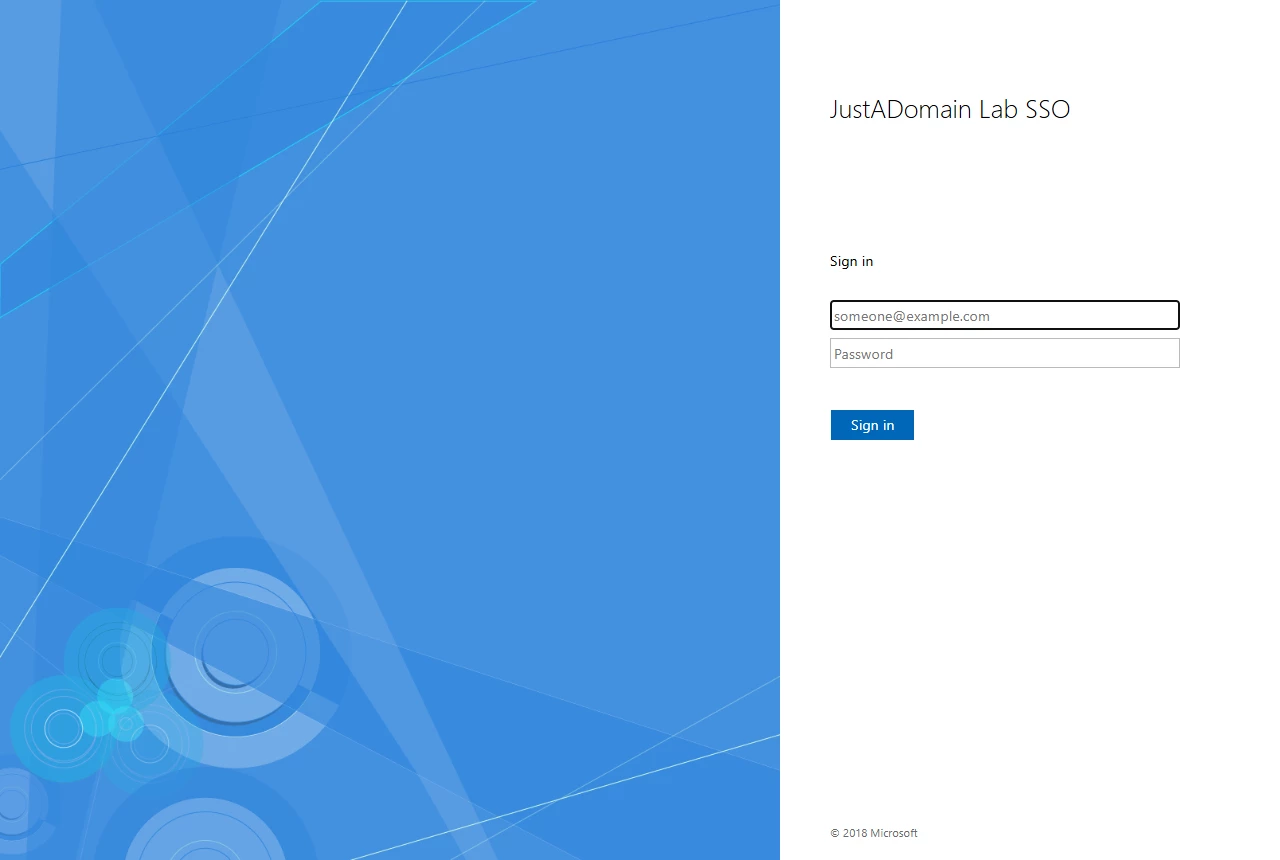
Sign in with domain credentials there and the browser lands back on the appliance, authenticated.
Also test the group path deliberately. Sign in with an account that holds access only through the AD group and has no explicit external user entry. If that account lands in the web UI, the group claim matched. This is the test that catches a mistyped group claim value, and it is worth running now rather than during an audit.
⚠ IMPORTANT On a HA cluster, watch the address bar during the SSO. During SSO the browser jumps from the cluster URL to the serving node's own FQDN, because the SAML endpoints are per node. The default backup server certificate carries only the cluster name and the virtual cluster IP (VIP) in its SAN, not the node FQDNs, so this hop shows a browser certificate warning even though the cluster URL itself is clean. In a lab, click through. The clean fix is a custom certificate whose SAN includes the node FQDNs as long as the cluster FQDN and it's VIP, imported through the console's PFX import path.
Vladimir Nikiforov
Product Management Analyst
Veeam Software
AI disclosure
Parts of this text were produced with an AI assistant working under the author's direction. The output was reorganized and edited by the author, who holds editorial responsibility for what is published here. The model's residual contribution is wording and structure.
Under Regulation (EU) 2024/1689 (the AI Act), applicable from 2 August 2026, Article 50(2) requires providers to mark AI-generated output in a machine-readable format, so this text may carry a provider watermark and be flagged by a detector. Article 50(4) exempts text that has undergone human review and editorial control from the deployer disclosure requirement. This notice is therefore voluntary.