

The overall intent of this article is to consolidate major considerations when it comes to using Veeam Recovery Orchestrator to conduct Recovery Verification for Backups.
Note: We will cover Backup Copies in another article, which is generally for recovery of VMs to another site during a critical site failure.
Note: Given the length and depth of this article, I recommend clicking on the reference diagram for each section, right click and open image in new tab. That way you can have the image open while you read the content.
Key:
- VBR: Veeam Backup & Replication
- VRO: Veeam Recovery Orchestrator
Orchestrating recovery verification from Backups - Use-Case Overview:
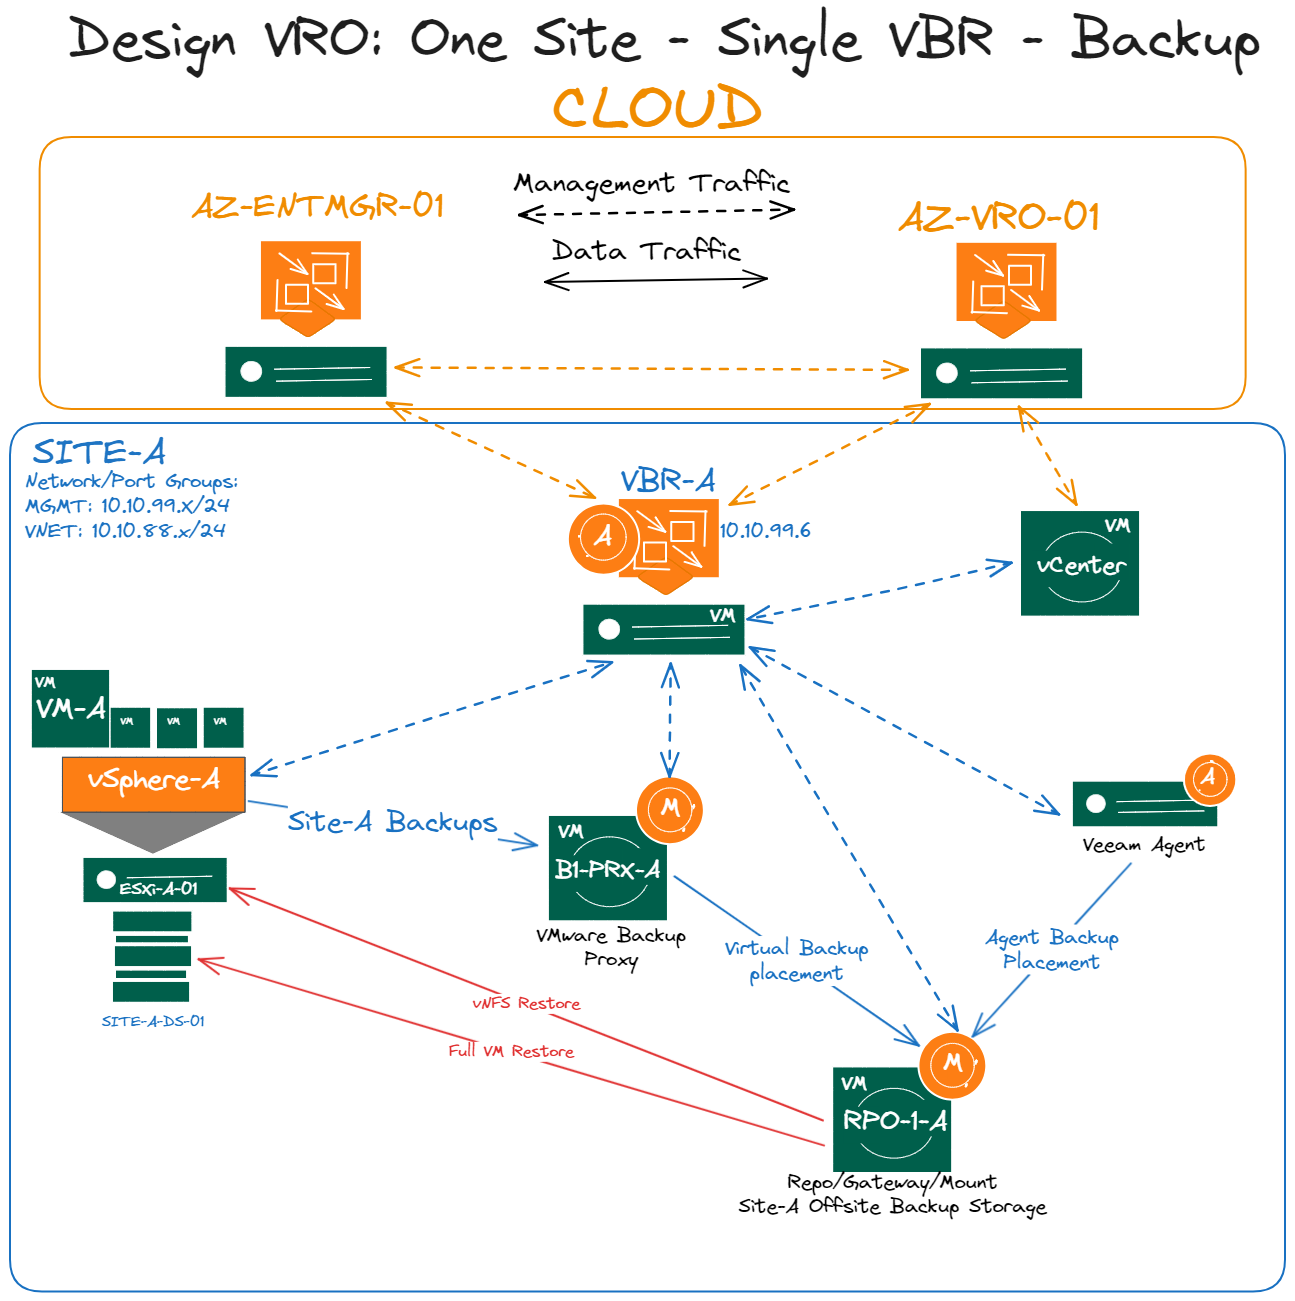
- Below you will see a is common customer design example.
- This is a single site scenario, protecting local virtual workloads.
- (1) VBR server at Site-Z which is the DR location.
- Backup Proxy on location.
- Backup Repository on location.
- (1) vCenter at Site-A as well as single vSphere cluster.
- Our Veeam Transport (Data Mover) service is represented by a (M) icon here for these machines.
- Our Agent services are represented by a (A), on VBR server is an Orchestrator Agent.
- Note: The (A) also represents a Agent for protecting workloads with an Agent.
- In this example we are not recovering from an Agent backup, but just know since an Agent backup is stored in the same backup chain format as a Virtual Backup we can also recover and verify these workloads in a similar fashion.
- Backup Proxies:
- Virtual or Physical Proxy server transporting/source data from the Production vSphere clusters.
- Backup Repositories:
- Generally, a Windows/Linux server with direct attached storage, NFS/SMB or Storage appliance specific.
- RPO-1-A is the backup repository for Site-A VMs.
- This is also often the Mount server, which is used to mount data for instant recovery with our vNFS protocol.
- You will also see Gateway mentioned here, this is specific for a certain backup repository which are unable to have the Data Mover installed locally. (IE: NFS/SMB)
- Note: This representation is acting a Direct Attached Storage on a Virtual Machine which has the Data Mover installed locally.
- Virtual Lab:
- A single Virtual Lab server (VLAB-A) which is a Linux VM that acts a router between production and Isolated Bubble Test networks.
- This is deployed through the (VBR) Console, all isolated network configuration and settings are done through the Virtual Lab component.
- Datalabs:
- DataLabs requires a Virtual Lab to be built in your Veeam Backup & Replication console. When you assign a DataLab in Veeam Recovery Orchestrator, it makes a one-to-one association between the Virtual Lab and DataLabs.
- DataLabs is an overlay on top of a Virtual Lab that extends recovery verification into Veeam Recovery Orchestrator.
- DataLabs is an important feature in Veeam Recovery Orchestrator as it allows you to test Recovery Plans manually or automatically on a calendar schedule.
- Enterprise Manager and Veeam Recovery Orchestrator:
- For this example, we have these management overlay servers in the cloud, it's best when they are not on-prem if a site fails.
- Even better would be to have VBR (VBR-A) also in the cloud, but this will limit your Data Labs testing capabilities Site-A.
- Although, there is a requirement for the VBR and VLAB-A server to be on the same domain for Ping and Script testing.
- This is done over the Masquerade network which we assign in the Virtual Lab.
Additional Site Recovery Considerations:
- Backups are for recovering data from its own location and recovering it back to the same location. (Site-A → Site-A)
- If Site-A fails, VBR-A is sitting on location, Veeam Recovery Orchestrator requires VBR to be online for recovery, as we need access to the policies and repositories.
- There are ways around this, as previously mentioned having your VBR server in the cloud or witness location.
- Replicating the VBR server with Veeam and doing a manual recovery of the VM at the other location.
- Taking a configuration backup of Veeam, having a cold server in-place at Site-A, cloud or witness site to recover the VBR server during an orchestration event.
- vNFS vs Full VM Restore:
- vNFS mounts the VM from the backup repository through a mount server to the ESXi host directly.
- .VMX file is added to inventory and machine is powered on.
- In DataLabs this is considered a Quick Test and what we cover in this article.
- Full VM Restore we are restoring the VM back from the repository into a vSphere Datastore.
- In DataLabs this is considered a Full Restore Test.
- You may want to consider full restore testing to reproduce a live fail over event.
- You can get a real sense of time required to get the environment online.
- vNFS mounts the VM from the backup repository through a mount server to the ESXi host directly.
Highly suggested reading on Virtual labs and DataLabs before going onto the next section: https://veeam.looop.co/topic/834194
DataLabs Key:
- VLAB: Veeam Virtual LAB (Linux Appliance / Router)
- DataLabs: DataLabs is a Veeam Recovery Orchestrator Technology that extends the functionality of Bubble testing.
- vSS: Virtual Standard Switch - (Foundation/Standard VMware Licensing) allows bubble testing of VMs onto a single host.
- vDS: Virtual Distributed Switch - (Ent+ VMware Licensing) allows bubble testing of VMs onto multiple hosts.
- Port Group (PG): This is a VMware Virtual Network functionality of grouping a single VM Network/Subnet. This is assigned to the vNIC of the Virtual Machine.
- vNIC – Virtual Machine NIC
- vNIC0, vNIC1, vNIC2 (All different Virtual NICS)
- VMNIC - A real physical interface on an ESXi host.
- VLANS: These are only a mandatory requirement for Isolated Port Groups created on vDS to ensure bubble test traffic is properly traversing between ESXi hosts.
- Advanced Single-host: When you build a virtual lab in Basic or Advanced Single-Host mode it will create a Virtual Switch on the ESXi host with the same hostname as the Virtual Lab. (IE: VLAB-A-vSwitch01)
- Advanced Multi-Host: You select the vDS and it will create the Isolated Distributed Port Groups, VLANs are important here, as well as how the vDS is physically uplinked.
Virtual Lab Network Modes:
There are three different network modes to choose from:
- Basic Single-Host (VSS): the isolated Virtual Switch and Port Group names and networks are auto-generated.
- Advanced Single-Host (VSS): the isolated Virtual Switch and Port Group names and networks are manually generated.
- Advanced Multi-Host (VDS): isolated Port Groups are created on the target VDS for each isolated network.
DataLabs Overview:
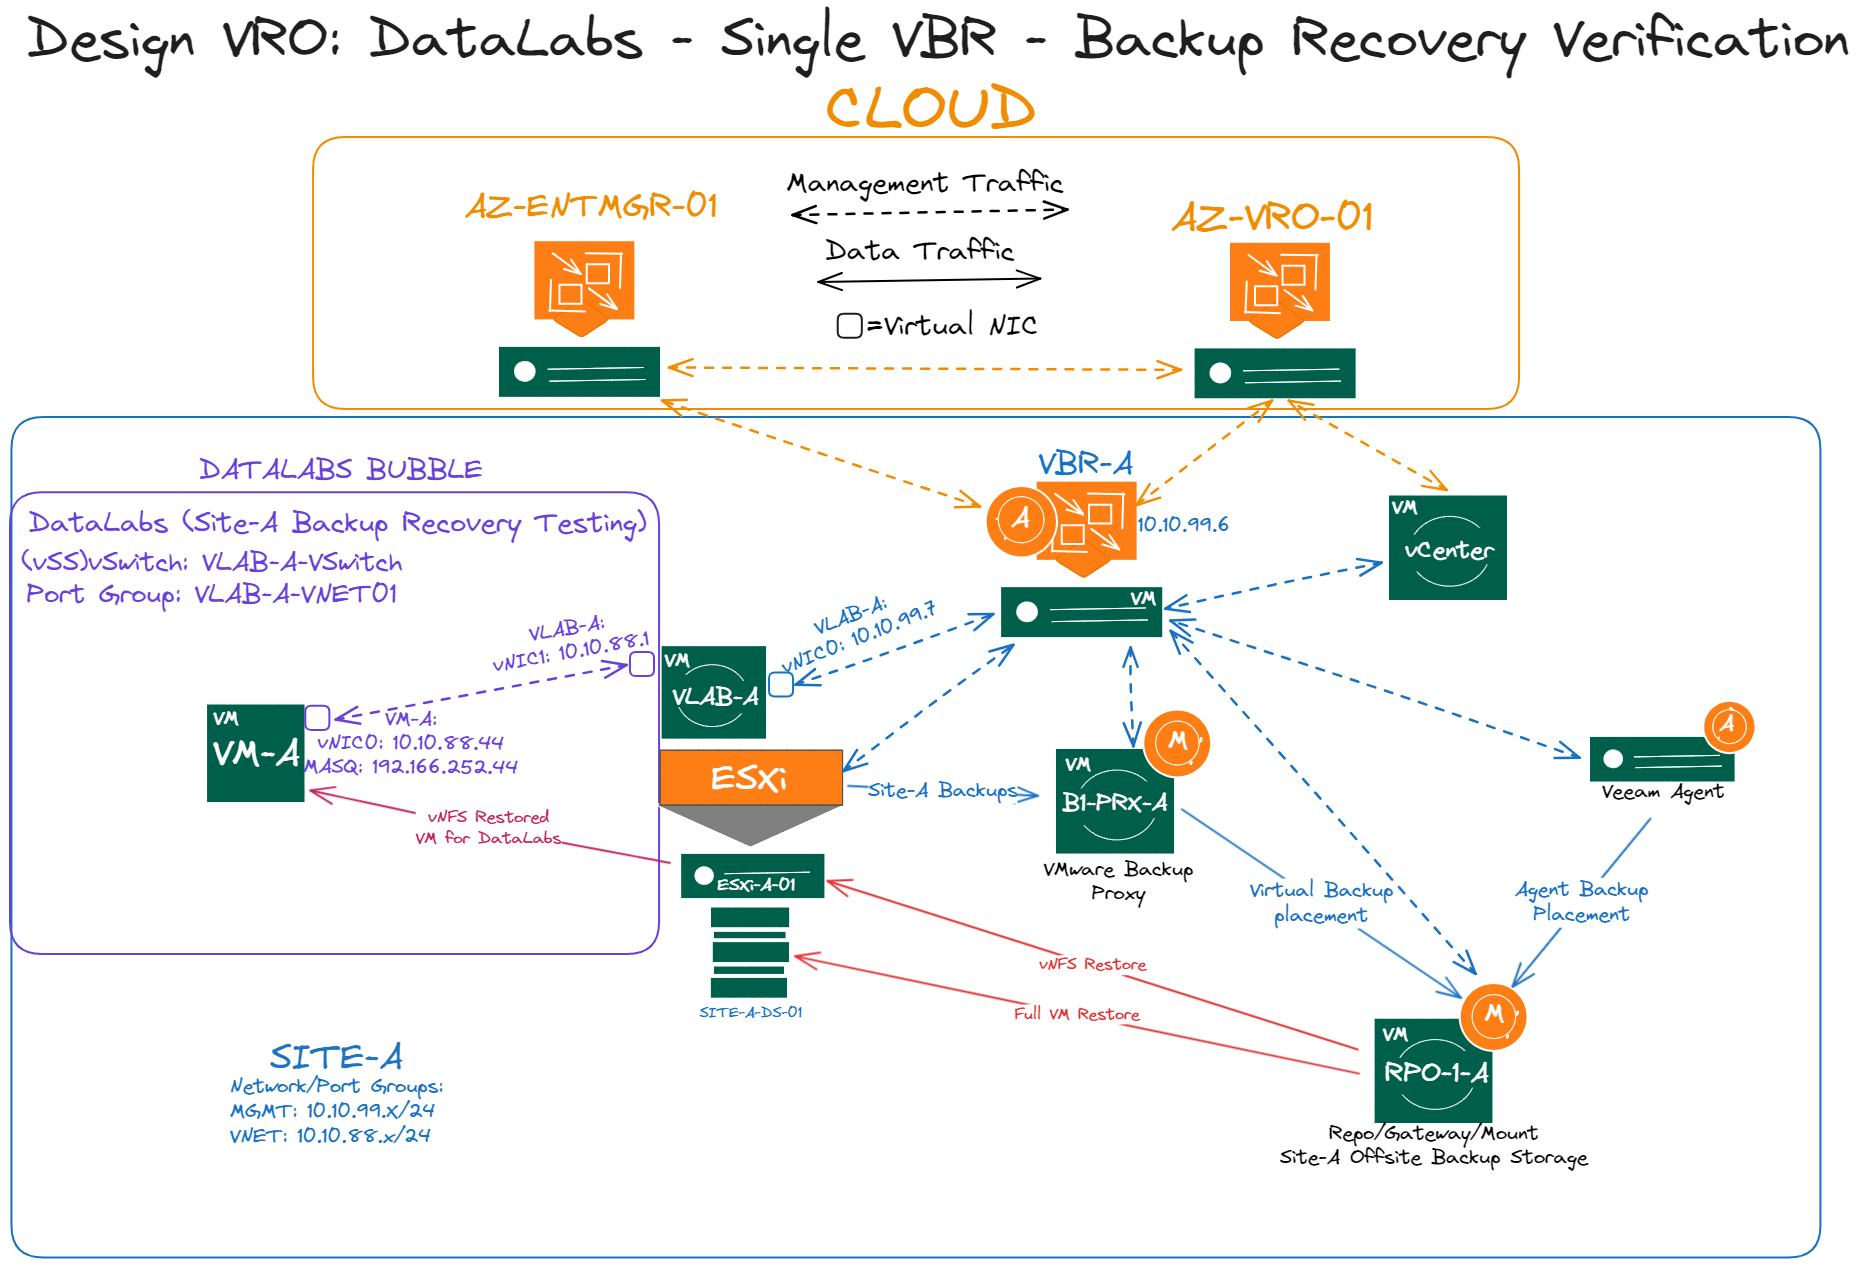
The diagram below is an extension of the one above, it adds in the isolated DataLabs network.
- In this scenario, we have a Virtual Lab (VLAB-A) deployed on the Site-A vSphere cluster.
- Specifically sitting on ESXi-A-01 which is attached to the Datastore: SITE-A-DS-01.
- Site-A Networking Background:
- vSphere Virtual networking:
- Site-A-vSwitch
- Port Group: MGMT01 (10.10.99.X/24)
- Port Group: VNET01 (10.10.88.X/24)
- Site-A-vSwitch
- vSphere Virtual networking:
- VM-A is being protected by Veeam Backup & Replication with a Backup job.
- VM-A original network settings:
- Port Group: VNET01
- IP Address: 10.10.88.44/24
- Gateway: 10.10.88.1/24
- VM-A original network settings:
- There are (2) vNICS assigned to the VLAB-A server.
- vNIC0: 10.10.99.7 which is sitting on the production (MGMT01) Port Group.
- Notice how the IP Address of VBR-A is also on the same network 10.10.99.6.
- vNIC1: 10.10.88.1
- Notice how this vNIC1 is sitting inside the DataLabs bubble and has the IP Address of 10.10.88.1.
- This IP is the Gateway of the VNET01 network.
- Since the VLAB acts a router, this will allow VMs to communicate to the VLAB and to each other.
- vNIC0: 10.10.99.7 which is sitting on the production (MGMT01) Port Group.
- VM-A depicted on this diagram is a vNFS restore, a backup file being mounted from RPO-1-A to ESXi-A-01.
- The original VM is still running in production, just not shown on this diagram.
- We are running a DataLabs test against a Recovery Plan in Veeam Recover Orchestrator setup to orchestrate recovery of VM-A.
- Isolated vNIC0: 10.10.88.44 is the original VM IP address, we aren’t doing a network remapping or Re-IP validation here.
- Masq: or Masquerade Address: 192.166.252.44.
- This rides on the same vNIC0 adapter and is used to communicate from production servers sitting on the same network as the Virtual Lab to isolated VMs.
- By default, when the Virtual Lab is running, it creates a static route on the Veeam Backup & Replication server.
- In this case it would be traffic for 192.166.252.44 would route to gateway 10.10.99.7 which is the IP address of the Virtual Lab.
- You can see that if they VBR server is on a different network than 10.10.99.X the traffic would drop since you can only control the first hop.
Virtual Lab: Advanced Single Host (VSS) In-depth view
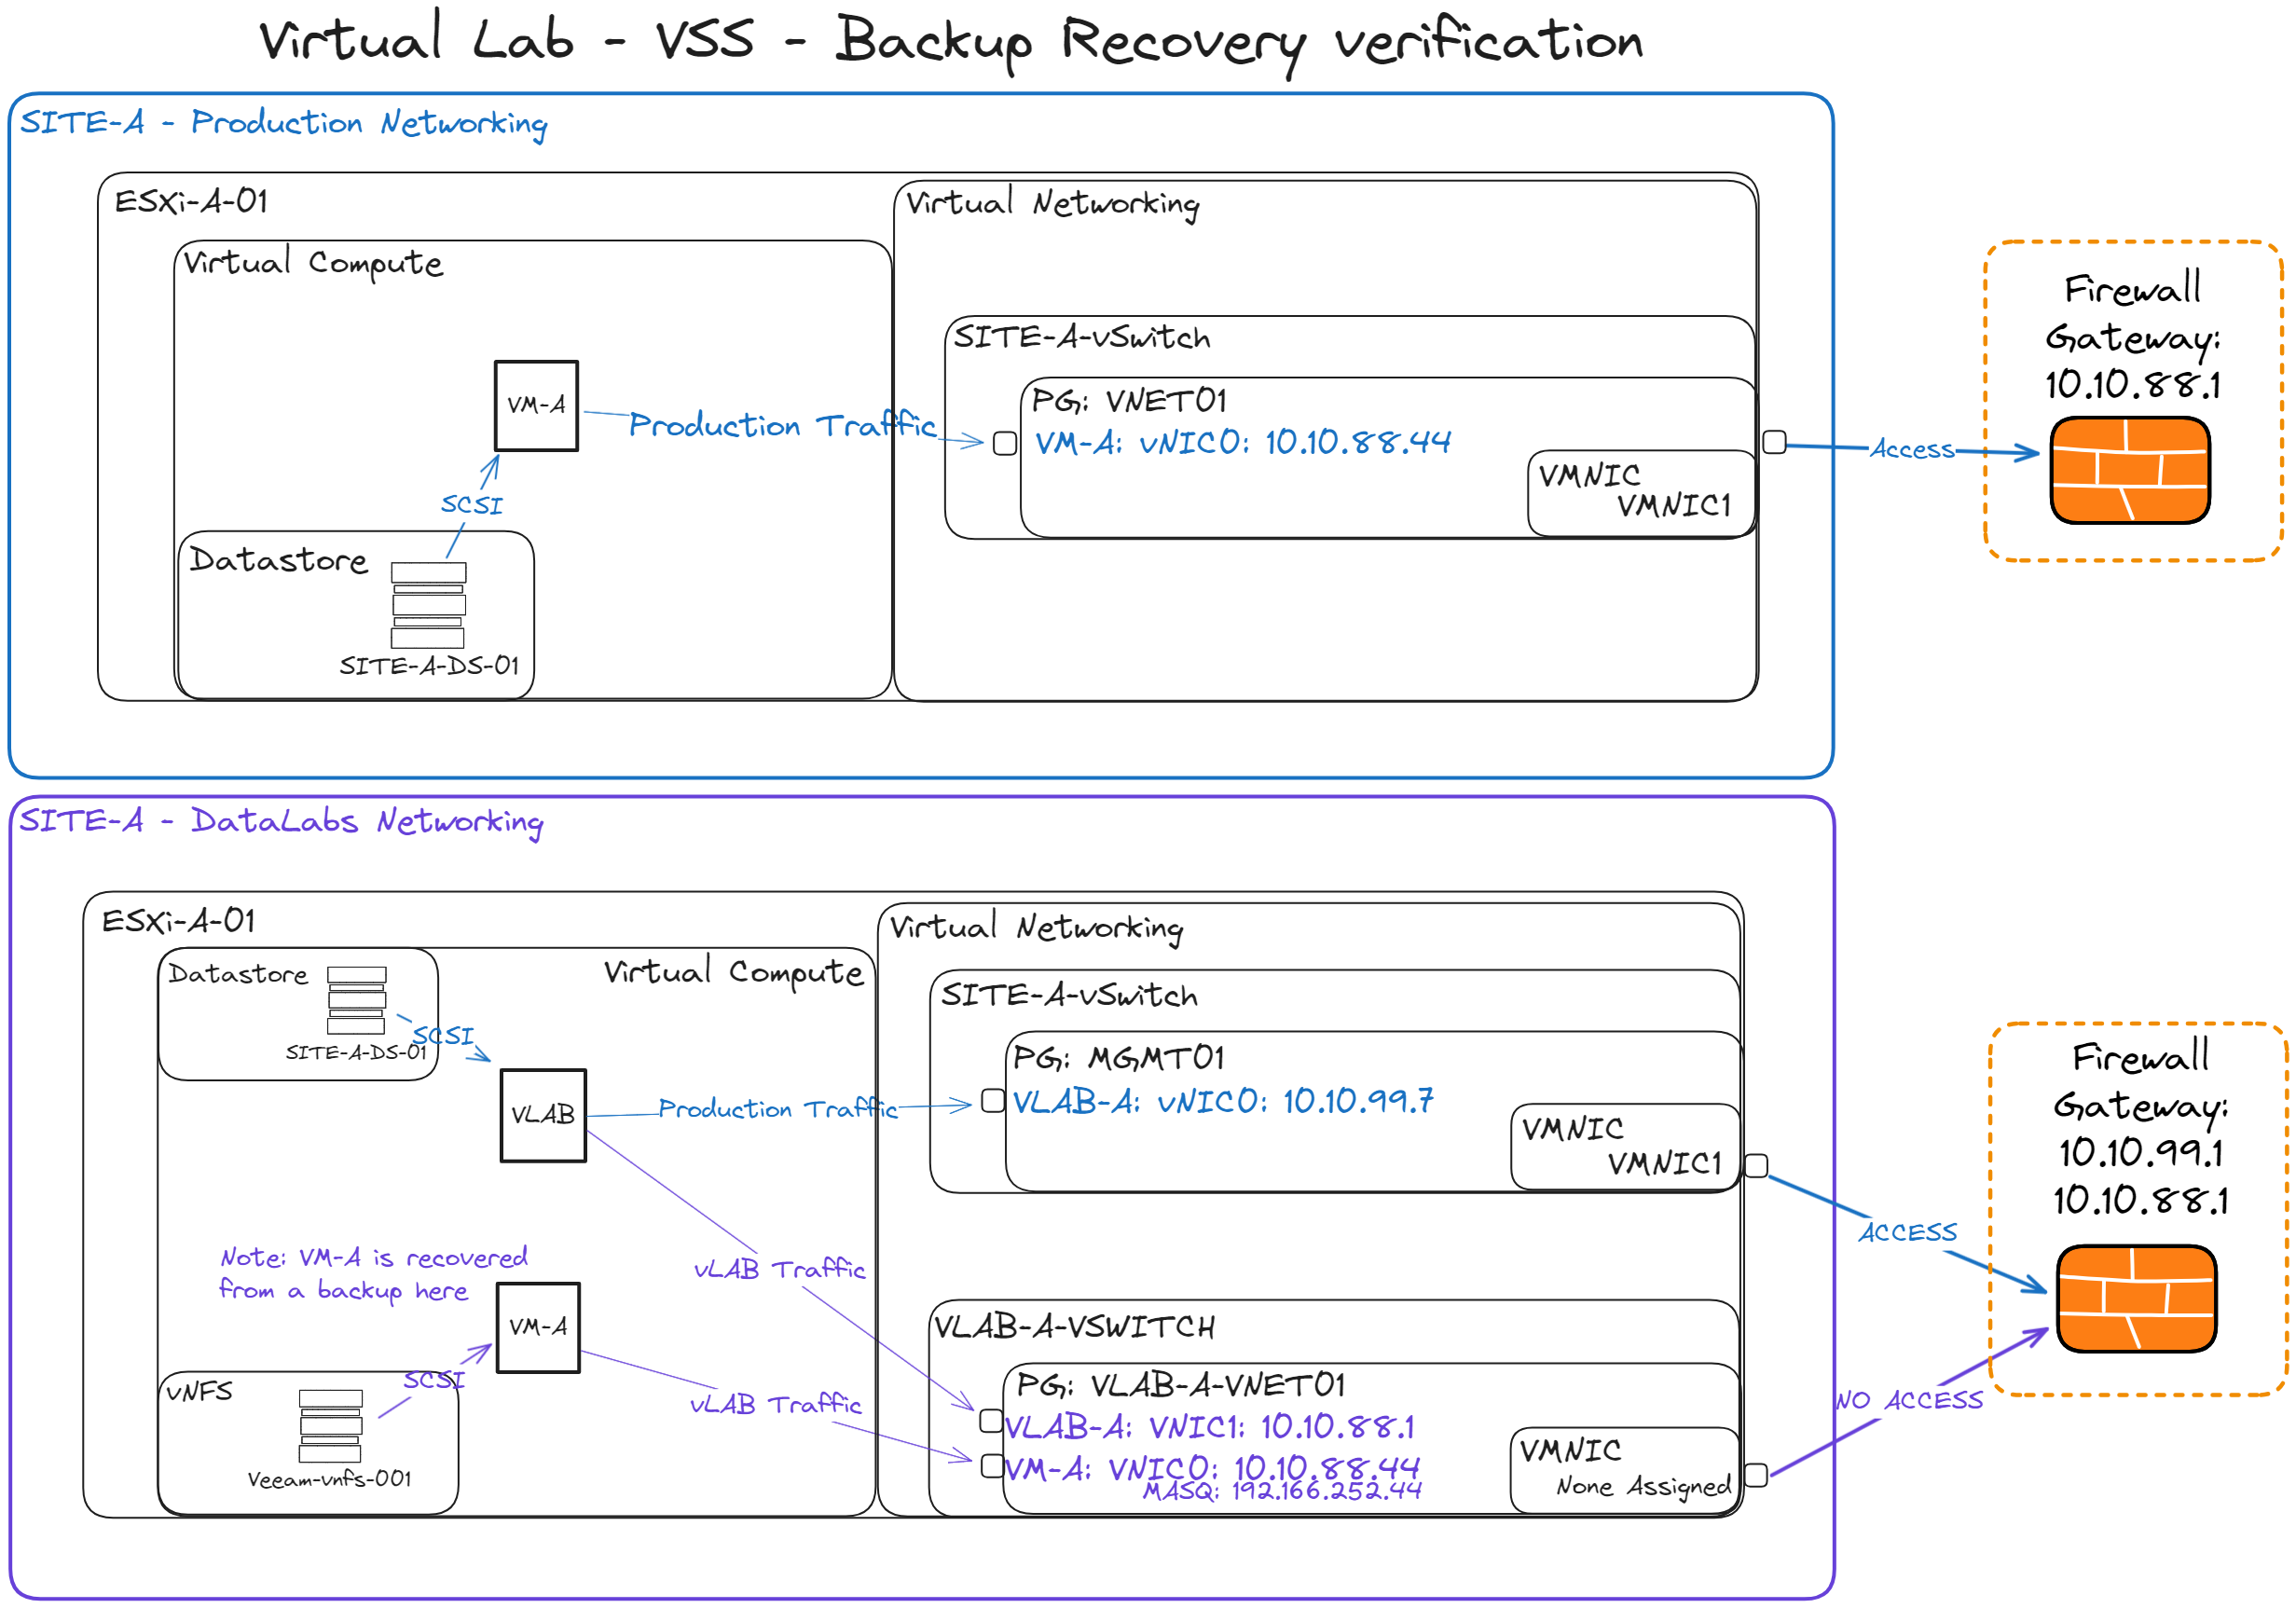
Diagram below is a more detailed representation of what is happening in vSphere when a Virtual Lab networking is created, and a Virtual Machine is running.
Note: Virtual Lab Networking, Compute, and Datastore configurations are all done in the VLAB deployment wizard.
- The top illustration in blue is the original vSphere compute and networking configuration for VM-A.
- Like the above diagram we have VM-A sitting on ESXi-A-01 and running on Datastore: SITE-A-DS-01.
- Our Production Virtual Switching, which is vSphere Standard Switching (VSS) is Site-A-vSwitch on Port Group: VNET01 with vNIC0: 10.10.88.44.
- VMNIC or physical ESXi adapter has a L2/L3 uplink to a firewall which IP Address is: 10.10.88.1
- The bottom illustration in Purple is the DataLabs vSphere compute and networking configuration for VLAB-A and VM-A.
- The recovered Virtual Machine VM-A is mounted with the following configurations:
- Mounted from backup from the mount server over our vNFS protocol on Datastore: Veeam-NFS-001.
- Virtual Network: VLAB-A-vSwitch
- Virtual Lab isolated Virtual Switch, auto-generated name <hostname-vSwitch>
- Notice how there is no VMNIC physical adapter assigned, this makes it isolated to the ESXi host.
- Its also why this is called Advanced Single-host mode.
- Port Group: VLAB-A-VNET01
- Isolated Port Group w/ no external access.
- During the Virtual Lab isolated network configuration, we select a production network.
- In this case our VM production network is VNET01.
- It also requests that you assign an Isolated Port Group association here I’ve labeled it: VLAB-A-VNET01
- Virtual Lab VLAB-A has been deployed to run on ESXi-A-01, with the below settings.
- Datastore: SITE-A-DS-01
- Virtual Network: Site-A-vSwitch
- Port Group: MGMT01 with vNIC0: 10.10.99.7
- This is also a production network, as you see it has a VMNIC adapter and external access.
- Notice that in the top Production Networking Site-A-vSwitch has port group VNET01.
- You can have multiple port groups in the same Virtual Switch.
- The production port group VNET01 is not illustrated in the Datalabs Networking since the recovered VM-A is not connected to it.
- Virtual Network: VLAB-A-vSwitch
- Same above applies here.
- Port Group: VLAB-A-VNET01
- Isolated Port Group w/ no external access.
- During the isolated networking phase, we select the above isolated VLAB-A-VNET01 network we created earlier.
- We create a vNIC1 in that isolated port group, we give it an IP Address, which should be the gateway address of the source network, since our VLAB is now the router.
- Then also specify the Subnet, and Masquerade network: 192.166.252.X.
- We can also do DHCP or DNS settings here as well for that network.
- The recovered Virtual Machine VM-A is mounted with the following configurations:
VRO_DATALABS_WB: https://docs.google.com/spreadsheets/d/131GByfhLDE8YojgTXLry8DE2UB4QFDqq6EebqZH38yw/edit?usp=sharing
-
Download the DATALABS workbook and go through the Local_Recovery_DataLabs sheet, reference the below information for specific clarity.
-
Consider reading the following article which covers some of the below concepts in more depth:
-
Backup a test VM, Create a Recovery Location, and deploy a Virtual Lab.
-
Identify a local test VM, and ensure the machine is backed up.
-
Create a Recovery location pointing to an local ESXi host for Compute and Choose a Datastore.
-
Remember if we do a Quick Test, it will use vNFS to mount the data from the backup repository.
-
If you select a full recovery this Datastore will be used to recover the test VM for the Virtual Lab.
-
You can use existing local Recovery location, as long as it points to local Compute and has the ESXi host you plan to put the Virtual Lab.
-
Remember you will have to select these by utilizing VMware Tags to define these in VRO.
-
-
Deploy the Virtual Lab on the same ESXi host as selected in the Recovery Location above, to test Local Backup Verification, on the same network as the VBR server if possible.
-
As we mentioned above VBR same subnet as VLAB for masquerade routing to isolated VMs.
-
Or is at least encompassed by the Recovery Location compute you've selected. (IE: Cluster)
-
-
Select Advanced Single Host Mode for Network type in the wizard.
-
Map original production VM network to isolated network. (Original Port Group to Isolated Port Group)
-
Remember when we backup a VM we backup the .VMX file which holds the information for the original network/port group.
-
When the VM gets recovered to vSphere Inventory, during the virtual lab/data lab verification process we re-map the production network to the isolated network we specify here.
-
-
Configure Isolated Network vNIC1 to mirror original Gateway IP address and custom Masquerade network.
-
Remember vNIC1 is assigned to the Virtual Lab in the isolated port group we created above, this is where the recovery VM vNIC will also sit, allowing communication between the two.
-
IE: 10.10.88.1 the original Gateway now the Virtual Lab Isolated IP.
-
IE: 10.10.88.44 being the original production VM IP now the Isolated IP, it will be able to leverage the Virtual lab as a router between production networks, as well as other possible VMs in the isolated network.
-
-
Configure Static Mapping to Original VM production IP to an Access IP on the VBR network.
-
We can assign IE: 10.10.88.44 IP of the VM (Now isolated IP) and assign an Access IP an open IP address on the VBR network (IE: 10.10.99.233)
-
This allows us to RDP to that access IP and create a Connection/NAT to the isolated IP.
-
-
-
Associate the Virtual Lab to a Data Lab in VRO: https://helpcenter.veeam.com/docs/vro/userguide/assigning_datalabs.html
-
Note: It asks for a Recovery Location in this configuration, this is only for Lab Groups, which is a specific configuration to each individual Data Lab this isn't used for the the VMs associated to the Recovery Plan you are testing.
-
You can ignore this for now, when you run a DataLab test against a recovery plan, you will select the Recovery Location we created above.
-
Note: This recovery Location can also be associated to the Recovery Plan during the creation, this is specific to Live Recovery/Fail over.
-
-
-
Create a Recovery Plan if you haven't already, associate the local test VM.
-
Select the VMware Tag or Backup Job IF it only encompasses that singular VM.
-
-
Run a Data Lab Test:
-
Go to Recovery Plans, highlight the new test Recovery Plan, click Verify -> Run Data Lab Test.
-
During the wizard select the DataLab associate we made to the Virtual Lab we configured above.
-
During the wizard select the Recovery Location we created above to use for the verification recovery.
-
-
High-level Step re-cap:
-
Took a backup of VM to test DataLabs verification on.
-
Configured a Recovery Location which also encompasses the location/placement of the Virtual Lab.
-
Quick vNFS test as well Full Restore Testing capability.
-
-
Configured a Virtual Lab with the right parameters for testing.
-
Associate the Virtual Lab to a DataLab in VRO interface.
-
Create a Recovery Plan
-
Run a DataLab test.
-
Closing:
-
Stay tuned for more updates to this article, as I am working on additional content.
- Note: Any advice in this article should be taken at your own risk, Veeam is not responsible for any production outages or loss of data for your recovery configurations and actions.
