

Continuing with my Linux theme this year, I thought I'd share how easy it is to implement Linux OS as Veeam Repositories in your environment. Instituting immutability with the Veeam Hardened Repository has certainly gained traction, and for good reason. There are several good posts out there on how to do so, including a couple of my favorites from
System Requirements
The first order of business before installing Linux is to make sure you have the supported hardware and software. Below shows a list of Veeam-supported Linux distributions:
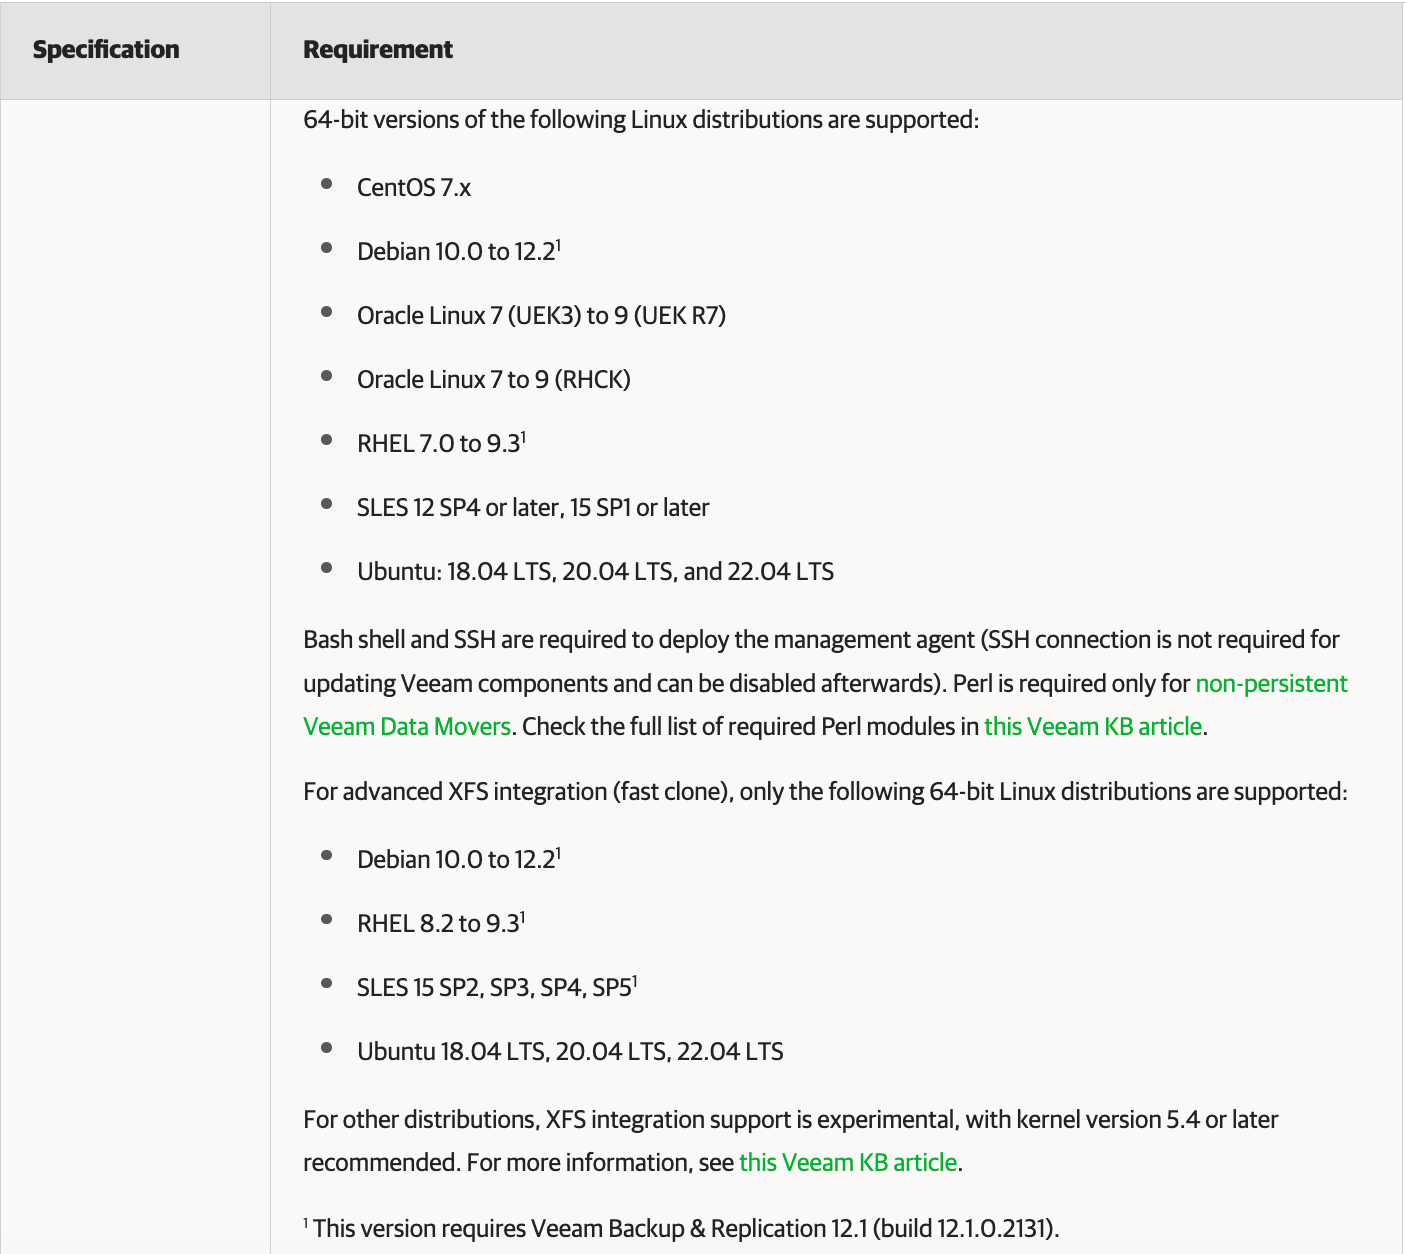
Besides the above, there are CPU and RAM requirements. The amount of CPU cores and Memory required will depend on your environment and concurrent tasks. Utilize Veeam's Best Practice Guide on how to calculate Repository hardware sizing.
It's also pertinent to know installing the Veeam management agent requires SSH and the Bash Shell. You can check if the user you use to configure your Linux server is using Bash by looking in the passwd file:

The Shell configured for the user will be the last item in the displayed output. Also, if you plan to use non-persistent Veeam Data Mover, then Perl is also required. NOTE: Persistent Data Mover is required for the VHR, as well as Linux Backup Proxies.
Fast Clone
There are a few final requirements to use Fast Clone technology. Using Fast Clone is highly recommended for best performance, as well as when using backup methods which use synthetic operations (e.g. Forever Forward or Reverse Incremental) :
- XFS filesystem
- Linux kernel supporting reflinks
- Cyclic redundancy check enabled
- Minimum data block size of 1KB; maximum of 4KB
More on the above requirements later…
Linux Installation
I won't go through the process to install Linux here. But, I get the discomfort you may feel in case you've never done so before. And if this is you, I recommend you view Hannes’s or Paolo's blogs I referenced earlier, which includes Ubuntu installation, to at least see how it's done. Other Linux distribution installs are similar. A suggestion I have as well is for you to create a small virtual machine (1 CPU, 2GB RAM, 20GB disk), download a few Linux distribution ISOs (for ex: Ubuntu, Centos, RHEL, other) and do a quick install of each just to get a feel for what is asked for. Takes 15mins each, and you gain experience in doing so.
Linux Configuration
Ok, so now it's the fun part → playing with the Linux command line! 🎉 Keep in mind, I'm writing this post based on a Debian-based system (Ubuntu), so some commands, such as the package manager and iscsi package name, etc. may be slightly different based on the Linux distribution you use. Also, I am configuring a Repository based on the iSCSI protocol. Verify the specific command for your protocol implementation choice and Linux distribution with the vendor you're using.
Before starting, it's always good to make sure you have the latest updates and security patches on your system. So first, let's run a command to update and upgrade software and packages:

Since I'm using iSCSi as my storage connection protocol, it is required to have the open-iscsi and multipathing packages installed. For the Ubuntu version I'm using (22.04), both are already pre-installed. Though outside the scope of this post, I will mention I also install one other package from my storage vendor, HPE Nimble. They have a nifty Linux Toolkit (NLT) utility which assists with a few Linux configurations and commands. Check with your storage vendor (if used) to see if they have a Linux integration tool to help configure and manage storage on your server.
After you've installed the required packages, the first thing to do, if using iSCSI as I am, is to change your Initiator IQN to a more descriptive name. So go into the initiatorname.iscsi file and modify the IQN:
sudo vim /etc/iscsi/initiatorname.iscsiIQN example: iqn.2023-12.com.domain.hostname:initiator01
Next, when using iSCSI, your storage vendor may have some preferrable iscsi and multipathing configuration settings you need to modify. This is where your storage vendor's Linux integration utillity would come in handy. For Nimble, they have a command you can run against the iscsi.conf and muiltipath.conf files to validate if they are configured based on their recommendations. If they aren't, you simply run the same command, but end it with a configure parameter instead of validate and the configuration file gets configured. If for some reason the configuration files don't get configured, you can still go into each file and modify them manually:
sudo vim /etc/iscsi/iscsi.conf
sudo vim /etc/multipath.conf
After modifying each file, restart the iscsid and multipathd services to apply the changes.
The last thing we need to do before getting our storage ready to use as a Veeam Repository is make sure each server network adapter on our storage network connects to the storage array. We do this by binding iSCSI sessions to a NIC or interface. To manage either Software or Offload iSCSI implementation, the iscsiadm tool uses the iface structure. Iface configuration is required for each network object used to bind to a session.
Sidenote here: Though not required, In my /etc/netplan/<YAML> file, I created friendly names (alias's) for each network adapter I'm using for management and iSCSI communication. Using alias names provides a more visually friendly adapter name so you know what the adapter is used for when performing various configurations such as iface. To change your adapter default names to an alias:
- First, get the mac address for the adapter by running:
Then copy the MAC some place for use in the YAML file we use to configure alias's. Next, run:ip a showsudo vim /etc/netplan/00-name-of-yamlThen enter the match section for the given adapter, using the mac address just copied, as shown below:

Adapter Alias Naming - When finished with the configuration, run:
sudo netplan tryThis will check the configuration syntax, then (when prompted, if there are no errors), press ENTER to accept the configurations to change the adapter names.
Back to iface configuration: To configure your storage adapters to use iface, run:
sudo iscsiadm -m iface -I iscsi-1 -o new
sudo iscsiadm -m iface -I iscsi-2 -o new
Then run:
sudo iscsiadm -m iface -I iscsi-1 –op=update -n iface.net_ifacename -v iscsi-1
sudo iscsiadm -m iface -I iscsi-2 –op=update -n iface.net_ifacename -v iscsi-2NOTE: The values iscsi-1 and iscsi-2 in the commands above are the alias names of my storage adapters.
Awesome. Now we're ready to connect to our storage! If you haven't done so, log onto your storage array and set up a Volume, configuring access to it with the IQN name you set earlier in the intiatorname.iscsi file. Now let's first discover our storage array (target):
sudo iscsiadm -m discovery -t sendtargets -p Discovery-IP-of-ArrayOnce your target (array) is discovered, you then need to connect to any configured Volumes by "logging in":
sudo iscsiadm -m node -lTo verify the Volume was connected, you can check a couple areas. First, on your Linux server, run lsblk and you will see default path names, such as mpatha shown below:
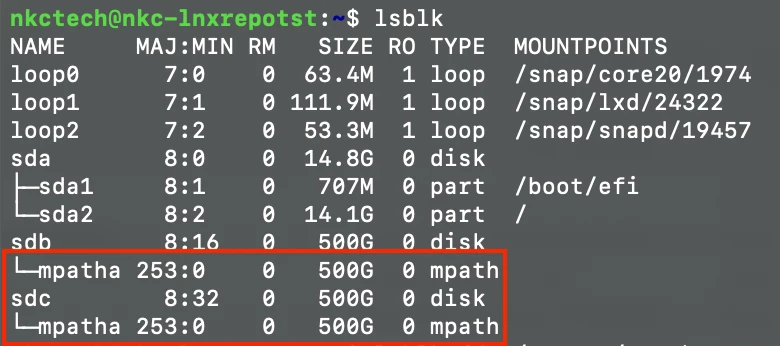
Another option to verify LUN connection is to view the Access area of your Volume on your array and verify there are Connections to it from your storage adapters.
Though not required, it’s a good practice to change the connected Volume’s default name to a more user-friendly name so you know what it is. To change the default storage device name to, for example, the same name as the Volume name on the array, first get the Volume WWID:
sudo multipath -llThen copy the WWID (string of characters in parentheses) somewhere to later use in the multipath configuration file. Next, modify the multipath configuration file:
sudo vim /etc/multipath.confAdd a multipaths section as shown below, using the copied WWID:
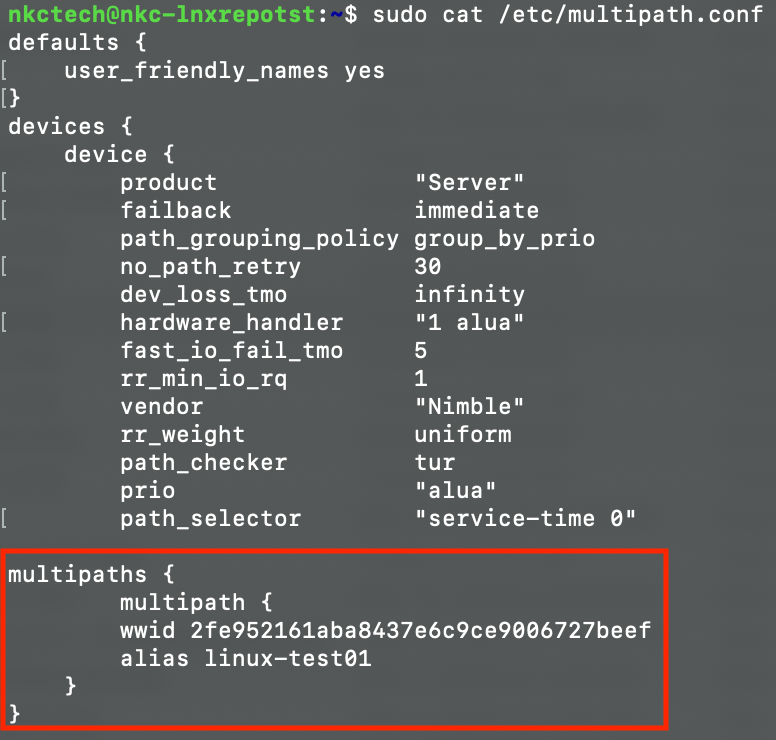
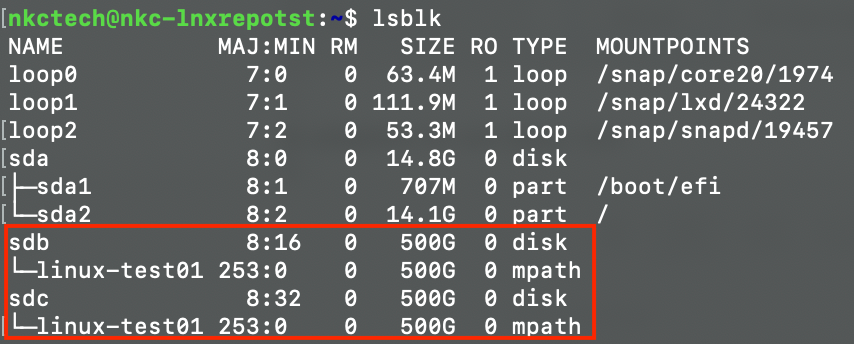
After the configuration, restart the multipathd service. When you again run the lsblk or multipath -ll commands, you should now see the friendly (alias) name of the connected Volume:
Ok, we're almost home! 🙌🏻 Now let's configure our storage. Run the parted utility:
sudo parted /dev/mapper/<vol-name>
<parted> mklabel gpt <ENTER>
<parted> mkpart primary 2048s 100% <ENTER>
<parted> quit
The above creates a primary partition at the 2048 disk sector, using all the disk. Also, keep in mind, when running parted, each task you run is final. There is no "write" command as is with the fdisk utility to finalize your partitioning configurations. In other words, each step in parted is final.
Now let's place a filesystem on the partition we just created. To do so, run:
sudo mkfs.xfs -b size=4k -m reflink=1,crc=1 -L <friendly-Vol-name> /dev/mapper/<Vol-name-part1>When running the above command, take note of the last parameter, the /dev/mapper/<name>. Make sure you run the mkfs command against the partition you just created. The partition's Volume name should now have "-part1" at the end of it. If you don't use this partition, you'll get an error saying the 'Resource or device is busy.' Also, remember our Fast Clone requirements at the start? This is where you configure them.. with the mkfs command (reflink and crc).
Next, we need to create a mount point to mount the filesystem to, then mount the filesystem to this directory. This is easily done by running the following commands:
sudo mkdir /<mount-dir-name>
sudo mount /dev/mapper/<Vol-name-part1> /<mount-dir-name>
You can now verify if your storage is ready to be used by Veeam by running:
df -hTIf everything was done correctly, this command will list your filesystem:
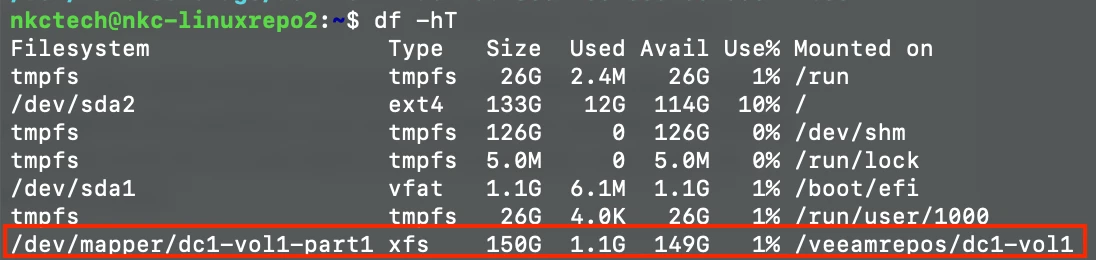
The above does list a different Volume name than what we’ve been using throughout this post...apologies for that; but the output still shows the end result when correctly adding storage to your Linux server.
Home Stretch!
Last but not least, let's now add the UUID of the storage device (Volume) to the /etc/fstab file so the device will continue to mount after each system reboot. It is recommended to use the device UUID rather than friendly name. Normally, you can run the blkid command to get device UUIDs, but this command doesn't display the UUID for mapped devices. So to get the UUID run:
ls -lha /dev/disk/by-uuidTake note of the line ending with dm-#. Copy the character string in this dm-# line as this is the device UUID. If you have multiple Volumes connected and are unsure of the correct dm-#, run
ls -l /dev/mapperThis above command shows all the Volumes along with their associated dm-#. When you have the correct UUID and have copied it, run:
sudo vim /etc/fstabAdd a UUID line as shown in the following image, using the UUID you copied a moment ago:
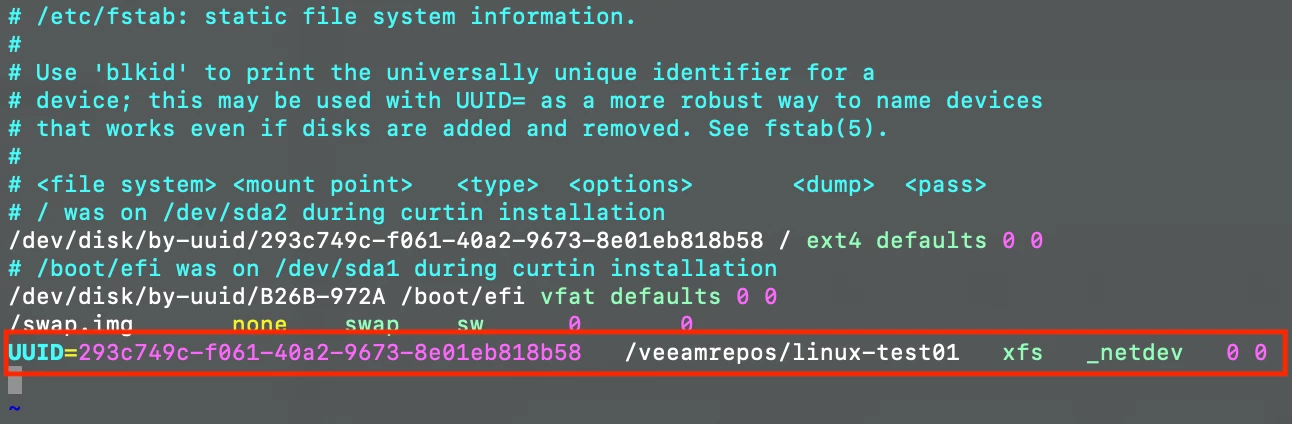
Once added, run sudo mount -a to accept the configuration change. It's advisable to test your Volumes continue to mount after reboot by restarting your server and re-checking your connected filesystems (df -hT).
Conclusion
That's it! You've done it! You just configured a fully functional Linux server to use as a Veeam Repository. You're now a Linux guru! 😎 All that's left to do is 1. log into your Veeam console and add this Linux server as a managed server using the credentials you used to configure the Linux server with, then 2. Add this newly added managed server as a Repository. You can then configure any of your Backup Jobs to use this new Repository as needed.
Let me know if you found this post useful, and if there are any other steps I may have left out; or even additional Linux commands or utilities you find useful when deploying Linux in your Veeam environment.


