


During a recent recovery scenario, I had to restore a physical Ubuntu server protected by Veeam Agent for Linux and bring it back as a virtual machine in a VMware environment.
The initial plan was to use the restore point and perform an Instant Recovery or a direct recovery to the VMware environment. In theory, that would be the fastest and cleanest path.
However, real environments do not always follow the ideal path.
Due to some limitations in the environment, I was not able to complete the Instant Recovery as expected. My initial suspicion was related to permissions, antivirus, firewall rules, or some kind of communication restriction between the Veeam components and the target VMware environment.
Since this procedure had to be performed during a weekend maintenance window, and because the customer was not available at that moment to validate or adjust some of those requirements, I had to move forward with another approach.
The alternative was to export the disks from the Veeam Agent backup as VMDK files and manually create a new VMware virtual machine.
The export worked.
The VM was created.
The disks were attached.
But the server did not boot.
The scenario
The environment was composed of:
Veeam Backup & Replication
Veeam Agent for Linux
A physical Ubuntu server
A VMware environment as the recovery target
The original physical server had three disks:
One 500 GB disk used by the operating system
One 500 GB disk mounted as /backup
One 1 TB disk mounted as /var/www
The backup itself was valid, and the disk export to VMDK was completed successfully. The issue started after manually creating the target VM in VMware and attaching the exported disks.
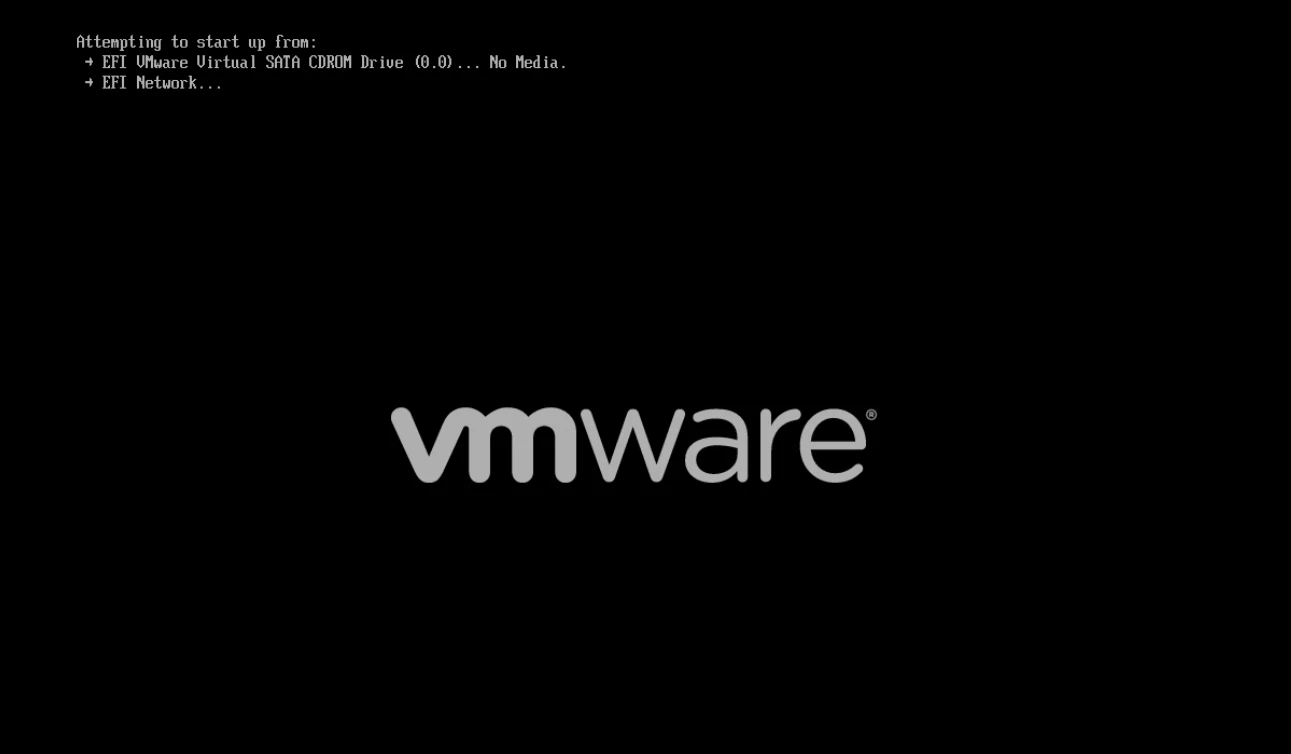
When the VM was powered on, it could not find a valid boot device.
At first, this could look like a disk problem, a corrupted export, a missing bootloader, or even a bad disk order. But before assuming that the exported disks were the issue, I decided to validate how the original physical server was configured.
Manual recovery approach
Since Instant Recovery was not possible within the available window, I followed this approach:
Created a new virtual machine in VMware without disks
Exported the disks from the Veeam Agent backup as VMDK
Attached the exported VMDK files to the new VM
Checked the disk order and controller configuration
Tried to boot the VM
At this point, VMware tried to boot using EFI. The console showed attempts to boot from EFI CD-ROM and EFI Network, but no valid boot device was found.
That was the first important clue.
If the original server was installed using BIOS/Legacy boot, but the new VM was created using EFI, the operating system may not boot even if the disk is healthy and correctly attached.
Checking the original Ubuntu server
Because the original server was still accessible, I logged into it to validate the disk layout and boot mode.
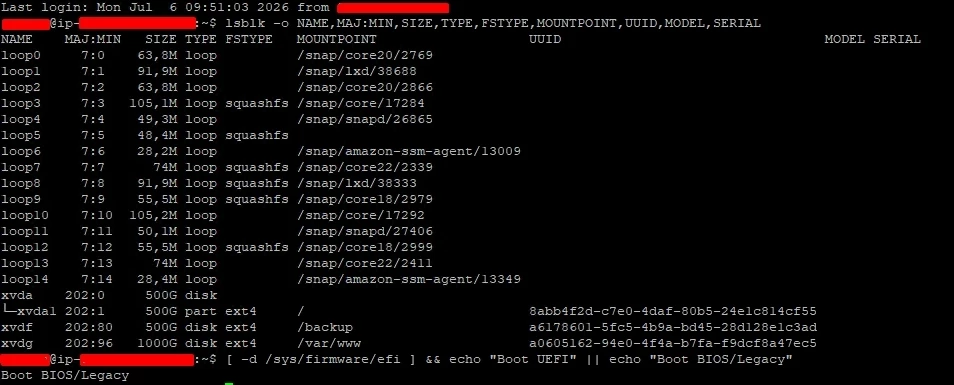
First, I checked the disks, filesystems, mount points, UUIDs, models, and serial information:
lsblk -o NAME,MAJ:MIN,SIZE,TYPE,FSTYPE,MOUNTPOINT,UUID,MODEL,SERIALThe output confirmed the disk layout:
xvda     500G disk
└─xvda1  500G part ext4 /
xvdf     500G disk ext4 /backup
xvdg    1000G disk ext4 /var/www
This was very important because the server had two disks with the same size. Without checking the mount points, it would be easy to attach the wrong 500 GB disk as the first disk in the VM.
After that, I checked whether the server was using UEFI or BIOS/Legacy boot:
[ -d /sys/firmware/efi ] && echo "Boot UEFI" || echo "Boot BIOS/Legacy"The result was:
Boot BIOS/LegacyThat explained the problem.
Root cause
The problem was not the Veeam backup.
The problem was not necessarily the exported VMDK files.
The real issue was a mismatch between the boot mode of the original physical server and the firmware configured on the new VMware VM.
The original Ubuntu server was installed using BIOS/Legacy boot.
The new VMware VM had been created using EFI.
Because of that, VMware was trying to boot the system as an EFI-based machine, but the operating system disk was prepared for BIOS/Legacy boot. As a result, the VM could not locate a valid boot device and moved to CD-ROM or network boot attempts.
This is one of those small details that can consume a lot of time during a recovery window.
Fixing the VM firmware
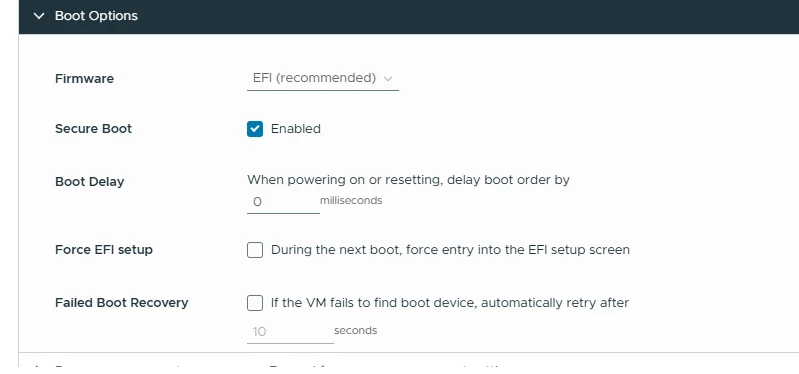
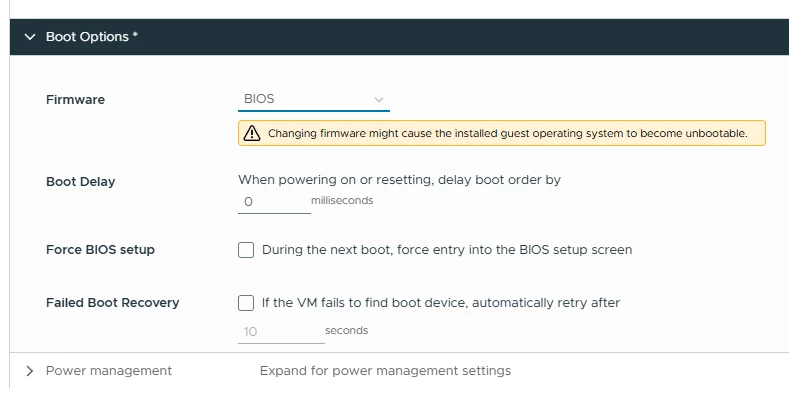
After confirming that the original server was using BIOS/Legacy, I changed the firmware of the VMware VM from EFI to BIOS.
In VMware, this can be adjusted under the VM settings, in the Boot Options section.
The key point is simple:
The target VM firmware should match the original server boot mode.
If the original server uses BIOS/Legacy, the restored VM should use BIOS.
If the original server uses UEFI, the restored VM should use EFI.
In this case, the correct configuration was BIOS.
Validating disk order and controller configuration
Another important point was the disk order.
When exporting disks manually and attaching them to a new VM, VMware does not automatically know which disk was the operating system disk in the original server.
In this case, the original server had:
500 GB disk mounted as /
500 GB disk mounted as /backup
1 TB disk mounted as /var/www
Because there were two disks with 500 GB, simply looking at the disk size was not enough. I had to confirm the mount points from the original server and make sure the disk that contained the root filesystem was attached as the primary boot disk in the VM.
I also checked the SCSI controller type and tried to keep the disk attachment consistent inside the new virtual machine.
This part is important because a wrong disk order can lead to the same symptom: the VM powers on, but cannot find the operating system.
Final result
After changing the VM firmware from EFI to BIOS and validating the disk order, the VM was able to locate the operating system disk and boot correctly.
This confirmed that the VMDK export was usable and that the main issue was related to the VM boot configuration.
It was not the most automated restore path, but it allowed the server to be recovered within the available window.
In a perfect scenario, Instant Recovery would probably have been the preferred option. But in this case, because of environmental restrictions and the urgency of the maintenance window, exporting the disks and manually rebuilding the VM was the best available path.
What I would check before starting
This case reinforced the importance of collecting some information from the original server before manually creating the target VM.
Before starting a similar recovery, I would recommend checking:
Original boot mode: BIOS/Legacy or UEFI
Disk layout
Mount points
Which disk contains the root filesystem
Disk sizes
Disk UUIDs
Controller type
Boot order
Secure Boot status
Whether the target VM firmware matches the original server
For Linux servers, this command is very useful to check the boot mode:
[ -d /sys/firmware/efi ] && echo "Boot UEFI" || echo "Boot BIOS/Legacy"And this command helps identify the disk layout:
lsblk -o NAME,MAJ:MIN,SIZE,TYPE,FSTYPE,MOUNTPOINT,UUID,MODEL,SERIALThese two simple checks can save a lot of time during a restore.
Lessons learned
This recovery was a good reminder that a valid backup is only one part of the restore process.
When recovering a physical Linux server as a VMware VM, the virtual hardware configuration matters a lot.
The backup can be healthy.
The disks can be exported correctly.
The VMDK files can be attached successfully.
And the VM can still fail to boot if the firmware, disk order, or controller configuration does not match the original server.
In this case, the most important detail was the boot mode.
The original Ubuntu server was using BIOS/Legacy boot, while the new VMware VM had been created using EFI.
Once the VM firmware was changed to BIOS, the server was able to boot.
Final thoughts
Instant Recovery is usually the fastest and preferred option when restoring workloads with Veeam. However, real-world recovery scenarios sometimes require alternative approaches.
Firewall rules, antivirus restrictions, missing permissions, network limitations, maintenance windows, and customer availability can all influence the recovery strategy.
Exporting disks to VMDK and manually creating a VMware VM can be a valid alternative, but it requires attention to details that are easy to miss.
For me, the main lesson from this case was clear:
Before manually restoring or converting a physical Linux server to VMware, always check how the original server boots.
A mismatch between BIOS/Legacy and EFI can make a perfectly valid restored disk look unbootable.
During a recovery window, small details like this can make all the difference.