
Introduction
Cloud is not always the most cost-effective solution for every workload.
We recently worked with a customer who was experiencing increasing costs in Microsoft Azure. The customer was running approximately 40 virtual machines (VMs) in Azure, and as the environment continued to grow, so did the monthly operational costs.
The primary goal of the project was straightforward:
Reduce the customer's infrastructure costs without compromising availability, security, backup, or future scalability.
After evaluating several alternatives, we concluded that moving the workloads from Azure to a dedicated on-premises environment hosted in our data center provided the best long-term financial outcome.
Evaluating the Options
We looked at several possible solutions:
-
Continue hosting the environment in Azure
-
Host the infrastructure with a third-party provider
-
Rent rack space in a data center, including power and cooling
-
Deploy the infrastructure at the customer's own location
After comparing the five-year total cost of ownership, the decision was made to rent rack space in our data center.
This gave the customer control over their own hardware and infrastructure while avoiding the significant cost and complexity of operating their own data center facilities.
The solution
The customer invested in their own:
-
Network equipment
-
Hypervisor infrastructure
-
Storage
-
Backup infrastructure
-
Software and licenses
We provided:
-
Rack space
-
Power
-
Cooling
-
Physical access
-
Fire protection
-
Infrastructure deployment
-
Migration assistance
The financial analysis was particularly interesting.
Looking at a five-year period, the investment was expected to break even during the second year compared with the projected Azure costs.
After the initial investment, the customer also had room to expand the environment with additional servers when required, without significantly increasing the recurring data-center costs.
This gave the customer both cost predictability and additional capacity for future growth.
Designing the Migration and Backup Strategy
For the migration and backup platform, we selected Veeam.
The goal was not only to migrate the workloads from Azure to the new environment, but also to establish a consistent backup strategy across both environments.
The solution included:
-
Veeam Backup & Replication
-
Veeam for Microsoft Azure
-
Physical Veeam infrastructure
-
On-premises backup repository
-
Immutable backups
-
Backup copies from Azure to the data center
-
External/off-site backup as an additional disaster-recovery layer
Physical Veeam Infrastructure
For security and disaster-recovery reasons, we deployed the Veeam infrastructure on a physical server.
The idea was simple:
If there was a major infrastructure failure or disaster, we wanted the backup infrastructure itself to remain as independent as possible from the production environment.
For the daily backup repository, we selected a Veeam Infrastructure Appliance.
This provided a combination of:
-
Fast local restore
-
Immutable backup capability
-
Secure backup storage
-
Simple operational management
An additional external backup solution was planned as a further disaster-recovery layer. Options included a BRAS service or Veeam Data Cloud, providing an independent copy outside the primary data-center environment.
Veeam for Azure
For the Azure workloads, we implemented Veeam for Microsoft Azure and integrated it with Veeam Backup & Replication.
This gave us centralized monitoring and management of the backup environment.
The Azure backup repository used Azure Blob Storage with the Cool access tier, helping reduce storage costs for backup data that did not require frequent access.
However, there was an important consideration.
Although recovery directly from the Azure repository was possible, the available Internet bandwidth meant that recovering larger workloads directly from Azure would take considerably longer than recovering from the local repository.
For that reason, we decided to create an additional local backup copy.
The Migration Strategy
Rather than migrating all workloads at once, we decided to migrate the environment one VM at a time.
This reduced the risk and allowed us to validate every workload individually.
We used two migration approaches depending on the application.
Rebuild and migrate the application
For applications that could easily be installed on a new server, we chose to:
-
Deploy a new VM.
-
Install the required operating system.
-
Install the application.
-
Migrate the required application data and configuration.
-
Test the application.
-
Decommission the old Azure VM.
This is often the cleanest approach when an application can easily be reinstalled.
Veeam-based VM migration
For workloads where rebuilding the server was not practical, we used Veeam to migrate the VM from Azure to the on-premises hypervisor environment.
Each VM received its own backup job.
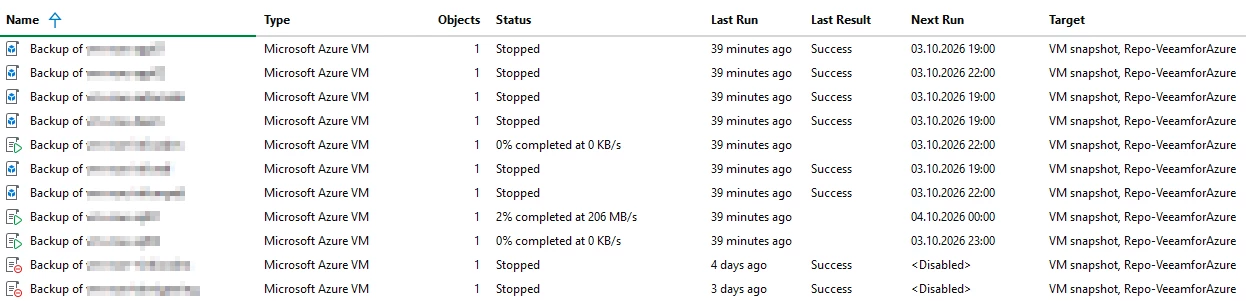
This made it easy to identify:
-
Which VMs had been backed up
-
Which VMs were ready for migration
-
Which VMs had already been migrated
-
Which workloads were still running in Azure
It also provided clear control over the migration process.
Creating the Local Backup Copy
Before migrating a VM, we used a Veeam Backup Copy job to transfer the backup data from Azure to the local Veeam repository.
This turned out to be an important part of the migration design.
Although it was technically possible to perform Instant Recovery directly from the Azure repository, the available Internet connection made this considerably slower.
By transferring the backup to the local repository first, we could perform the recovery locally at significantly higher speed.
The Migration Process
For each VM, the process was roughly:
-
The VM continued running in Azure.
-
Veeam maintained the backup.
-
The latest backup was copied to the local Veeam repository.
-
We stopped the VM in Azure.
-
We manually started a final backup.
-
The final backup captured the latest changes.
-
The backup was synchronized to the local repository.
-
We performed Instant Recovery to the on-premises Hyper-V environment.
The final manual backup was important.
By stopping the Azure VM before starting the final backup, we could ensure that no application changes were made after the final backup began.
This minimized the risk of data loss between the last scheduled backup and the migration.
Instant Recovery to Hyper-V
Once the backup was available in the local repository, we used Veeam Instant Recovery to start the VM directly from the backup.

During the recovery process we selected:
-
Hyper-V host
-
Target datastore
-
Target network
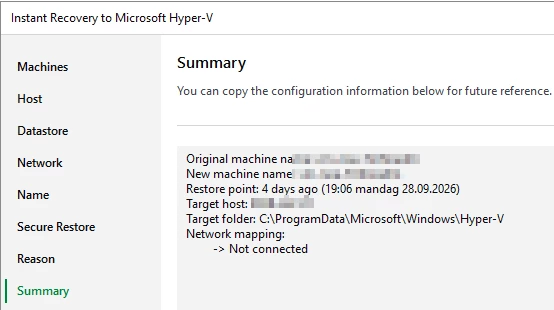
The VM was then started in the new environment.
This allowed us to bring the VM online very quickly without waiting for the entire VM disk to be copied to the production datastore first.
Moving the VM into Production
Once the VM had successfully booted and the application had been tested, we used Veeam to migrate the VM into its final production location.
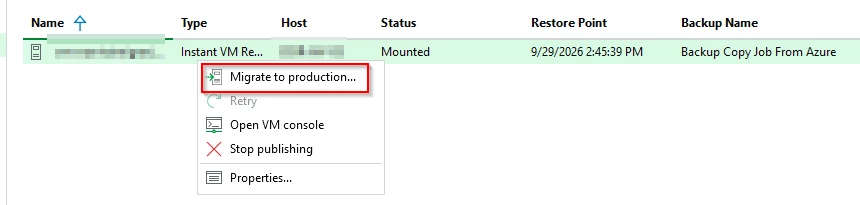
This leveraged the Hyper-V storage migration functionality.
The process moved the VM from the temporary Instant Recovery location to the production datastore and cleaned up the temporary recovery environment.
From the application's perspective, the transition was relatively simple.
The VM was now running on the new infrastructure, but because it had moved from Azure to a different network, it initially had the wrong IP configuration.
We opened the VM console and configured:
-
IP address
-
Default gateway
-
DNS servers
The DNS records were updated and the application was back online within minutes.
How Much Downtime?
One of the key questions during the project was how much downtime the migration would require.
The actual process was surprisingly quick.
From stopping the Azure VM to having the application running on the on-premises infrastructure took only a few minutes for the workloads we migrated using this method.
There are other technologies and migration architectures that could reduce downtime even further and potentially approach near-zero RTO/RPO scenarios.
However, those solutions would introduce additional complexity and cost.
For this particular customer, the short planned outage provided the right balance between:
Cost + Complexity + Downtime + Risk
One Unexpected Challenge: Azure Windows Editions
During the migration, we encountered an interesting challenge with some of the Azure VMs.
Azure VMs can use specific Windows Server editions and configurations that are tied to the Azure environment and licensing model.
The OS was running an Azure-specific Windows configuration that could not simply be moved to the on-premises environment and activated in the same way.
We therefore had to find a way to convert the installation to an edition suitable for the new on-premises environment.
The Supported Approach
The Microsoft-supported approach would be to deploy a new VM using the appropriate Windows Server edition and migrate the application and data.
For example:
-
Deploy a new Windows Server VM.
-
Configure the operating system.
-
Install the required applications.
-
Migrate application data and configuration.
-
Test the application.
-
Decommission the original VM.
This is the preferred approach when it is practical.
However, for this particular workload, rebuilding the server would have required additional work and introduced more migration complexity.
We therefore investigated an in-place conversion method.
An In-Place Conversion Workaround
We found an operational workaround that allowed the Azure Windows installation to be converted to Windows Server 2022 Datacenter.
It is important to emphasize that this is not a Microsoft-supported upgrade path and should not be treated as a standard production procedure.
The method involves temporarily changing Windows edition information in the registry and immediately launching Windows Setup.
The general process was:
- Preparation
Before starting:
-
Create a VM checkpoint/snapshot.
-
Take a full backup.
-
Ensure sufficient free space on the system disk.
-
Verify whether the installation is Desktop Experience or Server Core.
-
Obtain the correct Windows Server ISO.
-
Ensure that the ISO language matches the existing installation.
You can verify the current installation type and OS language with:
Get-ComputerInfo | Select WindowsInstallationType, OsLanguage
- Modify the Registry and Immediately Start Setup
Open PowerShell as Administrator and run the following commands:
foreach ($k in 'HKLM:\SOFTWARE\Microsoft\Windows NT\CurrentVersion','HKLM:\SOFTWARE\WOW6432Node\Microsoft\Windows NT\CurrentVersion') { Set-ItemProperty $k EditionID ServerDatacenter Set-ItemProperty $k CompositionEditionID ServerDatacenter Set-ItemProperty $k ProductName 'Windows Server 2022 Datacenter' }
Immediately after changing the registry, start the Windows Setup:
D:\setup.exe /auto upgrade /imageindex 4 /eula accept /dynamicupdate disable
Important
-
/imageindex 4is the Datacenter Desktop Experience image. -
If the server is running Server Core, use
/imageindex 3. -
Verify the available image indexes before starting the upgrade:
dism /get-wiminfo /wimfile:D:\sources\install.wim
Windows may restore the original edition information in the registry after a short period of time. Therefore, Windows Setup must be started immediately after modifying the registry.
- Licensing and Activation
After the conversion, the operating system must be activated using the appropriate licensing model.
Install the product key
slmgr /ipk <product-key>Then activate:
slmgr /atoDepending on the customer's licensing architecture, this could be:
-
KMS
-
AVMA
-
MAK
-
Another valid Windows Server licensing method
For AVMA, for example, the Hyper-V hosts must have the appropriate Datacenter licensing and the VM must have the required integration services configured.
The important lesson here is that changing the Windows edition does not remove the requirement for proper licensing.
- Verification
After the upgrade:
-
Verify the Windows activation status:
slmgr /dlvConfirm that the license status is Licensed.
-
Verify that the server is running the expected Windows Server edition.
-
Test the application and confirm that all required functionality is working.
-
Once everything has been verified and the server is operating normally, remove the VM checkpoint/snapshot.
Microsoft-Supported Alternative
If you want to use a Microsoft-supported approach, the recommended method is to:
-
Deploy a new VM with the required Windows Server Datacenter or Standard edition.
-
Configure the new server.
-
Migrate the application and required data/configuration to the new VM.
-
Decommission the old server once the migration has been successfully completed.
Note: The in-place method described above should therefore be considered an operational workaround rather than a Microsoft-supported upgrade path.
Lessons Learned
This project highlighted several important lessons.
1. Cloud is not automatically cheaper
Cloud infrastructure provides enormous flexibility, but that flexibility comes with a cost.
For stable workloads that run continuously, a dedicated on-premises environment can sometimes provide a significantly lower five-year total cost.
The correct decision depends on workload characteristics, utilization, operational requirements and the organization's ability to manage infrastructure.
2. Migration does not have to mean a big-bang project
Migrating one VM at a time allowed us to:
-
Reduce risk
-
Test the process
-
Validate applications individually
-
Minimize downtime
-
Quickly identify unexpected issues
3. Local backup copies are extremely valuable
Having a local copy of the Azure backups made a major difference.
It allowed us to recover workloads at local network speeds instead of relying entirely on the Internet connection to Azure.
4. Backup can also become a migration tool
Veeam was not only our backup platform.
It became an important part of the migration strategy itself.
The ability to take a backup, move that backup to the target environment and perform Instant Recovery gave us a flexible migration path without requiring specialized migration tooling.
5. Cost, RTO and complexity must be balanced
Near-zero downtime is possible with more advanced migration technologies.
But those technologies also come with additional licensing, infrastructure and operational complexity.
In this project, the customer accepted a short outage because the resulting solution provided a significantly better overall cost profile.
Final Result
The project transformed the customer's infrastructure from an Azure-only environment into a dedicated on-premises platform hosted in a professional data center.
The customer gained:
-
Significantly lower projected infrastructure costs
-
Predictable recurring costs
-
Dedicated hardware
-
Local high-speed recovery
-
Immutable backups
-
A structured disaster-recovery strategy
-
Room for future server expansion
-
A controlled migration process
-
Reduced dependency on Azure for these workloads
Most importantly, the financial analysis showed that the initial investment was expected to break even around year two over a five-year planning horizon.
The project demonstrates that the right answer is not always cloud or on-premises.
Sometimes the best architecture is about choosing the right combination of both — and using the tools already available to make the transition as controlled and low-risk as possible.