


✦ All of this seem over your head? Ask Claude to help. The GitHub repo ships a ready-made prompt that lets Claude Code ask for your addresses, set up SSH, install the proxy and the Pis, and guide you through the Veeam console: Deploy it with Claude Code →
There is no Veeam Agent for ARM. There is, however, a way to give the stock Linux agent a frozen, point-in-time image of a Pi's SD card and let it do what it does best. Here is the full build, end to end, almost entirely from the VBR web console.
This started as a weekend puzzle and turned into something I would actually run. I have a couple of Raspberry Pi 4s doing real work: one is a fixed ADS-B flight-tracking ground station, the other rides along in an aircraft. They are cheap, they run for months untouched, and when an SD card finally dies you discover how much configuration lived on it. That is exactly the kind of "small but annoying to rebuild" workload people have scattered across labs, shops and edge sites: signage players, sensor gateways, kiosk controllers, home-automation hubs.
Fair warning: this is not for the faint of heart. It involves a kernel module built from source on ARM, device-mapper tables, iSCSI, and a handful of shell scripts that have to be right. But once it is configured it just works: the Pis get snapshotted, Veeam backs them up on a schedule with normal retention, and I have done a full bare-metal restore to a brand-new card and booted it. Everything you see below was done on Veeam Backup & Replication v13, and with one small exception, every Veeam step was done in the web console.
Read this first. This is a community project, not a supported Veeam configuration. The Raspberry Pi side uses Veeam's open-source snapshot module built by hand for ARM64, and the orchestration is my own scripting. Test it, own it, and keep the scripts in version control. Nothing here modifies the Veeam appliance itself.
The problem
Veeam Agent for Linux is built for x86_64 (and IBM POWER). There is no aarch64 package, and as of v13 there is none planned, so a Raspberry Pi cannot run the agent. The usual workarounds are weak: a file copy to a share misses the boot partition, the partition table and everything that makes the card bootable, and a periodic dd of a live card gives you a crash-consistent image at best, with no incremental chain, no retention, no restore UI.
What I wanted was boring: the Pi shows up as a workload in VBR, gets a volume-level backup on a schedule, keeps restore points in a normal repository, and can be restored file-by-file or as a whole card. Veeam can do all of that for a Linux disk. The only thing missing was a way to hand it a Pi's disk.
The idea: a proxy that speaks x86
If the agent cannot run on the Pi, bring the Pi's disk to the agent. A small x86 Linux VM (I call it pproxy) runs the stock Veeam Agent for Linux, managed by VBR like any other Linux server. Each Raspberry Pi exports an image of its SD card over iSCSI to that VM. From Veeam's point of view the proxy is just a Linux machine with some extra block devices, and it backs them up at the volume level.
The trick that makes this trustworthy rather than a hack is what the Pi exports. It is not the live card. Between backups the Pi presents a read-only view of its partitions. When a backup starts, a pre-job script tells the Pi to freeze its filesystems for an instant, take a block-level snapshot of every partition using Veeam's own open-source blksnap module (built for ARM64), and swap the exported image over to those frozen snapshots. The agent then reads a consistent point-in-time image, and a post-job script releases the snapshot. The live card is never writable from the network, and the snapshot's copy-on-write area lives in RAM on the Pi so it never touches the card either.
| 0 changes to the VBR appliance | ~4.5 min per 32 GB card, per run |
| 1 VBR license instance for all Pis | 45 min restore point → booted new card |
Architecture
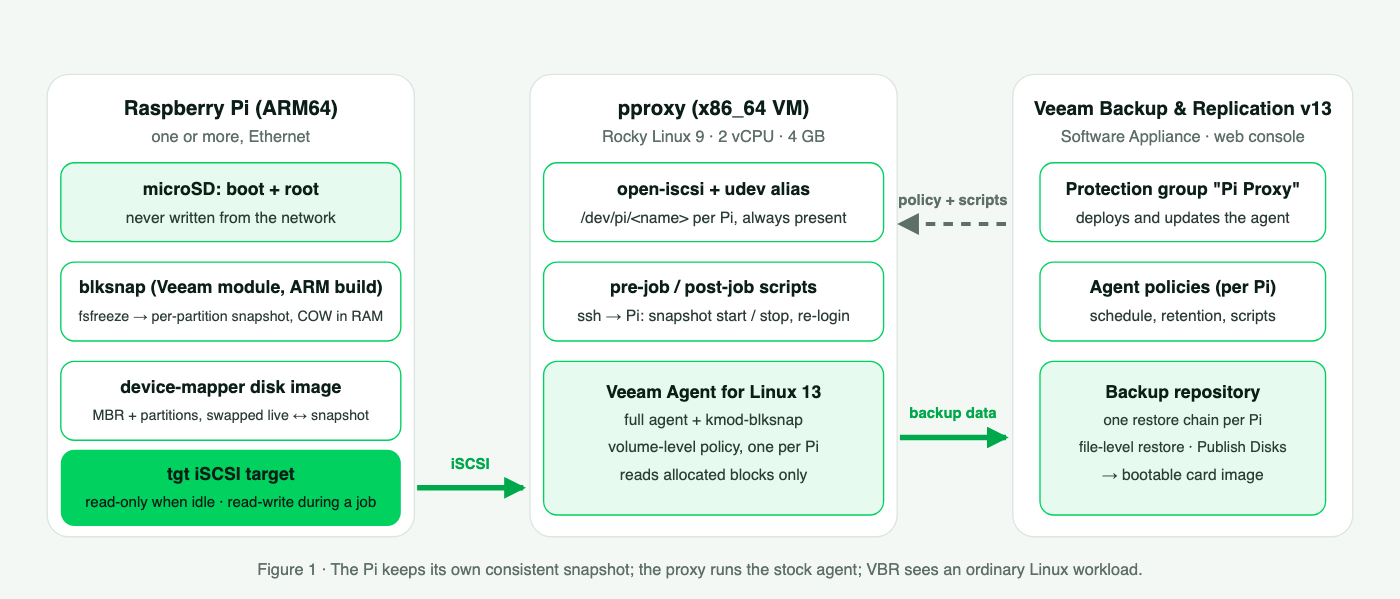
Architecture: the Pi keeps its own consistent snapshot; the proxy runs the stock agent; VBR sees an ordinary Linux workload
| Where | What runs there | Role |
|---|---|---|
| Raspberry Pi (pi-01, pi-02 · Pi 4 Model B · Raspberry Pi OS 64-bit, Debian 13) | Veeam blksnap 13.1.1.4 built via DKMS (with a one-line ARM64 patch), the blksnap CLI, tgt, pi-veeam-export.sh + a systemd unit | Persistent iSCSI export of a device-mapper disk image. Idle: live partitions, LUN read-only. During a job: frozen snapshot images, LUN read-write. |
| Proxy VM (pproxy · Rocky Linux 9 · x86_64) | Stock Veeam Agent for Linux 13 with the kernel module, iscsi-initiator-utils, a udev rule, /etc/pi-veeam/targets, pre/post-job scripts, an attach timer | Attaches each Pi as /dev/pi/<name>, lets the agent back it up as a volume, releases the snapshot afterwards. |
| VBR v13 (Software Appliance) | Protection group "Pi Proxy"; one agent policy per Pi with a Device object; two 2-line wrapper scripts per policy | Schedules, repository, retention, file-level restore, Publish Disks for bare-metal recovery. |
What happens during a backup
- Between runs the proxy stays logged in to every Pi's read-only export, so
/dev/pi/<name>always exists. The agent validates a policy's device objects both when the policy is applied and at the start of every job, before any user script runs, which is why the export has to be persistent. - Pre-job script (runs on the proxy, pushed there by VBR): for each Pi in its target list, SSH in and run
pi-veeam-export.sh start. The Pi doessync,fsfreeze, takes a blksnap snapshot of every partition, thaws (the freeze lasts well under a second), hot-swaps the device-mapper table to the snapshot images and flips the iSCSI LUN read-write. The proxy re-logs in so it sees the new content and starts change tracking clean. - The agent enumerates the disk, finds a real MBR and real ext4/vfat filesystems, takes its own snapshot of the image device and reads only the allocated blocks. On a 32 GB card that is about 9 GB.
- Post-job script:
pi-veeam-export.sh stopon each Pi (LUN back to read-only, table back to the live partitions, snapshot destroyed, RAM freed), then a re-login on the proxy so the device stays present for the next run.
Prerequisites
- VBR v13 with a Linux backup repository. I used the v13 Software Appliance and its web console throughout.
- A small x86_64 VM for the proxy: Rocky/RHEL 9, 2 vCPU, 4 GB, a static IP. Secure Boot can stay on; you will enroll Veeam's module-signing certificate once.
- Raspberry Pi OS 64-bit (Debian 12 or 13) on each Pi with kernel headers available, and Ethernet. Wi-Fi works, but at roughly one-fifteenth the speed.
- A static IP or DHCP reservation for every Pi and for the proxy. The proxy addresses Pis by IP, and the Pi's iSCSI ACL names the proxy.
- SSH key access from the proxy's root account to a sudo-capable user on each Pi (the installer sets this up).
Part 1 · Build the proxy
The proxy is deliberately dull. Rocky Linux 9 minimal, a static address, the iSCSI initiator, and a handful of files from the repo. The Veeam agent itself is installed by VBR later, from the protection group, so there is nothing Veeam-specific to do here by hand.
# on pproxy, as root
dnf install -y iscsi-initiator-utils
systemctl enable --now iscsid

# scripts and units from the repo
install -m 755 proxy/pi-attach.sh proxy/pi-detach.sh proxy/pi-add-target.sh \
               proxy/pi-job-pre.sh proxy/pi-job-post.sh /usr/local/sbin/
install -m 644 proxy/pi-veeam-attach.service proxy/pi-veeam-attach.timer /etc/systemd/system/
install -d /etc/pi-veeam /etc/pi-veeam/targets.d
systemctl daemon-reload && systemctl enable --now pi-veeam-attach.timer
Two details matter. First, VBR rejects a colon in a device path, so the by-path iSCSI names cannot be used as job objects. A udev rule keyed on each Pi's target name provides a clean alias that survives reboots, re-logins and sdX renumbering:
# /etc/udev/rules.d/99-pi-veeam.rules  (one line per Pi; pi-add-target.sh writes it)
KERNEL=="sd*", SUBSYSTEM=="block", ENV{DEVTYPE}=="disk", \
  ENV{ID_PATH}=="*iscsi-iqn.2026-09.local.lab:pi-pi-01-lun-*", SYMLINK+="pi/pi-01"
Second, the pre-job script does the real orchestration, and it is short. It walks a target list, asks each Pi for a fresh frozen snapshot, then re-logs in to the iSCSI target so the proxy picks up the read-write flag and starts with clean change tracking. It fails the job if any Pi cannot be snapshotted, which is the behavior you want.
# /usr/local/sbin/pi-job-pre.sh  (excerpt)
TARGETS=${PI_VEEAM_TARGETS:-/etc/pi-veeam/targets}      # "<ip> <ssh-user>" per line
KEY=/root/.ssh/id_ed25519_pi
while read -r PI PI_USER _; do
  SSH="ssh -n -o BatchMode=yes -o StrictHostKeyChecking=accept-new -i $KEY ${PI_USER}@${PI}"
  $SSH "sudo /usr/local/sbin/pi-veeam-export.sh stop"  >/dev/null 2>&1 || true   # clear a stale one
  $SSH "sudo /usr/local/sbin/pi-veeam-export.sh start" || { rc=1; continue; }
  OUT=$(/usr/local/sbin/pi-attach.sh "$PI" --relogin) || { rc=1; continue; }
  echo "$OUT" | grep -q "ro=0" || rc=1                                          # must be read-write now
done < "$TARGETS"
exit $rc
Registering a Pi with the proxy is one command. It appends the targets line, writes the udev rule, and installs the proxy's SSH key on the Pi:
pi-add-target.sh 10.10.0.101 pi-01 pi        # <pi-ip> <pi-hostname> <ssh-user>
echo "10.10.0.101 pi" > /etc/pi-veeam/targets.d/pi-01   # per-policy target list
Part 2 · Prepare the Pi
This is the part that is not for the faint of heart, and also the part that is fully scripted. pi/install.sh installs tgt, DKMS and the kernel headers, fetches Veeam's blksnap DKMS source package from the public Veeam repository (it is tagged amd64 but contains only C source and a dkms.conf, so it builds anywhere), applies a one-line patch for ARM64, builds and loads the module, builds the blksnap command-line tool from Veeam's GitHub, and installs the export service.
# on the Pi, as root, from the repo's pi/ directory
sudo ./install.sh 10.10.0.20            # argument: the proxy's IP (becomes the iSCSI ACL)
The ARM64 patch, in one sentence. Veeam's filter registers an ftrace handler with FTRACE_OPS_FL_SAVE_REGS; ARM64 kernels implement DYNAMIC_FTRACE_WITH_ARGS instead of WITH_REGS and reject that flag. The same guard the kernel's own livepatch code uses, #ifndef CONFIG_HAVE_DYNAMIC_FTRACE_WITH_ARGS, around that flag in three headers is the entire patch. The module then builds and loads cleanly on the Raspberry Pi 6.x kernels.
The export script has five modes and is the heart of the design. idle runs at boot and builds a device-mapper image of the whole card: a copy of the MBR and the sectors before the first partition, the partitions themselves (through loop devices, because the mounted partitions cannot be opened exclusively), and a copy of the tail. That image is exported by tgt with the LUN flagged read-only, so nothing on the network can write to the card. start and stop are what the proxy calls around each backup:
# pi-veeam-export.sh start  (excerpt: freeze → snapshot → swap image → LUN read-write)
SNAP_ID=$(blksnap snapshot_create --device /dev/mmcblk0p1 --device /dev/mmcblk0p2 \
                                  --file /run/pi-veeam --limit 512M | grep -oE '[0-9a-f-]{36}')
sync
for m in /boot/firmware /; do fsfreeze -f "$m"; done      # sub-second
blksnap snapshot_take --id "$SNAP_ID"
for m in /boot/firmware /; do fsfreeze -u "$m"; done
build_table snap | load_table          # dmsetup suspend / reload / resume, then flushbufs
tgtadm --lld iscsi --op update --mode logicalunit --tid 1 --lun 1 --params readonly=0

# pi-veeam-export.sh stop
tgtadm --lld iscsi --op update --mode logicalunit --tid 1 --lun 1 --params readonly=1
build_table live | load_table
blksnap snapshot_destroy --id "$SNAP_ID"
A few choices in there are deliberate and worth knowing about even if you never edit the script:
- Partitions are snapshotted, not the whole disk. The blksnap filter binds to the exact block device it is attached to, and filesystems submit I/O on the partition devices. The Veeam agent works the same way.
- The copy-on-write area is in tmpfs (
/run/pi-veeam, 512 MiB). The module refuses to put difference storage on a device it is snapshotting, and a quiet Pi writes very little during a five-minute backup. - Freeze, then take. Debian 13's ext4 uses the
orphan_filefeature; a frozen snapshot mounts cleanly on the proxy, so the agent can see allocated blocks and file-level restore works. This is what the agent does natively on x86. - The image is served with O_DIRECT and the page cache is flushed after every table swap, so the proxy never reads stale blocks across a live-to-snapshot swap.
Part 3 · Configure Veeam (web console)
From here on it is ordinary Veeam administration. Everything in this section is the v13 web console. The single exception, copying two tiny wrapper scripts onto the backup server, can be done through the console's Files view or simply with scp.
Protection group and agent deployment
Inventory → Protection Groups → Add → Individual computers. The only computer in the group is the proxy. Use an SSH credential with automatic privilege elevation. Leave the nosnap agent unchecked: the proxy needs the full agent with the kernel module, because the nosnap variant cannot image plain partitions.
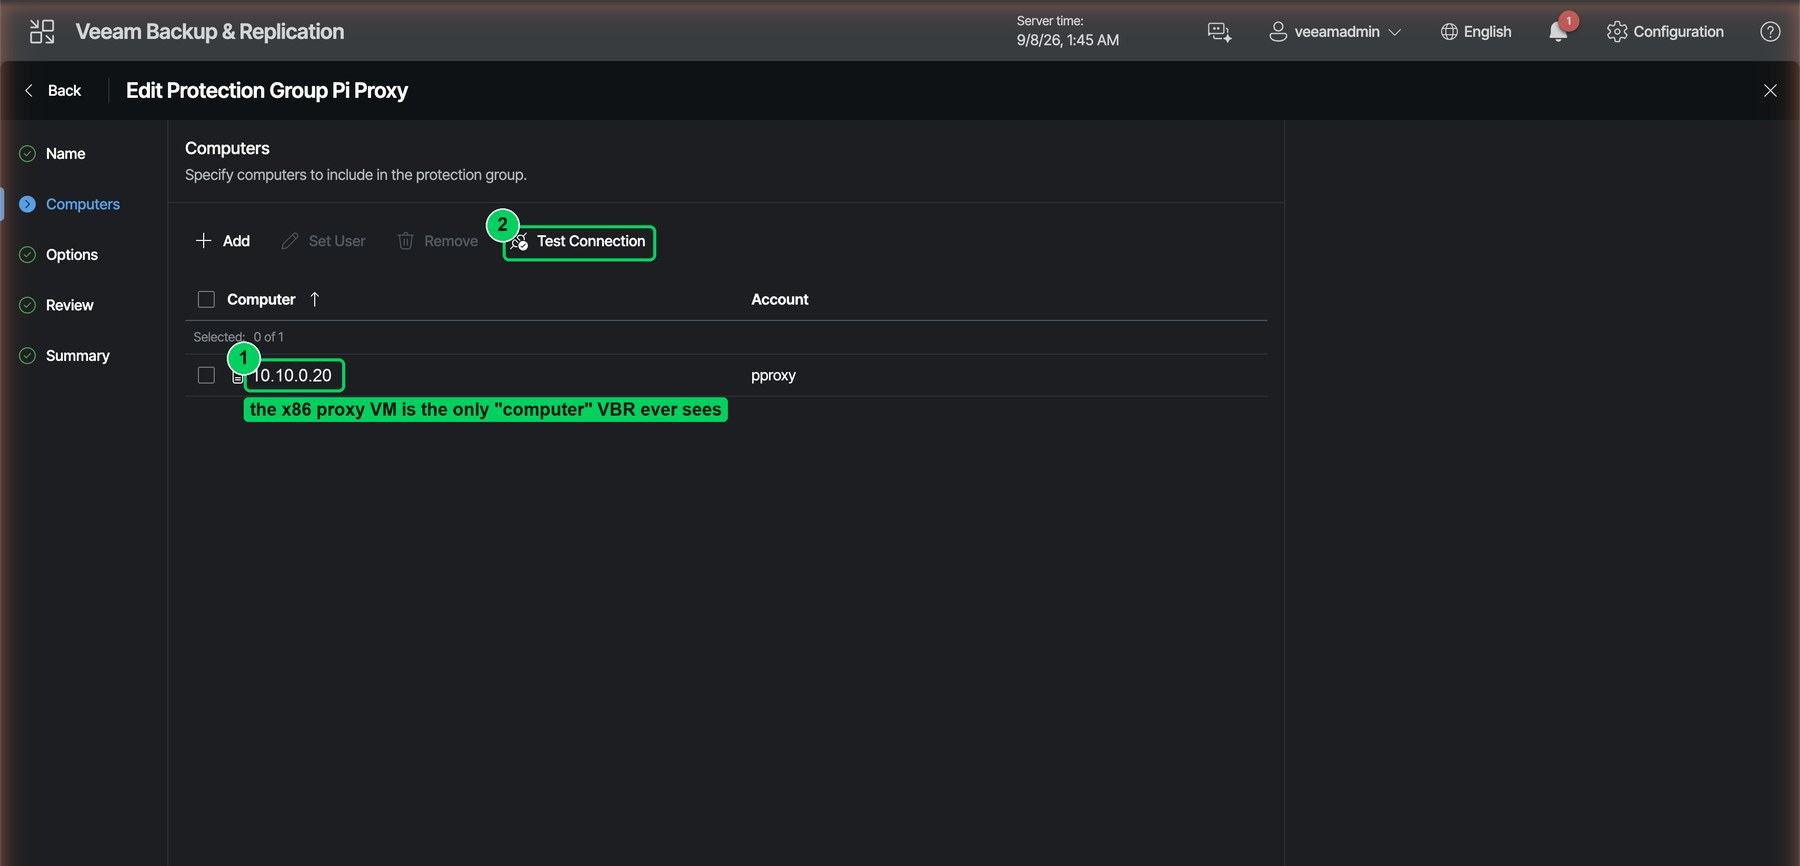
Figure 2. The protection group contains exactly one computer: the x86 proxy. Test Connection validates the SSH credential before deployment.
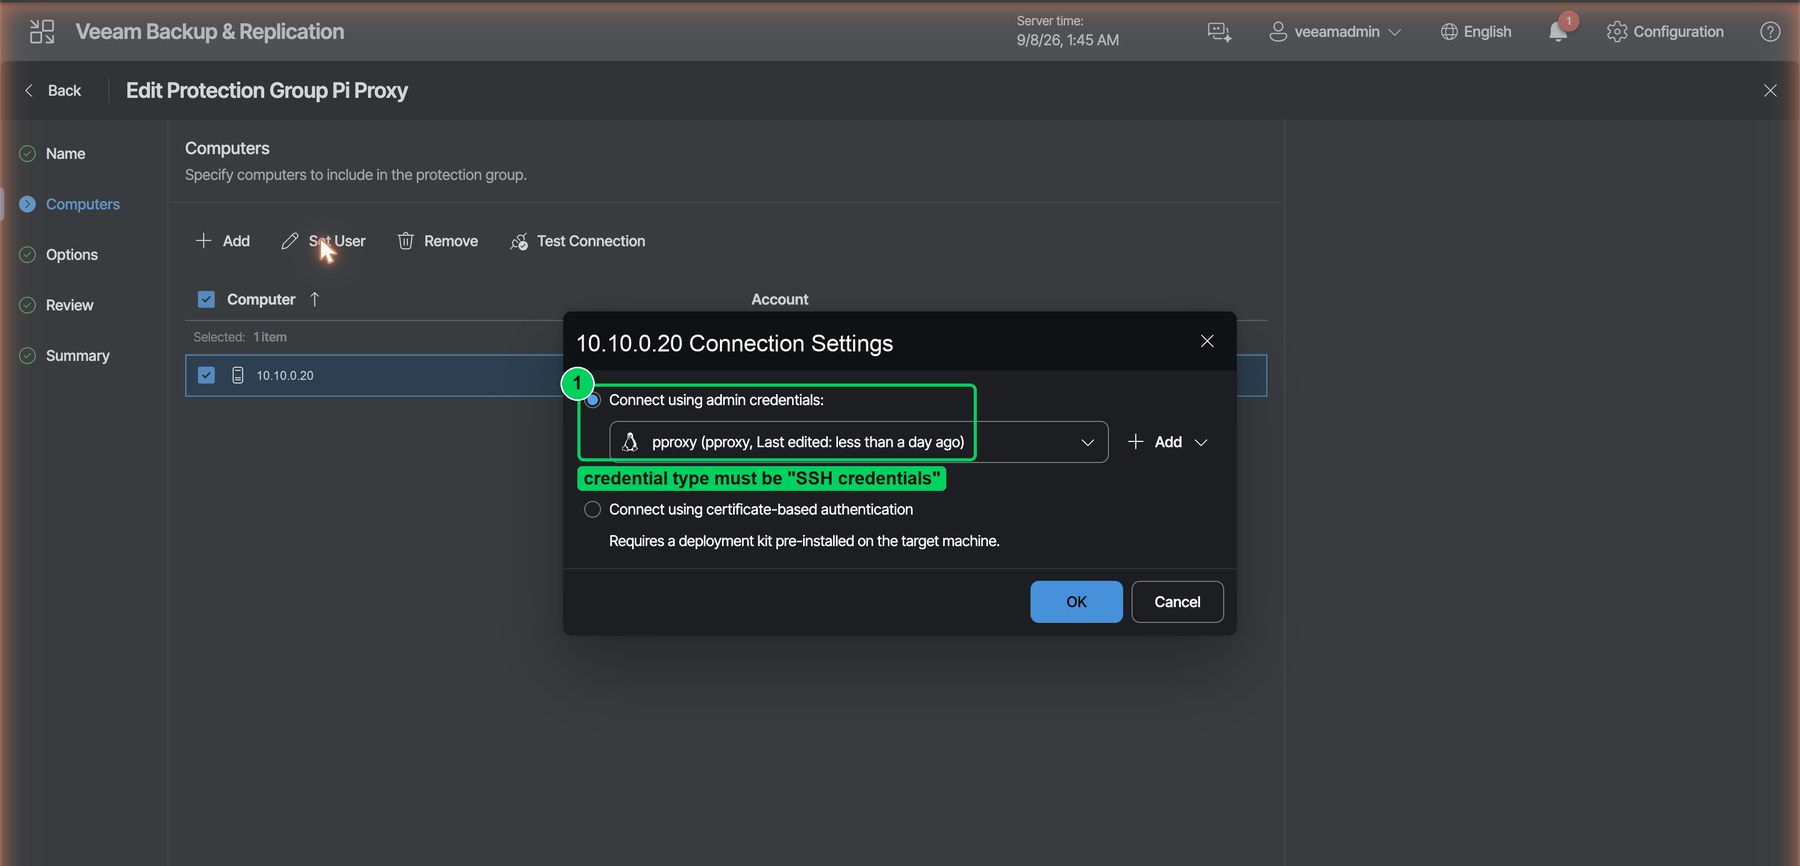
Figure 3. Connection settings for the proxy. The credential type must be "SSH credentials".
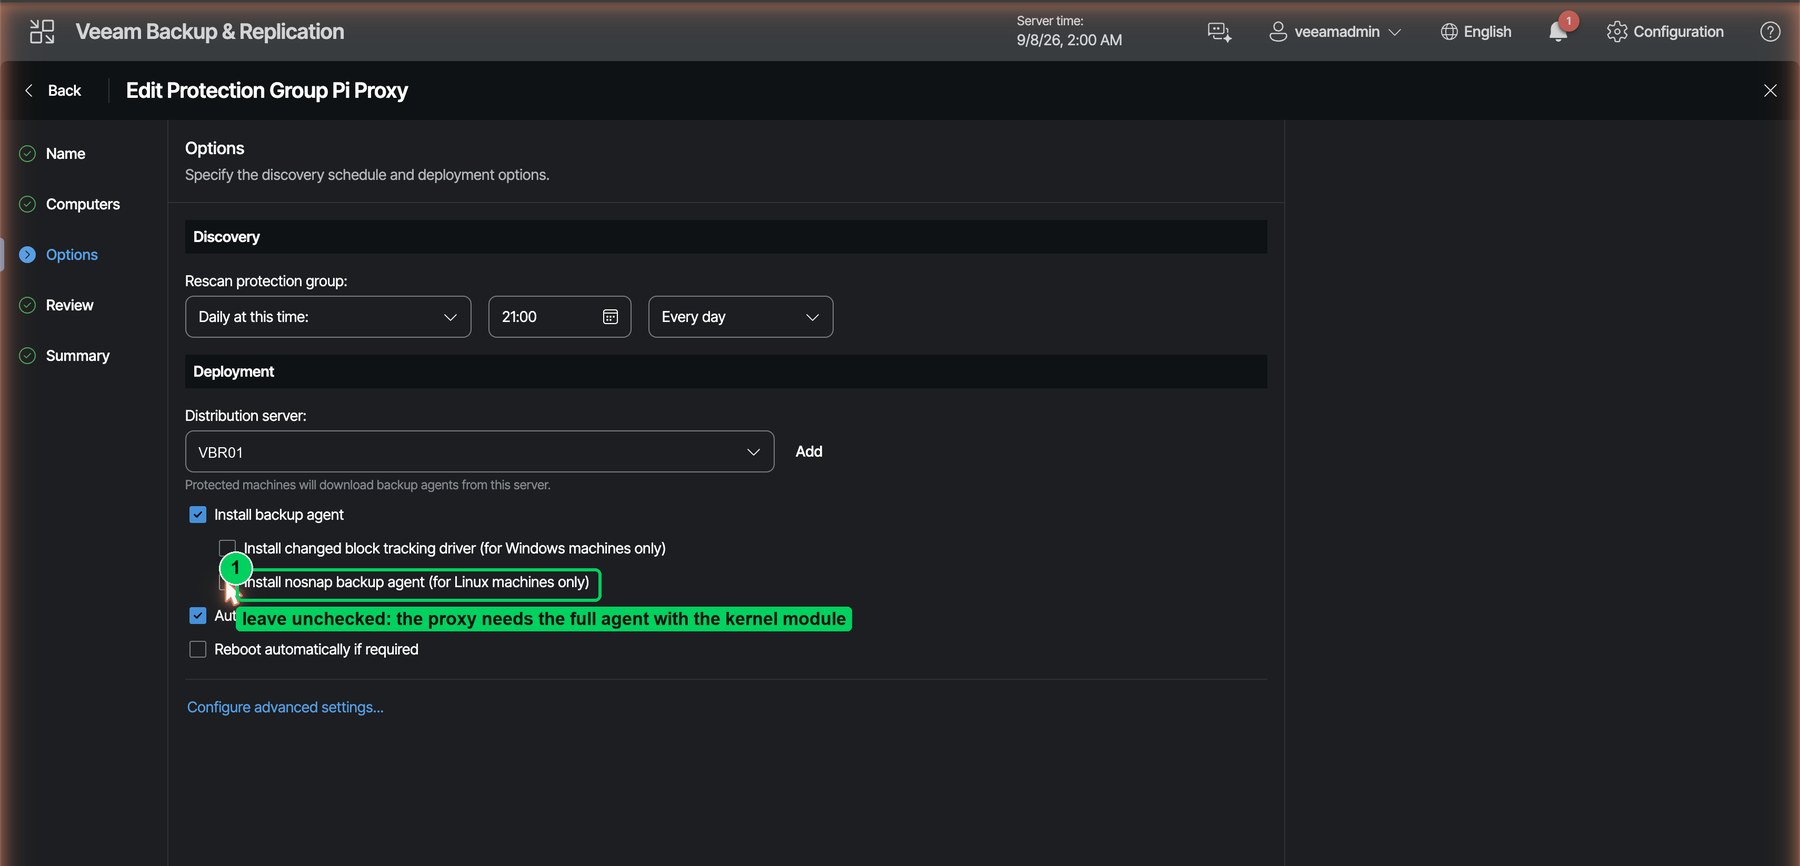
Figure 4. Deployment options. "Install nosnap backup agent" stays unchecked so VBR deploys the full agent and kmod-blksnap.
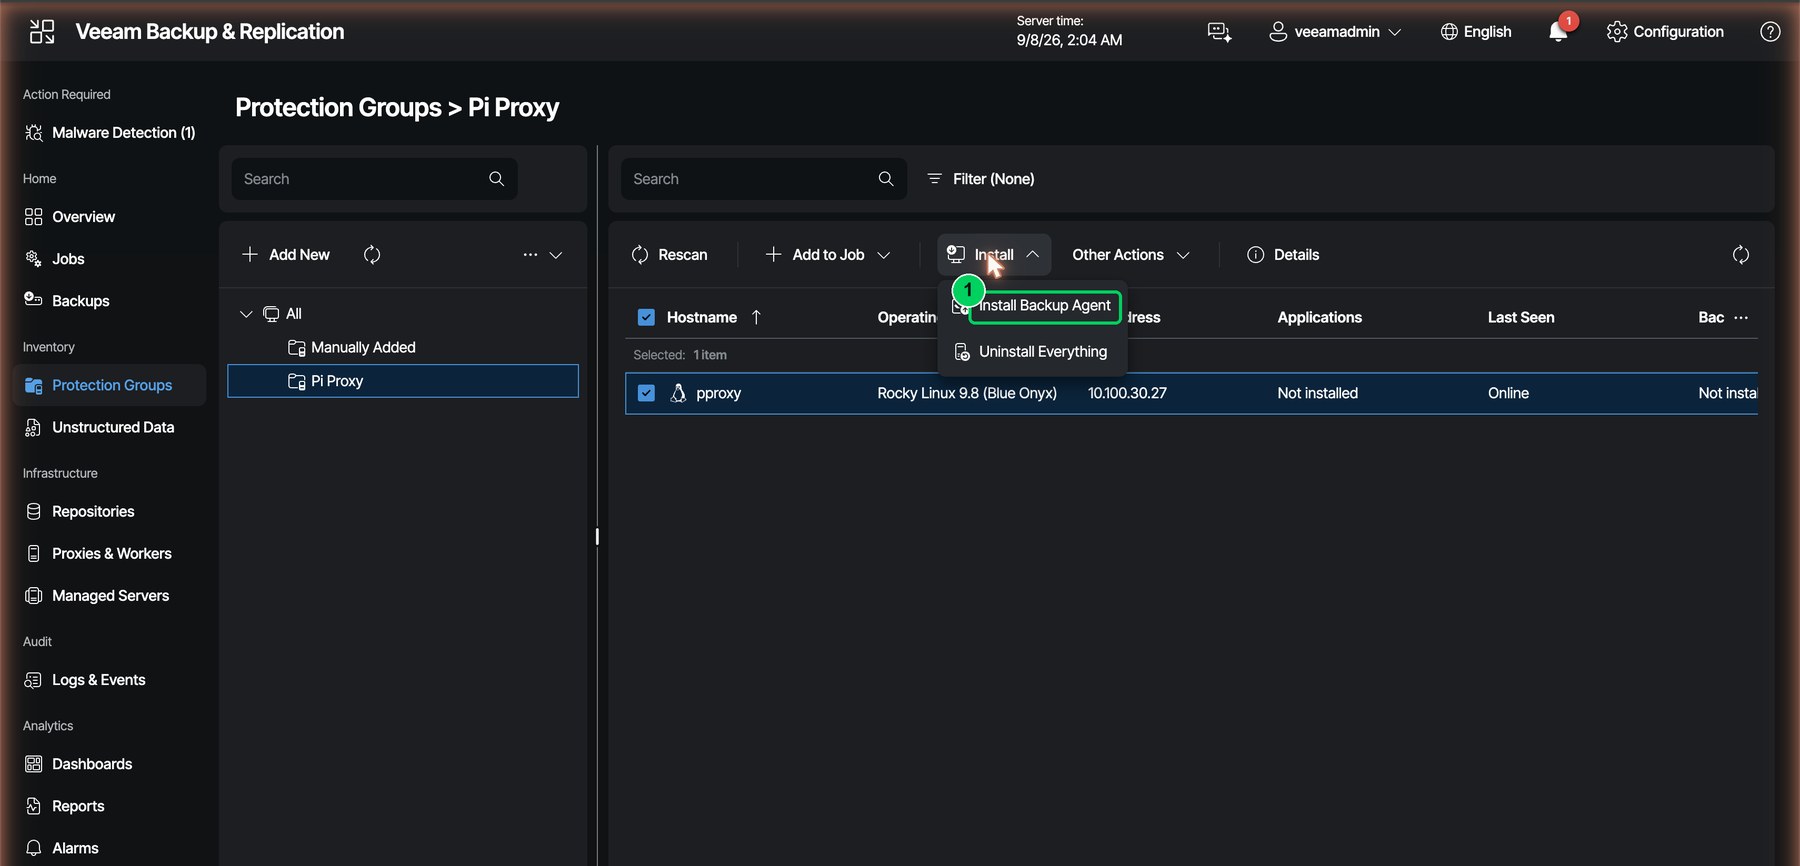
Figure 5. With the proxy discovered, Install Backup Agent pushes the agent packages from the appliance.
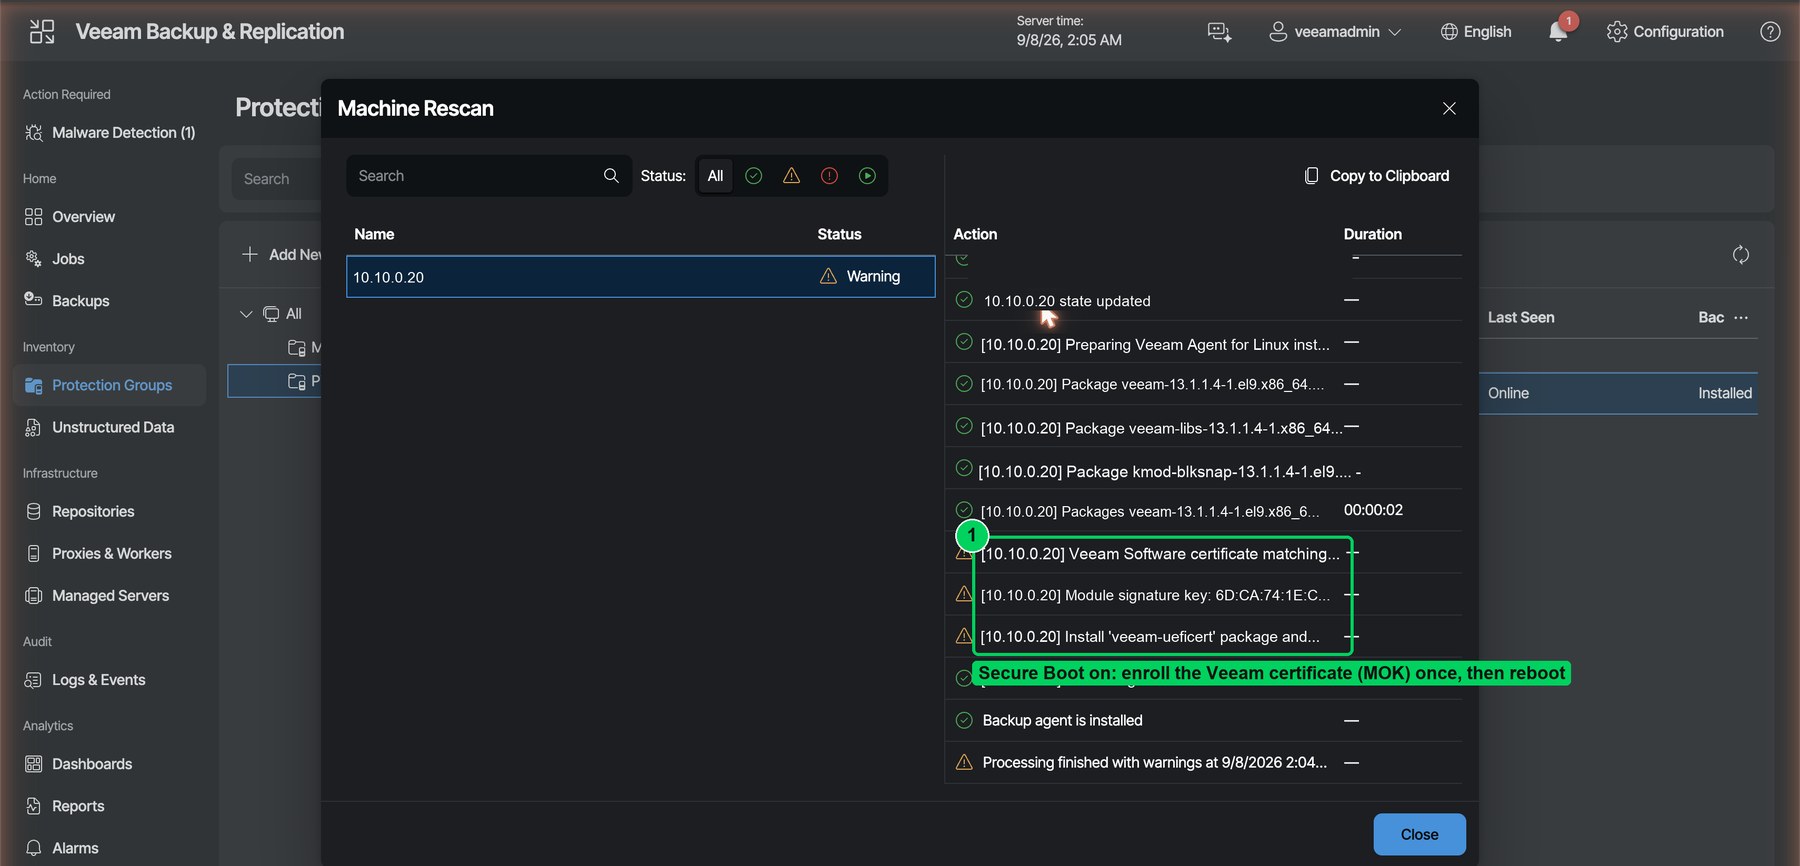
Figure 6. With Secure Boot enabled the rescan warns about the module signature and offers the veeam-ueficert package. Enroll it once with mokutil --import, reboot, and the warnings are gone.
Secure Boot. You do not have to disable Secure Boot on the proxy. Install
veeam-ueficertfrom the Veeam repository, runmokutil --importon its certificate, reboot, and confirm the enrollment in the MOK manager at the console. After thatmodprobe veeamblksnaploads normally.
The agent policy
Create the backup as an agent policy ("Server policy"), not a server-managed job. The difference is where pre-job and post-job scripts run: a server job runs them on the backup server, a policy runs them on the agent, which is where our scripts have to run. The wizard is the standard Linux agent wizard: name, workload (the proxy), volume-level backup, the Pi's device as the object, repository, and the backup server's address.
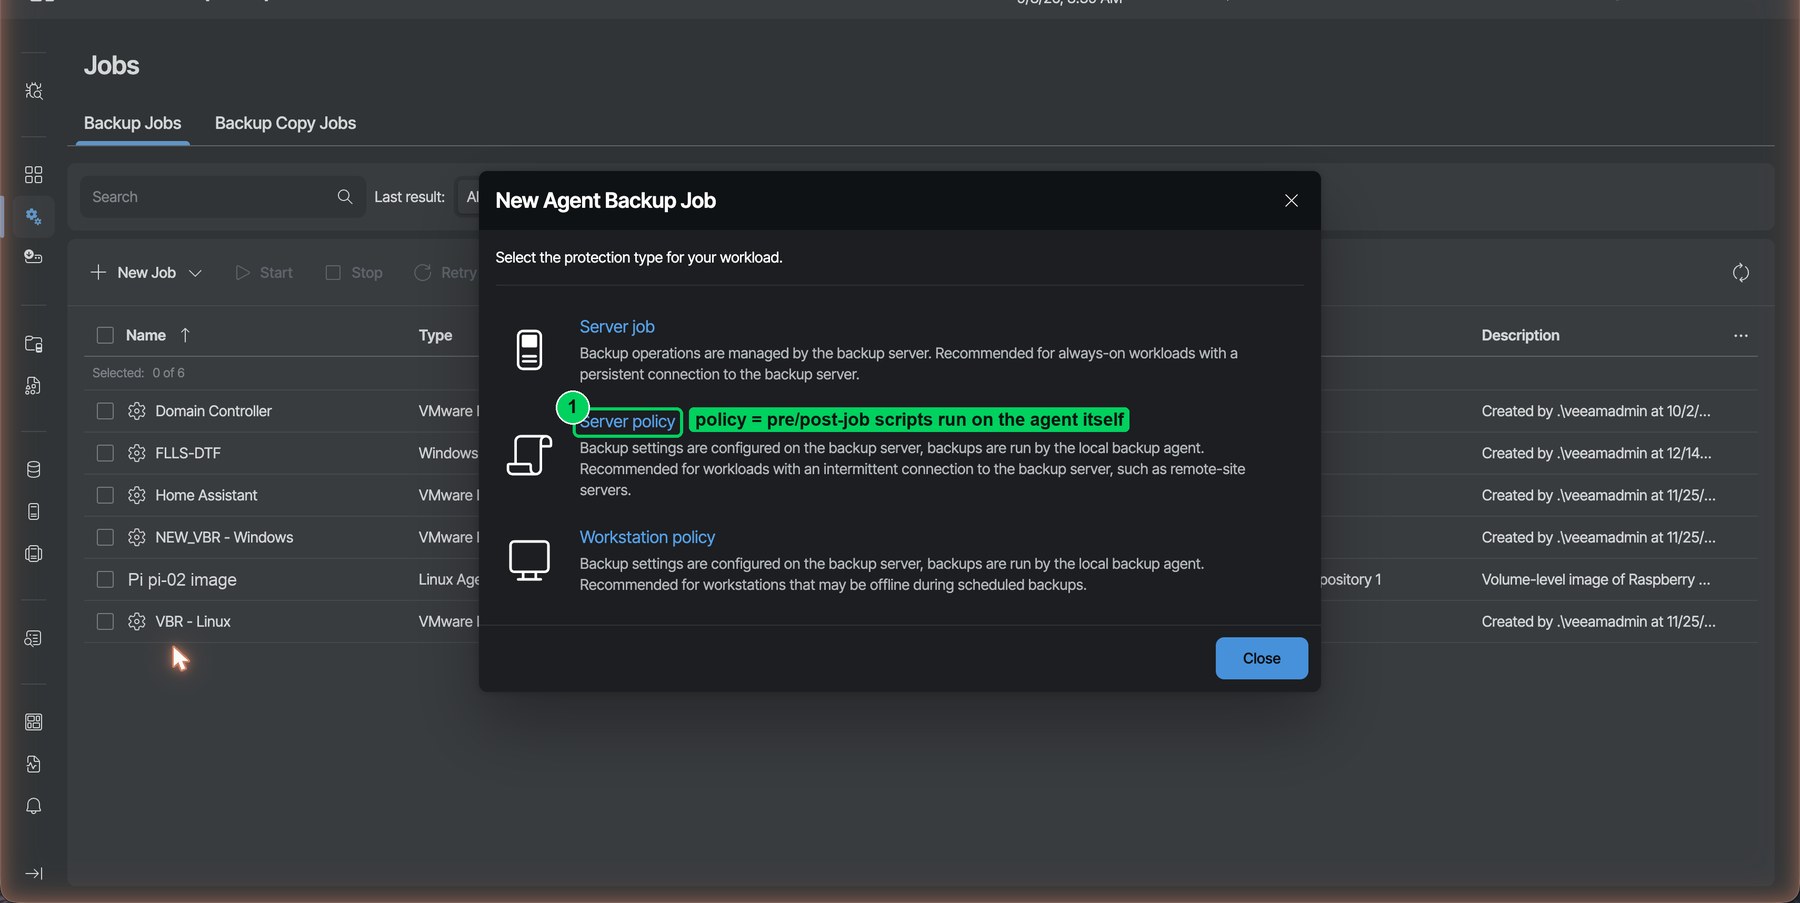
Figure 7. Jobs → New Job → Agent backup job. Choose Server policy.
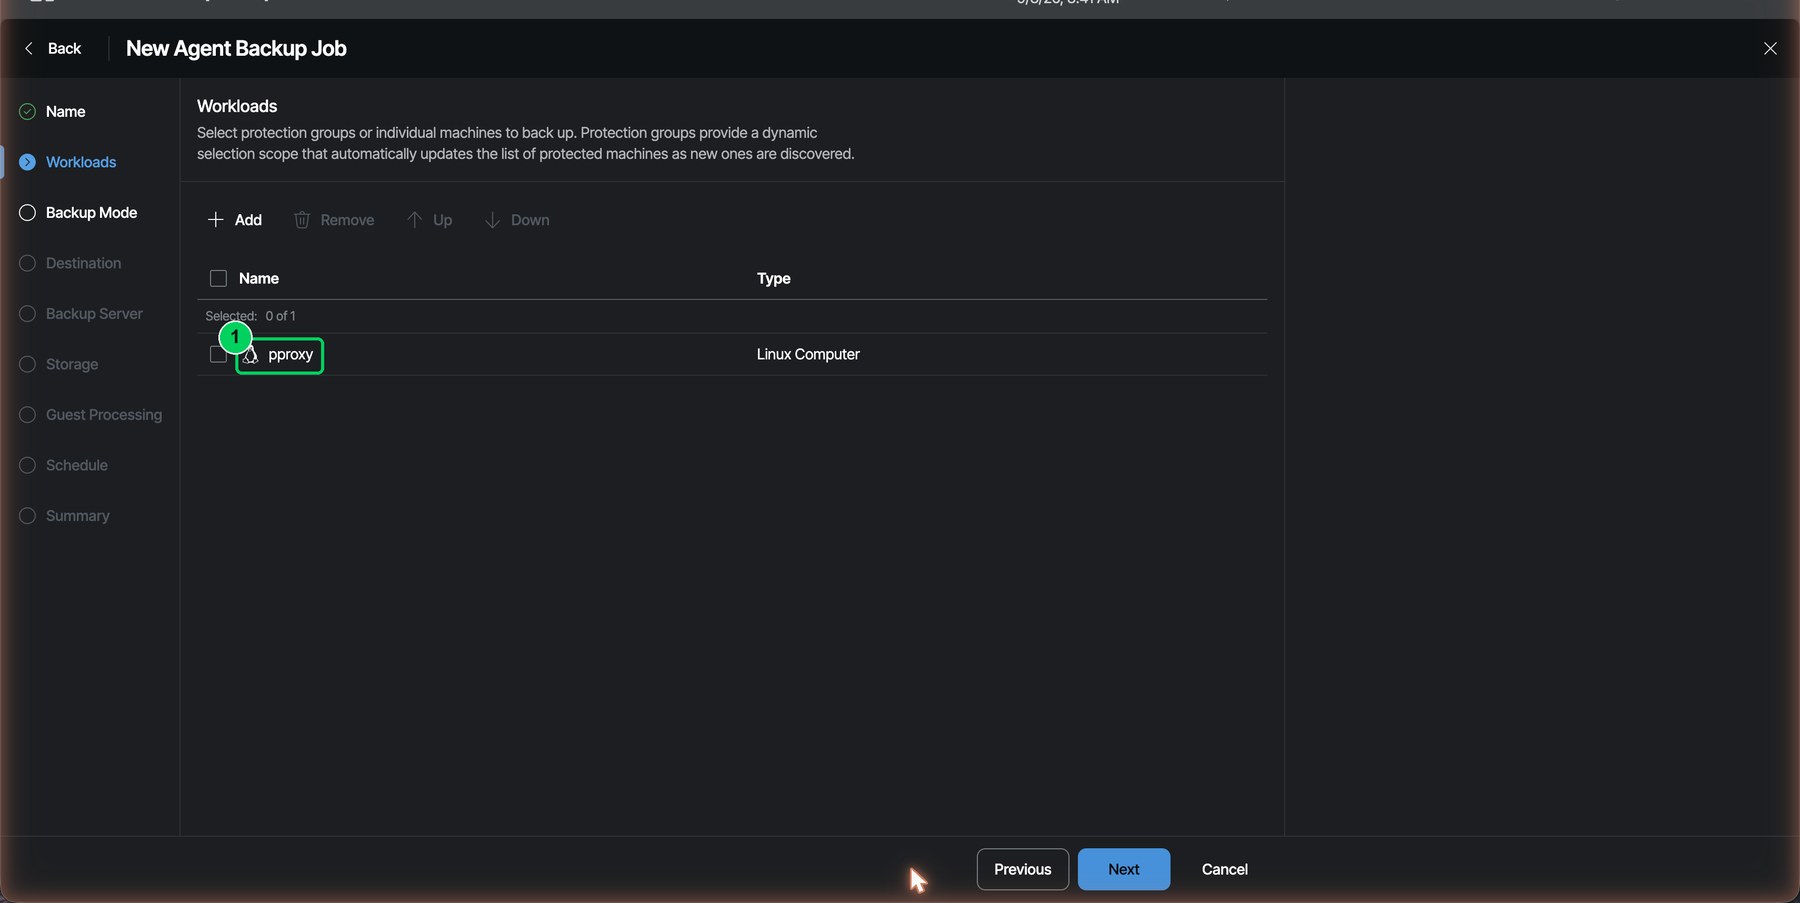
Figure 8. Workloads: the proxy, selected from the protection group.
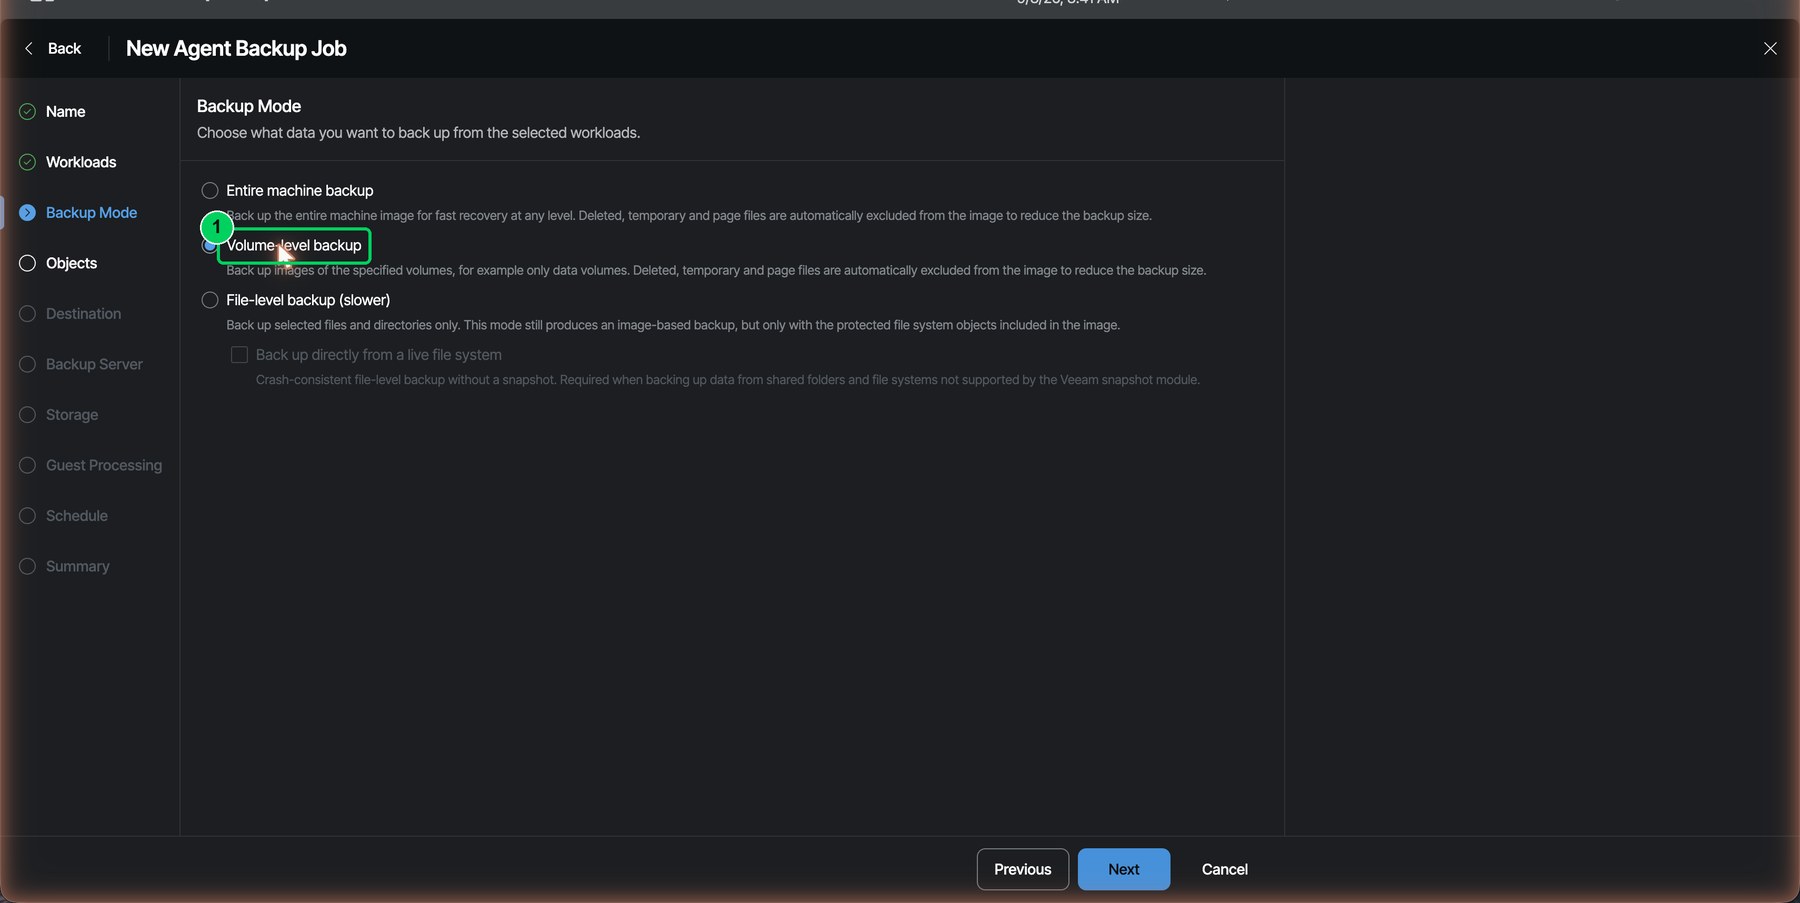
Figure 9. Backup mode: Volume-level backup.
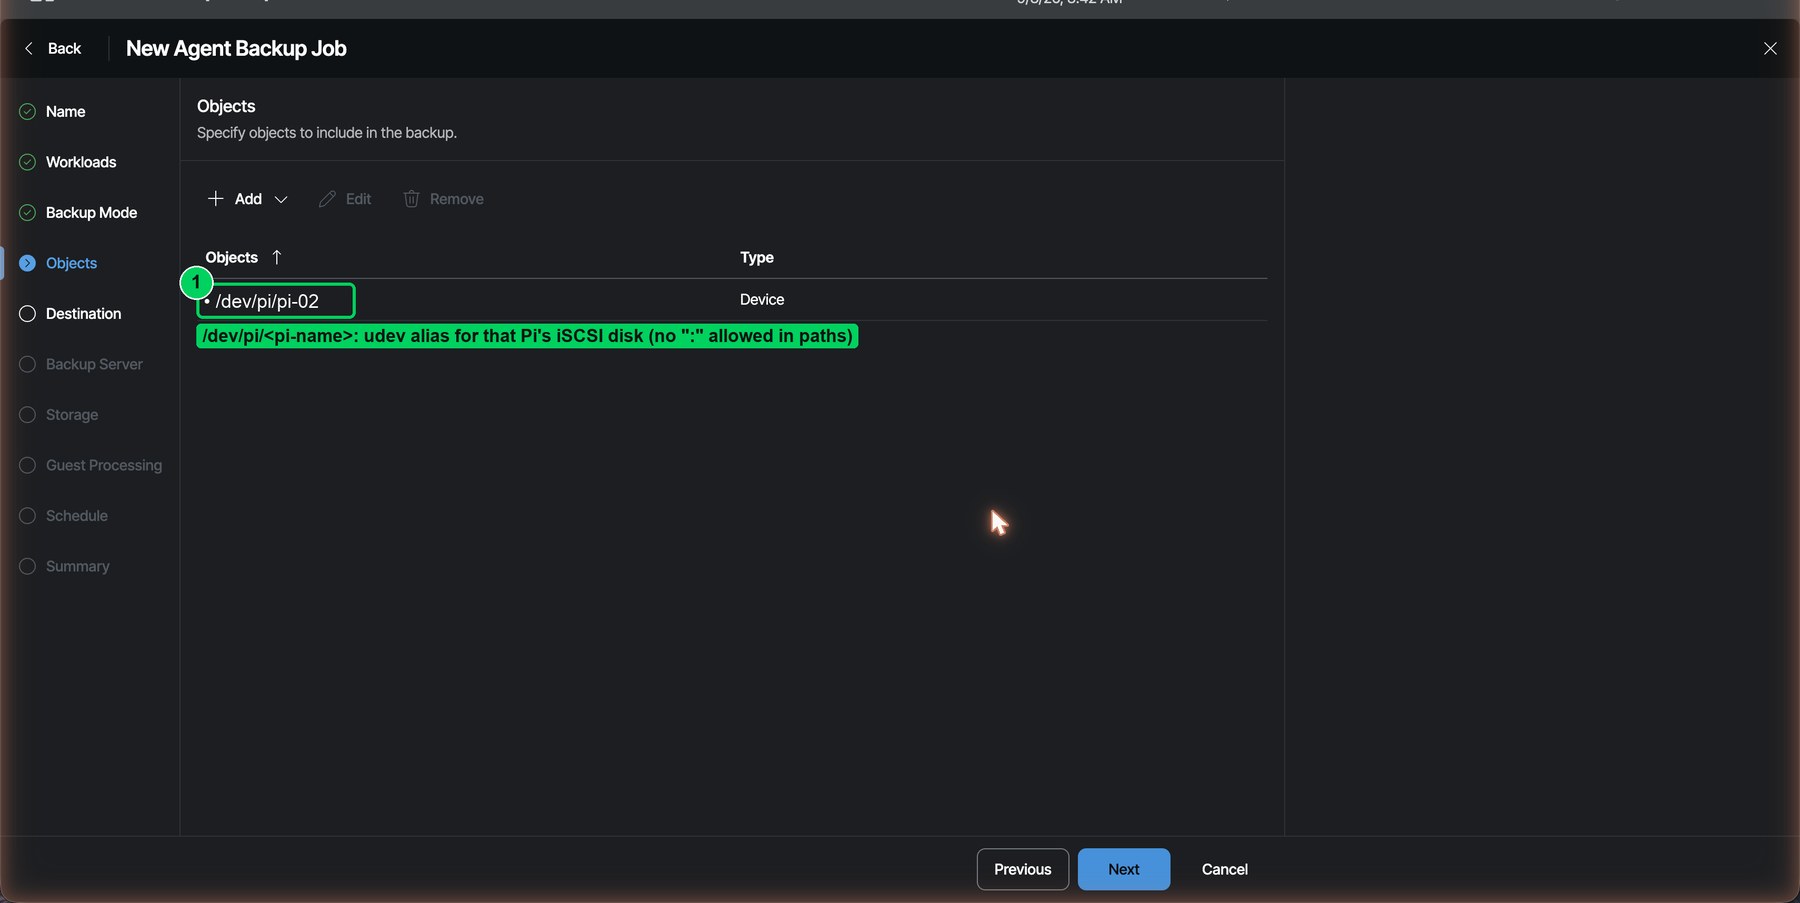
Figure 10. Objects: Add → Device, and enter the udev alias /dev/pi/<pi-name>. One device object per policy keeps the restore chains separate per Pi.
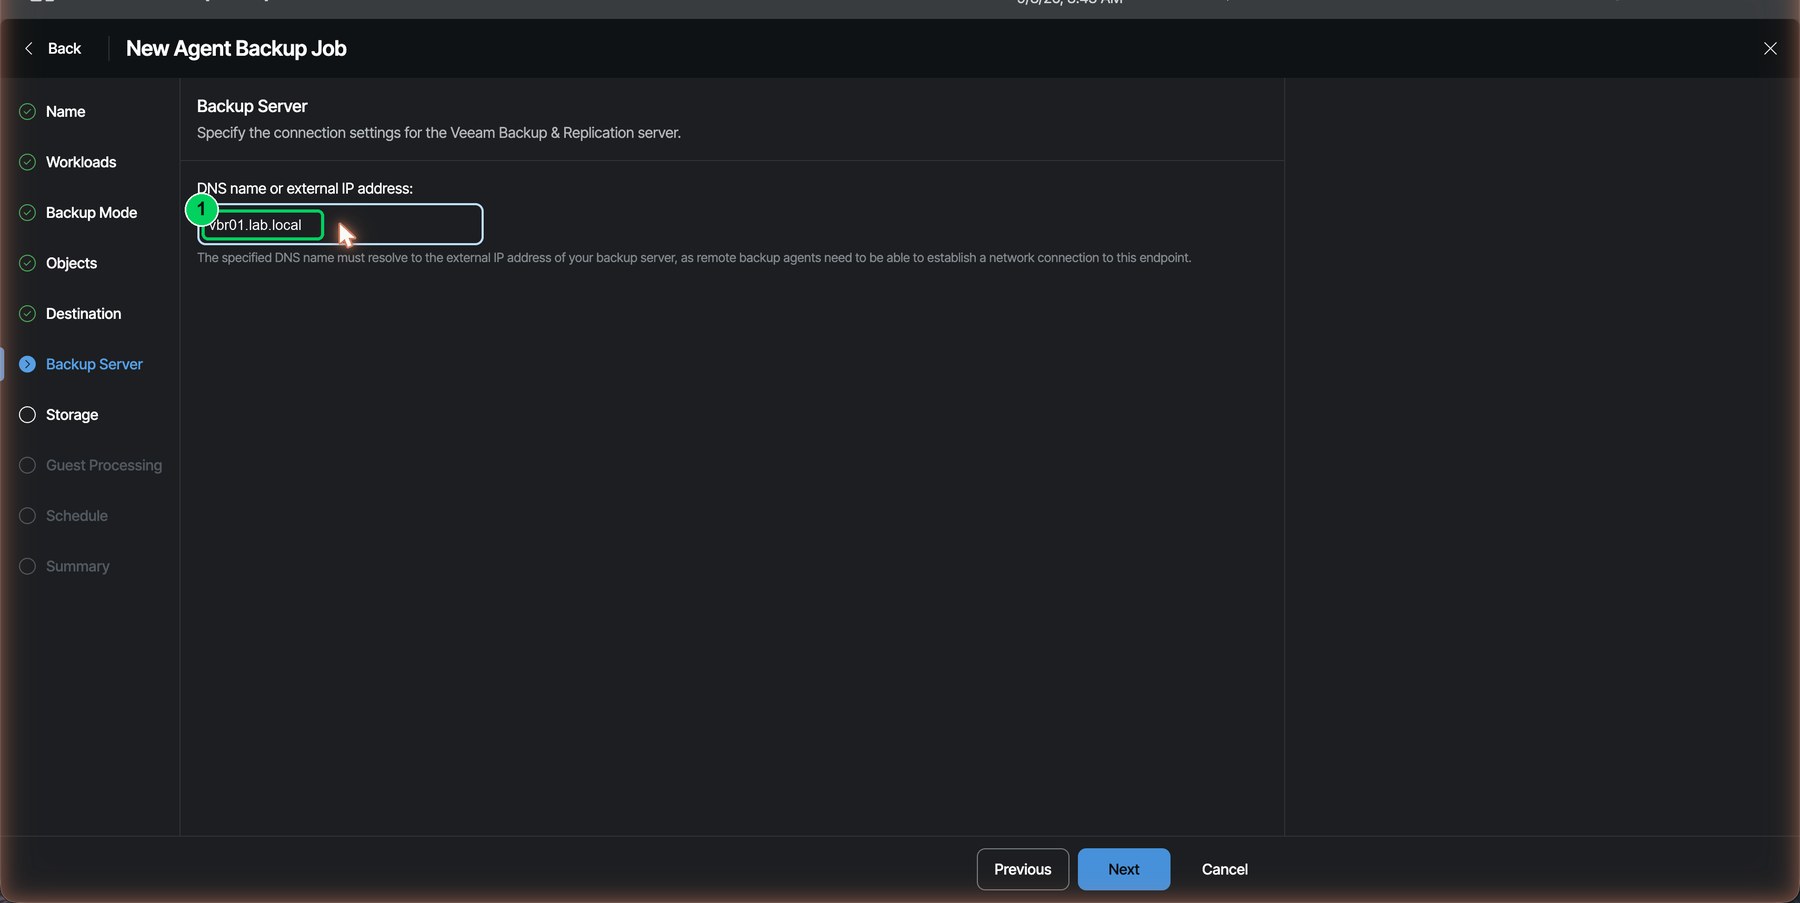
Figure 11. Backup server: the DNS name the agent will use to reach VBR.
Scripts: two lines on the backup server
Here is the one piece of plumbing that surprised me and is worth understanding. For an agent policy, VBR does not run a script that already sits on the agent. It reads the script file from the backup server, hashes it, pushes it to the agent under /var/lib/veeam/scripts/<policy-id>/, and runs it there. So the file you point the policy at has to exist on the appliance, and it cannot carry arguments.
The clean way to satisfy that is a pair of two-line wrappers per policy that just select the right target list and hand off to the real script on the proxy. The real logic stays in the repo; the appliance is touched once, with content that never changes.
# /var/lib/veeam/scripts/pi-veeam-pre-pi-01.sh   (and a matching -post-)
#!/bin/bash
PI_VEEAM_TARGETS=/etc/pi-veeam/targets.d/pi-01 exec /usr/local/sbin/pi-job-pre.sh
Getting those two files onto the appliance is the only step outside the web console. Two options: add the proxy as a managed Linux server (Managed Servers → Add → Linux, with every optional component cleared) and use the console's Files view to copy the files from the proxy to the backup server; or just scp them. I show the console route below because it keeps the whole build inside Veeam tooling.
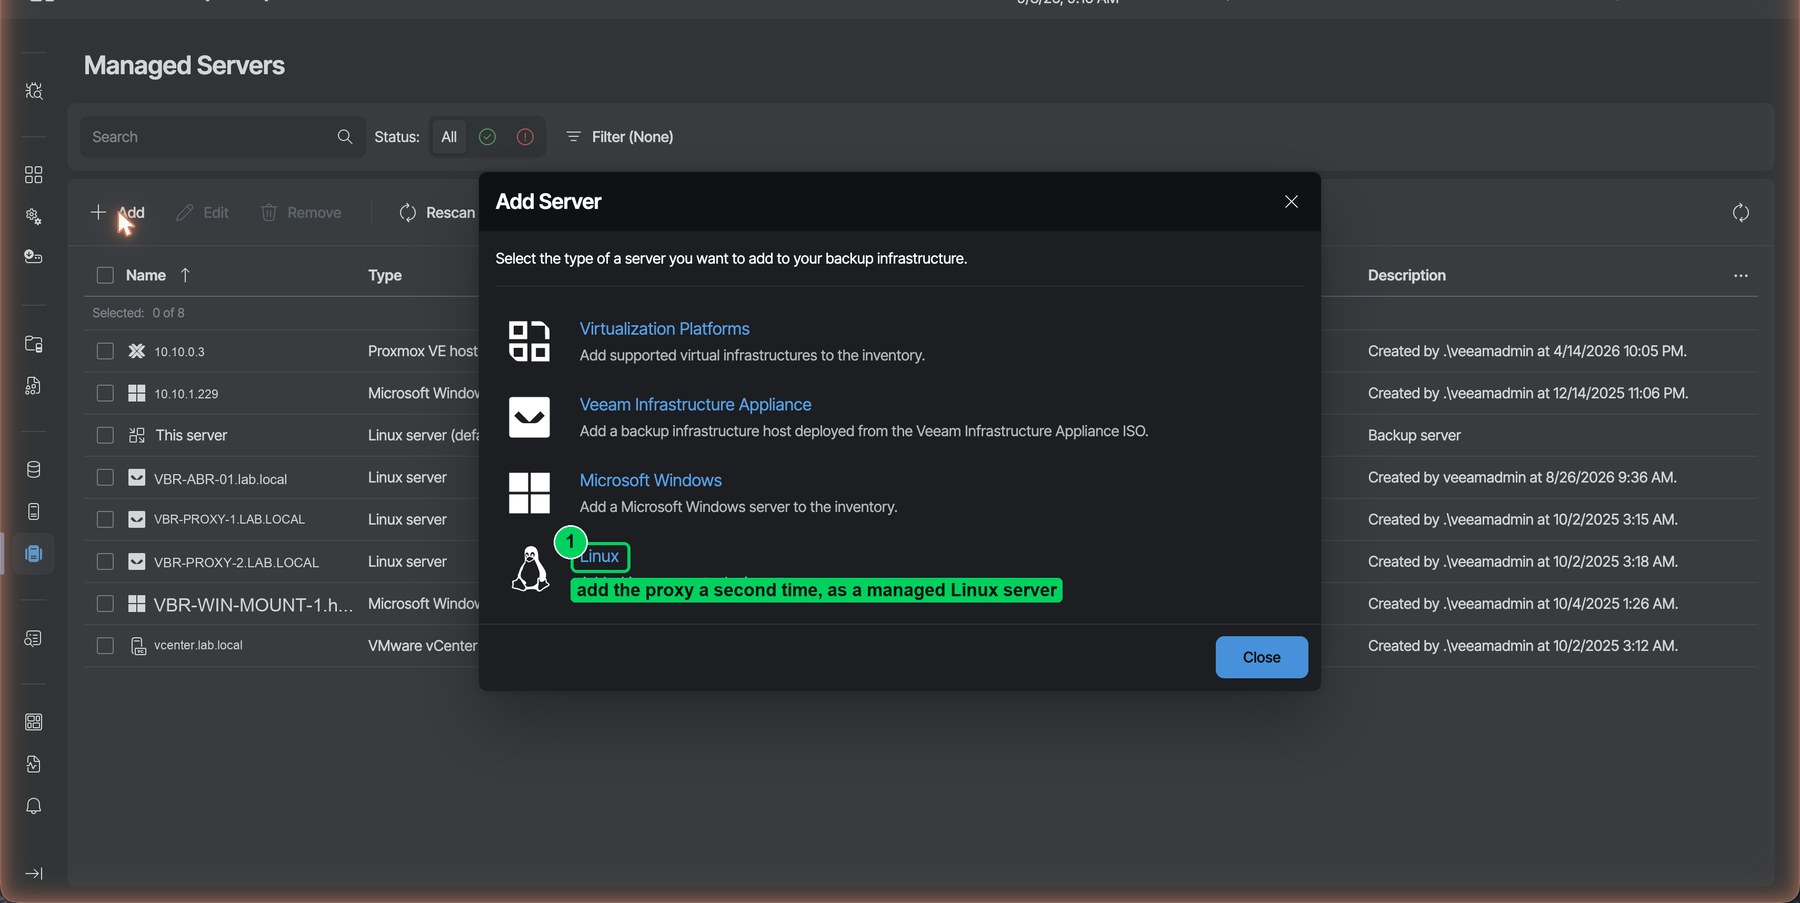
Figure 12. Managed Servers → Add → Linux. Adding the proxy as a managed server makes it visible in the console's Files view.
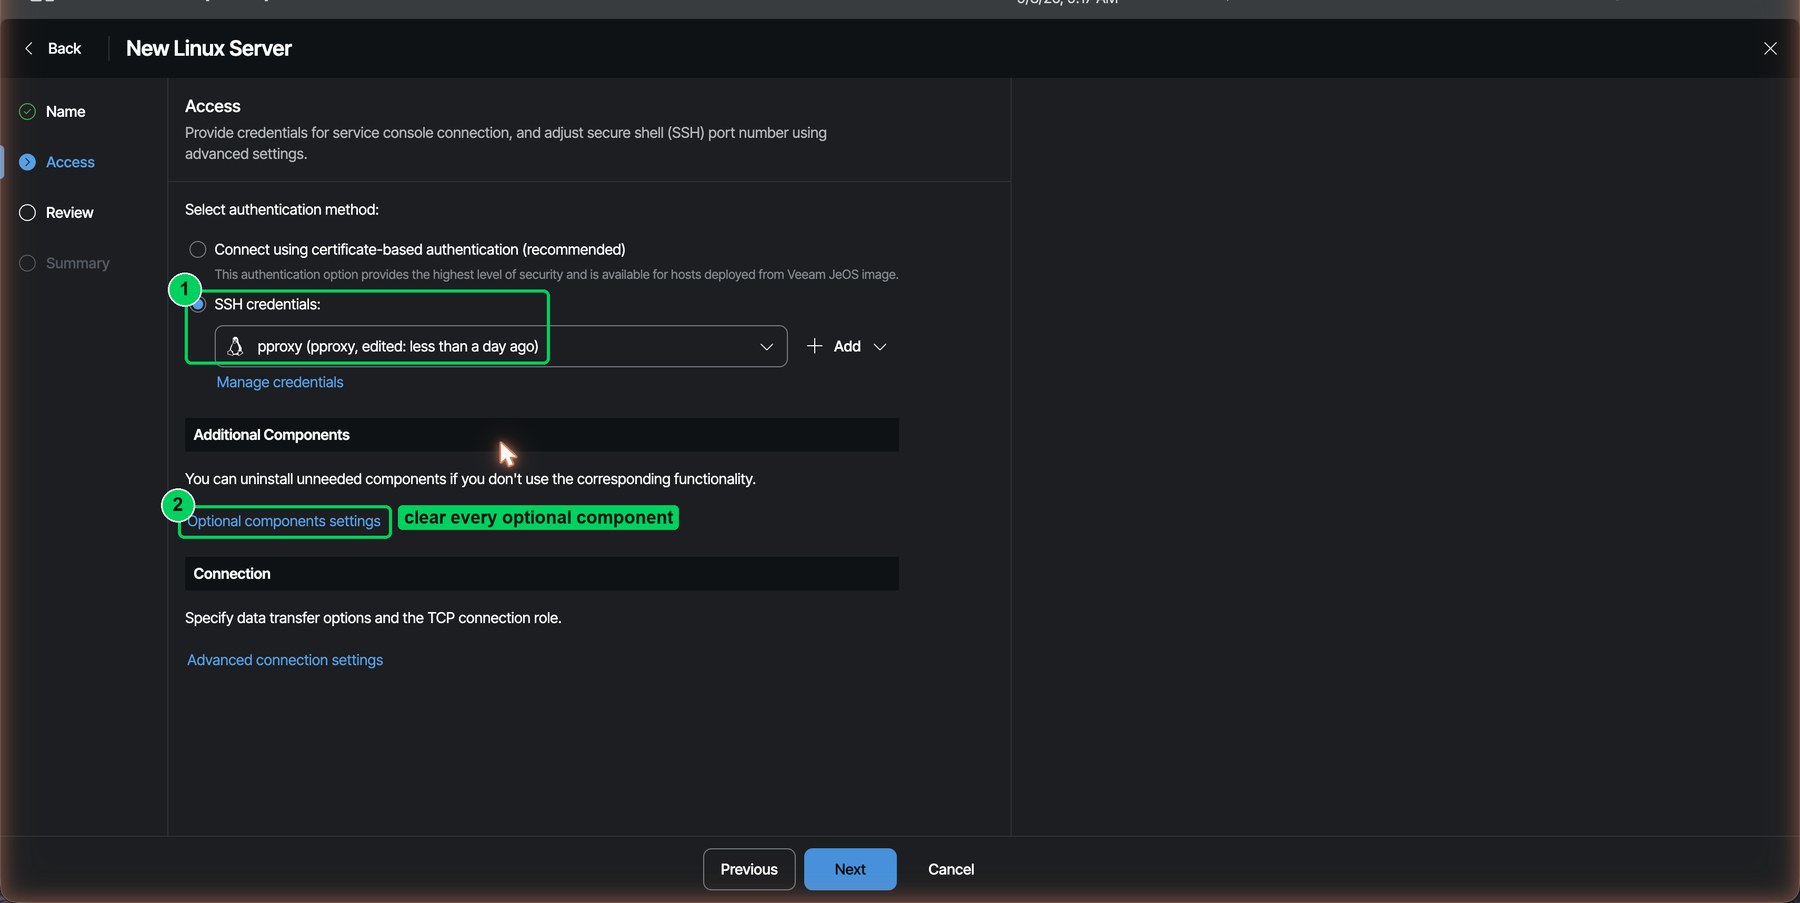
Figure 13. Same SSH credential. Open Optional components settings and clear every optional component.
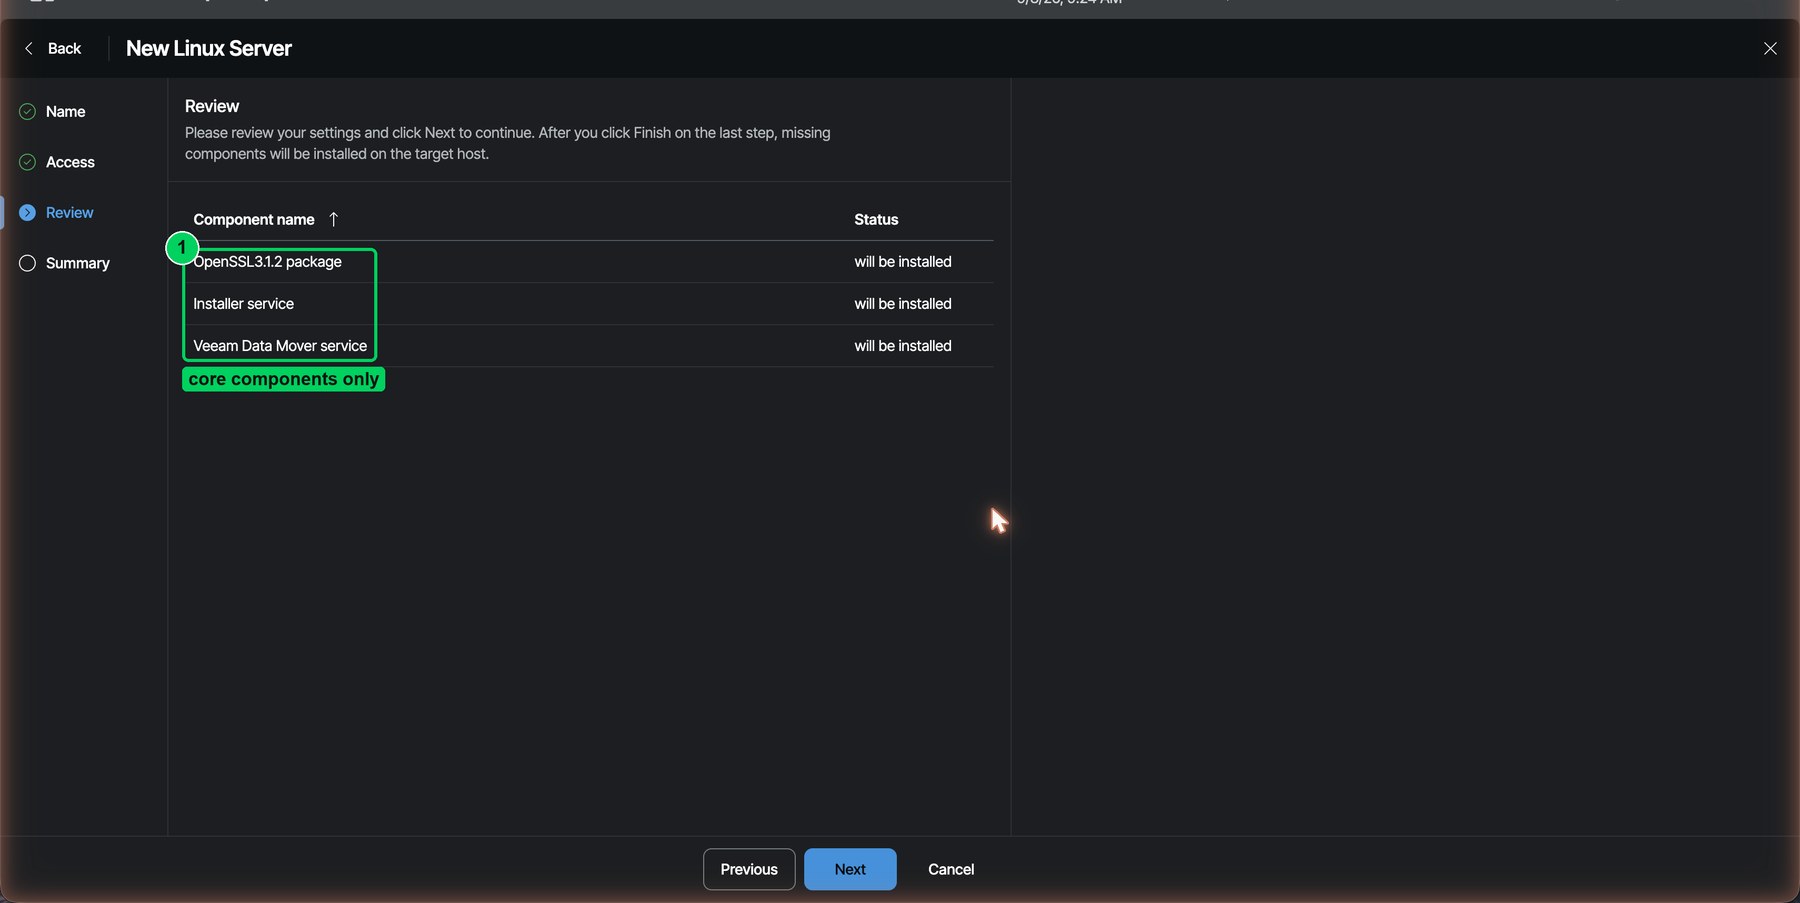
Figure 14. Review: only OpenSSL, the installer service and the Data Mover will be installed.
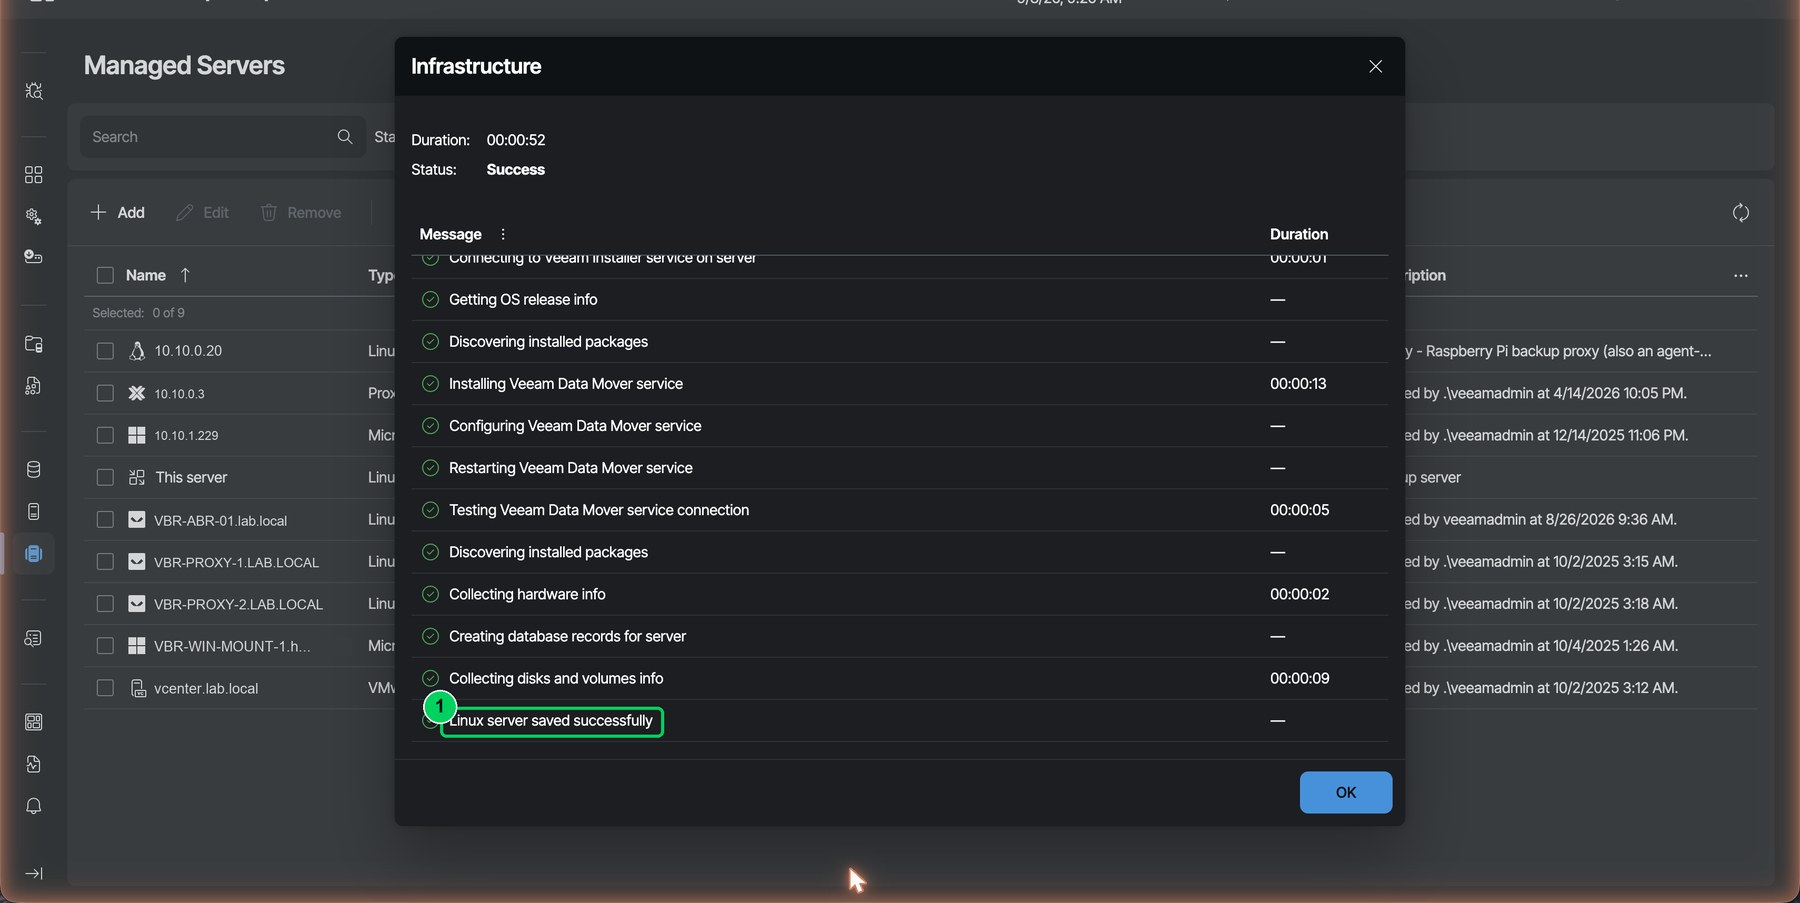
Figure 15. "Linux server saved successfully." The proxy now has both roles: agent host and managed server.
Then, in the policy: Guest Processing → enable application-aware processing → Customize → select the proxy → Application Settings → Scripts. Tick "Enable script execution" and set the two job scripts to the wrapper paths on the backup server.
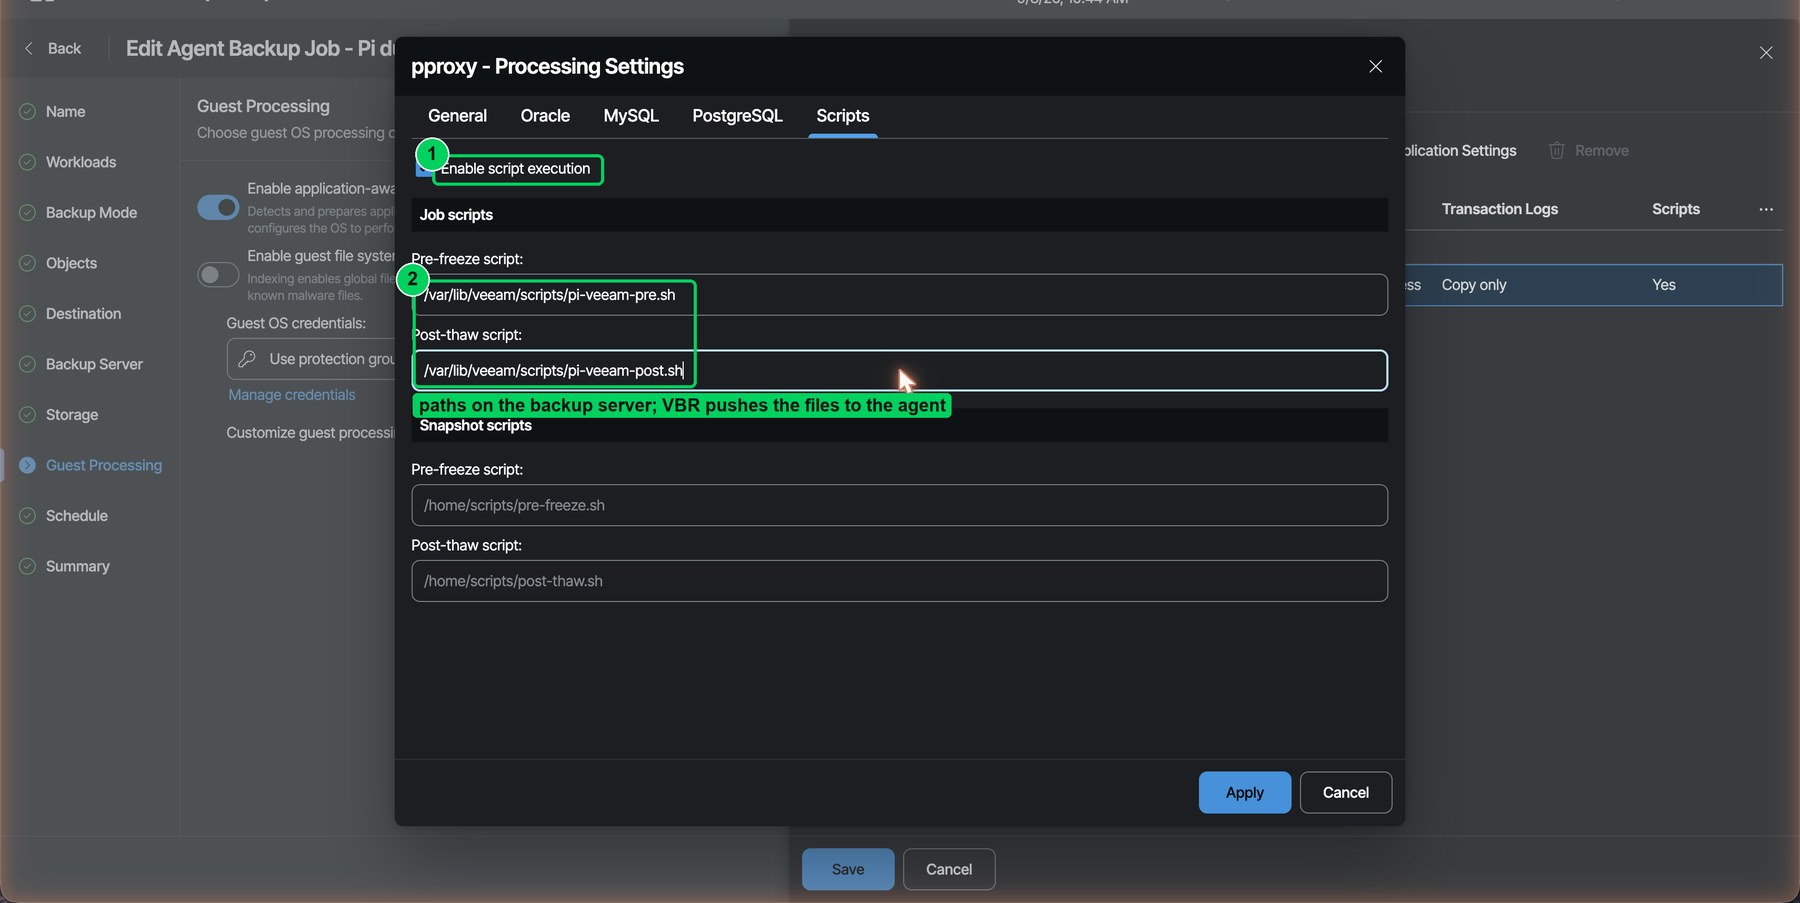
Figure 16. Job scripts point at the wrapper files on the backup server. The web console labels the pair pre-freeze/post-thaw; the thick client calls them pre-job/post-job, which is what they are.
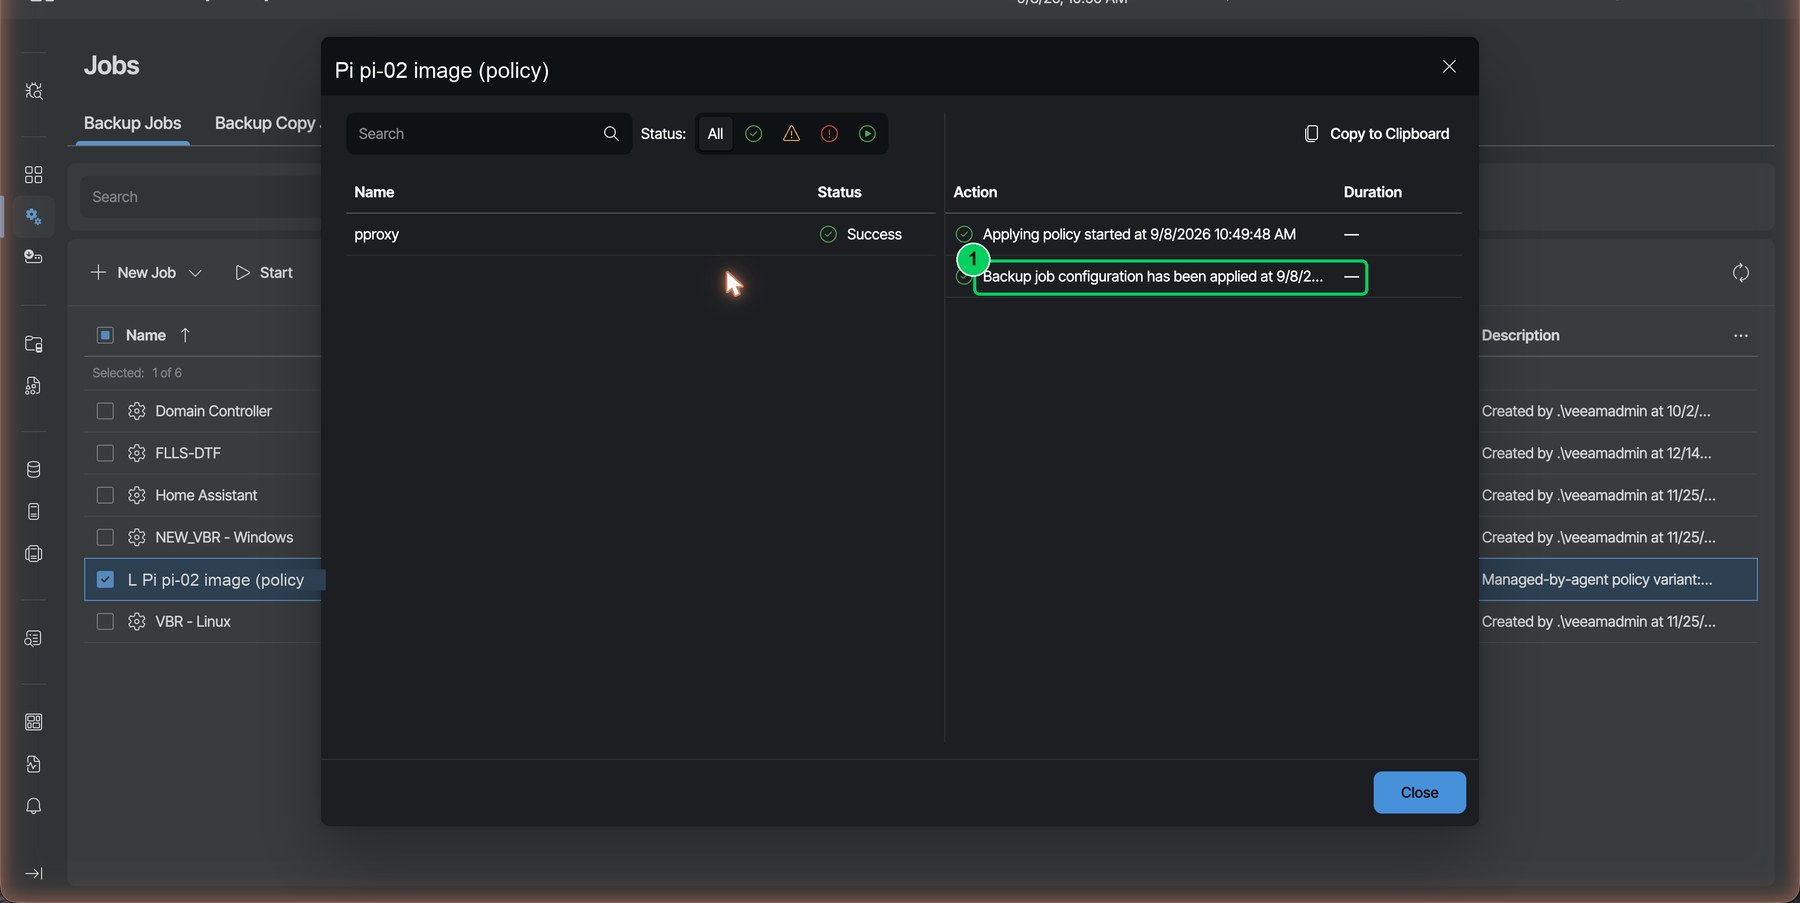
Figure 17. Apply Configuration. VBR hashes and pushes the wrappers to the agent and validates the device object.
Part 4 · First run and results
Start the policy from the Jobs view and watch the session under Logs & Events. The pre-job script reports success within a few seconds (the Pi snapshot itself takes well under a second; most of the time is the iSCSI re-login), then the agent takes its own snapshot of the image device and reads the allocated blocks.
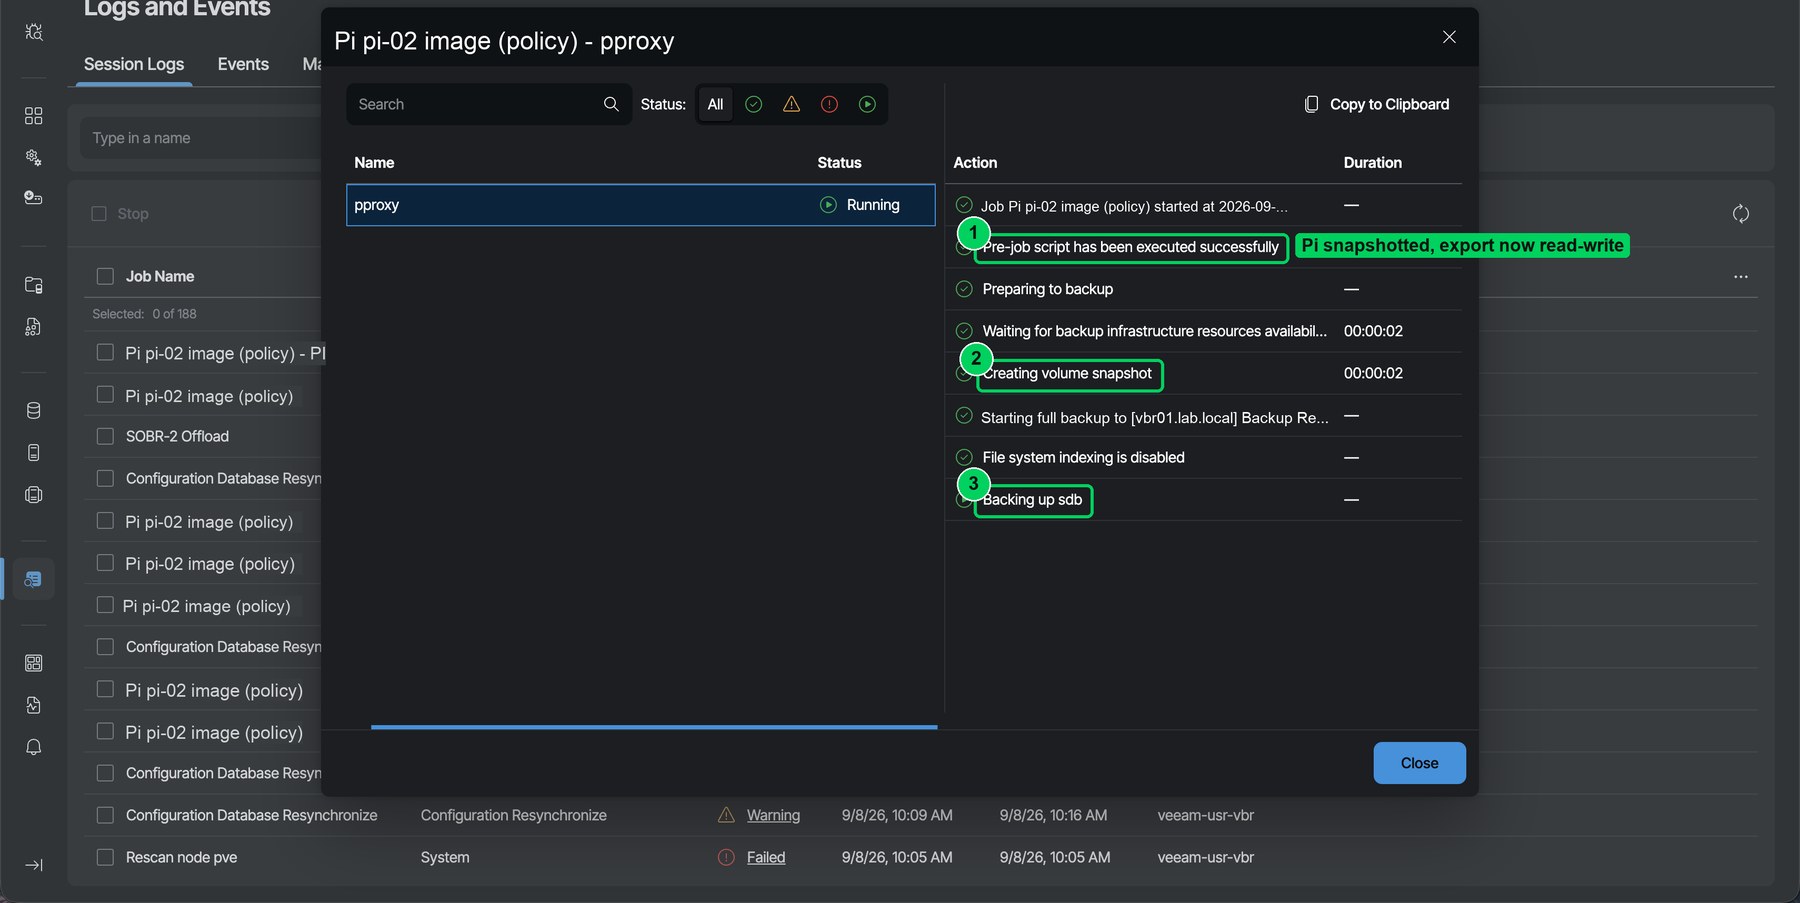
Figure 18. An unattended policy run. Pre-job script executed, volume snapshot created, "Backing up sdb" reads the Pi image at the SD card's native speed.
With two Pis each in their own policy, the Jobs view shows two Linux agent policies for the same host and the Backups view shows two independent chains. That is the layout I recommend: it gives each Pi its own schedule, retention and restore points, with one proxy and one license instance.
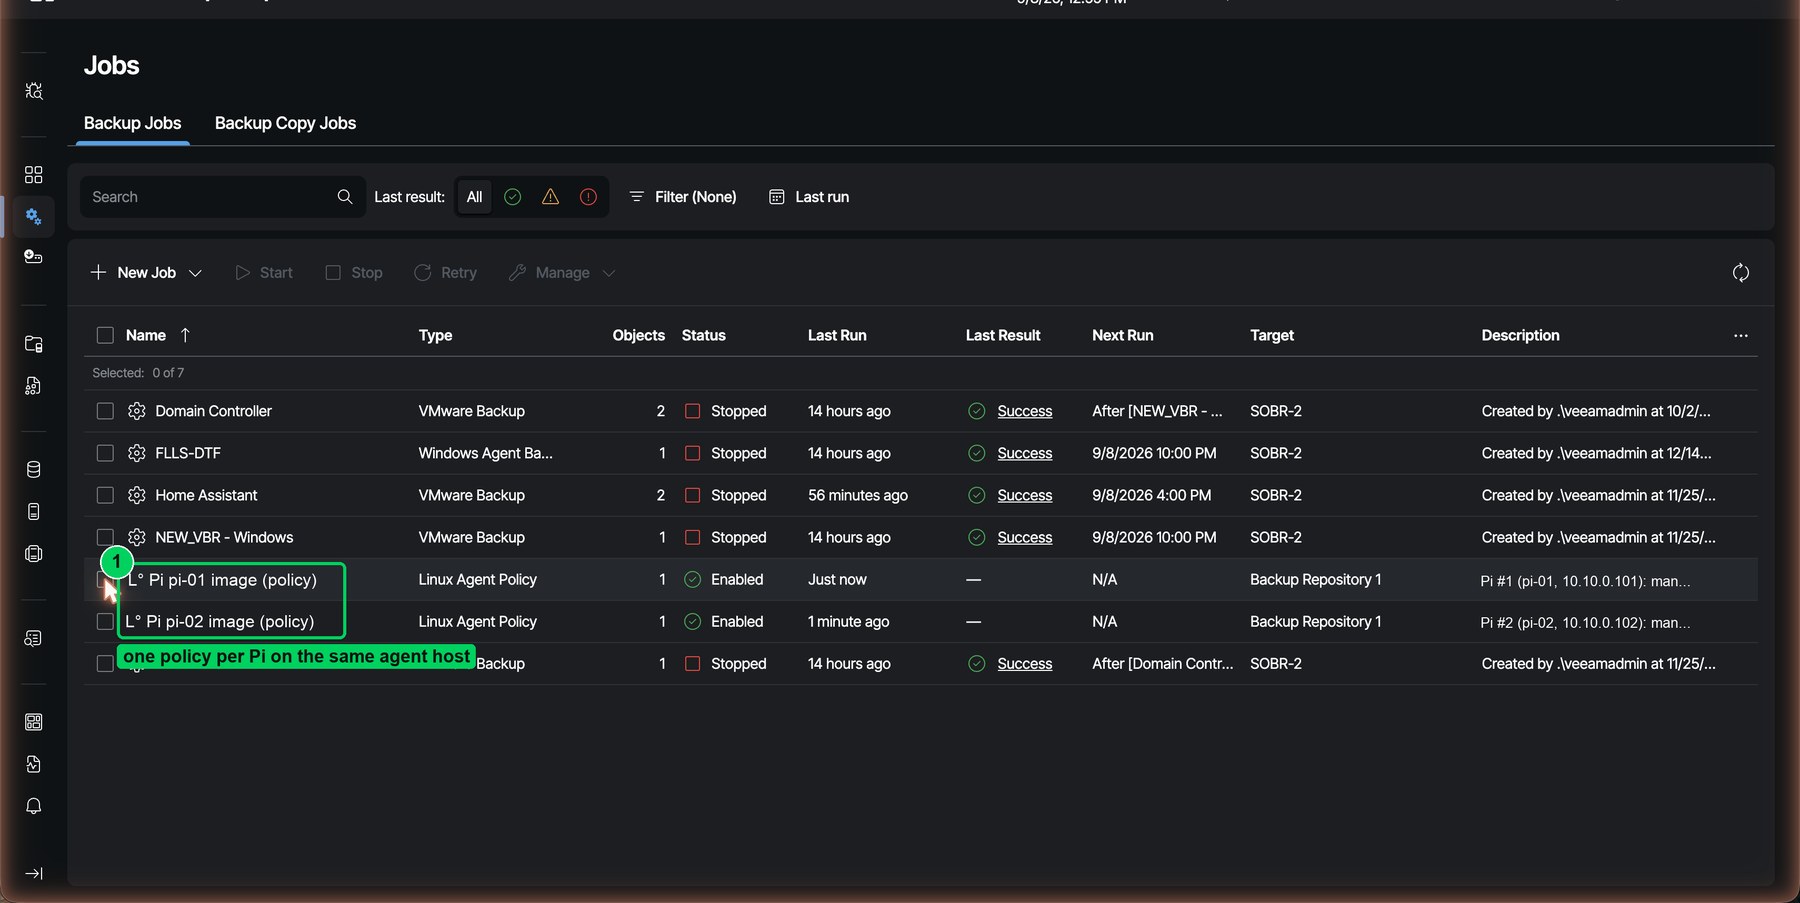
Figure 19. Jobs: one policy per Pi. VBR allows a machine in one server job, but in several agent policies.
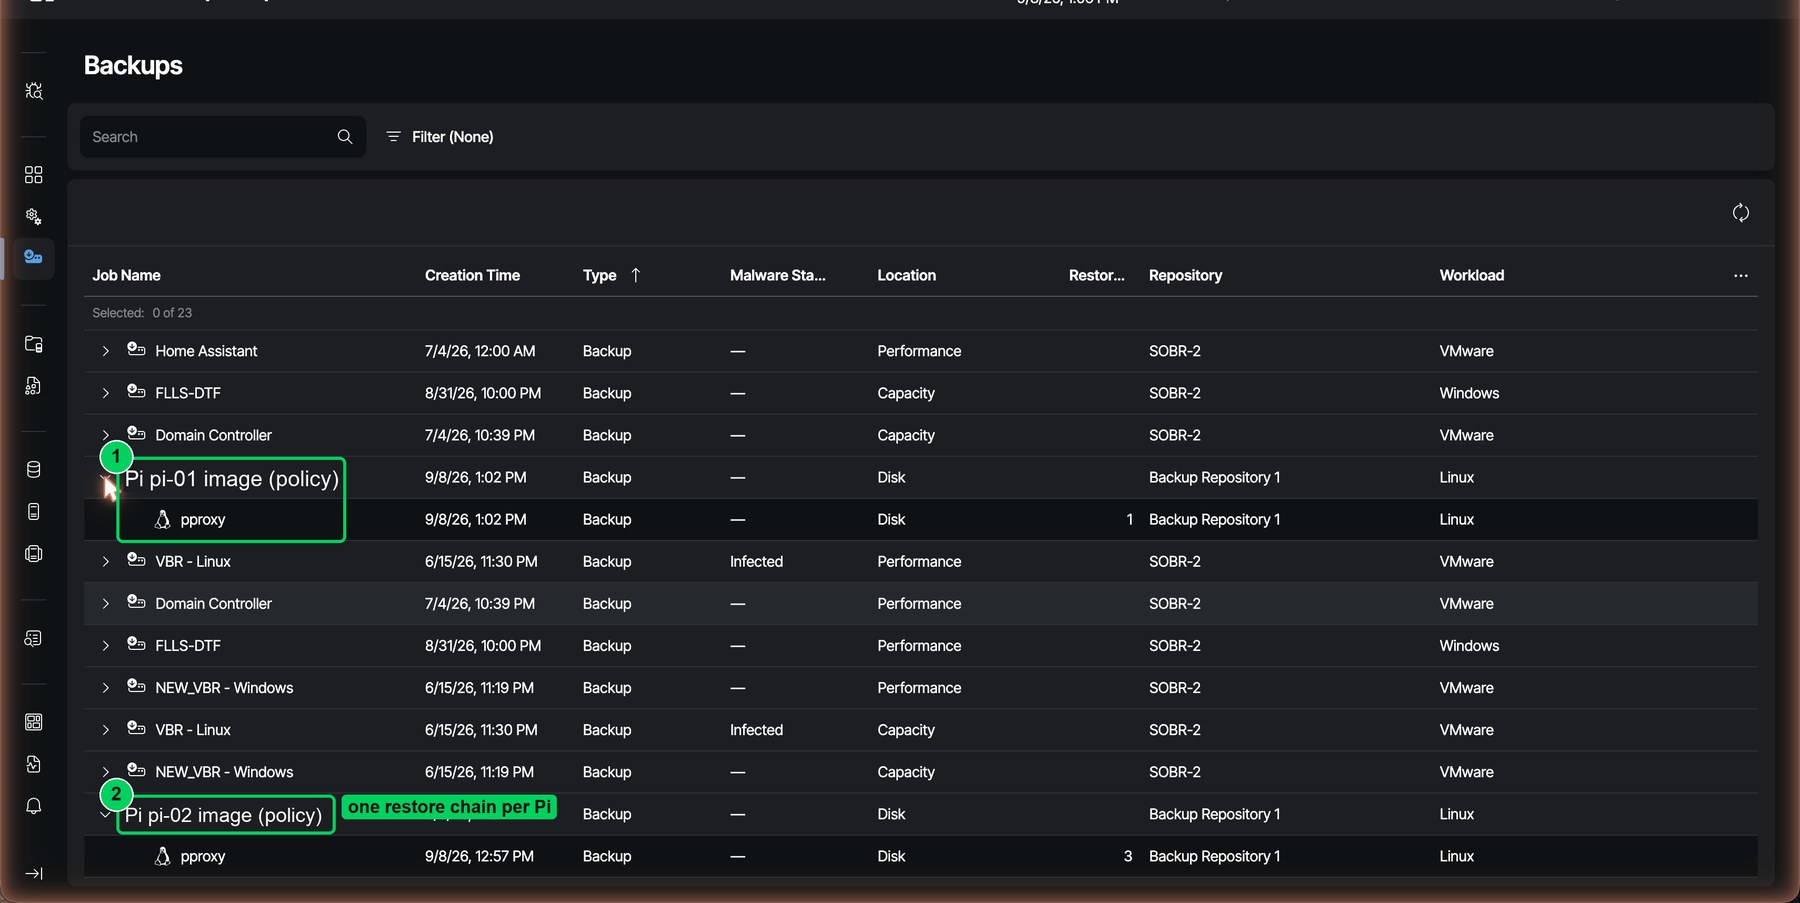
Figure 20. Backups: one chain per Pi, named after its policy, with the proxy as the workload.
Both Pis backed up back-to-back, each run isolated to its own Pi, at 42 to 43 MB/s, which is exactly what a class-10 microSD card delivers locally. VBR reports the bottleneck as "Source" every time. The proxy, the network and the repository are never the limit.
Part 5 · Restore, including bare metal
File-level restore
Because the Pi's disk carries a real partition table and real filesystems at every stage, a restore point looks like any Linux volume backup. Restore Guest Files mounts the root filesystem in the browser; pick the files and download or restore.
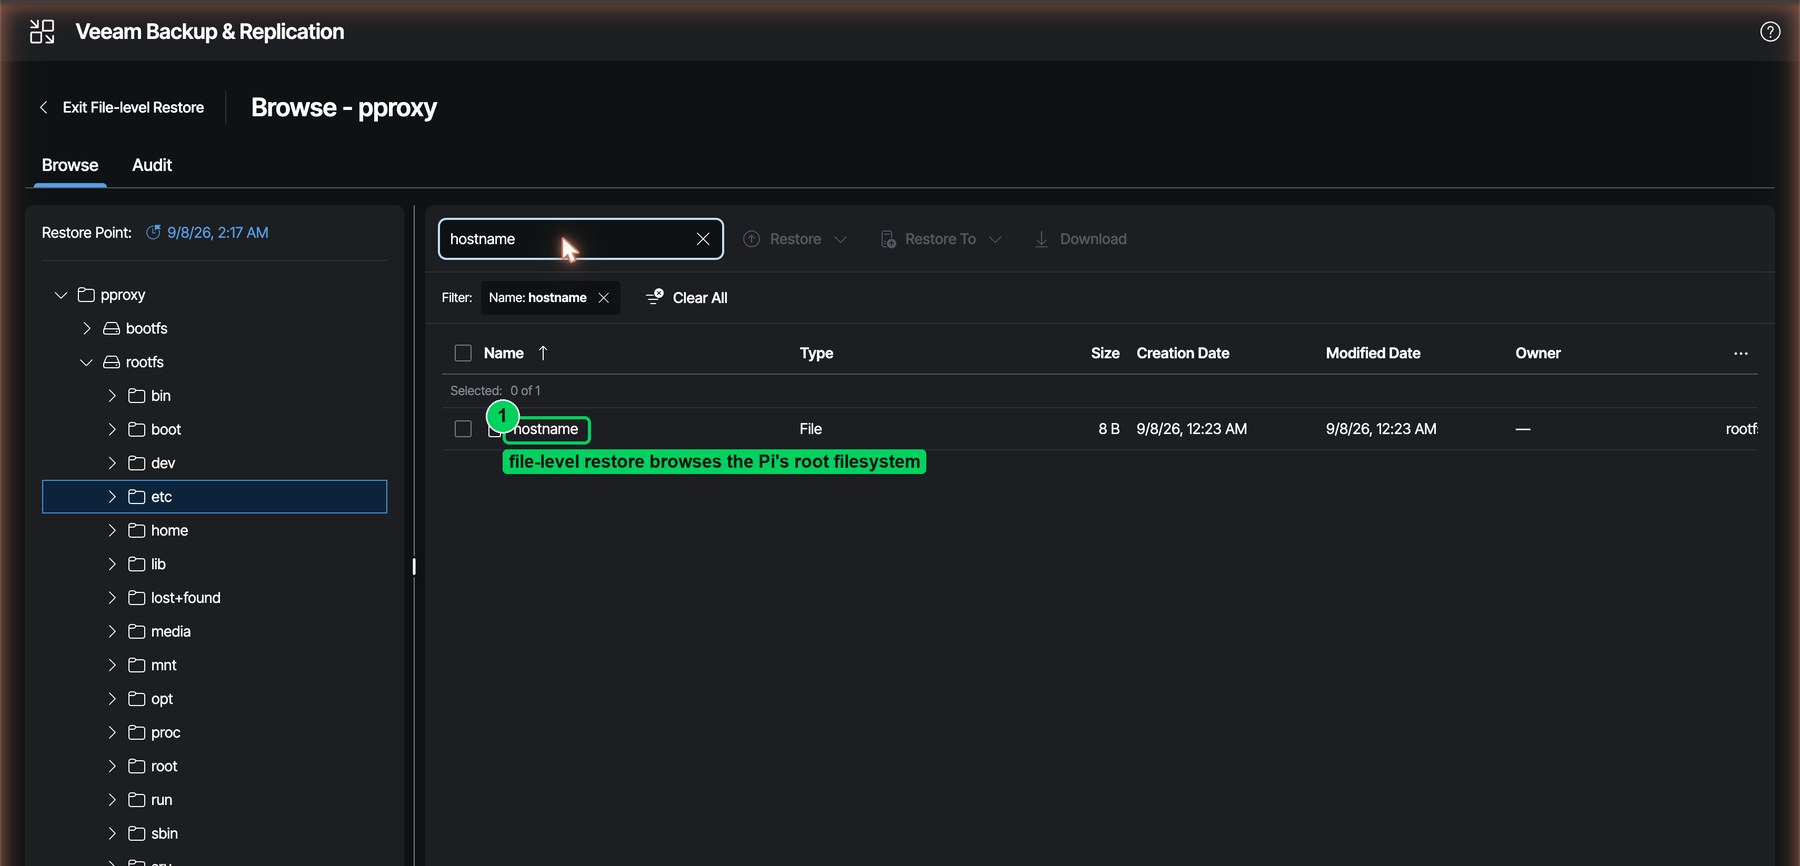
Figure 21. File-level restore of a Pi restore point: bootfs and rootfs, browsable like any other Linux agent backup.
Bare-metal restore to a new card
This is the test that matters, and it worked on the first boot. The path is Publish Disks in the web console, a small amount of shell on the proxy to turn the published partitions back into a bootable card image, and a card writer.
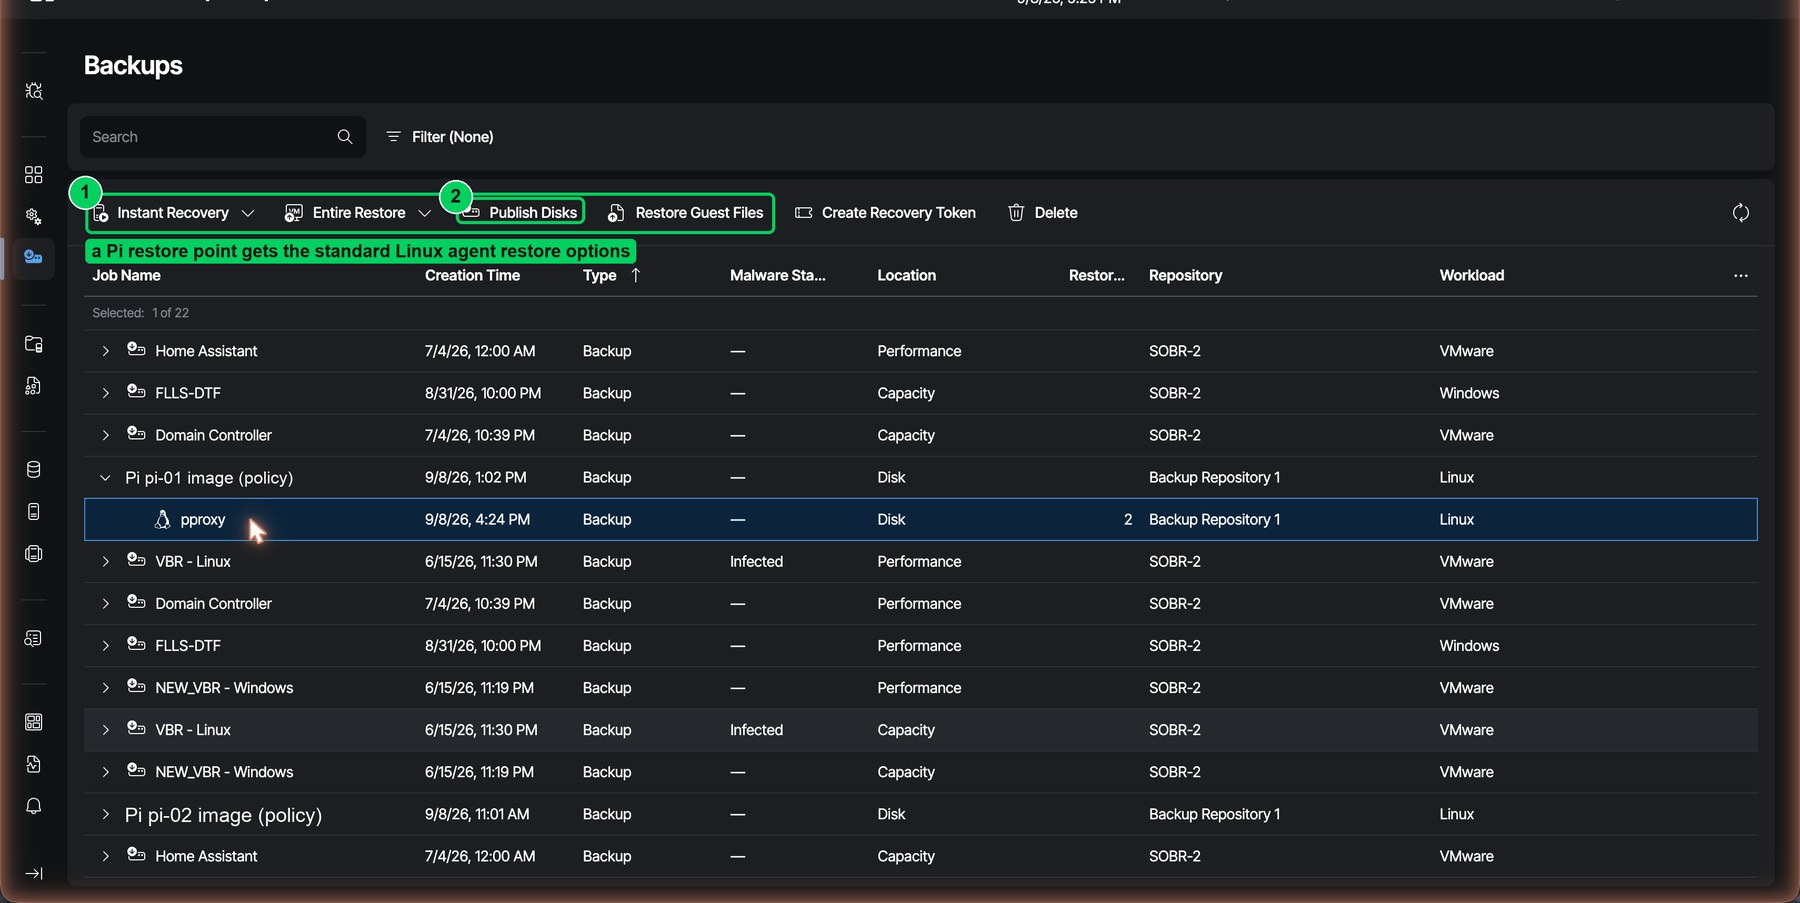
Figure 22. Select the restore point under the Pi's policy. Publish Disks is the one for a whole-card image.
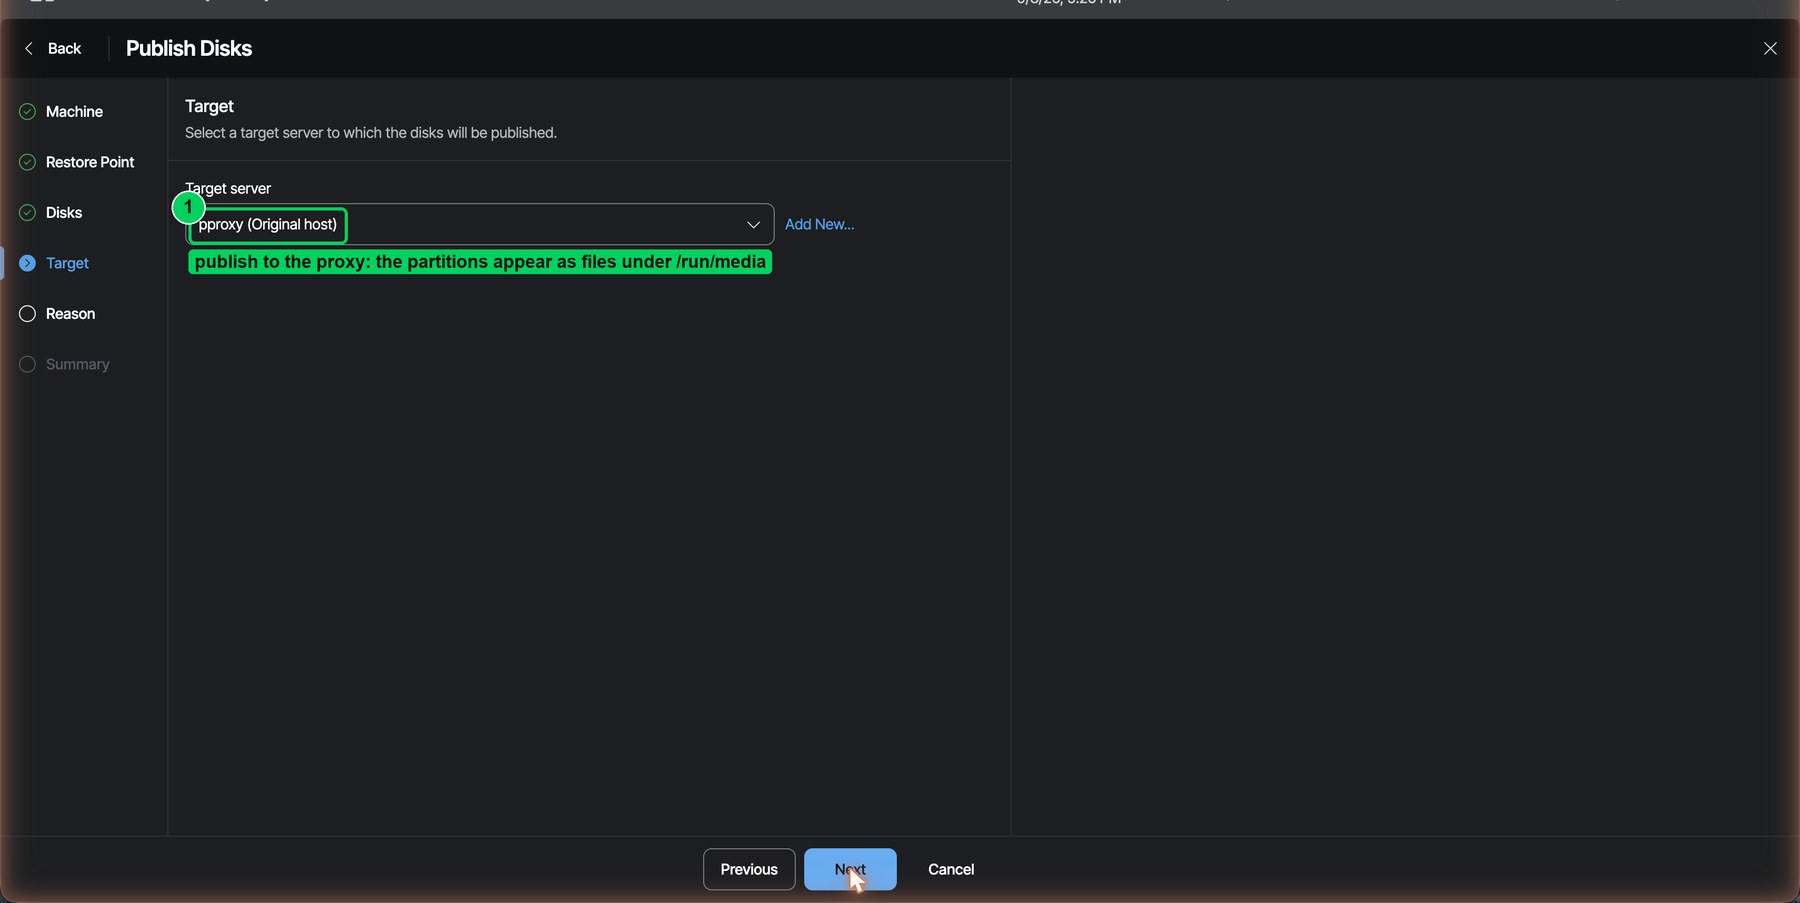
Figure 23. Publish Disks: machine → restore point → Disk 0 → target server. Publish to the proxy itself.
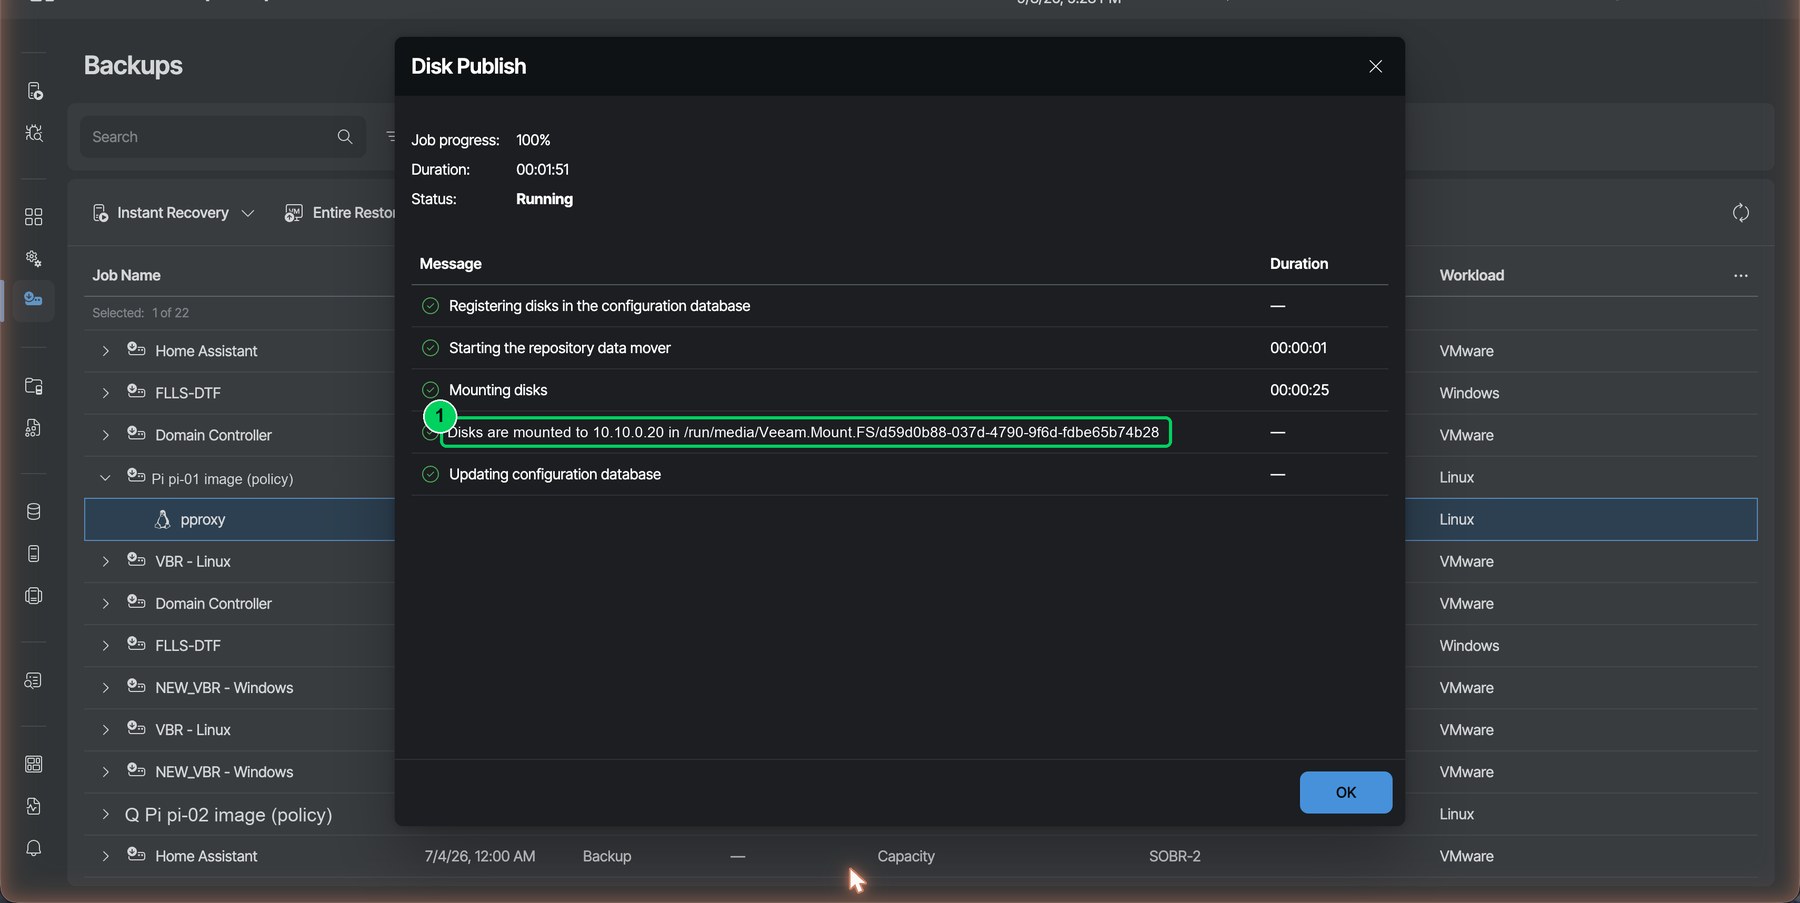
Figure 24. About two minutes later the disk is mounted on the proxy. The partitions appear as files under /run/media/Veeam.Mount.Disks/<session>/.
Publish Disks hands you the partitions, not a whole disk with an MBR. That is fine for a Raspberry Pi as long as you rebuild the partition table with the original disk identifier, because Raspberry Pi OS boots by PARTUUID=<disk-id>-02 in cmdline.txt and fstab. Save one sfdisk -d /dev/mmcblk0 dump per Pi with your documentation; the rebuild script reads everything it needs from it.
# on pproxy, as root, after Publish Disks
pi-rebuild-image.sh /run/media/Veeam.Mount.Disks/<session> sfdisk-pi-01.txt /var/tmp/pi-01.img
#   truncate to the original size → sfdisk the saved table (same label-id) → dd each partition file
#   to its original byte offset with conv=sparse.  53 seconds for a 32 GB card, 9.3 GB allocated.

# "32 GB" cards are not all the same size (mine was 711 MB smaller). Shrink to fit the new card:
pi-fit-image.sh /var/tmp/pi-01.img 61132800 sfdisk-pi-01.txt     # card size in 512-byte sectors
#   e2fsck -fy (replays the journal) → resize2fs → sfdisk with the shorter partition 2 → truncate

pigz -6 -k /var/tmp/pi-01.img                                     # 2.4 GB .img.gz, 84 s
e2fsprogs version. Debian 13 formats ext4 with the
orphan_filefeature. Rocky 9 ships e2fsprogs 1.46, which does not understand it; build 1.47.2 from kernel.org into/opt/e2fsprogson the proxy (about two minutes) and the fit script uses it automatically.
The .img.gz is exactly what Raspberry Pi Imager consumes, or write it from a laptop:
diskutil unmountDisk /dev/disk8      # macOS; use lsblk + umount on Linux
gunzip -c pi-01.img.gz | sudo dd of=/dev/rdisk8 bs=4m status=progress && sync
Card in the Pi, power on. Here is the restored Pi one minute later. The new card reports 61,132,800 sectors (the original was 62,521,344), the root filesystem is clean at its new size, every service is up, and the FlightAware feeder re-registered with the same site and feeder ID.
pi@pi-01:~ $ uptime -p; sudo fdisk -l /dev/mmcblk0 | grep -E 'sectors$|^/dev'; df -h / | tail -1
up 3 minutes
Disk /dev/mmcblk0: 29.15 GiB, 31299993600 bytes, 61132800 sectors
/dev/mmcblk0p1       16384  1064959  1048576  512M  c W95 FAT32 (LBA)
/dev/mmcblk0p2     1064960 61132799 60067840 28.6G 83 Linux
/dev/mmcblk0p2   29G  7.7G   20G  29% /
pi@pi-01:~ $ systemctl is-active dump1090-fa dump978-fa piaware fr24feed adsbexchange-feed | tr '\n' ' '
active active active active active
pi@pi-01:~ $ sudo journalctl -b -o cat | grep 'EXT4-fs (mmcblk0p2)'
EXT4-fs (mmcblk0p2): orphan cleanup on readonly fs
EXT4-fs (mmcblk0p2): mounted filesystem d6944274-… ro with ordered data mode. Quota mode: none.
EXT4-fs (mmcblk0p2): re-mounted d6944274-… r/w.
| Restore step | Where | Time |
|---|---|---|
| Publish Disks (register, data mover, mount) | web console → proxy | 1 min 46 s |
| Rebuild whole-disk sparse image | proxy | 53 s |
| Fit to the new card (fsck, resize2fs, table, truncate) | proxy | 5 s |
| Compress and copy to the laptop | proxy → LAN | ~3 min |
| Write the microSD (USB reader) | laptop | 35 min 38 s at 14.6 MB/s |
| Boot, services re-register | Pi | ~1 min |
Restore point to running Pi in about 45 minutes, and 36 of those are the card writer. Veeam's part is under ten.
Scaling to more Pis
Adding a Pi is five steps, three of them one-liners: run install.sh on the Pi, run pi-add-target.sh on the proxy and write its targets.d file, copy its two wrappers to the backup server, create the policy with /dev/pi/<name> as the object and those wrappers as scripts, Apply Configuration. Stagger the schedules; the agent processes one job at a time, and each 32 GB card takes about four and a half minutes.
Two things to check when you add a Pi. Every Raspberry Pi OS card carries the labels bootfs and rootfs, so in file-level restore pick by disk, not by label. And the agent identifies a disk by its MBR signature: cards cloned from the same image can carry the same identifier. Raspberry Pi OS regenerates it at first boot, so this is rare, but if two collide, change one with fdisk and update the PARTUUID references in cmdline.txt and fstab.
Performance numbers
All from this lab: Pi 4 Model B, 32 GB class-10 microSD, Rocky 9 proxy VM, v13 Software Appliance with a local repository.
| Path | Rate | Note |
|---|---|---|
| SD card, sequential read on the Pi | 44 MB/s | the ceiling for everything below |
| Pi on 2.4 GHz Wi-Fi → proxy over iSCSI | 3.3 MB/s | a 32 GB card takes ~2.5 h; use Ethernet |
| Pi on Ethernet → proxy over iSCSI | 40–57 MB/s | the card is the bottleneck, not the network |
| Veeam policy run, one Pi, Ethernet | 9 GB read at 42.5 MB/s, ~4.5 min | agent reads allocated blocks only (9 of 32 GB) |
| Two Pis, back-to-back policies | 9 GB each, 8 min 17 s total | disks are read sequentially |
| Publish Disks read on the proxy | ~175 MB/s | 9.3 GB image rebuilt in 53 s |
| microSD write from a laptop | 14.6 MB/s | the slowest step of a restore |
Why it is built this way
Persistent, read-only export. The agent checks a policy's device objects at apply time and at job start, before any script runs. So the Pi keeps its target up permanently, but read-only over the live partitions. Only during a job does the image switch to frozen snapshots and become writable, and even then writes land in the Pi's RAM, never on the card.
Policies, not server jobs. Server-job scripts run on the backup server. Agent-policy pre-job and post-job scripts run on the agent, before enumeration and after the read. That is the contract these hooks need, and it also lets one proxy carry one policy per Pi.
Real filesystems at every stage. The exported image always has a real MBR and mountable partitions, whether it is showing the live card or a snapshot. That is what keeps the agent's used-block detection working (9 GB read instead of 32) and makes file-level restore possible.
Full agent, kernel module, Secure Boot kept on. The proxy runs the same agent build you would install anywhere else, with Veeam's signed module and Veeam's UEFI certificate enrolled. Nothing on the proxy is patched or unsigned.
Or let Claude Code do the install
Everything on the Linux side of this build is reproducible from the repository, which makes it a good fit for an AI coding agent. The repo ships a ready-made prompt, DEPLOY-WITH-CLAUDE.md, for Claude Code. Clone the repo, open it in Claude Code, paste the prompt, and it will:
- ask you for the proxy's and each Pi's address, name and SSH user, and check that the addresses are static;
- test SSH to every host and help you fix what is missing (it hands you the
ssh-copy-idcommand to run yourself; it never handles your passwords); - install the proxy side, create the proxy's key for reaching the Pis and install it on each of them;
- run
install.shon each Pi, one at a time, and verify the read-only export before moving on; - register every Pi on the proxy, generate its wrapper pair, and dry-run the pre/post hooks so you see the snapshot appear and disappear;
- hand you the wrapper files for the backup server, then walk you through the web console steps above one at a time, checking the session log with you on the first run;
- save each Pi's
sfdisk -ddump into the repo so a bare-metal restore has what it needs.
# the whole thing, from a laptop
git clone https://github.com/bobby-barber/pi-veeam-proxy.git && cd pi-veeam-proxy && claude
# then paste the prompt from DEPLOY-WITH-CLAUDE.md
The prompt is deliberately conservative: it shows every remote command before running it, asks before anything hard to reverse, never writes to a Pi's card, and stops at the two things only a human can do, which are typing passwords and pressing the Secure Boot enrollment keys at the proxy's console.
Wrap-up
Is this something Veeam supports? No, and I would not put it in front of a customer as a product feature. Is it something I now run for my own Pis, with a nightly schedule, normal retention, and a restore I have actually tested to a new card? Yes. The heavy lifting, consistent snapshots, incremental chains, retention, file-level restore, disk publishing, all of it is stock Veeam Backup & Replication. The Pi side is a kernel module Veeam already publishes as open source, plus a few hundred lines of shell.
If you have Raspberry Pis doing real work somewhere, give it a try in a lab first. The scripts, the ARM64 patch, the systemd units and the restore tooling are in the repository below, along with the full build log this article was distilled from.
Repository: https://github.com/bobby-barber/pi-veeam-proxy · Pi installer and export script · proxy hooks and udev rule · image rebuild and fit scripts · design notes and command reference.