All-Demo Session & Installable ISO for Veeam Hardened Repository

All-Demo Session & Installable ISO for Veeam Hardened Repository
Userlevel 7
Badge +10


22-February 2024 Update:  GOOD NEWS! We are scheming a big update and overhaul of this page at or around VeeamON time. I can’t say more!


During the lead-up to VeeamON, it was amazing to see what content was leading the pre-registration information. We have the most data here than ever before. Constantly back and forth with the “Architecting Veeam Backup for Microsoft 365 at Scale” session, the session that @hannesk, Christoph Meyer and I are delivering was racing to the finish line as the leader. The “All Demo Session for Veeam Hardened Repository” was in the end the most popular pre-registered session, and as promised in the delivery in Miami, here is your everything you need to know guide.

Post Publish Updates:

  • 1-June 2023:  The installation requirements for the .ISO have been added.
  • 1-June 2023:  Video of installation of the .ISO has been added.
  • 2-June 2023:  Clarification on support, formatting of document.
  • 5-June 2023:  Updated .ISO with support banner and logon screen update, link updated. No changes to Ubuntu configuration or hardening script.
  • 29-June 2023: Updated .ISO with one enhancement, offline installation works.

Recording Resources

You can watch one of my practice runs of the session from Miami here:

At the VeeamON virtual event experience, we will have the replay from Miami session up very soon. 

Markdown File & Write Up

I have made a markdown file with a lot of the key information ready, you can download it here: rickvanover/VeeamHardenedRepoHub (github.com) Additionally - you can download the Markdown file at the QR code below:
 

This link goes to the VHR Markdown file that I’ve written up.

If you are not doing Markdown or GitHub you can download this as a PDF at the bottom of the page.

Overall advice

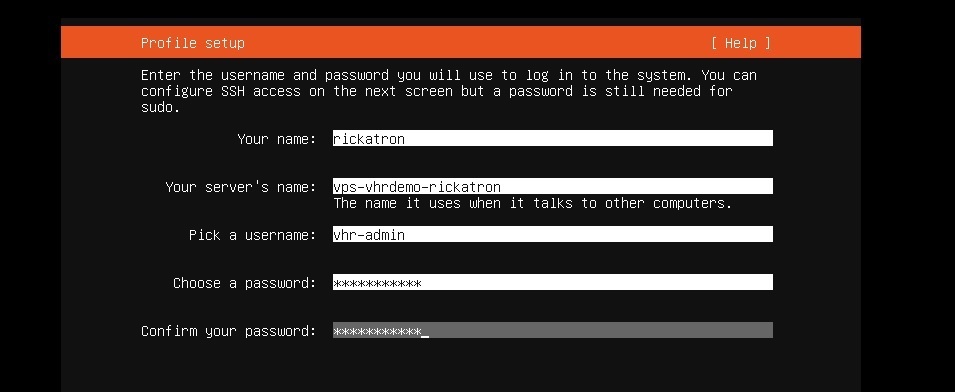
My overall advice on the Veeam Hardened Repository is to plan your deployment, this will greatly improve your experience with using the VHR. For example, I’m notorious for not documenting the options I put during the Ubuntu installation at this important stage:
 

Installable .ISO & Hardening Script

Key Update 18-December 2023: We have taken down the link for the .ISO, there will be a  new one coming “Soon” :)! 

One of the key parts of the Miami experience is the update we had from Product Management on new functionality for the Veeam hardened repository, which includes the Hardening Script and the installable .ISO. I recommend watching the replay to hear from Hannes and Christop directly before using the script and .ISO. We recommend at least 100 GB for storage. You can get both below:

  • Hardening Script: https://www.veeam.com/sys507
  • Installable .ISO: )18-December 2023 - We’ve removed this download and a new one is coming “soon”!)

About this installable .ISO…. The principal benefit of the installable .ISO is that it sets up much of the installation pre-defined *and* applies the above linked hardening script. 

Installable .ISO Requirements

For the installable .ISO, we recommend you follow these prerequisites (mainly relevant if you try to install it in a VM for lab purposes):

  • This is now optional from the 29-June update:  Internet connection (HTTP to the Ubuntu update servers for automatic security updates)
  • 2 CPUs, 6 GB RAM
  • UEFI boot is required (BIOS does not work) UEFI secure boot strongly recommended
  • 1 disk with at least 100GB for the operating system (plus cache files)
  • 100GB is a hard requirement. If that’s too high, please give feedback below.
  • Then there should be at least one second disk that is larger 100GB for backup data that would be the Veeam repository

During the installation, follow the wizard and reboot after the installation finished. Then install the hardened repository role. The VHR final layout will have all disks are mounted to /mnt/backup<n>

Important: Reboot again (this second reboot locks down the whole system and you can only reboot / shutdown with sudo. there is no root / sudo anymore at this stage) - this is the result of the hardening.  Think of this result as taking a massive green pill that tells this system its role in life forever on is to be a VHR.

After reading all of this, you are now ready to watch my video of installing the VHR with the .ISO:


Installable .ISO General Information & Support Statement

  • It's a community project. please don't call Veeam support for use of the .ISO. Once a VHR is deployed and configured in Veeam Backup & Replication, it would be subject to support. 
  • Automatic updates are enabled.
  • The user does not have permissions to update manually.
  • We plan to add a note to the banner message where to find more information about the ISO installer.

Get Started with the Veeam Hardened Repository 

Getting started with the VHR doesn’t have to be overwhelming. Give it a try - and let us know how it goes in the comments below.


This topic has been closed for comments

199 comments

Userlevel 1
Badge

Another AHA! moment.  I took a look at the file structure (lsblk) and found that the deployment ended up on the internal SD Card (ISDM).  It really was out of space.  I had to go in to the BIOS and disable the ISDM.  Reinstalled and now I’m able to add the Repository.

Userlevel 7
Badge +14

That makes sense as the VHR gets installed on the smallest available volume. Good to see that you've found the issue.

Userlevel 5
Badge +2

Another AHA! moment.  I took a look at the file structure (lsblk) and found that the deployment ended up on the internal SD Card (ISDM).  It really was out of space.  I had to go in to the BIOS and disable the ISDM.  Reinstalled and now I’m able to add the Repository.

interesting… I believe we discussed SD cards during development and hoped that we found a way to ignore them… I might come back to you on this 

Userlevel 5
Badge +2

confirmed… we install on the smallest device no matter what. It’s noted as bug

Userlevel 7
Badge +20

Another AHA! moment.  I took a look at the file structure (lsblk) and found that the deployment ended up on the internal SD Card (ISDM).  It really was out of space.  I had to go in to the BIOS and disable the ISDM.  Reinstalled and now I’m able to add the Repository.

Glad to hear you figured it out and that they have noted it as a bug in doing so.

Userlevel 7
Badge +10

That is an important catch there @David Tate BIG → Thank you @HannesK for noting this. 

I wonder if we can put in logic to “ignore” removable media like that.

Userlevel 7
Badge +20

I wanted to ask if there was any thought for this project about automation - mainly for the screens that you do have to enter information or just click done can that we in an answer file or something that we can feed into the ISO deployment?

I am trying to think of ways to automate this for my Veeam team to make things easier.  It is not much to do with the current deployment but simplifying it would help me not get as many questions.  😁

Userlevel 7
Badge +10

I wanted to ask if there was any thought for this project about automation - mainly for the screens that you do have to enter information or just click done can that we in an answer file or something that we can feed into the ISO deployment?

I am trying to think of ways to automate this for my Veeam team to make things easier.  It is not much to do with the current deployment but simplifying it would help me not get as many questions.  😁

That’s a good point Chris. I have discussed with one organization about a remote build/remote deploy type of use case. Something like that may be of interest. I’ll relay this and bring up. No promises.

Userlevel 7
Badge +20

I wanted to ask if there was any thought for this project about automation - mainly for the screens that you do have to enter information or just click done can that we in an answer file or something that we can feed into the ISO deployment?

I am trying to think of ways to automate this for my Veeam team to make things easier.  It is not much to do with the current deployment but simplifying it would help me not get as many questions.  😁

That’s a good point Chris. I have discussed with one organization about a remote build/remote deploy type of use case. Something like that may be of interest. I’ll relay this and bring up. No promises.

Thanks Rick.  Just a thought to make things easier and hopefully it comes to fruition.  I am still working on that one site that is not allowing me to deploy things sadly.  😢

Userlevel 5
Badge

Hi,


I'm currently playing with the VHR ISO on a physical server. Works perfect, but I also want to test single user mode if for some reason we need to do some troubleshooting. However, the GRUB menu doesn't show up (it boots directly into the OS), so I'm unable to edit the boot entry. Reading the blogpost this is a requirement by the hardening script.

Following Hannes blog post (Ubuntu Linux Defense: Secure Boot & Single User Mode (veeam.com) we need to set a password for grub in order to be able to edit the boot entries. We need to configure this before the second reboot after VHR deployment, since after that the system is locked down.

I'm wondering if we have a chicken and egg situation here. Is the hardening script executed during the second reboot? If so, doesn't the script then disable GRUB again so we still won't be able to access the GRUB menu to configure single user mode?

Can now also report that the hardened ISO Installer also crashes on a brand new Dell R250 PowerEdge, in addition to the old R720 we had lying around that I tested earlier.  It does progress further than it did on the R720 though, which crashed on the network setup screen.  Now it crashes near the end of the configuration.  So something about it does not seem to jive with Dell hardware - maybe it’s the hardware RAID card, or iDRAC controller?

I’ve gone ahead and installed a vanilla copy of LTS 22 without issue.  My question is can I run the hardening script on it, despite it being designed for LTS 20?  I’m guessing not, and that I should just wait until work has been completed on 22 compatibility.

Userlevel 1

Can now also report that the hardened ISO Installer also crashes on a brand new Dell R250 PowerEdge, in addition to the old R720 we had lying around that I tested earlier.  It does progress further than it did on the R720 though, which crashed on the network setup screen.  Now it crashes near the end of the configuration.  So something about it does not seem to jive with Dell hardware - maybe it’s the hardware RAID card, or iDRAC controller?

I’ve gone ahead and installed a vanilla copy of LTS 22 without issue.  My question is can I run the hardening script on it, despite it being designed for LTS 20?  I’m guessing not, and that I should just wait until work has been completed on 22 compatibility.

I’ve had similar issues testing with Dell R730 and R740’s.  I initialized the mirrored boot drive, setup two 10+2 R6 data drives and all (9 so far) have acted the same.  The install crashes just after the networking.  I’ve had success by installing vanilla 20.04 customizing the disks, selecting the mirrored drive as the boot drive and creating a GPT partition for the remainder of the space.  I then format both the data drives as xfs and set the mount point to /mnt/backup1 and /mnt/backup2. 

Immediately after that I boot from the hardened ISO and it installs as expected.  I’m not sure exactly what the hardened ISO doesnt like about the system on the initial install but this is working for me

Dave

Userlevel 7
Badge +10

Can now also report that the hardened ISO Installer also crashes on a brand new Dell R250 PowerEdge, in addition to the old R720 we had lying around that I tested earlier.  It does progress further than it did on the R720 though, which crashed on the network setup screen.  Now it crashes near the end of the configuration.  So something about it does not seem to jive with Dell hardware - maybe it’s the hardware RAID card, or iDRAC controller?

I’ve gone ahead and installed a vanilla copy of LTS 22 without issue.  My question is can I run the hardening script on it, despite it being designed for LTS 20?  I’m guessing not, and that I should just wait until work has been completed on 22 compatibility.

I’ve had similar issues testing with Dell R730 and R740’s.  I initialized the mirrored boot drive, setup two 10+2 R6 data drives and all (9 so far) have acted the same.  The install crashes just after the networking.  I’ve had success by installing vanilla 20.04 customizing the disks, selecting the mirrored drive as the boot drive and creating a GPT partition for the remainder of the space.  I then format both the data drives as xfs and set the mount point to /mnt/backup1 and /mnt/backup2. 

Immediately after that I boot from the hardened ISO and it installs as expected.  I’m not sure exactly what the hardened ISO doesnt like about the system on the initial install but this is working for me

Dave

Hey @efd121  → Thanks for this. 

Everyone else:
I confirmed with QA we will be taking a look at the next version here after a separate milestone is made, but please keep these PoV’s coming.

Userlevel 7
Badge +14

@efd121 Is the boot drive utilizing software RAID? I know a similar case and during the setup of a regular Ubuntu there where many additional steps necessary. Not sure if this can be automated.

Userlevel 5
Badge +2

Hi,


I'm currently playing with the VHR ISO on a physical server. Works perfect, but I also want to test single user mode if for some reason we need to do some troubleshooting. However, the GRUB menu doesn't show up (it boots directly into the OS), so I'm unable to edit the boot entry. Reading the blogpost this is a requirement by the hardening script.

Following Hannes blog post (Ubuntu Linux Defense: Secure Boot & Single User Mode (veeam.com) we need to set a password for grub in order to be able to edit the boot entries. We need to configure this before the second reboot after VHR deployment, since after that the system is locked down.

I'm wondering if we have a chicken and egg situation here. Is the hardening script executed during the second reboot? If so, doesn't the script then disable GRUB again so we still won't be able to access the GRUB menu to configure single user mode?

Hello,
could you maybe tell us what server you used? Just to know what works… the more hardware information you can provide, the better it is.

I think we should show the grub menu longer in a future version to avoid issues like that you cannot see it. That’s useful feedback! https://askubuntu.com/questions/1264119/how-to-change-grub-timeout-in-ubuntu-20-04 should work if you edit it before the system locks down itself during the second boot.

Some settings are applied before the first boot, some (like the sudo stuff) are applied at second boot. The script does not do anything around grub, because it requires manual user interaction which we wanted to avoid

Best regards,
Hannes

Userlevel 5
Badge +2

Can now also report that the hardened ISO Installer also crashes on a brand new Dell R250 PowerEdge, in addition to the old R720 we had lying around that I tested earlier.  It does progress further than it did on the R720 though, which crashed on the network setup screen.  Now it crashes near the end of the configuration.  So something about it does not seem to jive with Dell hardware - maybe it’s the hardware RAID card, or iDRAC controller?

I’ve gone ahead and installed a vanilla copy of LTS 22 without issue.  My question is can I run the hardening script on it, despite it being designed for LTS 20?  I’m guessing not, and that I should just wait until work has been completed on 22 compatibility.

Thanks for reporting the crashes. Yes, incompatible hardware is very likely the reason, because we did not change Ubuntu itself.

For 22.04: probably some settings would fail. We can only start on 22.04 once DISA STGs are released for 22.04 (Canonical is working on it, but it will take time...)

Userlevel 7
Badge +20

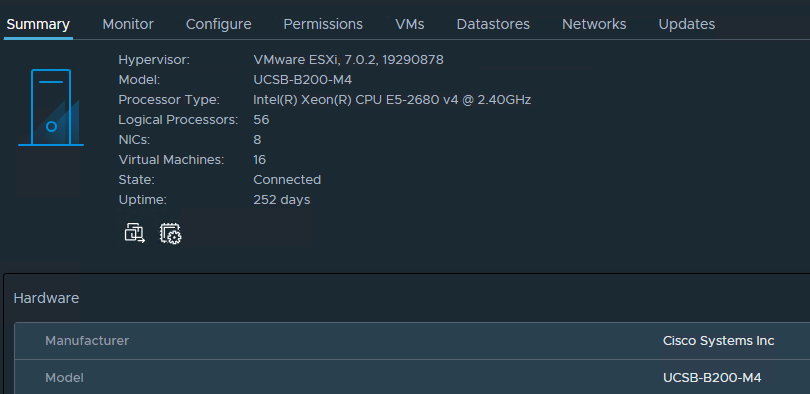
@HannesK - do you know if the ISO supports Cisco UCS?  In particular these models in the screenshot.  This is the one that does not allow me to fully deploy things or I get it deployed then it errors on adding the VHR to the Veeam Console.


Userlevel 7
Badge +12

@Chris.Childerhose 

We don‘t test against specific hardware. But you may check the compatibility list from Cisco to see if your model is compatible with Ubuntu 20.04:

https://ucshcltool.cloudapps.cisco.com/public/


Best,

Fabian

Userlevel 7
Badge +20

@Chris.Childerhose

We don‘t test against specific hardware. But you may check the compatibility list from Cisco to see if your model is compatible with Ubuntu 20.04:

https://ucshcltool.cloudapps.cisco.com/public/


Best,

Fabian

Thanks Fabian I will check.  I just wondered and posted this if anyone else with similar HW gave input. 😁

Userlevel 7
Badge +10

That’s interesting @Chris.Childerhose → especially as a VM if it isn’t working.

Userlevel 5
Badge

Hello,
could you maybe tell us what server you used? Just to know what works… the more hardware information you can provide, the better it is.

I think we should show the grub menu longer in a future version to avoid issues like that you cannot see it. That’s useful feedback! https://askubuntu.com/questions/1264119/how-to-change-grub-timeout-in-ubuntu-20-04 should work if you edit it before the system locks down itself during the second boot.

Some settings are applied before the first boot, some (like the sudo stuff) are applied at second boot. The script does not do anything around grub, because it requires manual user interaction which we wanted to avoid

Best regards,
Hannes

Hi,

it’s an HPE Proliant DL360 Gen10 Plus server

Badge

I could use some help. We documented the wrong root password and can no longer sign in as root. I tried multiple times to enter the grub menu to reset the pw, but I just don’t get the option. I can’t make any changes to the grub menu timeout since it requires root. Any suggestions on how to reset my root password or do I need to build another server?

Userlevel 5
Badge

On EFI systems you have to use the ESC key to get into the grub menu. There is an issue though, if you press it too frequent you’ll end up in the grub command line. I haven’t figured out yet how you can edit the entry to enter single user mode from there.

edit: just found on google that you have use the ‘normal’ command and press the ESC key again to return to the grub menu (this time it doesn't enter the CLI if you press it too many times). Just tested it and it works.

Thanks for your response. I ended up booting int he grub command line and got stuck. I really don’t know much about Linux. Could you help me understand the normal command? And do I press escape once or do I press an hold?

Userlevel 5
Badge

If you enter the ‘normal’ command, the system reboots again. Right after pressing enter after typing the normal command press ESC multiple times until you see the grub menu.

see here:

https://askubuntu.com/questions/381613/how-to-return-from-grub-prompt-to-the-grub-menu