


Stolen from: A haiku about DNS - It's not DNS. There is no way it's... - nixCraft
If there are DNS issues our backup infrastructure will struggle. When it rains it pours so usually during these times a restore is suddenly our top priority. Would be good if our backup server could communicate with the proxies and the virtual infrastructure huh? Tough luck…
What can we do to make our backup infrastructure more independent? On both Windows and Linux systems exists a hosts file which is read before the system resolves the DNS server. On Linux this is located in /etc/hosts, on Windows easily accessible via c:\Windows\System32\Drivers\etc\hosts
As a bonus: With this you are able to control your network flow. If there is a dedicated network for backups available and you want to use that network, managing the hosts file with might be perfect for you.
Does managing a single file on potentially hundreds of systems sound like a good idea? NO. Let's take a look how we can automate this task! For this we are going to use the popular configuration management tool ansible.
What are we going to do?
To automate this task, we are going to utilize ansible to manage the hosts file on Windows and Linux systems.
In Part 1
- Setup our Ansible Controller on Ubuntu24.04
- Setup our Windows Proxy with Scripts
- Setup our Linux Proxy
In Part 2 Making DNS more resilient with ansible automated etc/hosts (Part 2) | Veeam Community Resource Hub
- Setup our Ansible Inventory
- Create our centrally managed etc/hosts
- Create and verify our ansible playbook
We are going to manage the hosts files of the Linux and Windows Proxies and the VBR Server.
Basic Ansible Controller Setup
Let's get started with setting up our ansible controller.
For this blog, I am going to utilize ubuntu 24.04 as ansible controller host. Ansible-Core is sufficient which can be installed with apt.
sudo apt install ansible-coreTo connect to our proxies, we will use SSH. For this we are going to create a key pair.
To focus on simplicity, I am going to create a key without passphrase.
For production I would recommend creating one with passphrase and adding it to the ssh-agent.
ssh-keygen -t ed25519Save your public key for later. You can display it with cat (change ansible with your username)
cat /home/ansible/id_ed25519.pub

ssh-ed25519 AAAAC3NzaC1lZDI1NTE5AAAAIOd9RMRHq25XdyyAbjFHFFxFrUuvC+Ng/JIqppcgue0w ansible@ansible-controller
Next, we are going to configure an ansible.cfg. I will create this project in the home directory of my user; however any directory will work. This will let ansible know how to connect to its inventory:
[defaults]
#connect to remote hosts with this user
remote_user = ansible

#use this private key file
ansible_ssh_private_key_file = "/home/ansible/.ssh/id_ed25519"

#ignores host key settings (otherwise you are going to need to accept hosts files on state runs)
host_key_checking = false

#inventory to use is the inventory file in the current directory
inventory = inventory
ansible_connection = ssh
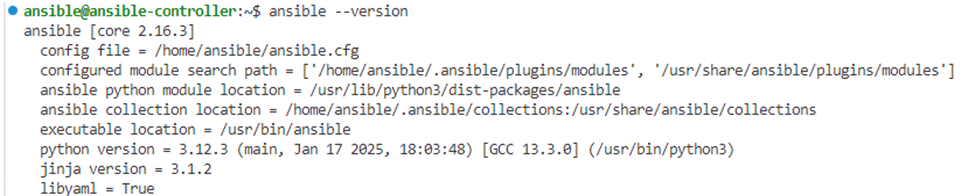
To verify our installation is successful we can run
$ansible --versionThis also tells us that our configuration is read from our current directory:
Proxy Setup
Ansible will use SSH to connect to our Windows and Linux hosts. We are going to need a service user, firewall rules and an ssh server on these systems.
Windows Proxy (and VBR)
Windows is a bit tricky since openssh server is not installed by default. Further ssh administrator handling is different than expected.
First the openSSH server needs to be installed and firewall rules created. You can do this manually, but I created a script for consistency across the environment:
#install SSH Server
Add-WindowsCapability -Online -Name OpenSSH.Server

# Start and set the SSH server service to start automatically
Start-Service sshd
Set-Service -Name sshd -StartupType 'Automatic'

#Create Firewall Rule
if (!(Get-NetFirewallRule -Name "OpenSSH-Server-In-TCP" -ErrorAction SilentlyContinue | Select-Object Name, Enabled)) {
    Write-Output "Firewall Rule 'OpenSSH-Server-In-TCP' does not exist, creating it..."
    New-NetFirewallRule -Name 'OpenSSH-Server-In-TCP' -DisplayName 'OpenSSH Server (sshd)' -Enabled True -Direction Inbound -Protocol TCP -Action Allow -LocalPort 22
} else {
    Write-Output "Firewall rule 'OpenSSH-Server-In-TCP' has been created and exists."
}
Next, we are going to create a windows service user. Again, for consistency I created a script. Fill in your ansible controller public key and a STRONG password in the first lines
# add ssh key and PW for user
$sshKey = "ssh-ed25519 AAAAC3NzaC1lZDI1NTE5AAAAIOd9RMRHq25XdyyAbjFHFFxFrUuvC+Ng/JIqppcgue0w ansible@ansible-controller"

$password ="P@ssw0rd"
# Create the new user
New-LocalUser -Name "ansible" -Password (ConvertTo-SecureString $password -AsPlainText -Force) -FullName "Ansible User" -Description "User for Ansible automation" -PasswordNeverExpires

# Add the user to the Administrators group
Add-LocalGroupMember -Group "Administrators" -Member "ansible"

# Create the .ssh directory for the user
$sshDir = "C:\Users\ansible\.ssh"
New-Item -ItemType Directory -Path $sshDir -Force

# Create the authorized_keys file and add the public SSH key
$authorizedKeysPath = "$sshDir\authorized_keys"
Set-Content -Path $authorizedKeysPath -Value $sshKey

# Set the appropriate permissions for the .ssh directory and authorized_keys file
icacls $sshDir /grant "ansible:F"
icacls $authorizedKeysPath /inheritance:r
icacls $authorizedKeysPath /grant "ansible:F"

# Add the public SSH key to the administrators_authorized_keys file
Add-Content -Force -Path $env:ProgramData\ssh\administrators_authorized_keys -Value $sshKey
icacls.exe "$env:ProgramData\ssh\administrators_authorized_keys" /inheritance:r /grant "Administrators:F" /grant "SYSTEM:F"

Write-Host "User 'ansible' created and added to Administrators group. SSH key has been added."
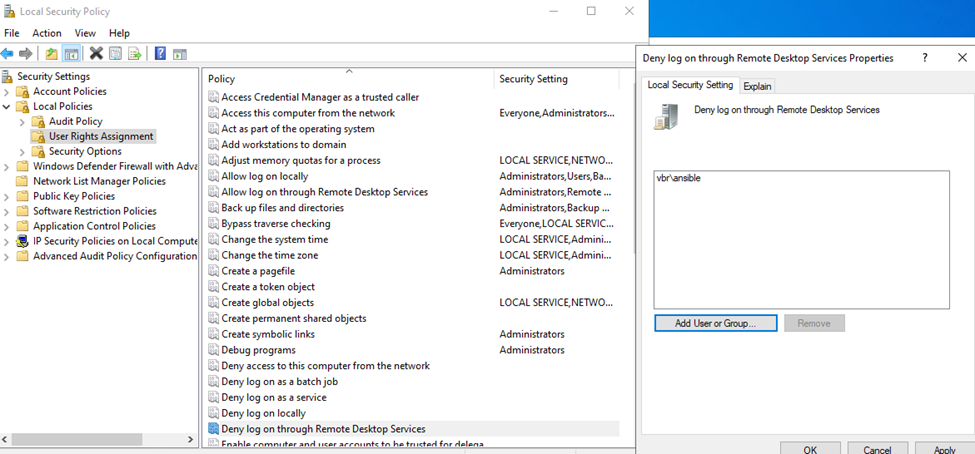
Afterwards we are going to deny that users access to the system via RDP
Let's verify that this worked. On our ansible controller we are going to try to open an ssh session to our windows proxy:
ssh ansible@winproxy01.srgls.lanIf you are getting a connection, you are good to go!
Linux Proxy
For Linux we need to create an ansible service user and allow it to elevate its permissions. Connect to your Linux Proxy and run the following commands.
sudo useradd -m ansible

sudo adduser ansible sudo

#add a strong password
sudo passwd ansible
Now we are going to do something nasty and allow privilege elevation without passwords for this user. This option can potentially make your configuration insecure. Instead, you might want to use a timeout instead or target specific commands.
sudo visudoadd to the end of the file:
ansible ALL=(ALL) NOPASSWD:ALLFinally add your ansible controller public key to the authorized keys of this user
sudo su - ansible

mkdir .ssh

cd .ssh

vim authorized_keys
Feel free to use any editor you like. Nano might be more approachable at the beginning
Again, let's verify that we can ssh from our ansible controller to our linux proxy:
ssh ansible@linproxy01.srgls.lanIf you are getting a connection, you are good to go!
Summary
In this tutorial we learned
- It’s always DNS
- How we setup our Ansible Controller
- How we setup our Windows and Linux Proxies
Part 2: Making DNS more resilient with ansible automated etc/hosts (Part 2) | Veeam Community Resource Hub
References
Get started with OpenSSH for Windows | Microsoft Learn
DNS resolution | Veeam Backup & Replication Best Practice Guide
