

Something I have seen in many online discussions is Veeam’s (until recently) lack of a REST API for Backup & Replication. Until version 11, API functionality was only possible via Enterprise Manager or a PowerShell cmdlet. With version 11, this cmdlet was upgraded to a more modern PowerShell module and a REST API was introduced, albeit with limited functionality.
I have also found that the PowerShell module has its own limitations, such as:
- Much slower command execution (~30 seconds for Get-VBRBackupRepository vs. ~2 seconds for equivalent REST API)
- No support for PowerShell Core (cannot utilize module directly on MacOS/Linux devices, must leverage PSRemoting)
Utilizing ASP.NET Core, you can create your own REST API service, granting your organization the following Veeam functionality:
- Remotely manage VBR servers via REST API, utilizing Veeam’s REST API where it exists and the PowerShell module where it doesn’t
- Keep PSRemoting turned off in your environment
- Securely pass credentials/encryption passwords to the VBR remotely
- Communicate with multiple resources from the same API endpoint (such as VBR servers, VB365 servers, VMware clusters, etc.)
- (Service Providers) Insert a middleman between your customers and your VSPC instance, allowing for API access to the console without giving public internet access to the machine
- Host your public APIs on Linux machines or inside containers
Here on the automation desk, I’ll be posting a series of articles detailing the process of creating and configuring your own ASP.NET Core MVC application, covering topics such as:
- Initial configuration (Project creation, packages, Swagger UI, Windows Authentication)
- Authenticating with the VBR REST API & Creating Scheduled Tasks
- Embedding PowerShell commands & calling PowerShell from PowerShell Core
For the purposes of these articles, I will be running the service on a B&R server and only building sample APIs for VBR to keep complexity down. A sample project will be available on my GitHub to follow along with. We will also be developing with .NET 6 even though 7 has recently been released, as not all NuGet packages we need for the project support 7 as of writing. Additionally, .NET 6 is an LTS release while .NET 7 is only an STS release.
Without further ado, here is part 1.
Pre-requisites:
- Installations of Visual Studio Code and .NET 6 SDK
- C# Extension for VSCode
- Familiarity with PowerShell commands, C#, and RESTful API
- NuGet Package Manager Extension for VSCode
- (Optional) NuGet Package Manager GUI Extension for VSCode
- (Optional) OpenAPI (Swagger) Editor Extension for VSCode
- Trust the ASP.NET Core HTTPS development certificate on Windows and macOS
First, we will begin by creating a new ASP.NET Core MVC Project. Begin by browsing to an empty folder where you would like the project to be saved. Then, in the terminal window, copy and paste the following command:
dotnet new webapi -f net6.0
Once the command executes, you should now have a new .csproj file and associated project files. Some of these files are samples, but we will follow the same file format throughout this series. You may receive an error like “error NU1100: Unable to resolve 'Swashbuckle.AspNetCore (>= 6.4.0)' for 'net6.0'.” while building or running the project. If this happens, run the following commands:
dotnet nuget add source --name nuget.org https://api.nuget.org/v3/index.json
dotnet restore
Now that the project is created, we will begin by customizing the Swagger UI. Start by adding the following to the top of Program.cs:
using Microsoft.OpenApi.Models;
Then, replace line 10 with the following:
builder.Services.AddSwaggerGen(options =>
{
options.SwaggerDoc("v1", new OpenApiInfo
{
Version = "v1",
Title = "Veeam B&R Custom API",
Description = "An ASP.NET Core Web API for Veeam Backup & Replication",
});
});
This will update the title, version number, and description shown at the top of the Swagger UI. Next, replace line 26 with the following:
app.UseSwaggerUI(c =>
{
c.SwaggerEndpoint("/swagger/v1/swagger.json", "VBR API v1");
});
This changes the swagger endpoint and customizes the name displayed in the “Select a definition” dropdown. Finally, attempt to run your project with the following command:
dotnet run
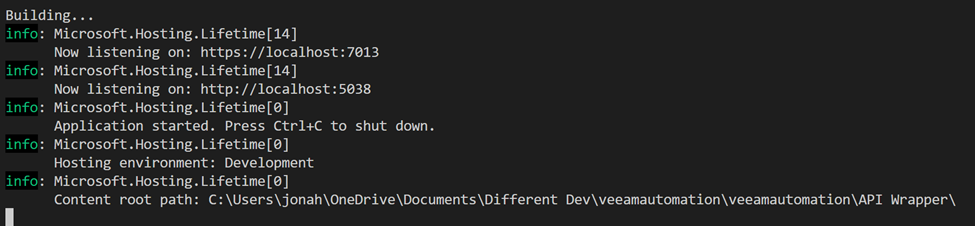
If the project builds successfully, you will see an output like the following:
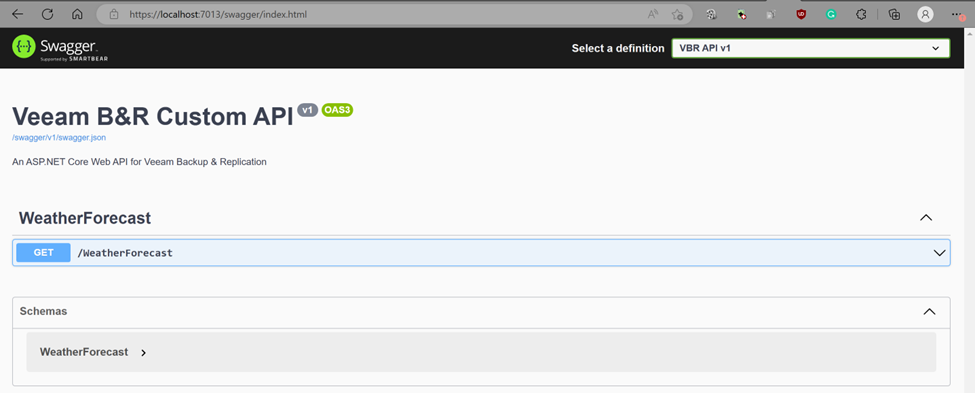
With the project running, we should be able to access the swagger UI from a web browser.
Next, we will add a few packages that will be needed throughout the project:
- Microsoft.PowerShell.SDK
- Microsoft.AspNetCore.Authentication.Negotiate (6.0.12)
These two packages will allow for integrated PowerShell scripting and Windows Authentication while the application is hosted via IIS or Kestrel.
As the final step of Part 1, we will configure the service to use Windows authentication, allowing for SSO with an Active Directory domain. First, we will add the following line to the top of Program.cs:
using Microsoft.AspNetCore.Authentication.Negotiate;
Next, add the following under var builder = WebApplication.CreateBuilder(args):
builder.Services.AddAuthentication(NegotiateDefaults.AuthenticationScheme)
.AddNegotiate();
builder.Services.AddAuthorization(options =>
{
options.FallbackPolicy = options.DefaultPolicy;
});
builder.Services.AddRazorPages();
The final change to make to Program.cs is to add the following above app.UseAuthorization():
app.UseAuthentication();
Now that Program.cs is configured for Windows authentication, there are a few configuration changes we will need to make. The first change will be to ensure IIS Express uses Windows authentication when VS Code debugs the code. To do this, open LaunchSettings.json and change the following configuration settings under iisSettings:
"windowsAuthentication": true
"anonymousAuthentication": false
Finally, Kestrel requires SPNs to be set for the account running the service on the production machine. You can read more about this here. Information on some additional configuration that may be needed for operation on Linux and macOS systems can be found here.
This concludes Part 1 of the series. In the next part, we will configure the service to authenticate with the VBR REST API at startup and set up a scheduled task to renew the API token before it expires.


