

The overall intent of this article is to consolidate major considerations when it comes to using Veeam Recovery Orchestrator to Recover from a Replication Job.
Key:
- VBR: Veeam Backup & Replication
- VRO: Veeam Recovery Orchestrator
Orchestrating recovery from Backup Copies - Use-Case Overview:
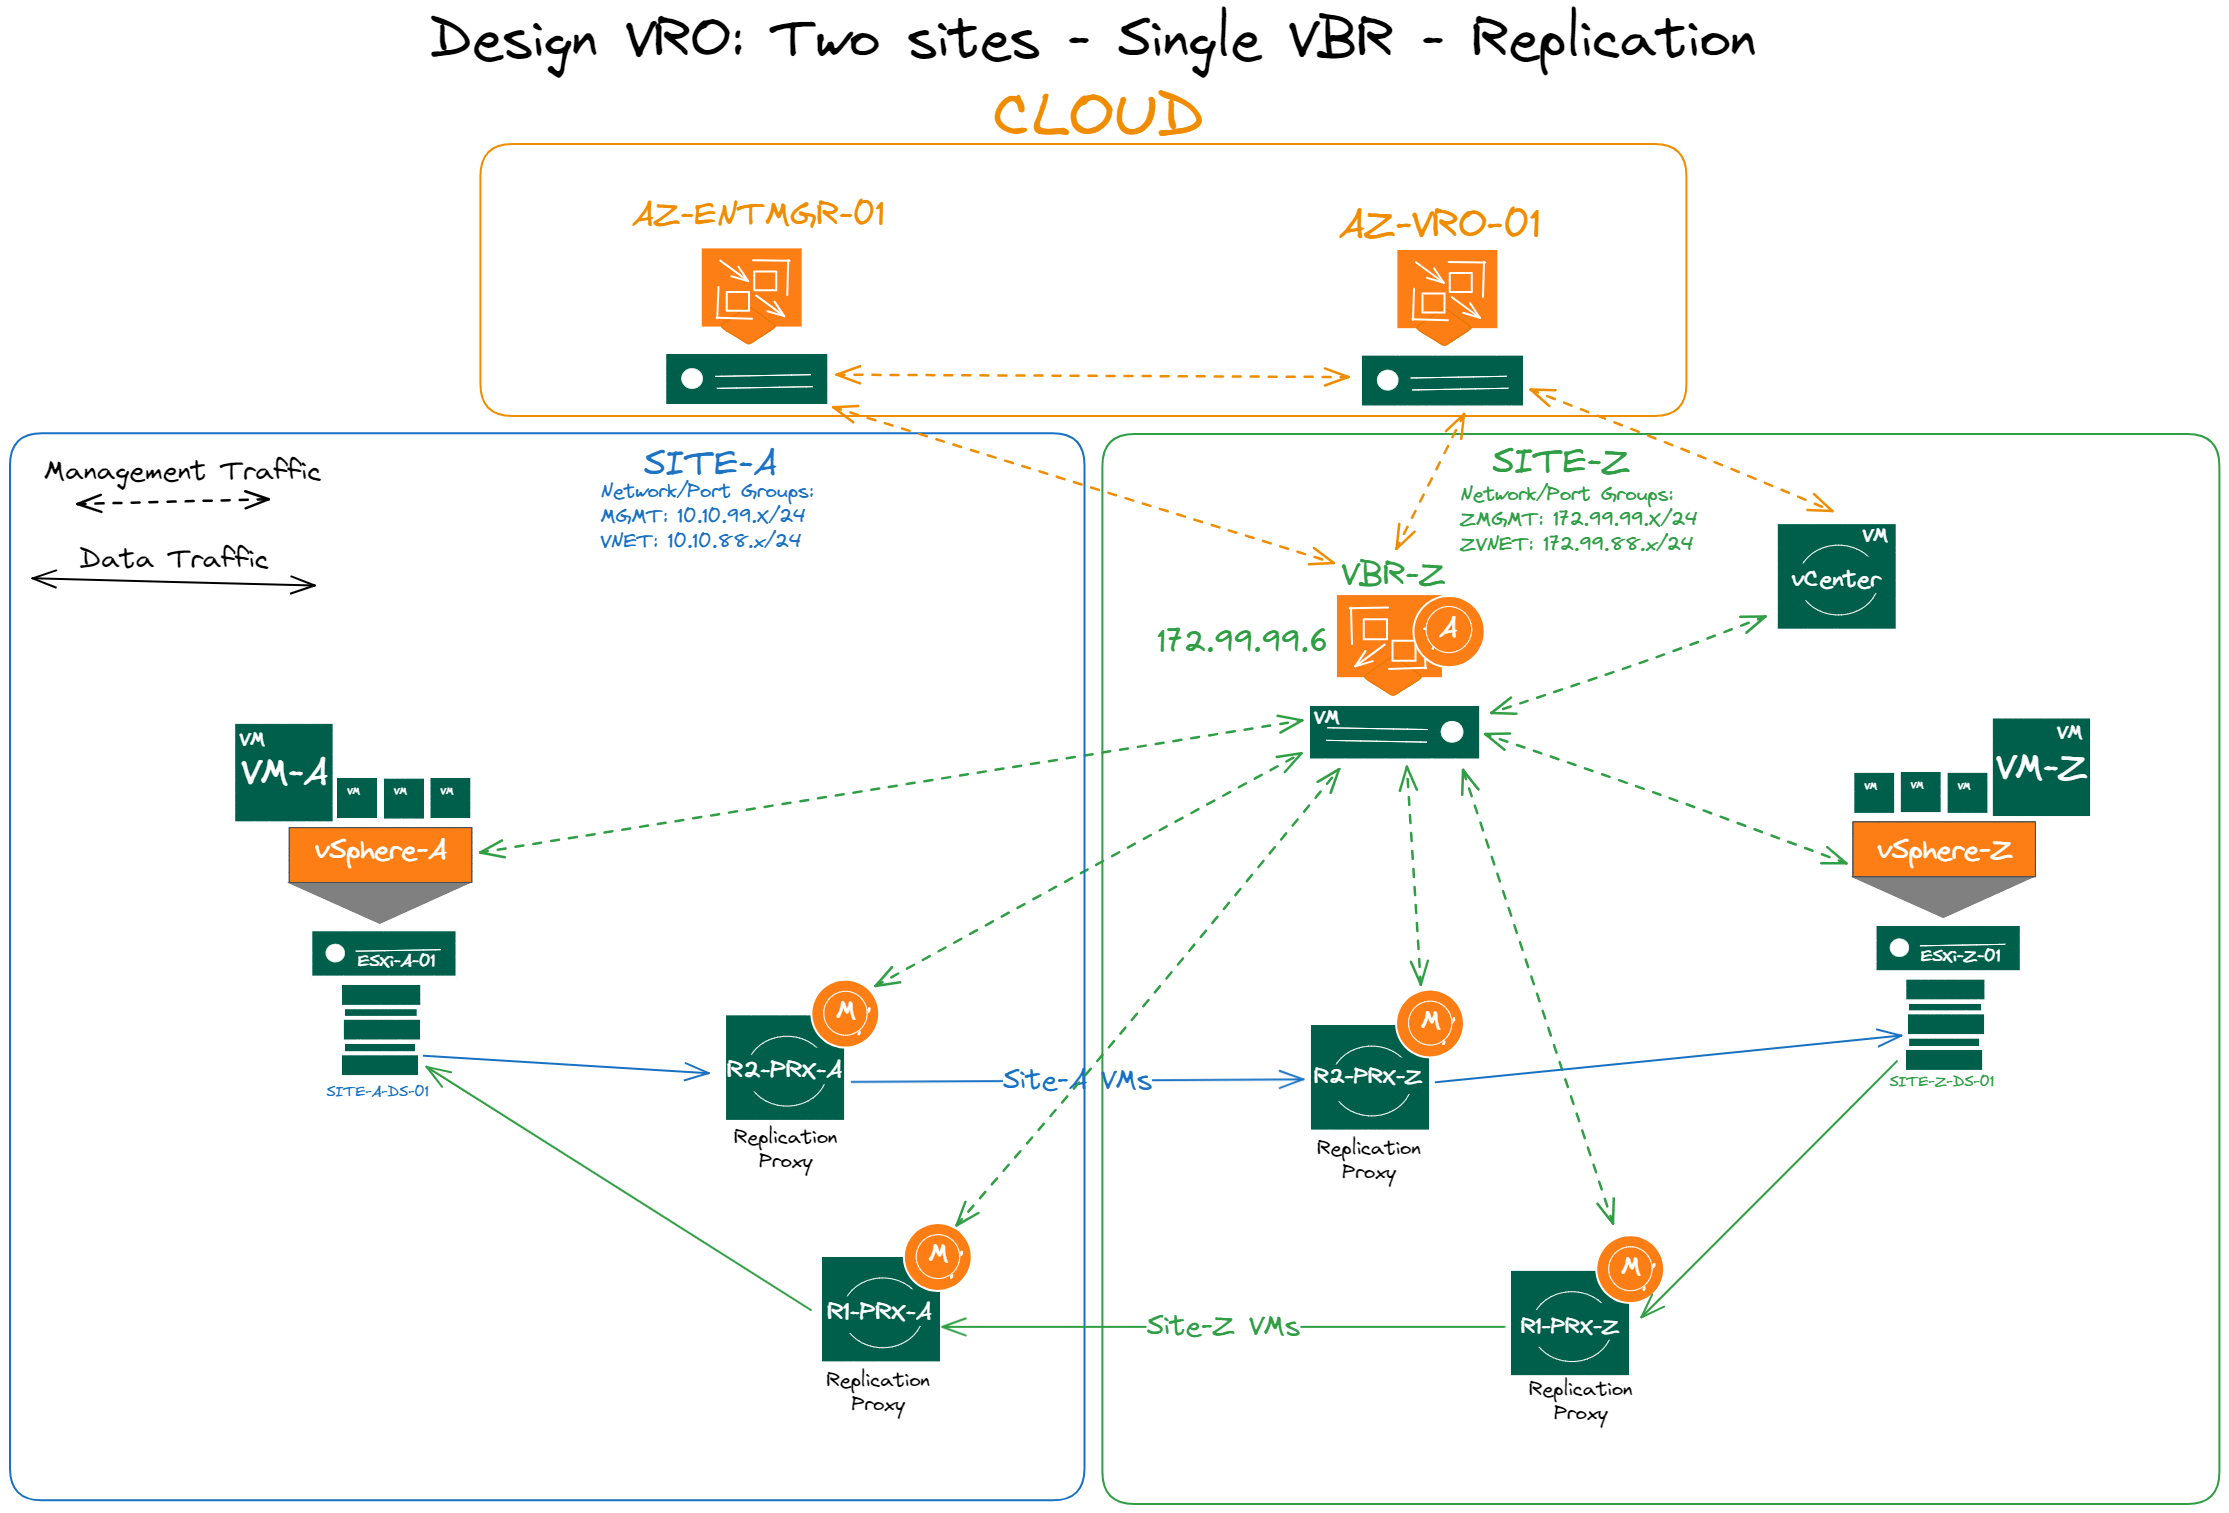
- Below you will see a is common customer design example.
-
Both sites are Active/Active with production virtual workloads being protected with Replication Jobs.
- (1) VBR server at Site-Z which is the DR location.
-
(2)Backup Proxies at each location.
- vCenter at Site-Z and vSphere cluster at each location.
- Agent deployed protecting a physical workload.
- Our Veeam Transport (Data Mover) service is represented by a (M) icon here for these machines.
-
Our Agent services are represented by a (A), on the VBR server is an Orchestrator Agent, which handles encrypted communications between the two.
-
- Backup Proxies:
- Virtual or Physical Proxy server transporting/source data from the Production vSphere clusters at each location.
- Enterprise Manager and Veeam Recovery Orchestrator:
- For this example, we have these management overlay servers in the cloud, it's best when they are not on-prem if a site fails.
- Even better would be to have VBR (VBR-Z) also in the cloud, but for the sake of common configurations we will leave it at Site-Z.
- There are also considerations regarding Virtual Labs and testing that will come up in later articles I plan to develop.
Additional Site Recovery Considerations:
-
Replications are for recovering data from one site to another during a critical site failure, we can orchestrate recovery of VMs from Site-A to Site-Z.
-
If Site-Z fails, VBR-Z is sitting on location, Veeam Recovery Orchestrator requires VBR to be online for recovery, as we need access to the policies and repositories.
-
There are ways around this, as previously mentioned having your VBR server in the cloud or witness location.
-
Replicating the VBR server with Veeam and doing a manual recovery of the VM at the other location.
-
Taking a configuration backup of Veeam, having a cold server in-place at Site-A, cloud or witness site to recover the VBR server during an orchestration event.
-
Note: That this failure will cause an increased RTO for a Site-Z failure, Site-A will not be impacted during a critical site failure as VBR will be online.
-
-
-
We often use Source and Target to represent taking a workload from Site-A (source) and recovering it to Site-Z (Target) and vice versa.
How do Replications work: (Referencing the above image)
Sourcing Data:
-
VBR-Z has replication policies configured to protect both Site-A and Site-Z.
-
When the replication process starts, Veeam Backup & Replication starts the replication process, very similar to how we source data for backups. We reach out to vSphere (vCenter/ESXi) to take a snapshot of the VM in the policy.
-
We then transfer the data from a source to the target proxy server at the other site, which lands the data in a new .VMDK delta file.
-
This gives us the ability to have point-in-time restores from stored snapshots at the target location.
-
Restoring Data:
-
Unlike backup or backup copy, the data is already stored in a Datastore in the target VMware cluster, this gives us the capability to spin up the workload directly on the ESXi host.
-
As mentioned above, we have point-in-time restore capabilities with snapshots.
Veeam Recovery Orchestrator:
- It's important to note that for Veeam Recovery Orchestrator (VRO) we are utilizing components created and configured from the Veeam Backup & Replication interface.
- Veeam Recovery Orchestrator is an additional product and deployment on top of your existing Veeam Backup & Replication server, it connects to your Enterprise Manager and/or VBR instances and creates orchestration overlays.
- VRO Placement: If you have presence in the cloud, we would recommend that this be placed in the cloud or at a Witness location.
- Additional considerations: Veeam University (VU) https://veeam.looop.co/topic/834185
- VMware Tagging: A popular but very important aspect of our Veeam product when grouping and categorizing workloads to protect and in this case grouping of servers for restoration.
- With Veeam Recovery Orchestrator mapping and grouping your workloads for orchestration, it's best practice to-do so with VMware Tags.
Veeam Recovery Orchestrator Core Components:
-
Recovery Locations: Unlike backup and backup copy recoveries we don't need Recovery Locations for recovery of replicated workloads.
-
The normal Compute, Storage, Network Mapping, and Re-IP configurations are all done in the Replication Job.
-
We will need to create Recovery Plans for Lab Groups, which are separate groupings specific for DataLabs.
-
These Lab Groups are great for taking protected Domain Controllers at a Target location, recovering them from backup to a specified location, which is defined with Recovery Locations.
-
-
- Recovery Plans: A recovery plan is where we select the workloads we will orchestrate and the Recovery Location in which those workloads will be recovered to.
How to Configure VRO for Orchestration of a Test VM from Site-A to Site-Z:
-
Below I am going to walk you through how to configure an example VM recovery of a Site-A VM being recovered to Site-Z.
-
We will configure a Replication Job, VMware Tags, and Recovery Plans.
Replication Job:
-
Login to your Veeam Backup & Replication server, once the application is open, go to the Home tab in the navigation pane on the lefthand side, if not already.
-
At the top ribbon, select Replication Job -> Virtual Machine. (The Wizard will open in the middle of the screen)
-
-
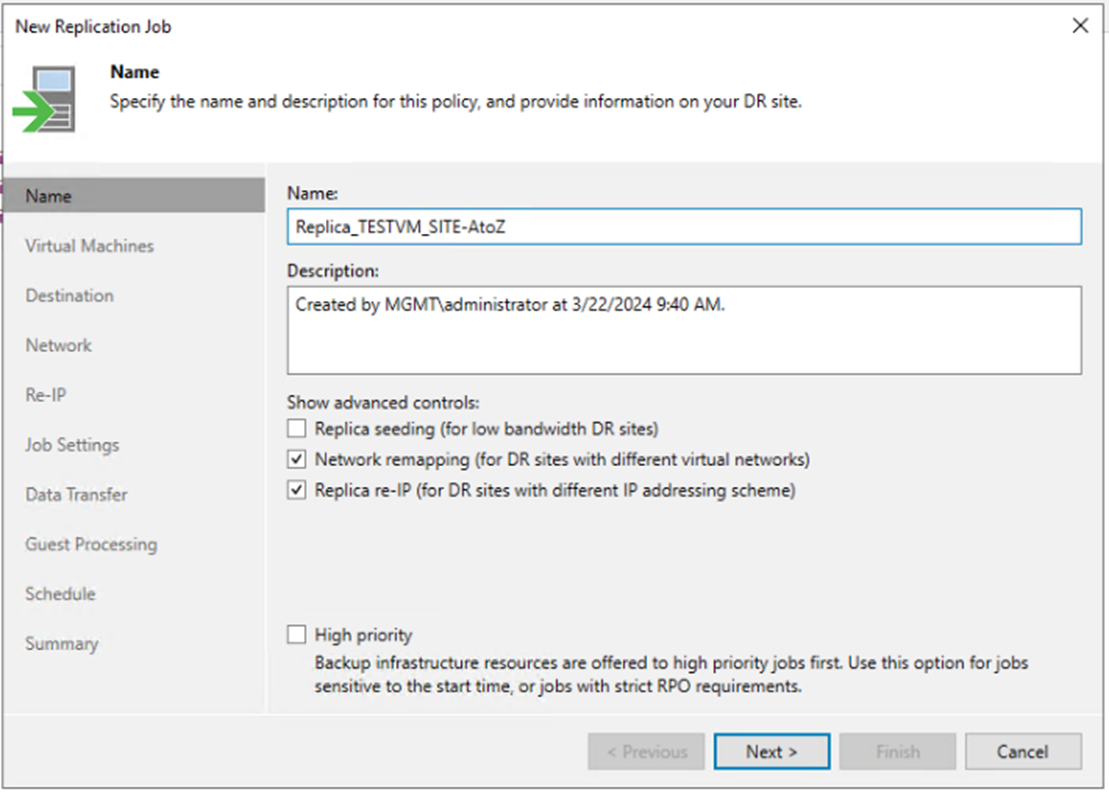
Once in the New Replication Job Wizard do the following:
-
Name: (IE: Replica_TESTVM_SITE-AtoZ)
-
Advanced Controls:
-
Replica Seeding: If you already have data at location via a backup repository with a Backup Copy job or already have the VM replicated there we can use these during the initial replication.
-
Network remapping: This is for identifying the Target Virtual Port Groups and Networks you will be utilizing when recovering the VM.
-
Replica Re-IP: Generally Network Mapping and Re-IP are chosen together, often the networks at that Target location are different subnet ranges as well.
-
Note: If you have a stretched Layer 2 you may not need remapping or Re-IP.
-
Note: Often, we have customers who replicate their BGP routes and VLAN configurations between sites and allow for a L3 cutover instead.
-
-
-
-
Select your Virtual Machines: For an initial test it's always best to select a new or utility VM for testing.
-
Destination: Chose your Target Host/Cluster, Resource Pools, VM Folder, and Datastores.
-
Network: (Will only be shown if you have remapping selected) - Select your Source and Target networks.
-
Re-IP: (Will only be shown if you have Re-IP is selected) - Select your source and Target networks, Target Gateway, and Target DNS servers.
-
Job Settings: Here you will select your Metadata repository to store job chain information, Replica name suffix and Restore Points to keep.
-
Data Transfer: Source and Proxy are the most important selections here, you should manually select these to ensure no disruption to other policies and workloads.
-
Guest Processing: If required you can do in-guest OS application consistent backups.
-
Schedule: How often are we running this job, you can run it as often as it takes for the job to complete. (This is based on your infrastructure/sizing)
-
I'd recommend once daily for now.
-
-
Summary: Complete the Wizard, and run the job.
-
Creating VMware Tags:
- We need to create at a minimum (1) VMware tags for each Site on our vCenters or single vCenter if it manages both sites.
- These Tags will be used to define which workloads we plan to recover with our Recovery Plans.
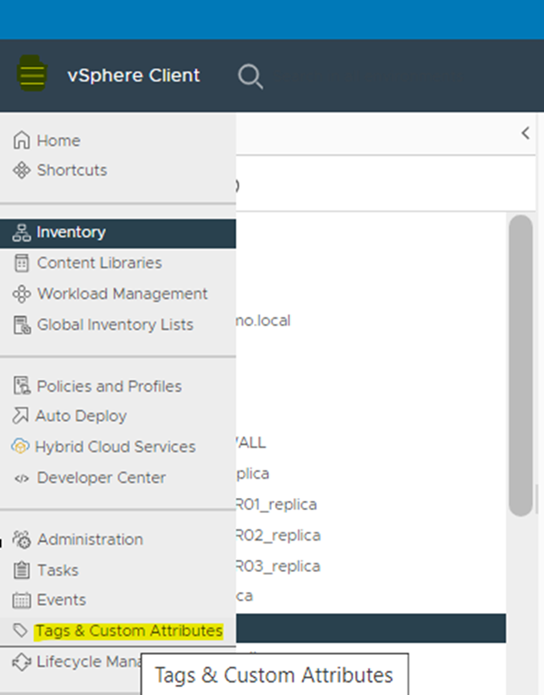
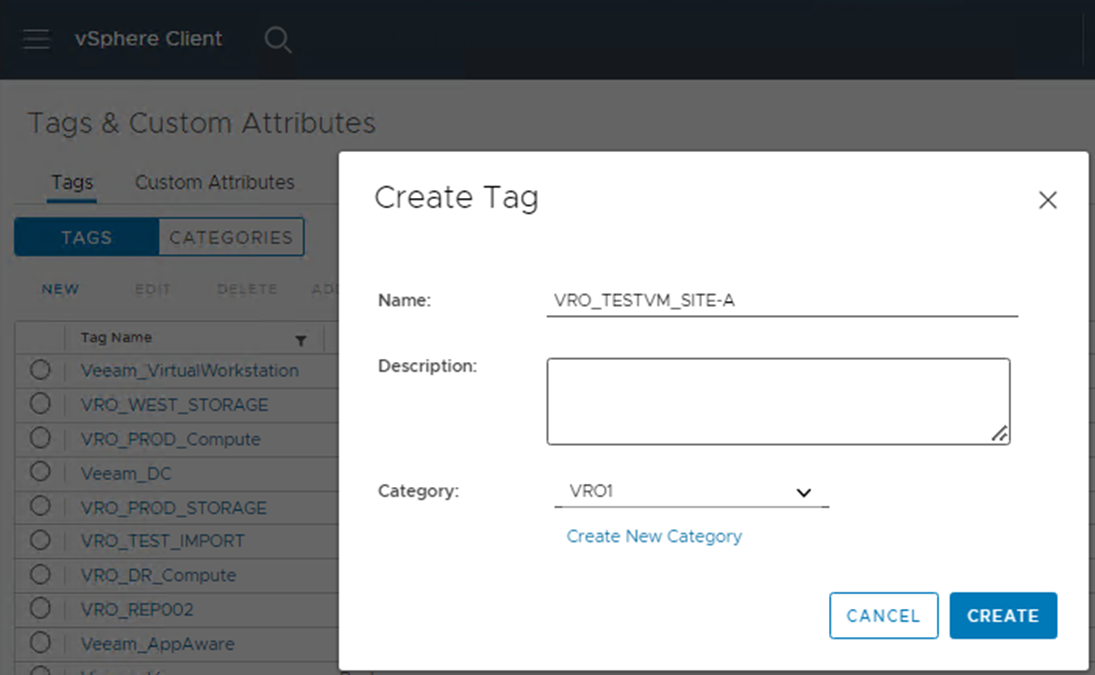
- Create Tags:
- In vCenter you will want to go to your menu in the upper left-hand corner and then select (Tags & Custom Attributes) from the list.
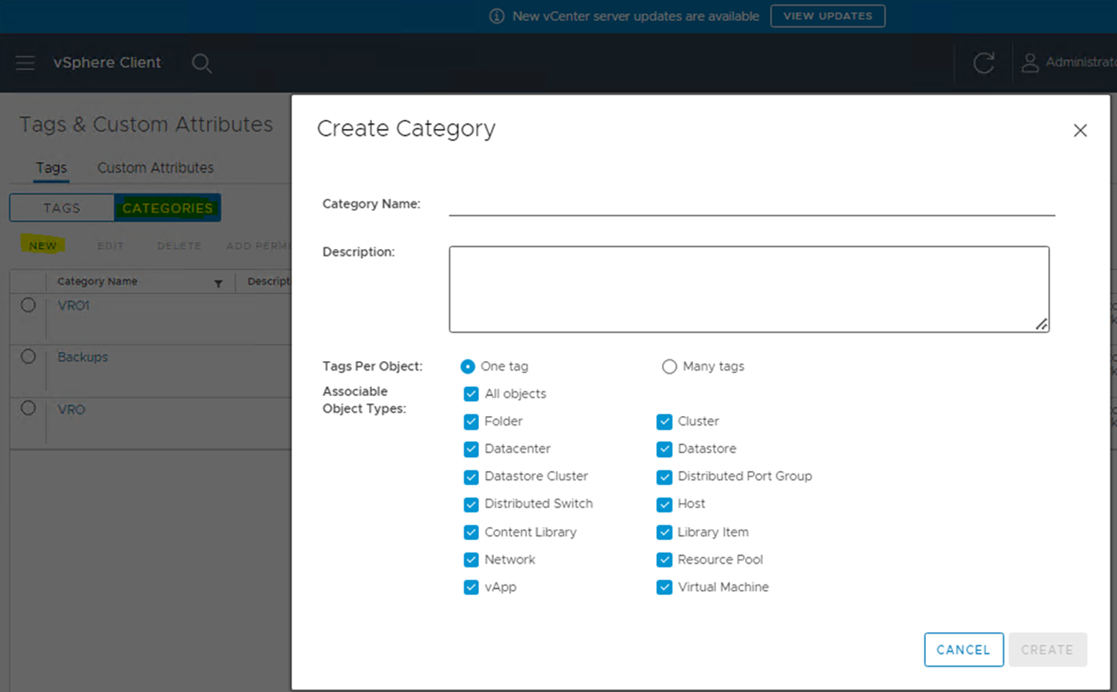
- Create a new Category and name it VRO or something similar.
- Create (1) New Tags for each location and associate them to the VRO Category you created. (IE: VRO_TESTVM_SITE-A)
- Note: We don't specifically need these tags for pinpointing workloads to recovery with a Recovery Plan, you can also use the replication job you created.
- Using the replication job as your indicator on the Recovery Plan is also an option, but will recover all associated workloads.
- Using VMware tags gives you capabilities to gather workloads potentially protected by different replication jobs.
- Reference: I would link a VMware article but that might change, so google "What are VMware Tags and How to use them"
- Note: We don't specifically need these tags for pinpointing workloads to recovery with a Recovery Plan, you can also use the replication job you created.
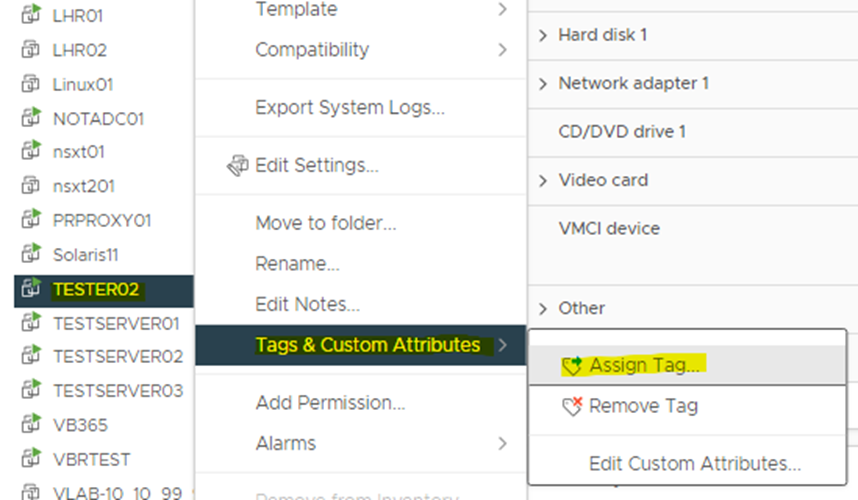
- Associate Tags:
- Go back to Inventory on the upper left-hand menu in vCenter and find your Compute and Storage to Tag.
- Associate the TESTVM Tag to a Test server that you have protected with a Backup Job and Backup Copy Job on the VBR server.
- Updating VRO Inventory:
- Use the Tags created above, if you don't see them in the VRO inventory, login to the Veeam One Web client (https://VROVM:1239/) and run a rescan from the configuration page.
Creating Recovery Plans:
- Now that we've created a Recovery Location, we will create a Recovery Plan that will associate to our newly created Recovery Location.
- Exit Administrator by clicking (Exit Administration) in the upper lefthand corner.
- On the left-hand side in the Navigation pane click (Recovery Plans), select (Manage), and select (New)
- Once in the New Restore Plan Wizard fill out the following:
-
Give a Recovery Plan Name: (IE: VRO_RECOVERY_PLAN_SITE-AtoZ)
-
Plan Type: Select (Replica) plan type.
-
Inventory Groups: This is where we can select the (VRO_TESTVM_SITE-A) Tag we created.
-
Note: You can also select the Replication Job we created as well, tags are best for scaled out deployments.
-
- VM Recovery Options: Choose defaults here.
- VM Steps: Add Ping Test
- Protect Inventory Groups: Only for reprotection of the Virtual Machine after a commit failover.
- RTO&RPO: This simply validates whether the protected workloads are achieving these marks for the associated Backup Copy Plan.
- Report Template: Default
- Report Scheduling: Default
Closing:
-
Once you have created your Replication Job, VMware Tags, and your Recovery Plans you are ready to test a replica recovery from Site-A to Site-Z.
- Note: This is a live recovery and should be taken at your own risk, Veeam is not responsible for any production outages or loss of data for your recovery configurations and actions.
Recovery_Workbook: https://docs.google.com/spreadsheets/d/1qyZHWLFMg64q9CfQ3Ohnv1gRWNzT9LSzpW7L8JKkCEQ/edit?usp=sharing
