

Hello Everybody,
Like the song says “I am going back to Kasten to Kasten, no I don’t thinks so”.. or wait was that “Going back to Cali”?
Ok so we are GOING BACK TO KASTEN THEN!!
In this series we will go from Kasten A to Z, Start to Finish, and make lack of Kubernetes knowledge DIMINISH!
PART1 Setup our Test Environment
What we will need:
3 Ubuntu VMs with 2 vCPU, 4GB memory, and 150GB of disk space.
I have built mine in Proxmox.
What are we going to do:
- Install a K3S 3 node cluster (1 control-plane and 2 worker nodes)
- Install the External Snapshotter
- Install Metallb LoadBalancer
- Install Longhorn for storage
Step 1 Install K3S
As stated before there are 3 Ubuntu VMs. (note you could do this with only one node as well)
k2control
k2wo2
k2wo3
From the command line on your control-plane VM
curl -sfL https://get.k3s.io | K3S_KUBECONFIG_MODE="644" INSTALL_K3S_EXEC="server" sh -s - --disable=servicelb --disable=local-storageWe are disabling the default servicelb load balancer and also the default local storage that comes with K3S
Next we want to add the two worker nodes. In K3S they are also known as agents.
IMPORTANT! You must first retrieve the token from the freshly installed control plane node. This can be found in /var/lib/rancher/k3s/server/token file. Use the content of that file for the token in the command below

From the command line on both worker nodes type:
curl -sfL https://get.k3s.io | K3S_URL=https://k2control:6443 K3S_TOKEN=K108c2cd614c7b9effb08cd684bc3c15e7b3c88d9002afd82bf3443333a04cf4a2e::server:bf60b0fa0d4e2e9bd6cf3a1be55c6f19 sh -I want to create an alias in bash so that I don’t have to type kubectl all the time but instead just type k. Also I want to setup autocompletion:
source <(kubectl completion bash)
echo "source <(kubectl completion bash)" >> ~/.bashrc
I will edit my .bashrc file in my home directory:
adding the following two lines:
alias k=kubectl
complete -o default -F __start_kubectl k
Then either logon or logoff or type this command:
exec bash
You should then see the worker nodes appear in your cluster
k get nodes
Let’s take it for quick run:
k run nginx --image=nginx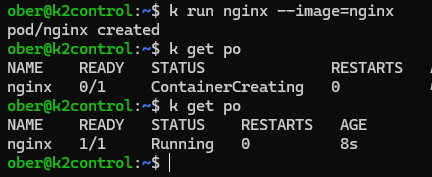
EXTRA BONUX INFO just for fun: I wonder where that pod with the Nginx container is running?
k get po -owide
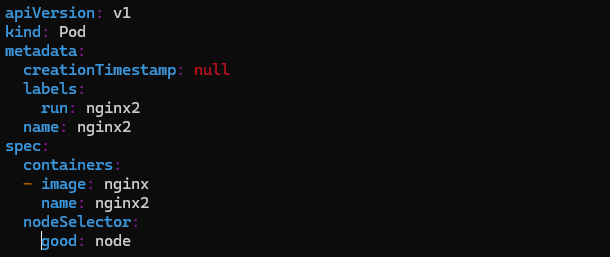
What if I want to force a pod to run on a certain node. Let’s create a pod manifest yaml file the lazy way then alter it and apply:
k run nginx2 --image=nginx --dry-run=client -oyaml >nginx2.yamlWe can apply a label to the node we want which will make it easier to apply the selector.
k label node k2w02 good=node
Now let’s open the file and put in a node selector that will force the pod on a certain node.
vi nginx2.yamlWe will add the node selector good=node to the yaml file
Now we will apply the manifest:
k apply -f nginx2.yamlWe can check where it has been placed:
k get po -owide
That’s it for Part 1 Day1.
Stay tuned as we continue next time installing our external snapshotter and loadbalancer.


