

Hello there,
In my last post, we talked about using private deployment in VB for AWS. Today, we're diving into another essential aspect of AWS - encryption. In certain situations, AWS users might have separate accounts for different tasks, like Production, Development, and Testing, as well as distinct services such as encryption, logging, and networking.
VB for AWS does a great job with cross-account encryption for EBS volumes during backups and restores. However, when it comes to repository encryption, it doesn't offer an easy way to use a cross-account Customer-Managed Key (CMK) in the user interface. But no worries, we've got a workaround using REST API.
In this post, I'll walk you through the process of creating a repository that's encrypted with a cross-account CMK. But first things first, let's get our CMK ready. So, let's head over to the account where you've either already created one or plan to set it up.
Preparing CMK
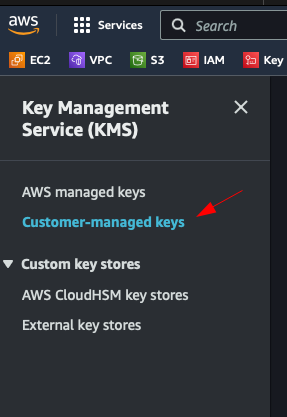
Find the Key Management Service in AWS and click on Customer-managed keys
Click Create Key
Keep 'Symmetric' selected for the key type, and leave the usage as 'Encrypt and decrypt.' Now, when it comes to advanced options, you have a choice to make between a single-region key or a multi-region key. In this particular example, I'll opt for a single-region key.
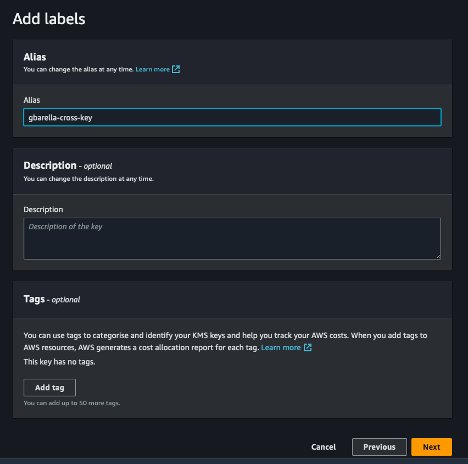
Give your key an Alias.
Select the user or role you want to be the admin. In my example I selected the role used by the SSO with the admin rights.

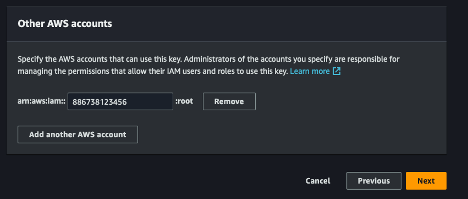
In the 'Key Usage permissions' section is where you'll configure the key's permissions for another AWS account. To get started, scroll down and locate 'Other AWS accounts.' Click 'Add another AWS account' and input the account ID associated with your VBAWS appliance's location.
This step sets the stage for the next action, where we can refine and restrict these permissions to a single role.
On the next page, you will scroll-down and find the Key Policy.
It should look like this:
{
    "Id": "key-consolepolicy-3",
    "Version": "2012-10-17",
    "Statement": [
        {
            "Sid": "Enable IAM User Permissions",
            "Effect": "Allow",
            "Principal": {
                "AWS": "arn:aws:iam::20xxxxxxxxxxx:root"
            },
            "Action": "kms:*",
            "Resource": "*"
        },
        {
            "Sid": "Allow access for Key Administrators",
            "Effect": "Allow",
            "Principal": {
                "AWS": "arn:aws:iam::20xxxxxxxxxx:role/aws-reserved/sso.amazonaws.com/AWSReservedSSO_Admins_b537b1edf998e882"
            },
            "Action": [
                "kms:Create*",
                "kms:Describe*",
                "kms:Enable*",
                "kms:List*",
                "kms:Put*",
                "kms:Update*",
                "kms:Revoke*",
                "kms:Disable*",
                "kms:Get*",
                "kms:Delete*",
                "kms:TagResource",
                "kms:UntagResource",
                "kms:ScheduleKeyDeletion",
                "kms:CancelKeyDeletion"
            ],
            "Resource": "*"
        },
        {
            "Sid": "Allow use of the key",
            "Effect": "Allow",
            "Principal": {
                "AWS": "arn:aws:iam::88xxxxxxxxxx:root"
            },
            "Action": [
                "kms:Encrypt",
                "kms:Decrypt",
                "kms:ReEncrypt*",
                "kms:GenerateDataKey*",
                "kms:DescribeKey"
            ],
            "Resource": "*"
        },
        {
            "Sid": "Allow attachment of persistent resources",
            "Effect": "Allow",
            "Principal": {
                "AWS": "arn:aws:iam::88xxxxxxxxxxx:root"
            },
            "Action": [
                "kms:CreateGrant",
                "kms:ListGrants",
                "kms:RevokeGrant"
            ],
            "Resource": "*",
            "Condition": {
                "Bool": {
                    "kms:GrantIsForAWSResource": "true"
                }
            }
        }
    ]
}
Replace the ARN of the cross account in the SIDs "Allow use of the key" and "Allow attachment of persistent resources" with the ARN of the IAM role used in the appliance to add the repository.
{
    "Version": "2012-10-17",
    "Id": "key-consolepolicy-3",
    "Statement": [
        {
            "Sid": "Enable IAM User Permissions",
            "Effect": "Allow",
            "Principal": {
                "AWS": "arn:aws:iam::20xxxxxxxxxxx:root"
            },
            "Action": "kms:*",
            "Resource": "*"
        },
        {
            "Sid": "Allow access for Key Administrators",
            "Effect": "Allow",
            "Principal": {
                "AWS": "arn:aws:iam::20xxxxxxxxxx:role/aws-reserved/sso.amazonaws.com/AWSReservedSSO_Admins_b537b1edf998e882"
            },
            "Action": [
                "kms:Create*",
                "kms:Describe*",
                "kms:Enable*",
                "kms:List*",
                "kms:Put*",
                "kms:Update*",
                "kms:Revoke*",
                "kms:Disable*",
                "kms:Get*",
                "kms:Delete*",
                "kms:TagResource",
                "kms:UntagResource",
                "kms:ScheduleKeyDeletion",
                "kms:CancelKeyDeletion"
            ],
            "Resource": "*"
        },
        {
            "Sid": "Allow use of the key",
            "Effect": "Allow",
            "Principal": {
                "AWS": "arn:aws:iam::88xxxxxxxxxx:role/gbarella-vbaws-v5a-VeeamInstanceBackupRestoreAcces-8KMBJC2XAJMD"
            },
            "Action": [
                "kms:Encrypt",
                "kms:Decrypt",
                "kms:ReEncrypt*",
                "kms:GenerateDataKey*",
                "kms:DescribeKey"
            ],
            "Resource": "*"
        },
        {
            "Sid": "Allow attachment of persistent resources",
            "Effect": "Allow",
            "Principal": {
                "AWS": "arn:aws:iam::88xxxxxxxxxx:role/gbarella-vbaws-v5a-VeeamInstanceBackupRestoreAcces-8KMBJC2XAJMD"
            },
            "Action": [
                "kms:CreateGrant",
                "kms:ListGrants",
                "kms:RevokeGrant"
            ],
            "Resource": "*",
            "Condition": {
                "Bool": {
                    "kms:GrantIsForAWSResource": "true"
                }
            }
        }
    ]
}
Click Finish
Creating the repository
Now that our CMK is prepared, it's time to make use of the REST API to create a repository with cross-account encryption.
I'll be using Swagger as the REST API client for this demonstration, but you're free to use Postman or any other client of your choice. If you opt for Swagger, you can refer to this post, where I've outlined how to obtain the authorization token and prepare for sending HTTP requests:
Link to Post: How to Assign Custom Tags on Veeam Backup for AWS Workers
Additionally, for more in-depth information, you can consult the user guide, which provides comprehensive details:
User Guide: Veeam Backup for AWS REST API Reference
Once you have successfully acquired the authorization, locate the Repositories resource collection, and expand the 'POST /api/v1/repositories' to 'Add a Backup Repository.' Click on 'Try it out.'
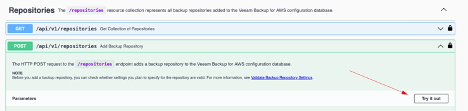
As you can see in the example from Swagger there are some parameters we need to complete
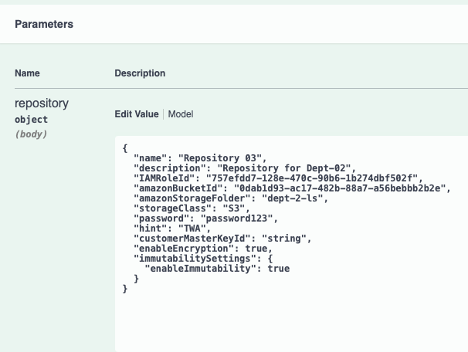
We need to retrieve some of these information from other sections, such as IAMRoleID and AmazonBucketID.
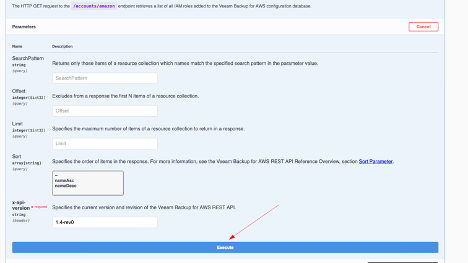
Scroll all the way up until you find IAMRoles section and expand the first GET, click on Try it out and execute.
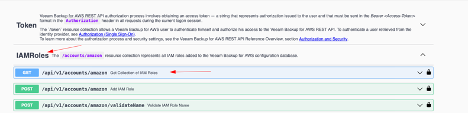
Find the role you will use to create the repository from your backup account and note the “id”.
Response should be something like this:
Now, let's do the same for the bucket, but with a slight twist. This time, we'll use the IAM Role ID you acquired in the previous step. In the 'Search Pattern' field, type the bucket name to make it easier to locate the correct bucket, especially if your account hosts multiple buckets.
This is the bucket I am using:
Note the bucket ID, make sure you are notating the bucket ID and not the Region ID. Bucket ID is the above one.
Let’s replace these IDs in the JSON of the repository creation:
Password and hint parameters can be excluded since we are using KMS. I am also setting immutability to off.
{

  "name": "Repository_with_CMK_cross-account",

  "description": "Repository encrypted with CMK from another account",

  "IAMRoleId": "d98f4d37-7874-4be1-9702-770078f5c9cd",

  "amazonBucketId": "9ca0647c-7e5a-453a-bee9-e360453057a5",

  "amazonStorageFolder": "barella-cmk-kms-account",

  "storageClass": "S3",

  "customerMasterKeyId": "arn:aws:kms:us-east-1:2028xxxxxxxx:key/326888a0-f016-4054-9258-92cf10763552",

  "enableEncryption": true,

  "immutabilitySettings": {

    "enableImmutability": false

  }

}
Click Execute.
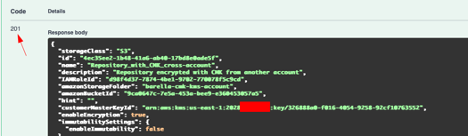
It will take a couple seconds and you should have a response like this:
Let’s go ahead and verify if the repository is created.
In the UI it will not show the CMK, but we can confirm in the database the key is being used:
Disclaimer: Please be advised that the method described here is not officially supported. We want to assure you that we are actively monitoring and confirming the steps in this process, even though unforeseen issues may still occur.
I hope this guide has been helpful in creating a cross-account CMK-encrypted repository in Veeam Backup for AWS. If you have any questions or need assistance, feel free to reach out. Thanks for reading, and best of luck with your Veeam and AWS adventures.

