

Microsoft introduced a protected Microsoft Teams API last year, which was ‘metered’, meaning that Microsoft are charging for the usage of the APIs. If you missed the original announcement and subsequent details on this, the payment models and licensing requirements for this can be found within Microsoft Learn. Microsoft also provided a nice write-up on their justification and principles regarding what makes an API chargeable, you can read this here, if interested.
Looking ahead from the Microsoft Teams metered APIs, we can see that Microsoft have introduced a metered SharePoint API and, purely speculation on my part, I wouldn’t be surprised if in the future we saw an approach from Microsoft that allowed generic API access included within the Microsoft 365 product suite, but additionally High-Capacity variants of the same APIs, to capture bulk data scenarios such as performing backups.
With this in mind, design considerations such as the introduction of additional metered APIs or migration between Cloud Solution Providers can necessitate change within your organisation’s Azure tenant, this could require the creation of separate resource groups or even subscriptions, for reasons such as department cross-charges.
As the title of this blog post suggests, I’m attempting to update the subscription used by my App Registration, and if you’ve found your way here, you might be attempting to do the same. I’ll be showing you how to achieve this via Azure CLI, and via the Azure Portal.
Azure CLI
Step One: Locate Your Old & New Subscriptions
A quick one to start us off with, as we’ll be migrating between subscriptions, we need to know the name or the SubscriptionId of the resources we’re working with. You can get a list of all your subscriptions by running the following command:
az account subscription list --out tableThe –out table formatting is optional, but I find it useful as it strips the output down to just four columns, with the two we’re interested in being “DisplayName” and “SubscriptionId”. Copy down the values for your old and new subscriptions, we’ll need these shortly.
Step Two: Create the New Resource Group
Each resource must reside within a resource group, and resource groups can’t be migrated between subscriptions, at least at the time of writing this article. Therefore, to migrate the resource between subscriptions, we need a new resource group for the resource to reside within. We’ll create our new resource group via the following command:
az group create --name "Resource Group Name" --location ukwest --subscription "New SubscriptionName or SubscriptionGUID"This command only requires a few variables, the resource group name is whatever you wish to call it, try something meaningful to you such as “M365MeteredAPIBilling”, the location is the region where the resource group will reside. Should the region providing the resource group become unavailable, resources can only be read, but not updated from a configuration standpoint, for more information on this, see the relevant Microsoft documentation here. Finally, the subscription variable needs to be your new subscription you wish to use, I include this variable because otherwise the CLI will use your default subscription, which might not be the one you meant!
Step Three: Find the Existing Billing Resource
The resource we’re working with is a ‘microsoft.graphservices/accounts’ type resource. To find this, we’ll run the following command:
az resource list --resource-type Microsoft.GraphServices/accounts --subscription "Old Subscription Name or GUID"Again, the resource list is scoped to your current subscription, or your default if you haven’t defined this, so be sure to include the subscription you intend to migrate from. You’ll then receive an output of your resource name, id, and resource group, amongst other metadata. Take note of the resource ID, you’re about to need it.
Step Four: Migration Time
Now we can put this all together with a single command to facilitate the move.
az resource move --destination-group "New Resource Group Name" --ids "ResourceID" --destination-subscription-id "New Subscription GUID" --subscription "Old Subscription Name or GUID"
az resource move --destination-group "PAYG-RG-M365APIS" --ids "/subscriptions/<REDACTED_GUID>/resourceGroups/VB365_Metered_APIs/providers/Microsoft.GraphServices/accounts/VB365APIBilling" --destination-subscriptionid "<REDACTED_GUID>" --subscription "<REDACTED_GUID>"
Now, this is where things get messy. When I first attempted to work with this, I got informed that my resource group didn’t exist, which of course wasn’t true, but it didn’t exist within the current subscription context, as my default subscription wasn’t my old subscription used for this app registration. Because of this I had to include the –subscription parameter, and provide the old subscription, to give the ‘az resource move’ command the appropriate context to operate within. This can take a while to validate & run, but once completed, the resource has been successfully migrated!
Azure Portal
Now let’s look at how to do this from the Azure Portal.
Step One: Find the Resource
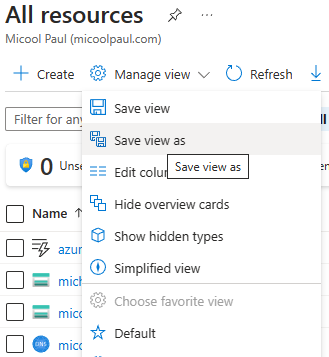
Navigate to the Azure Portal and select ‘All Resources’. Within here we need to firstly click ‘Manage view > Show Hidden Types’, to ensure we can see the ‘microsoft.graphservices/accounts’ type, which is hidden by default.
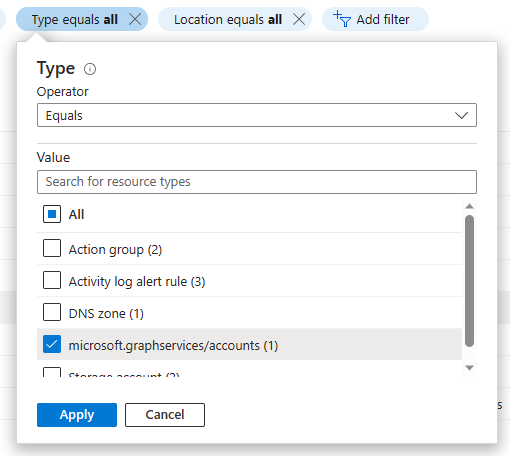
If you’ve got a lot of resources, you might also benefit from applying a filter to the type, setting it to only ‘microsoft.graphservices/accounts’.
Once we’ve found our resource, click its name to open it.
Step Two: Performing the Migration
We won’t find much of interest within the resource properties, but under the ‘Essentials’ section we’ll see “Subscription (move): <Subscription Name>”. Click on move to start the migration workflow.
Within the newly opened migration flow you’ll have the ability to specify your subscription, and then either choose an existing resource group, or the option to create a new one. Once these options are selected, click next.
Once this is selected, Microsoft will perform a validation check, prior to allowing the move, this can take a few minutes.
Once the validation is successful, click ‘Next’ to open the review screen, confirm everything is as you expect, tick the acknowledgement, and select ‘Move’ to execute the migration.
The Final Step: Testing
It doesn’t matter whether you used Azure CLI, or Azure Portal to complete this task, the most important end step for both is that you must test to ensure everything is still working within your applications. In my case, I was using Veeam Backup for Microsoft 365 to protect my test Teams tenant, and post-migration, everything worked as expected.


