Veeam Backup & Replication is a data protection and disaster recovery solution for virtual, physical, and cloud environments. With Veeam Backup & Replication you can Create crash-consistent and application-consistent backups of virtual and physical machines, quickly restore physical machines, EC2 instances, VMs, VM disks, guest OS files, and application items, perform a backup health check to verify that backups are not corrupted and are ready for restoring, create VM replicas and switch to them in case of a disaster and automate transferring of backups to tapes and other external repositories.
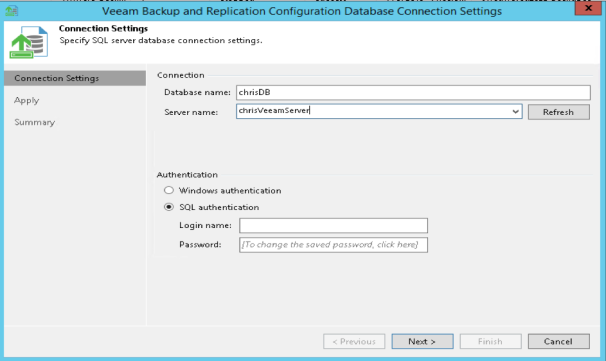
Veeam Backup and Replication Configuration Database Settings come with the Veeam.Backup.DBConfig.exe utility that allows you to manage connection settings for Veeam Backup & Replication and/or Veeam Backup Enterprise Manager configuration database.
Using this utility, you can:
1. Connect to a different Microsoft SQL Server instance. If you specify a database that does not exist yet, it will be created on the selected server.
2. Change the authentication method for the database connection. Possible methods are Microsoft Windows authentication and Microsoft SQL server authentication.
Steps in a nutshell:
Run or backup Veeam from the console, dismount the database from the MS SQL Server,
– Install MSSQL and mount the DB, use dbconfig and point Veeam to the new instance. Here are the steps needed to migrate your Veeam SQL Databank to a new server.
Next, ensure the following requirements are met
1. Ensure automatic backup jobs and copy jobs are disabled (not mandatory but recommended)
2. Ensure the Veeam Backup Service is disabled.
3. Also, ensure the Veeam Broker Service is disabled
This step is needed in order to mitigate data loss. The screenshot below shows stopped services

4. Open the Configuration Backup Settings and perform a manual backup of the Database and ensure it is placed in a safe place.
– Here, a new SQL Instance is setup (Db restored etc).
– A service account is also created in AD to support windows Authentication when changing the connection to this new Db and also granting logon access to the Veeam services
5. Change the database configuration settings: To associate Veeam with the restored database, please use the DBConfig Utility “Veeam Backup and Replication Configuration Database Settings) to change to the new DB.
This can be reached from the
A. Start menu
B. Veeam
C. Configuration Database Settings.
D. From Cortana
Note: This step depends on the operating system used. Follow your OS steps and locate “configuration Database Settings” OR
– You can launch the Veeam.Backup.DBConfig.exe utility from the Start menu by clicking the Configuration Database Connection Settings, OR
– Alternatively, you can use the Veeam.Backup.DBConfig.exe file located in the installation folder of Veeam Backup & Replication (by default, %PROGRAMFILES%VeeamBackup, and ReplicationBackup).
6. Select “Veeam Backup and Replication” and click “Next”

Select Windows Authentication and enter the service account user created in AD and click on Next.
– This will apply the settings and try to restart all previously stopped services.
Note: You can help out here by manually starting all services and if possible grant the Service account to log on right to the services. (Otherwise, the Veeam backup and Replication Configuration Database Connection settings will not be able to start the Services if this right is needed for it to work).
– Also start the Veeam Cloud Connect Service (Note, even when this is not manually stopped, it will be automatically stopped and if logon rights have to be granted, do this manually and have it started).

Here is the link to the original blog post. I hope you found this blog post helpful, and please visit this blog for interesting and informative contents.


