Happy Thursday Community! Thought I'd share another Linux process today – how to resize a Linux volume used as a Veeam Repository in Linux OS, specifically increasing its size. This also is in reference to using an array as your Volume-backed storage. Logical Volume Manager (LVM) processes won't be discussed. Additionally, though there is a process to decrease Volume sizes as well, I also won't be discussing that process either. When wanting to decrease Volume size, I highly recommend creating a new Volume of the desired size, then copy your data to it to prevent potential data corruption.
As most of you probably know, increasing Volume sizes within Windows is pretty straight forward → increase LUN storage on your array, then rescan your disks in Windows Disk Manager, then Extend the Volume. It takes a minimal amount of time to perform. Within Linux, there are a few more tasks needing to be performed than in Windows to get your Volume size increased. I'll share exactly what those steps are below.
- The first thing you need to do is go onto your storage array and increase your LUN size. How to perform this step is dependent on your array. But, for most arrays this process is pretty straighforward
- Second, log onto your Linux Veeam Repository server and unmount the Repository Volume you're wanting to increase:
sudo umount /path/to/vol/mountpoint -
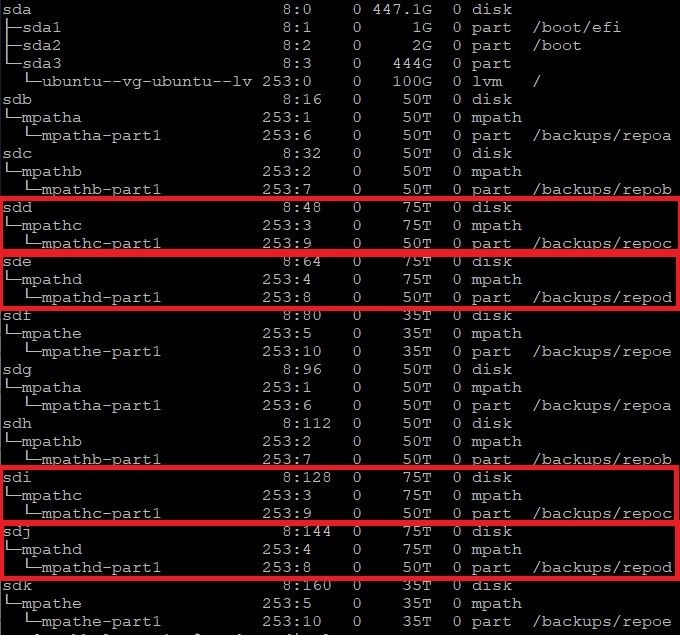
When using Linux OS for a Veeam Repository, you should be using multipathing to connect to your array. I discuss this process a bit in my Taking the Fear out of Implementing Linux Veeam Repositories post. Multipath devices appear as single logical devices in Linux, typically by default named like mapthX . Personally, I change the logical path names in the multipath.conf file to make the Volume names more descriptive for what I use them for. Each mapped device should have at least 4 paths to the array LUNs you're using as Veeam Repository Volumes, denoted by the file path, /dev/sdX . You need to retrieve each device used for the path for the next step in this process. To get each device used, run the below command:
sudo multiipath -ll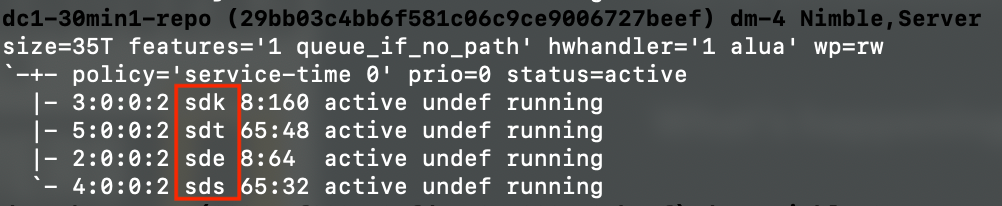
Multipath Devices -
You'll then need to rescan each scsi device noted in the above step to detect the increased Volume size of the underlying LUN. This is done by 'writing a 1' to the rescan file for each device

Device Rescan -
Next, you need to resize the multipath device. The command used below instructs the multipath daemon to update the size of the multipath device based on the resized scsi device paths. Running the command should return ok. If something in the command is incorrect, fail will be returned (NOTE: there is no space between the "k" and single quote in the command below)

Multipath Resize -
You now need to re-mount the Volume
sudo mount /dev/mapper/<vol-name-part1> /path/to/vol/mountpoint -
The last step in the process is to make the filesystem aware of the size increase. If you're using XFS, as Veeam recommends, you'll use the command as noted below. For other filesystems, use the resize2fs command
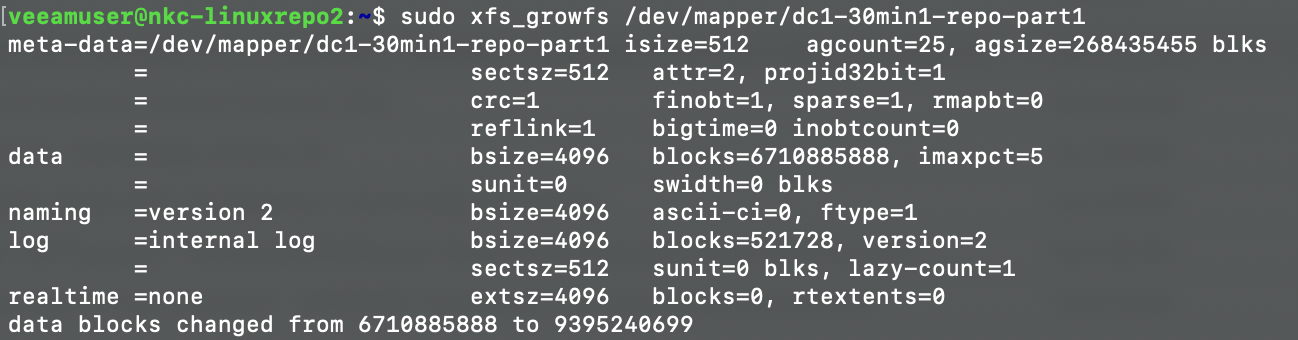
Filesystem Resize To make sure everything looks ok, re-check your disk free space:
df -hT
You then should rescan your Linux server in the Veeam Console so Veeam is aware of the additional space.
Though not required, after you perform the above steps, if you want to check your Volume (filesystem) has no errors, you can run the following command:sudo e2fsck -f /dev/mapper/vol-name-part1
Hopefully the above process helps you if or when the time comes you may need to increase the size of your Veeam Repository if you use Linux OS. If you have any questions about the above, please comment below.