

It’s the year of Linux!!! Well, at least for me it is. 😉 I’ve used a decent amount of Linux CLI over the years in managing vSphere environments, but not learned near as much as I wanted to. I always felt a void in my depth of knowledge & expertise about Linux. So I started this year going all in with LFCSA (Linux Foundation Certified Systems Administration) video courses on Pluralsight, learning about Linux Storage, Operations, Users & Groups, Service, and Network Management.
Because I’m way more comfortable now using Linux, I’m planning on implementing Linux systems as Veeam Backup components in my environment to decrease the heightened security risk Windows systems tend to pose. As such, I’ve been reading up on Linux implementation in Veeam’s User Guides, starting with the Veeam Agent for Linux (VAL) User Guide. I thought I would share my Linux Agent journey from Preparation, to Install/Implementation, to “Hiccups” encountered, to Backup Success with the Community in hopes others will have a smooth Linux Agent implemention process in their environment.
I’ll be discussing this process using a Debian-based derivative, Ubuntu 20.04. For Redhat-based systems (RHEL, Centos, etc), the process is mostly the same, except a few required modules have different names, as well as RHES systems use the yum package management utility vs apt in Debian systems.
Agent Architecture and Components
When you install the Agent, Veeam deploys several components, as listed below:
- Veeam Agent for Linux Service (veeamservice) – responsible for managing all tasks and resources in the Agent
- Veeam Agent for Linux Job Manager (veeamjobman) – Linux process started by the Linux Service for every backup job session
- Veeam Agent – communicates with the Linux Service and Job Manager process – this service is started by the process to perform data transfer operations – copies data from the backed up Volume to the backup location during backup; copies data from backup location to the target Volume during restore. This service also performs compression
- Veeam Agent for Linux Driver – Veeam driver used to create Volume snapshots, as well as keep track of changed blocks
NOTE: it is worth noting here, if you unload this driver or the system gets rebooted, the CBT map data is reset. As such, backups would take longer to run (see below excerpt from Guide)
VAL CBT Note - SQLite Database engine – stores Agent configuration data
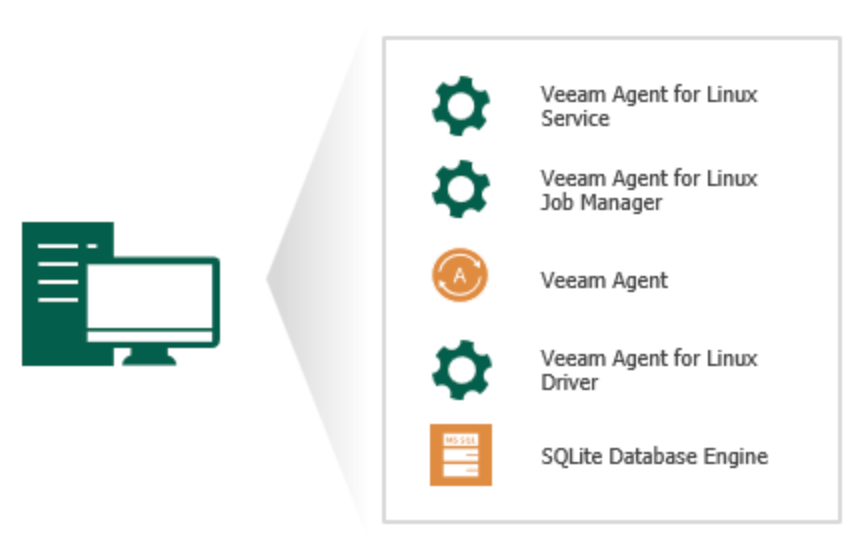
Veeam Agent for Linux Architecture
Next, Like Veeam Agent for Windows, there are 2 backup modes:
- Standalone mode, which means the Agent is managed on the client itself by the user
- Managed mode, which means the Agent is controlled by the Veeam Backup and Replication Server or Veeam Service Provider Console
Additionally, there are 3 Linux Agent backup types you can perform:
- Entire Machine
- Volume-level
- File-level
For restores, you can perform bare-metal, volume, or individual file recovery. Don't forget to create your Bootable Recovery Media ISO after Agent installation so you can perform your restores when needed
Last, there are 3 Editions you can use with the Linux Agent:
- Server – a licensed, full-featured commerical edition
- Workstation – like the Server Edition this is also licensed, but with limitations
- Free – no license is required; allows for only 1 backup job; you cannot use a VCC Repository or do direct backup to Object Storage Repositories; and, you cannot use pre-freeze/post-thaw scripts
For a full feature comparison of each Edition, review Veeam's Agent Comparison Guide on page 7
Requirements
Before diving head first into the Agent installation, I highly recommend you thoroughly review all the Systems Requirements in the Linux Agent User Guide, as well as a couple worthwhile accompanying Veeam KBs, KB2260 and KB2804. I won’t go over all requirements here, but I will highlight several worth noting:
- Hardware – no special support caveats here, except Containers and Paravirtual Instances are not supported; nor are devices managed by Veritas Volume Manager
- OS – most any Linux OS distributions and filesystems are supported
- Be aware, Linux kernel support is only from 2.6.32 to 6.3 and most need to be 64-bit, but VAL does support 32-bit of RHEL6 and Oracle6
- Total filesystem size cannot exceed 218TB, and file size cannot exceed 16TB
- Each backed up Volume must have a unique UUID
- The Linux Agent does not support Volumes on USB or SDs, nor does it support LVM snapshots
- Software – there is an extensive list of software required in the Guide. The good thing is most are pre-installed with standard Linux OS distributions. “Light” OS distributions may need the listed modules manually installed
- To check if a module is loaded or not, you can run:
lsmodto view all loaded modules on your system. You can pipe ,|sort, to list them alphabetically, or even pipe,|grep <module-name>, to check on a specific module. Another command you can run isapt listto view all installed modules; for example, to see if python3 is installed, type:apt list --installed | grep python3 - As noted in the Considerations and Limitations section, make sure the following modules are not installed:
hcdriver,snapapi,snapapi26,snapper,dattobd,dattobd-dkms,dkms-dattobd,cdr, andcxbf
- To check if a module is loaded or not, you can run:
Pre-Requisites
Before installing the Linux Agent, there are tasks you’ll more than likely need to perform to ensure your Agent install is successful:
- First, I recommend getting your system current by updating security packages & modules:
sudo apt update && sudo apt upgrade -y - Also, the user account you use for the Agent needs to have BASH (
bin/bash) as its default shell. You can check by viewing the user shell information in thepasswdfile:cat /etc/passwd | grep <username>; the last items in the displayed output line will show the default Linux shell for the user

Linux User Default Shell - Verify you have
linux-headers(kernel-headersfor RHES) installed on your system:apt list --installed | grep linux-headers-generic - Next, you more than likely need to install
dkms, which is just a framework allowing kernel modules to be upgraded without changing the whole kernel. To install, run:sudo apt install dkms -y - Last, you need to check your Linux kernel version, because the version you’re running will determine which Veeam “snapshot/CBT package” to install,
veeamsnaporblksnap.veeamsnapis supported up to kernel version5.18, andblksnapis supported on newer kernel versions beginning with5.10. Run:uname -rand reference the kernel version output for the next section in which I discuss Agent install
Agent Installation
- To begin the Agent installation, first download the Agent from Veeam’s website
- Next, place the downloaded
veeam-release*Agent install file on the Linux system you want to back up. Use thescpcommand or other file transfer tool (e.g. WinSCP) to put the file on the system. I prefer thescpcommand and placing the file in the/tmpdirectory on the target (client) machine:

SCP Command - You’re now ready for the Agent install. View the Installation page in the Guide for the installation command specific to your Linux distribution. For Ubuntu, move to the directory you placed the package in and run:
sudo dpkg -i /veeam-release* && sudo apt update*more on this step in the next section -
After the
veeam-releasepackage install, you then need to install the specific Veeam package based off the kernell version you retrieved earlier. Since my kernel version is5.4.0-163-generic, I need to installveeamsnap:sudo apt install veeam -y. If you have a newer kernel version:sudo apt install blksnap -y
"Hiccups"
I ran into only one error during Agent installation, but thankfully it wasn't too difficult to figure out
- When attempting to install the
veeam-releasepackage, I received the following error:
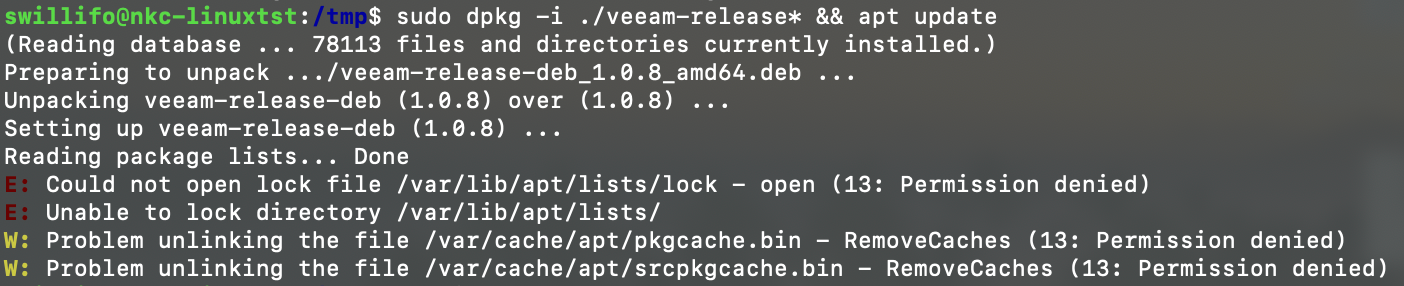
Veeam Agent for Linux Install Error If you look closely at the command I ran, you may be able to figure out the problem. By the way, the command I ran is exactly what is shown in the User Guide. Can anyone guess what my issue was? You guessed it – I needed elevated privileges for both commands in the line. When using
&&, what you're doing is running 2 commands together on one line (i.e. concatenating them). When you do so, and you're not the root account, you need to elevate each command usingsudo. Once I addedsudoto the 2nd command in front ofapt update, the installation was successful -
Above was the only error I encountered, but I thought it worthwhile to share a couple issues posted by members on the Community Hub. I won't elaborate on them in detail, but instead share their posts below. The short-version of the problems encountered though is they either didn't have the needed pre-requisite module software installed, or their software was out of date. Once installed or upgraded, the Agent installation was successful (1st post), or ran without error (2nd post). Take a quick read of the posts below:
Failed Agent Install by@Moustafa_Hindawi
Veeam Agent Backup Error by@tonylee
Veeam Agent Linux Failed to Create Snapshot by@MicoolPaul
Configuration
- After installation, you are now ready to create your Linux Agent job. To begin, type
veeamorveeamconfig uion the command line and just go through the simple job configuration wizard- Provide a job name
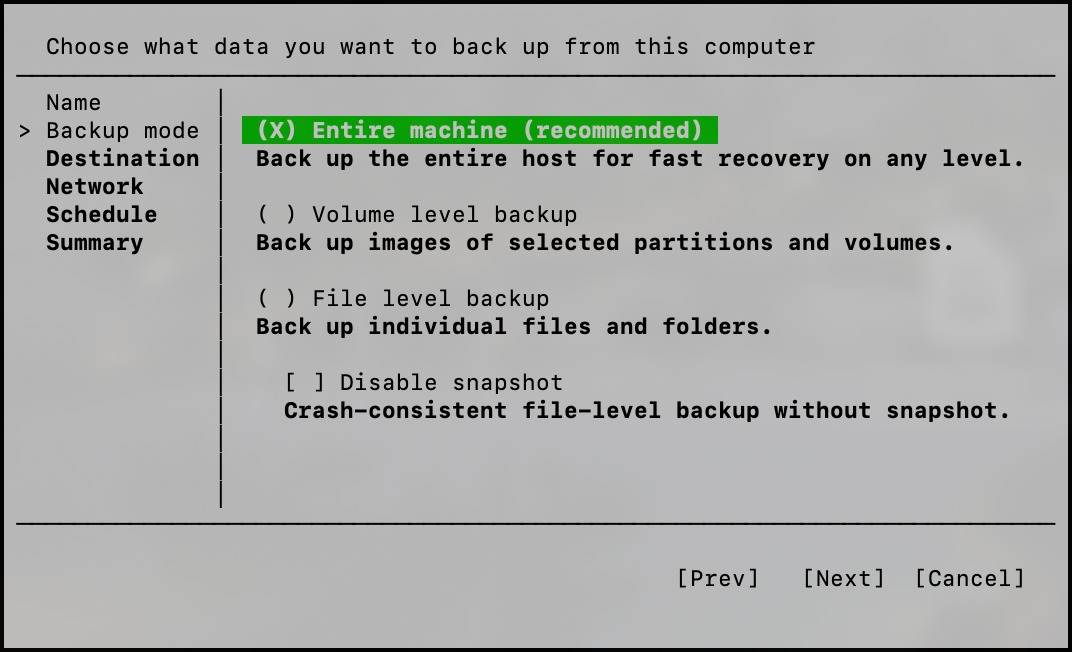
- Select a Backup Mode
Veeam Agent for Linux Backup Mode - Choose a Destination. Depending on what you select, further information will need to be configured – Network Share information if Shared storage was selected; Veeam Server and Repository information if Backup & Replication was selected
NOTE: though you have the ability to select Local storage to store your Backups, it's highly recommended not to use this location for your backup files
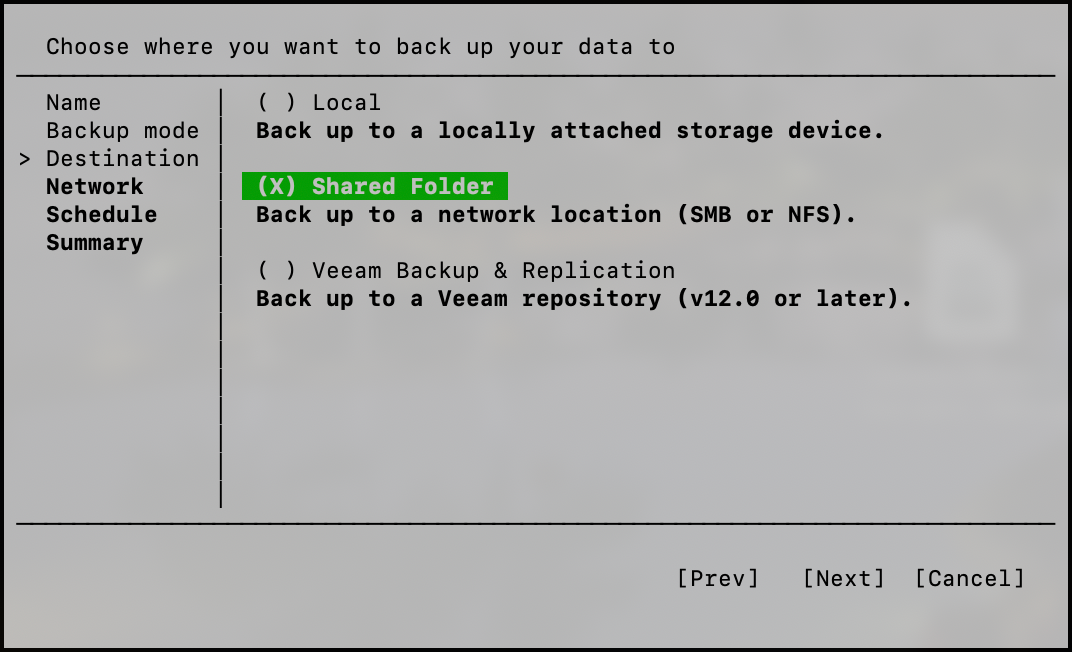
Veeam Agent for Linux Backup Destination
- Click Finish when all items have been configured
Tips
I wanted to end with some limitations to be aware of, as well as a few neat Linux Agent CLI tips to help with your Linux Agent administration:
- Limitations
- You cannot change backup type from volume-level to file, and vice versa
- When you go through the Agent configuration UI wizard, you may notice there are no settings to configure a different compression or storage optimization level than the defaults (Compression = option 2, using the Lz4 algorithm; Storage Optimization = 1024KB, or 1MB). If you need to change these defaults, you have to use the
veeamconfigCLI tool to do so. As with normal image-level backups in VBR, compression setting changes do not require an Active Full to be run for them to take effect on the next job run; but, they won't effect previous backup files/chains. If you change storage optimization, you will need to run an Active Full for the new setting to take effect
- CLI tips
- To get help running
veeamconfigcommands, simply typehelpat the end of a certain command you have questions on, e.g.veeamconfig helporveeamconfig job create help - One cool thing about the
veeamconfigCLI tool is, like vSphere'sesxcli, you can begin typing the command you want and press ENTER, and if you don't have the argument needed to finish the command, you'll get a list of arguments displayed to choose from, as shown below:
Agent CLI Help -
To create a job, e.g. Volume-Level, see the example in the Guide. Take note of the Advanced Settings section here on the arguments to use to change Compression and Storage Optimization settings
-
Maybe you're unsure of what settings you have configured for your job, before typing in a long command, or clicking through the UI, you can simply run the following command to get an instant overview of your job settings:
veeamconfig job info --name <job-name>
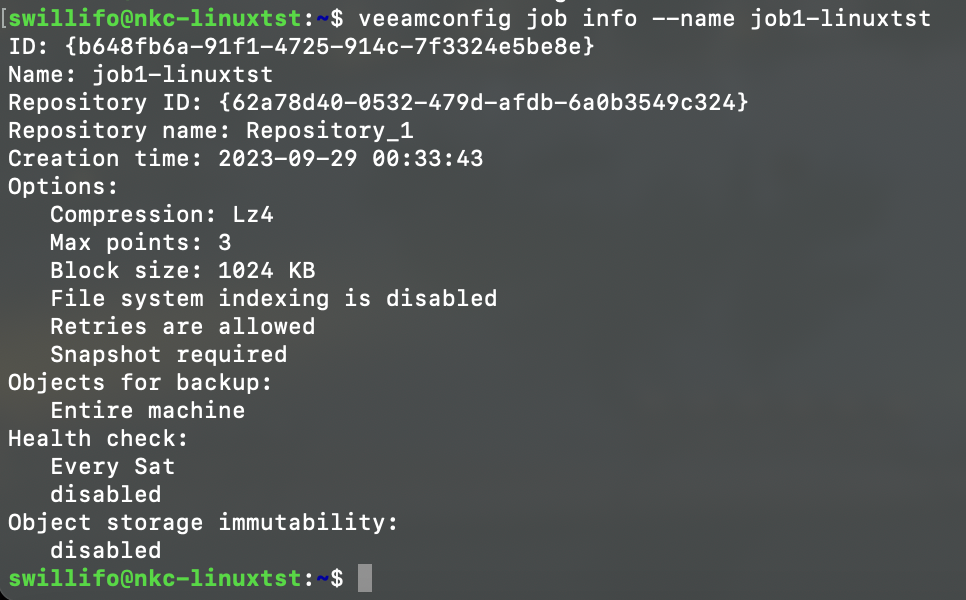
Veeam Agent for Linux Job Settings -
To view full help information about the
veeamconfigtool, type:man veeamconfig
And voila’! That’s all there is to it. After the installation and job configuration, my Linux system backed up successfully. Hope this post helps you in getting any of your Linux devices backed up successfully with Veeam's Agent for Linux! Let me know if this helped, and/or if there were any errors during Agent install or difficulties in getting your system backed up successfully.


