

Hi Folks,
I have written up some quick instructions on setting up Minikube a single node Kubernetes cluster on your laptop. If I have missed something or if anything is unclear please reach out to me.
The great thing about Kubernetes is that you can take it anywhere. If just want to familiarize yourself with Kubernetes and do some testing, then Minikube is an easy to install nonproduction single node Kubernetes cluster that you can install on your laptop. I am using my windows 10 Lenovo Thinkpad.
First, we need to enable the Hyper-V role (or install Oracle VirtualBox if your laptop OS will not run Hyper-V) on your laptop. Mac users can use brew https://gist.github.com/kevin-smets/b91a34cea662d0c523968472a81788f7
To enable the Hyper-V role, follow these instructions:
https://docs.microsoft.com/en-us/virtualization/hyper-v-on-windows/quick-start/enable-hyper-v
INSTALL MINIKUBE
Minikube is a single node Kubernetes cluster which allows you test Kubernetes.
There are two ways to install Minikube on Windows. You can either download the binaries or by leveraging the windows packet manager called Chocolatey. I would recommend using Chocolatey as it will be easier to update going forward when new versions of Minikube are released.
Install Chocolatey:
https://chocolatey.org/docs/installation
Install minikube:
From an Administrative CMD run:
choco install minikube
Note:
If you prefer to use bash instead of the windows command line you can install the Windows Subsystem for Linux (WSL). In bash it is easy to create common Kubernetes command aliases and autocompletion:
Install WSL
https://docs.microsoft.com/en-us/windows/wsl/install-win10
RUN MINIKUBE
In CMD as administrator (Type bash if you have installed WSL, otherwise simply continue with the commands).
Minikube comes with addons that apply production like features to our test environment. You can view them by running:
minikube addons list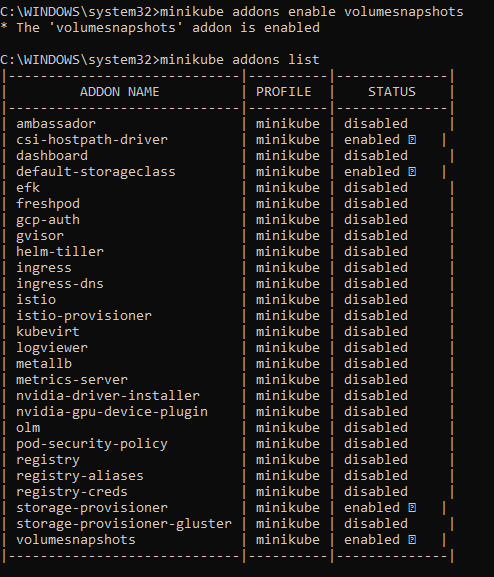
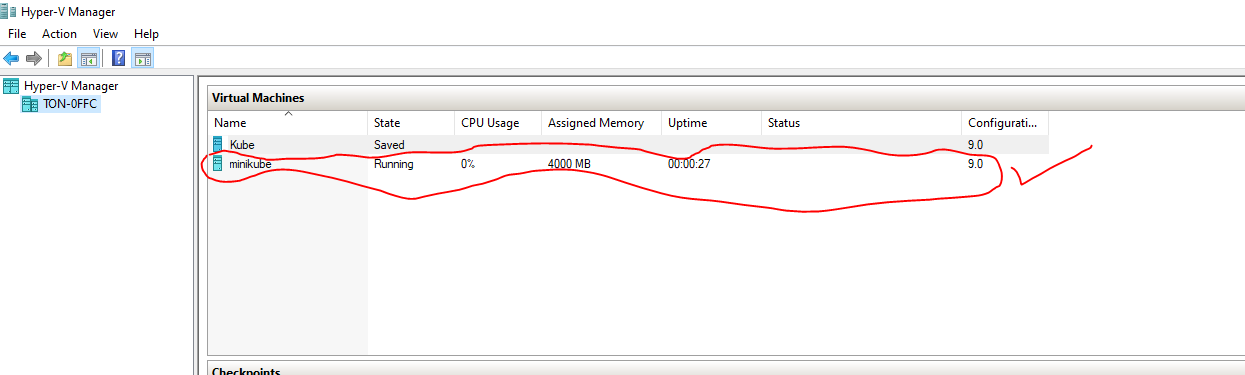
This command will build the minikube VM and get everything setup and running correctly.
minikube startIf you check Hyper-V Manager, you should now see a new VM running called minikube:
We want to be able to automatically provision persistent storage for our containers in order to snapshot them later, perhaps with your favourite Kubernetes backup program Kasten? 
We enable of a couple of addons in Minikube, csi-hostpath-driver and volumesnpashots:
Minikube addons enable volumesnapshots,csi-hostpath-driverKubernetes will leverage Storageclasses to dynamically provide persistent storage to containers that request them by means of persistent volume claim (pvc)
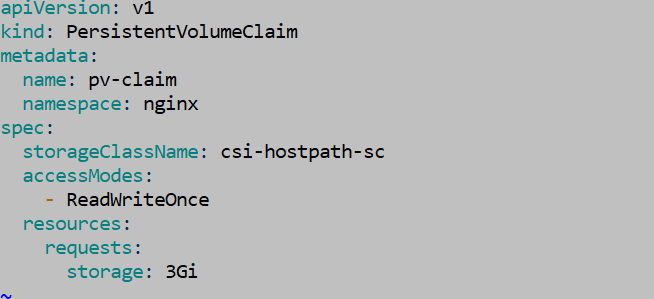
The default sc in minikube will the standard so we will change this to csi-hostpath-sc:
kubectl patch storageclass csi-hostpath-sc -p '{"metadata": {"annotations":{"storageclass.kubernetes.io/is-default-class":"true"}}}'
We will now delete the standard sc:
kubectl delete sc standard
minikube addons disable default-storageclassWe will now create a pod that will request persistent storage.
For this we will create a nginx pod called task-pv-pod with a persistent volume claim called my-pv-claim. (Examples taken from the official Kubernetes documentation at Kubernetes.io)
Our cluster will automatically provide storage to the pod since we have a storage class that is dynamically capable of doing this.
We will first create a namespace so that our pod will be segregated.
kubectl create ns nginxFirst we will create a Persistent Volume Claim. This will be referenced by our pod when it requests persistent storage. Create in your favorite editor the following file and name it pvc.yaml
Now ask Kubernetes to create the PVC.

We will now create our pod:
In notepad++ paste the following text into a file and name it nginxpvcns.yaml
kind: PersistentVolumeClaim
apiVersion: v1
metadata:
  name: my-pv-claim
  namespace: nginx
spec:
  accessModes:
    - ReadWriteOnce
  resources:
    requests:
      storage: 1Gi
---
kind: Pod
apiVersion: v1
metadata:
  name: task-pv-pod
  namespace: nginx
spec:
  volumes:
    - name: my-pv-storage
      persistentVolumeClaim:
       claimName: my-pv-claim
  containers:
    - name: task-pv-container
      image: nginx
      ports:
        - containerPort: 80
          name: "http-server"
      volumeMounts:
        - mountPath: "/usr/share/nginx/html"
          name: my-pv-storage
Now in the same directory where that file is located type:
kubectl create -f nginxpvcns.yamlWe can check if the pod and its storage was created according to the wishes of our yaml file above. To do this we must tell Kubernetes where to look, which is in the nginx namespace: kubectl get pods -n nginx:
Kubectl get pods -n nginx 
And for the storage:
Kubectl get pvc -n nginx 
The is a lot that you can do with Minikube and if you have any issues or make any mistakes you can rebuild your cluster by simply typing Minikube delete and then Minikube start all over again.
Have fun!!!


