

In the first part of this three part blogpost we’ve discussed why to use gMSAs to achieve application consistency before backing up our workloads with Veeam Backup and Replication (VBR).
In this part I will show you, how easy it can be implemented with VBR and how the process differs from the official manual.
(1) Ensure your forest schema is updated to (at least) Windows 2012 (Version 56+)
First, check your version of the forest schema and increase it, if needed, beforehand.
You might well go all the way up to the maximum possible level for your most legacy domain controller. Check for compatibility with other domain related services like Exchange servers etc. first, to make sure you don’t break other things.
(2) Make sure you have created a KDS root key
The KDS root key is a crucial component of the Microsoft Group Key Distribution Service (KdsSvc). It is used to generate group keys that are distributed within an Active Directory environment. This root key is essential for creating group Managed Service Account (gMSA) passwords.
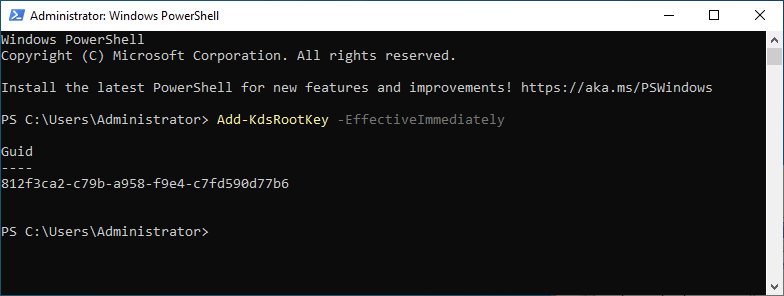
You can check the presence of a root key by running Get-KdsRootKey in PowerShell on one of your DCs. If you get an empty result, you can create the key by running Add-KdsRootKey -EffectiveImmediately in an elevated PowerShell on once of your DCs. Other DCs will not be able to use the root key until it was properly replicated. So, you have to wait 10h after the command, before you can create your first gMSA account.
There is a workaround for the wait time, but this should only be used in test environments:
Add-KdsRootKey -EffectiveTime ((get-date).addhours(-10)). It forces the key to become effective 10h in the past already.
It is recommended to create only one root key per domain.
(3) Prepare your guest interaction proxy (GIP)
We always educate not to have Veeam Backup and Replication (VBR) and any of its components inside the production domain. This can no longer be achieved completely using gMSAs. If we want to make use of gMSA, the system requesting the temporary password must be member of the domain. The guest interaction proxy (GIP) is the component within Veeam that talks to the workload and injects the guest helper to carry out the afore mentioned tasks. Currently, it must be a Windows server (physical or virtual). The GIP will be the one to request the gMSA password from the domain. But nothing to worry about, as it is sufficient to have only the GIP inside your production domain. From the Veeam perspective this is a one-way trust. Veeam can control its services on the GIP, once it is added as a managed server using e.g. a local admin of the GIP system. Someone having overtaken the GIP, can by no means manipulate anything on the Veeam side though.
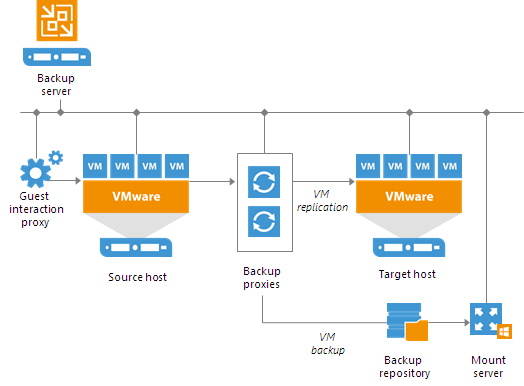
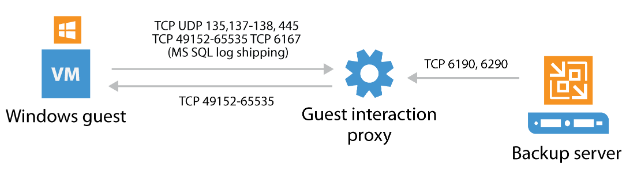
It is also good practice to have the GIP located close to your workloads from a network perspective. Best would be in the same perimeter or even layer-2 domain. Then we only need network rules from VBR to the GIP (port 6190 and 6290) and the GIP can freely access the domain and its workloads.
Think of the GIP as your bridgehead to the domain. Having it close to your workloads makes also sense from a port security perspective. If your VBR is in another VLAN and maybe has a firewall between itself and the workload’s VLAN, you only must open the control ports to your GIP if it was placed in the same VLAN as the workloads. This also nicely fits the recommendation for log-shipping servers. So, feel free to use the GIP for log-shipping if needed as well.
(4) Create a security group to allow access to the gMSA’s password
Before we create the gMSA account, we should create a security group for the computer accounts that will be granted access to the gMSA account. This group will only carry computer accounts. In our context this will only be the Veeam Guest-Interaction-Proxy (GIP) itself, as this is the system to request the password from the domain to be used to access the guest workloads. While creating the gMSA later, this group will be added to the “PrincipalsAllowedToRetrieveManagedPassword” property. This system will then be the only entity in your environment being able to acquire the password from a domain controller.
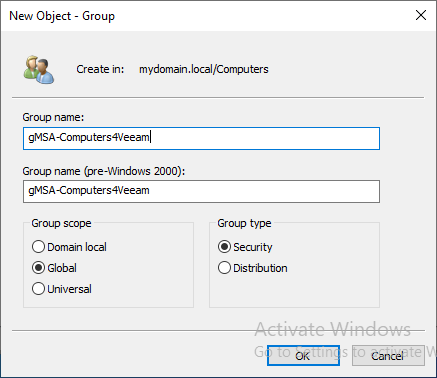
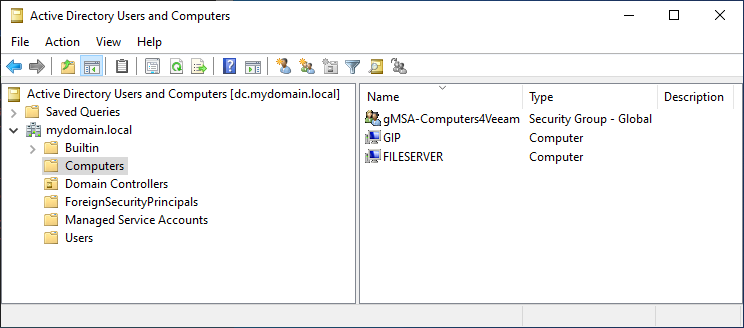
You can put this group to any OU suitable for you. Let’s call the new security group “gMSA-Computers4Veeam” in our example. I used “Computers” in my example.
(5) Create the gMSA
We can now create our first gMSA account in the domain. This cannot be done graphically from inside “Active Directory Users and Computers” (ADUC). We must use PowerShell.
Let us assume that we want to have a gMSA by the name of “gmsa4veeam” and our domain FQDN is “mydomain.local”. In addition, we created a security group for the computer(s) with access to the gMSA and gave it the name “gMSA-Computers4Veeam”. The guest interaraction proxy (or proxies, if you want to have more than one) will be added to this group later.
To create the gMSA we also have to define a FQDN for it. Here I would recommend to default to the name we specified above plus the FQDN of the domain. “gmsa4veeam.mydomain.local” in our example.
Now let’s create the gMSA on one of our DCs:
Mind that, in contrast to the description in Veeam’s helpcenter, the name of the gMSA has to be specified WITHOUT the domain name in front of it “gmsa4veeam” instead of “mydomain\gmsa4veeam”. Otherwise, the PS method will flag a wrong format for an account name.
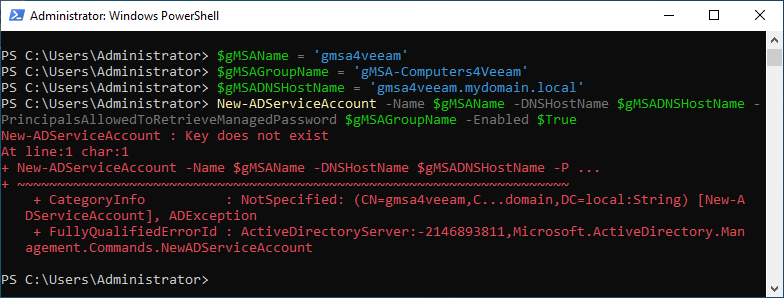
Obviously, I did not wait the ten hours after having created the KDS-Key. This is why we get the error here. So, time to call it a day, have nice glass of red wine and continue the other day. 😉
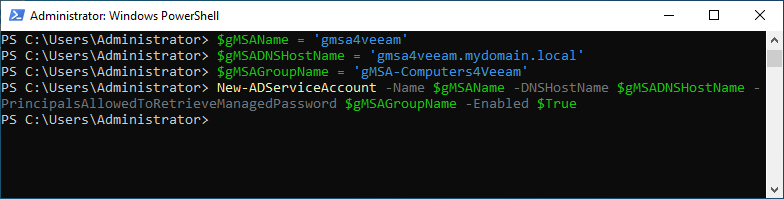
Ten hours later, it looks like it worked better:
If we investigate ADUC now, we should find our gMSA under “Managed Service Accounts”.
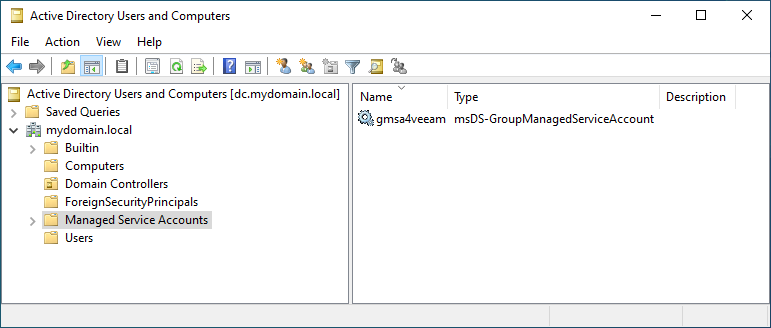
There could already be other service accounts in the OU. You might have a managed service account used by Entra-ID synchronization for instance. In general, we could use a single gMSA account for all our workloads, but it is considered more secure to separate gMSAs for critical components into their own accounts. So, we might end up with a few gMSA to be used with VBR. Don’t use too many, as complexity one of the natural enemies of security.
(6) Enable guest systems to allow access via the new gMSA
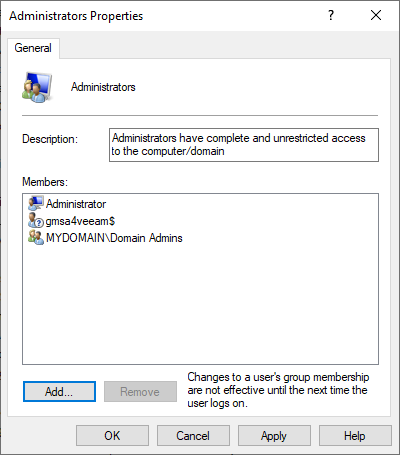
To achieve application consistency with it, the gMSA has to be member of the local admins of your guest systems. We can do that manually, by adding the gMSA to the group of local admins of your workloads. In our example, we want to backup a file server by the incredibly imaginative name of “fileserver”. 😉
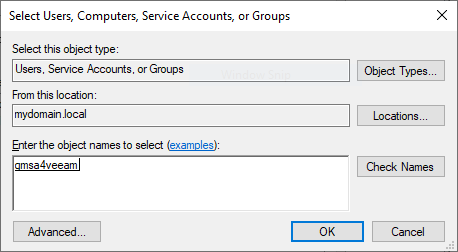
So, head to the system and open the users management. Make sure to search on the domain level (mydomain.local), check for the name (gmsa4veeam) and add it.
Note here, that no other tasks are necessary. You do not need to “Install” the gMSA. Neither on the GIP or VBR server, nor on your workloads. This in in contrast to the manual in Veeam’s helpcenter.
Installing the MSA was only necessary for legacy service accounts (sMSA), as these are only valid on a single system. gMSAs are by nature part of the domain. And yes, I double checked that several times in newly created test environments. 😊
(7) Finally, time to set it up in VBR
Now comes the fun part. Bring things to live. First, we have to let VBR know about the gMSA. Remember, VBR is not member of the domain. So, it cannot check your input for plausibility.
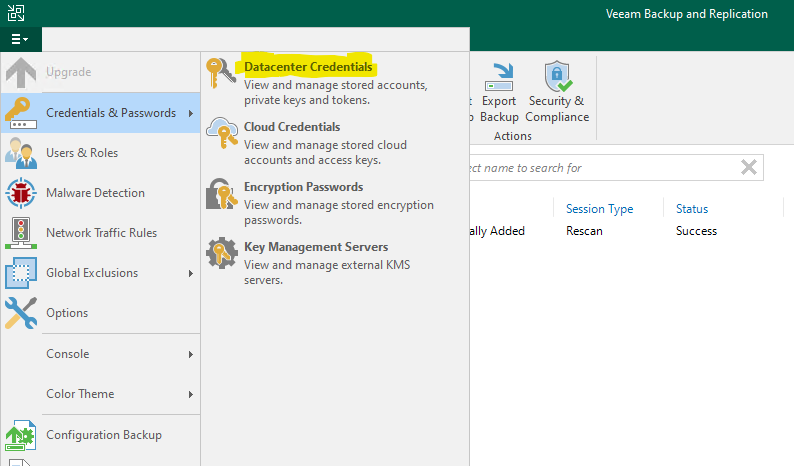
Head to the “burger menu” first and click on “Credentials & Passwords” and then “Datacenter Credentials”.
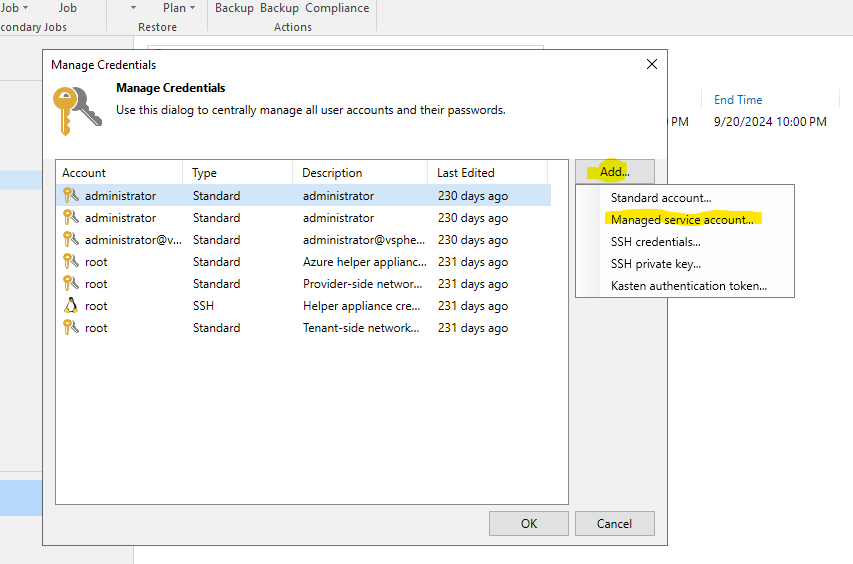
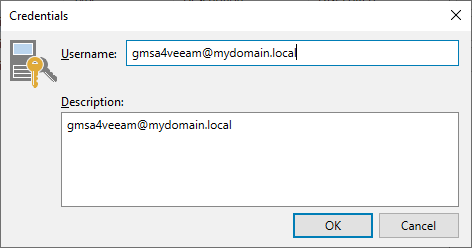
Then click on "Add” to add the service account and make sure to choose “Managed service account” from the dropdown menu.
Now enter the FQDN name of your gMSA. This is including the domain name.
This is why we had to specify an FQDN while creating the gMSA in the first place.
The account should show in the list now.
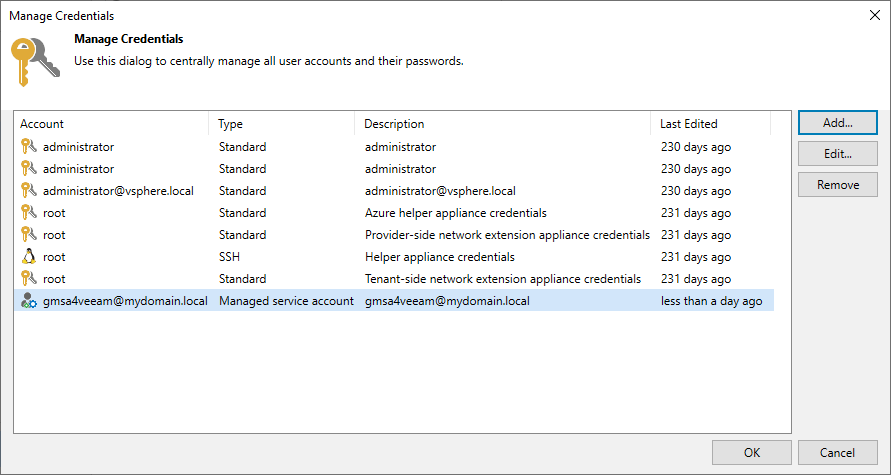
As being said, no typos here please. VBR cannot check it, as the magic later happens on the GIP only.
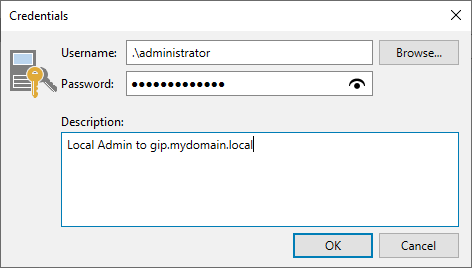
Talking about the GIP, we have to make the system we prepared above a “Managed Server”. Do this by adding it as “Microsoft Windows” within your “Backup Infrastructure”.
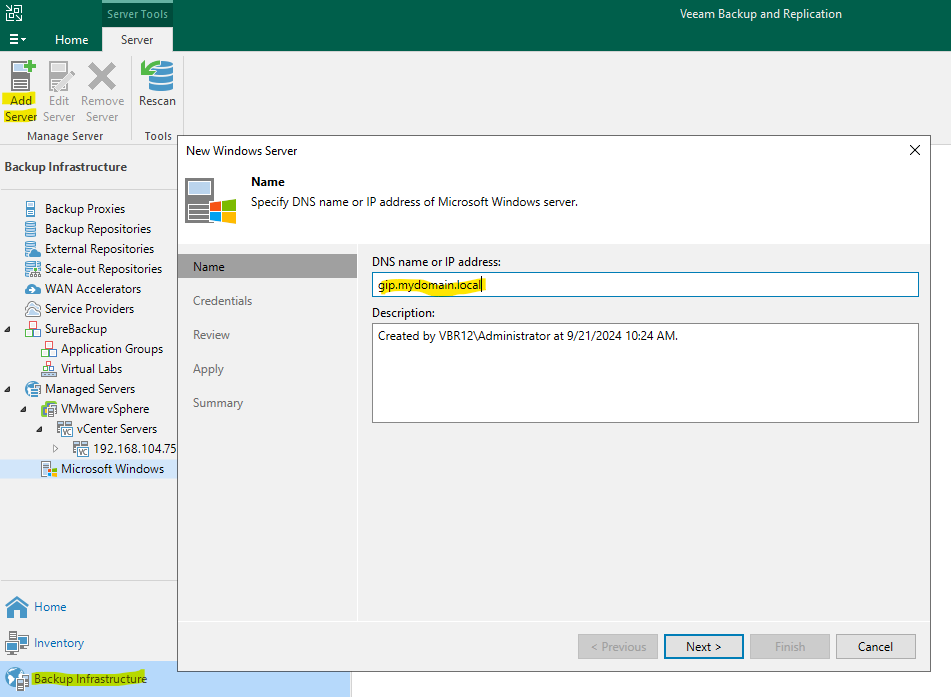
You might want to use any local admin here. I would recommend refraining from giving VBR any domain accounts to separate your worlds. This is the only point of contact now into your production systems.
Finally, we can enable our backup job for the fileserver to leverage the gMSA to achieve application consistency. Make sure to also specify the GIP here as only the GIP can query the gMSA’s password.
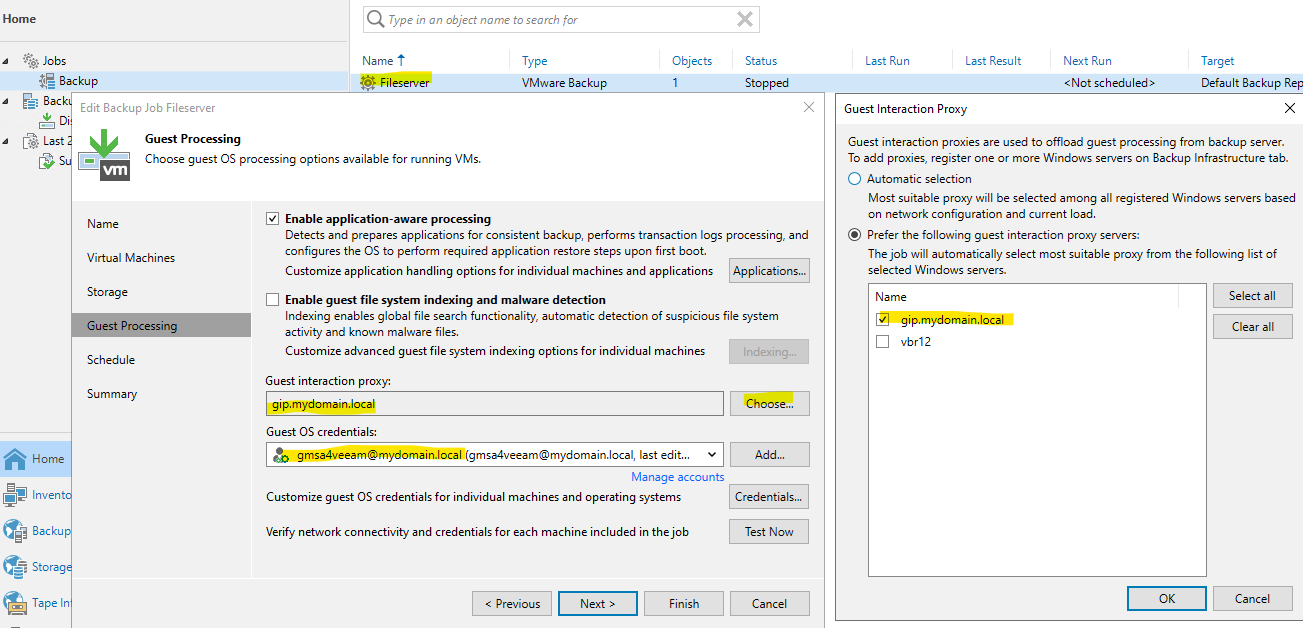
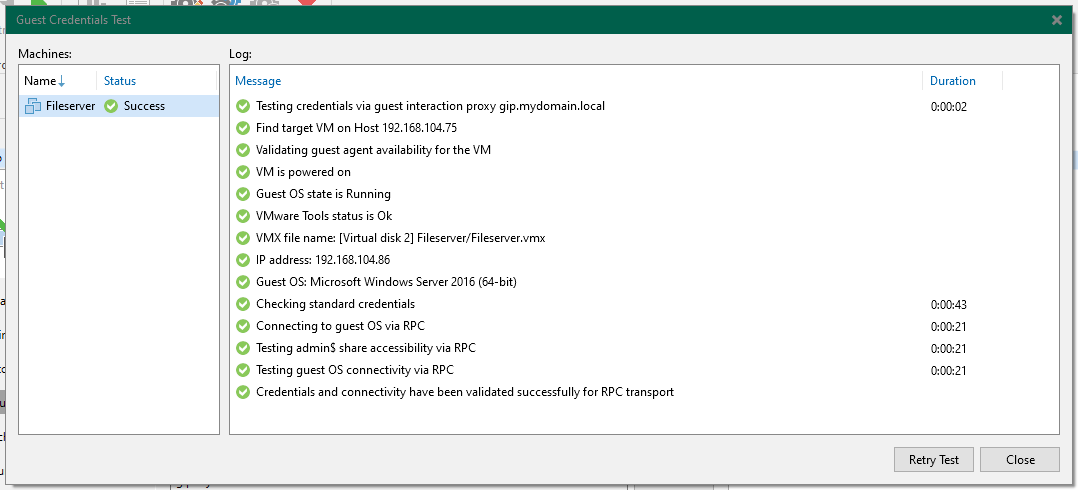
You might “Test Now” to make sure everything is set.
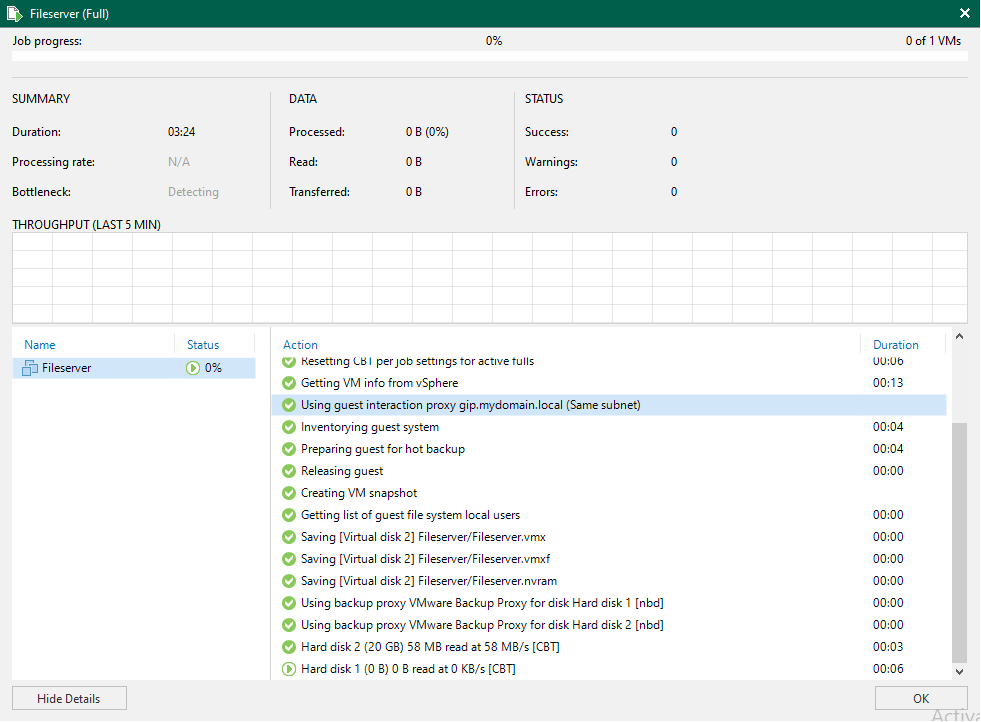
The backup just works. Very unspectacular, but what we expected.
This brings us to the successful end of part 2 already.
In the upcoming third part of this blogpost we will learn about attack vectors to gMSA’s and how to handle those and what comes next with Windows 2025.
Stay tuned. 😊

