When running self-hosted applications in a homelab or on-premises environment, HTTPS is often the first thing to fall through the cracks. Self-signed certificates trigger browser warnings, and public certificate authorities like Let's Encrypt require your services to be internet-accessible. The solution? Run your own internal Certificate Authority.
However, this is not a difficult problem to solve. Just setup an internal PKI using Step CA running as a rootless Podman container, then extend it to issue certificates for services on your network. In this first part, we'll focus entirely on getting Step CA up and running — initializing the CA, configuring automated certificate issuance, and setting up a systemd timer to handle renewals without any manual intervention.
Create a new podman network for step-ca
podman network create ca-services


podman network ls
Create a CA volume and Quadlet (quadlets are the preferred method for starting Podman containers:
podman volume create step-ca

mkdir -p ~/.config/containers/systemd


cat > ~/.config/containers/systemd/step-ca.container << 'EOF'
[Unit]
Description=Step CA Container
Wants=network-online.target
After=network-online.target
RequiresMountsFor=%t/containers

[Container]
Image=docker.io/smallstep/step-ca:latest
ContainerName=step-ca
Volume=step-ca:/home/step:Z
PublishPort=8443:8443
Network=ca-services
AutoUpdate=registry
PodmanArgs=--add-host=yourdomain.com:127.0.0.1

[Service]
Restart=always
TimeoutStartSec=900

[Install]
WantedBy=multi-user.target default.target
EOF
Initialize Step CA
# Start Step CA container for initialization
podman run -it --rm \
  -v step-ca:/home/step \
  smallstep/step-ca step ca init \
  --name="MY Own CA" \
  --dns="yourdomain.com" \
  --address=":8443" \
  --provisioner="admin"

# Start the service
systemctl --user daemon-reload
systemctl --user start step-ca.service
systemctl --user enable step-ca.service
Note: During initialization, you'll set a password for the CA. Remember this password!
To easily interact with the container we will install the step-cli utility on the host, I am running this on an Ubuntu VM so will install via a deb package, so if you are using a different distribution then just download it from here https://smallstep.com/docs/step-cli/installation/ :
wget https://dl.smallstep.com/gh-release/cli/docs-ca-install/v0.25.2/step-cli_0.25.2_amd64.deb
sudo dpkg -i step-cli_0.25.2_amd64.deb
Configure DNS resolution on the host:
echo "127.0.0.1 yourdomain.com" | sudo tee -a /etc/hosts
Bootstrap step-cli
CA_FINGERPRINT=$(podman exec step-ca step certificate fingerprint /home/step/certs/root_ca.crt)

step ca bootstrap --ca-url https://yourdomain:8443 --fingerprint $CA_FINGERPRINT --force


step ca health
Create Certificate Directories
At first I will leverage my step.ca with two applications, trillium notes and mailpit:
# Create directory structure
mkdir -p ~/certs/{trilium,mailpit}
mkdir -p ~/nginx-acme/certs/live/{trilium.yourdomain.com,mailpit.yourdomain.com}
mkdir -p ~/mailpit-certs
Create a Certificate Renewal Script (or just get AI to do it for you, but make sure to double check)
cat > ~/renew-all-certificates.sh << 'EOF'
#!/bin/bash

set -e

SERVICES=("trilium" "mailpit")
CERT_BASE_DIR="$HOME/certs"
NGINX_CERT_DIR="$HOME/nginx-acme/certs/live"

echo "Starting certificate renewal process..."

for service in "${SERVICES[@]}"; do
    echo "Processing $service.yourdomain.com..."

    # Create service cert directory if it doesn't exist
    mkdir -p "$CERT_BASE_DIR/$service"
    mkdir -p "$NGINX_CERT_DIR/$service.yourdomain.com"

    # Issue/renew certificate with 24h duration (within CA limits)
    step ca certificate \
        "$service.yourdomain.com" \
        "$CERT_BASE_DIR/$service/$service.crt" \
        "$CERT_BASE_DIR/$service/$service.key" \
        --provisioner admin \
        --not-after 24h \
        --force

    # Copy to nginx format
    cp "$CERT_BASE_DIR/$service/$service.crt" "$NGINX_CERT_DIR/$service.yourdomain.com/fullchain.pem"
    cp "$CERT_BASE_DIR/$service/$service.key" "$NGINX_CERT_DIR/$service.yourdomain.com/privkey.pem"

    # Copy to mailpit directory (for mailpit service)
    if [ "$service" = "mailpit" ]; then
        cp "$CERT_BASE_DIR/$service/$service.crt" "$HOME/mailpit-certs/mailpit.crt"
        cp "$CERT_BASE_DIR/$service/$service.key" "$HOME/mailpit-certs/mailpit.key"
    fi

    echo "Certificate renewed for $service.yourdomain.com"
done

echo "Restarting services..."
systemctl --user restart nginx-trilium.service mailpit.service

echo "Certificate renewal completed successfully!"
EOF

chmod +x ~/renew-all-certificates.sh
Create Systemd Timer for Auto-Renewal:
cat > ~/.config/systemd/user/cert-renewal.service << 'EOF'
[Unit]
Description=Certificate Renewal with step-cli
Requires=step-ca.service
After=step-ca.service

[Service]
Type=oneshot
ExecStart=%h/renew-all-certificates.sh
EOF

cat > ~/.config/systemd/user/cert-renewal.timer << 'EOF'
[Unit]
Description=Certificate Renewal Timer
Requires=cert-renewal.service

[Timer]
OnCalendar=daily
Persistent=true
RandomizedDelaySec=300

[Install]
WantedBy=timers.target
EOF

# Enable the timer
systemctl --user daemon-reload
systemctl --user enable cert-renewal.timer
systemctl --user start cert-renewal.timer
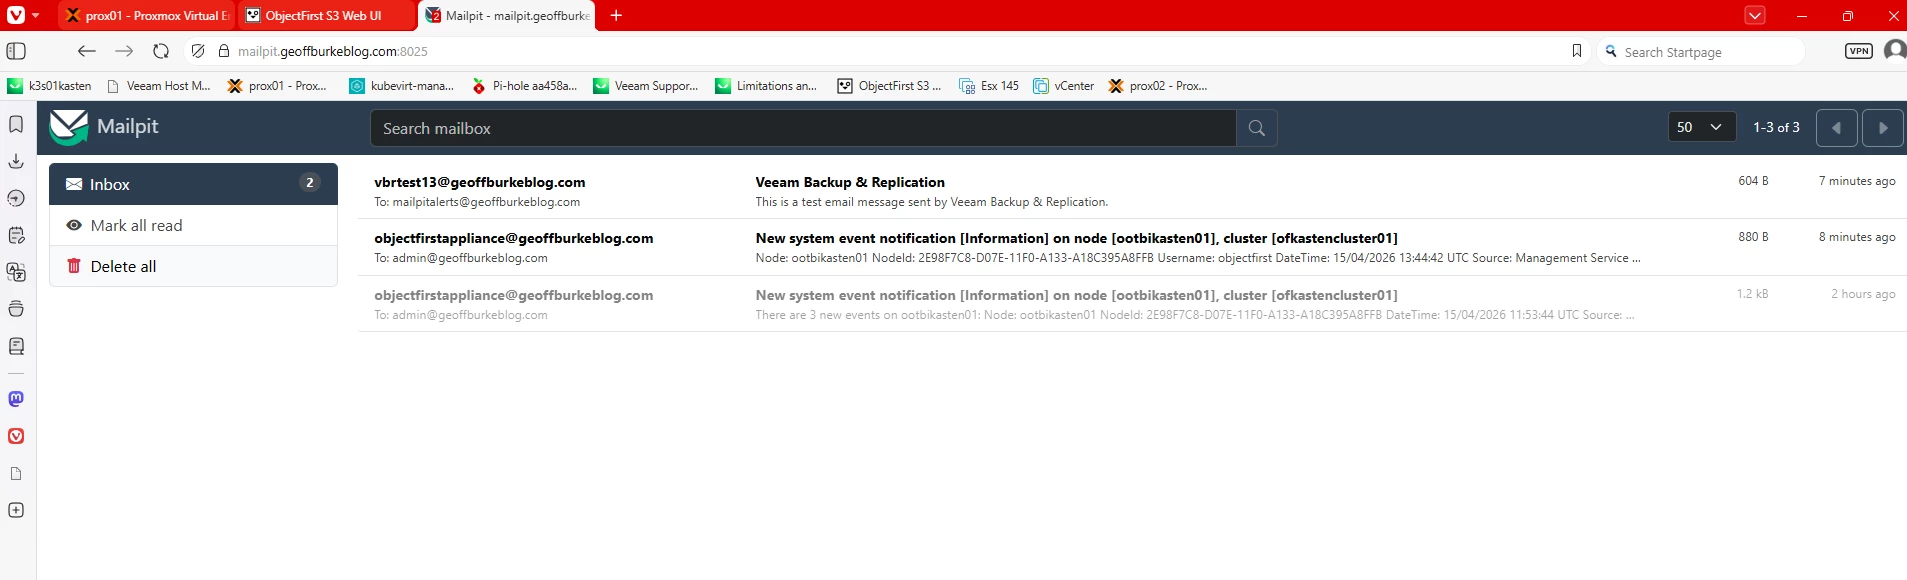
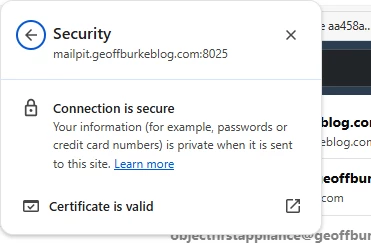
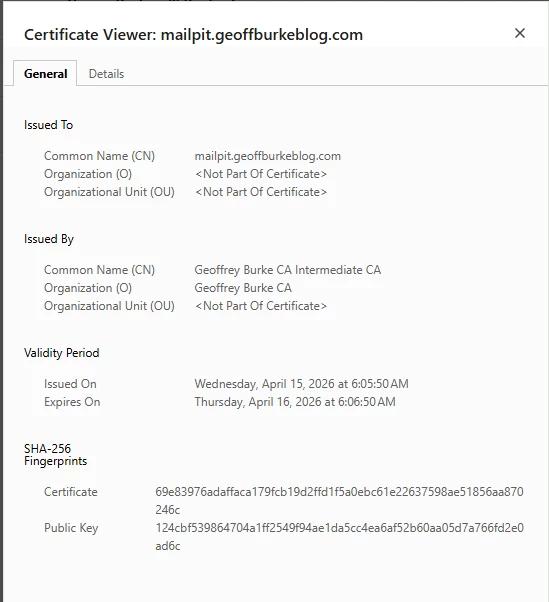
MAILPIT setup.
I use mailpit to test smtp notifications from various applications in my lab:
cat > ~/.config/containers/systemd/mailpit.container << 'EOF'
[Unit]
Description=Mailpit Container
Wants=network-online.target
After=network-online.target step-ca.service
RequiresMountsFor=%t/containers

[Container]
Image=docker.io/axllent/mailpit:latest
ContainerName=mailpit
Volume=%h/mailpit-certs:/certs:ro
PublishPort=8025:8025
PublishPort=1025:1025
Network=ca-services
AutoUpdate=registry
Exec=--smtp-tls-cert /certs/mailpit.crt --smtp-tls-key /certs/mailpit.key --ui-tls-cert /certs/mailpit.crt --ui-tls-key /certs/mailpit.key
PodmanArgs=--add-host=yourdomain.com:127.0.0.1

[Service]
Restart=always
TimeoutStartSec=900

[Install]
WantedBy=multi-user.target default.target
EOF

# Start Mailpit
systemctl --user start mailpit.service
systemctl --user enable mailpit.service
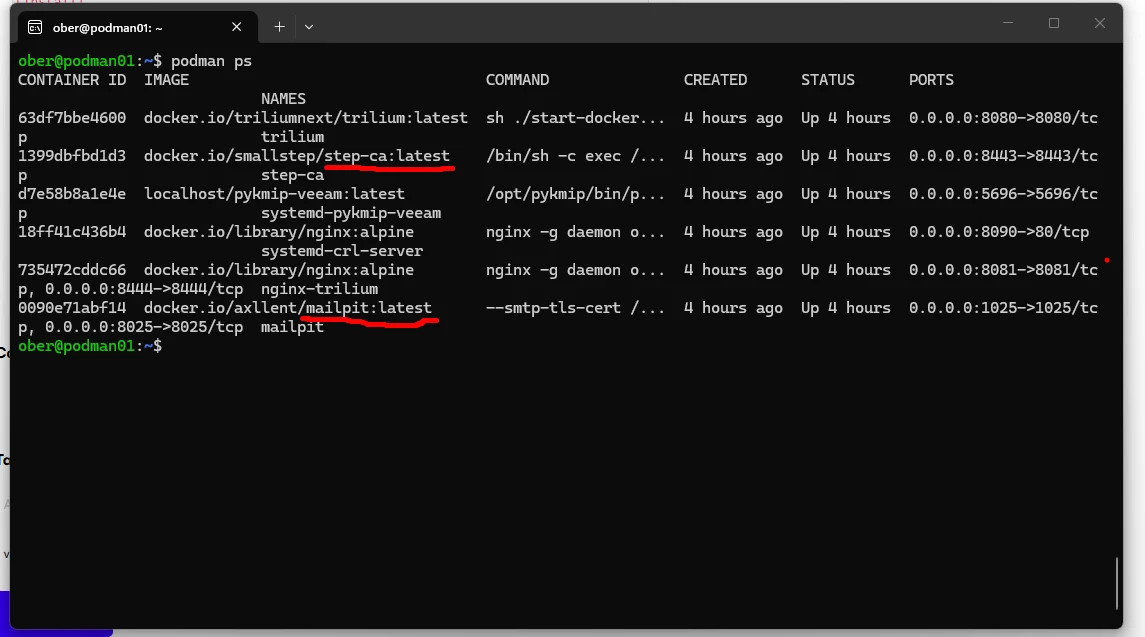
All the containers should now be running:
Time to test with Veeam:
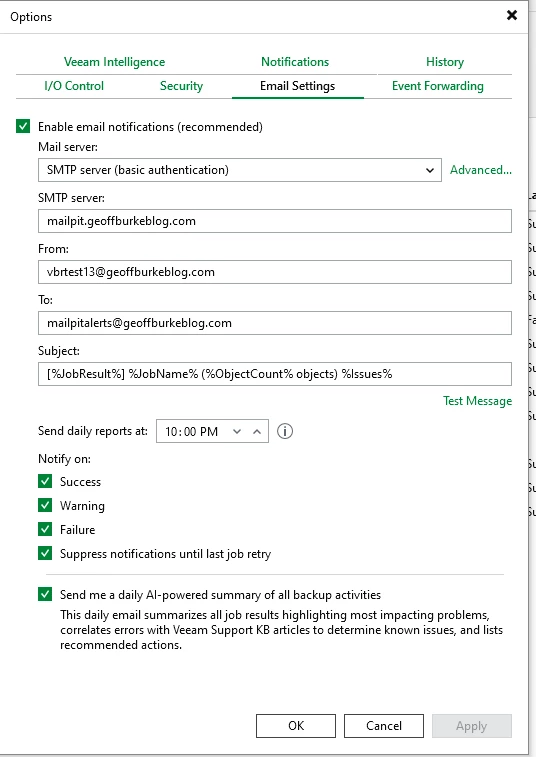
In the Veeam Console go to Options and setup email notifications:
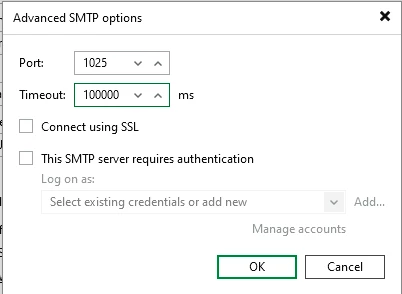
Don’t forget to add the port:
Now to see if it actually works!