

You might have missed it but this week Mr. Cloud Connect published a blog about setting up a test KMS server! Exactly a Month ago I was thinking the same thing and found it to be a world of pain. At the time I tried PyKMIP and Cosmian but had major issues. Then I tried vibe coding a KMS DIY server with my buddy Claude (well at times buddy at others arch enemy!!). I got to the point where Veeam accepted the KMS server but then the job would fail.
My home lab is not big so I try to do everything in containers and for this I looked at his forked github repo and with the help of claude containerized it.
THIS IS NOT MEANT FOR PRODUCTION! Just for Lab Learning!
Clone Luca’s repo on your podman host:
git clone https://github.com/dellock6/pykmip-veeam
You will need these values:
Throughout this guide, replace these placeholders with your actual values:
| Placeholder | Description | Example |
|---|---|---|
<SERVER_IP> | IP address of your PyKMIP server | 192.168.1.100 |
<SERVER_FQDN> | Fully qualified domain name of your server | kmip.example.com |
<SERVER_HOSTNAME> | Short hostname of your server | kmip |
<COUNTRY> | Two-letter country code | US |
<STATE> | State or province | California |
<CITY> | City or locality | San Francisco |
<ORGANIZATION> | Organization name | MyCompany |
<PFX_PASSWORD> | Password for the PKCS#12 file | SecurePassword123 |
mkdir -p ~/pykmip-veeam/{config,certs,data,policies}
cd ~/pykmip-veeam
Create a Dockerfile:
cat > Dockerfile << 'EOF'
FROM ubuntu:24.04

# Install Python 3.11
RUN apt-get update && \
    apt-get install -y software-properties-common && \
    add-apt-repository -y ppa:deadsnakes/ppa && \
    apt-get update && \
    apt-get install -y python3.11 python3.11-venv python3-pip git && \
    apt-get clean

# Create pykmip user
RUN groupadd -r pykmip && \
    useradd -r -g pykmip -s /bin/false -d /opt/pykmip pykmip

# Install PyKMIP-Veeam fork
RUN python3.11 -m venv /opt/pykmip && \
    /opt/pykmip/bin/pip install --upgrade pip && \
    /opt/pykmip/bin/pip install git+https://github.com/dellock6/pykmip-veeam.git

# Create directories
RUN mkdir -p /etc/pykmip/{certs,policies} /var/lib/pykmip && \
    chown -R pykmip:pykmip /var/lib/pykmip

USER pykmip
WORKDIR /opt/pykmip

EXPOSE 5696

CMD ["/opt/pykmip/bin/pykmip-server", "-f", "/etc/pykmip/server.conf"]
EOF
Build the container:
podman build -t pykmip-veeam:latest .
Configure the PyKMIP Server:
cat > ~/pykmip-veeam/config/server.conf << 'EOF'
[server]
hostname=0.0.0.0
port=5696
certificate_path=/etc/pykmip/certs/server-cert.pem
key_path=/etc/pykmip/certs/server-key.pem
ca_path=/etc/pykmip/certs/ca-cert.pem
auth_suite=TLS1.2
policy_path=/etc/pykmip/policies
logging_level=DEBUG
database_path=/var/lib/pykmip/pykmip.db
enable_tls_client_auth=True
tls_cipher_suites=
    ECDHE-RSA-AES256-GCM-SHA384
    ECDHE-RSA-AES128-GCM-SHA256
EOF
Create a Policy file:
cat > ~/pykmip-veeam/policies/policy.json << 'EOF'
{
    "groups": {
        "default": {
            "CERTIFICATE": ["LOCATE", "GET", "DESTROY"],
            "SYMMETRIC_KEY": ["LOCATE", "GET", "DESTROY", "ENCRYPT", "DECRYPT"],
            "PUBLIC_KEY": ["LOCATE", "GET", "DESTROY", "ENCRYPT"],
            "PRIVATE_KEY": ["LOCATE", "GET", "DESTROY", "DECRYPT"],
            "SECRET_DATA": ["LOCATE", "GET", "DESTROY"]
        }
    },
    "default": "default",
    "preset": {
        "*": "default"
    }
}
EOF
Create certificates and remember to replace the following in the file:
<SERVER_IP>- Your PyKMIP server's IP address<SERVER_FQDN>- Your server's fully qualified domain name<SERVER_HOSTNAME>- Your server's short hostname
cd ~/pykmip-veeam/certs

cat > openssl-ca-veeam.cnf << 'EOF'
[ ca ]
default_ca = CA_default

[ CA_default ]
dir              = .
database         = $dir/index.txt
new_certs_dir    = $dir
certificate      = $dir/ca-cert.pem
serial           = $dir/serial
crlnumber        = $dir/crlnumber
private_key      = $dir/ca-key.pem
default_days     = 825
default_crl_days = 365
default_md       = sha256
preserve         = no
policy           = policy_loose

[ policy_loose ]
countryName            = optional
stateOrProvinceName    = optional
localityName           = optional
organizationName       = optional
organizationalUnitName = optional
commonName             = supplied
emailAddress           = optional

[ v3_ca ]
subjectKeyIdentifier = hash
authorityKeyIdentifier = keyid:always,issuer
basicConstraints = critical,CA:true,pathlen:1
keyUsage = critical, digitalSignature, cRLSign, keyCertSign
crlDistributionPoints = URI:http://<SERVER_IP>:8090/crl.pem

[ v3_intermediate_ca ]
subjectKeyIdentifier = hash
authorityKeyIdentifier = keyid,issuer:always
basicConstraints = critical,CA:true,pathlen:0
keyUsage = critical, digitalSignature, cRLSign, keyCertSign
extendedKeyUsage = serverAuth
crlDistributionPoints = URI:http://<SERVER_IP>:8090/crl.pem
subjectAltName = DNS:<SERVER_FQDN>,DNS:<SERVER_HOSTNAME>,IP:<SERVER_IP>

[ client_cert ]
basicConstraints = CA:FALSE
subjectKeyIdentifier = hash
authorityKeyIdentifier = keyid,issuer
keyUsage = critical, digitalSignature, keyEncipherment
extendedKeyUsage = clientAuth
crlDistributionPoints = URI:http://<SERVER_IP>:8090/crl.pem
EOF
Initialize the CA Database:
sudo touch index.txt
sudo bash -c 'echo "01" > serial'
sudo bash -c 'echo "01" > crlnumber'
Also create a new folder in the certs folder for our crl (certificate revocation list that Veeam must have)
sudo mkdir -p crl
Generate root certificate, replace the values in the -subj parameter with your organization details:
# Generate CA private key (2048-bit RSA)
sudo openssl genrsa -out ca-key.pem 2048

# Generate CA certificate (valid for 10 years)
sudo openssl req -new -x509 -days 3650 -key ca-key.pem -out ca-cert.pem \
  -config openssl-ca-veeam.cnf -extensions v3_ca \
  -subj "/C=<COUNTRY>/ST=<STATE>/L=<CITY>/O=<ORGANIZATION>/CN=PyKMIP-Root-CA"
Generate server certificate:
# Generate server private key
sudo openssl genrsa -out server-key.pem 2048

# Create certificate signing request
# Replace <SERVER_FQDN> with your server's FQDN
sudo openssl req -new -key server-key.pem -out server-csr.pem \
  -subj "/C=<COUNTRY>/ST=<STATE>/L=<CITY>/O=<ORGANIZATION>/CN=<SERVER_FQDN>"

# Sign server certificate (configured as intermediate CA per Veeam requirements)
sudo openssl x509 -req -in server-csr.pem -CA ca-cert.pem -CAkey ca-key.pem \
  -CAcreateserial -out server-cert.pem -days 825 -sha256 \
  -extfile openssl-ca-veeam.cnf -extensions v3_intermediate_ca
Generate client certificate:
# Generate client private key
sudo openssl genrsa -out veeam-client-key.pem 2048

# Create certificate signing request
sudo openssl req -new -key veeam-client-key.pem -out veeam-client-csr.pem \
  -subj "/C=<COUNTRY>/ST=<STATE>/L=<CITY>/O=<ORGANIZATION>/CN=veeam-kmip-client"

# Sign client certificate
sudo openssl x509 -req -in veeam-client-csr.pem -CA ca-cert.pem -CAkey ca-key.pem \
  -CAcreateserial -out veeam-client-cert.pem -days 825 -sha256 \
  -extfile openssl-ca-veeam.cnf -extensions client_cert
Generate CRL
sudo openssl ca -config openssl-ca-veeam.cnf -gencrl -out crl/crl.pemGenerate pkcs12 for veeam:
# Replace <PFX_PASSWORD> with a secure password of your choice
sudo openssl pkcs12 -export -out veeam-client.pfx \
  -inkey veeam-client-key.pem -in veeam-client-cert.pem \
  -certfile ca-cert.pem -passout pass:<PFX_PASSWORD>
(remember that password)
Verify the certificates:
# Verify server cert is configured as CA with pathlen:0
sudo openssl x509 -in server-cert.pem -text -noout | grep -A 5 "Basic Constraints"
# Expected output: CA:TRUE, pathlen:0

# Verify CRL distribution points exist
sudo openssl x509 -in server-cert.pem -text -noout | grep -A 3 "CRL Distribution"
# Expected output: URI:http://<YOUR_SERVER_IP>:8090/crl.pem

# Verify server cert Subject matches your FQDN
sudo openssl x509 -in server-cert.pem -noout -subject
# Expected output: subject=CN = <YOUR_SERVER_FQDN>

# Verify CRL is valid
sudo openssl crl -in crl/crl.pem -noout -text | grep -E "Issuer|Next Update"
# Expected: Issuer should be PyKMIP-Root-CA, Next Update should be in the future
We have to set permissions so that the podman containers can read the certs:
sudo chmod 644 ~/pykmip-veeam/certs/*.pem ~/pykmip-veeam/certs/*.pfx
sudo chmod 755 ~/pykmip-veeam/certs
Deploy the CRL Server:
mkdir -p ~/crl-server
sudo cp ~/pykmip-veeam/certs/crl/crl.pem ~/crl-server/
Start the CRL Server (note I am using port 8090 because I have another podman container already using 8080):
podman run -d \
  --name crl-server \
  -p 8090:80 \
  -v ~/crl-server:/usr/share/nginx/html:ro,Z \
  docker.io/library/nginx:alpine
Verify that you can access the crl:
# Test CRL access locally
curl -s http://localhost:8090/crl.pem | openssl crl -inform PEM -noout -text | grep Issuer
# Expected output: Issuer: CN=PyKMIP-Root-CA

# Test from another machine (replace <SERVER_IP> with your server's IP)
curl -s http://<SERVER_IP>:8090/crl.pem
# Should return the CRL file content
Deploy the pykmip-veeam container:
podman run -d --name pykmip-veeam -p 5696:5696 \
  -v ~/pykmip-veeam/config/server.conf:/etc/pykmip/server.conf:ro,Z \
  -v ~/pykmip-veeam/certs:/etc/pykmip/certs:ro,Z \
  -v ~/pykmip-veeam/policies:/etc/pykmip/policies:ro,Z \
  -v ~/pykmip-veeam/data:/var/lib/pykmip:Z \
  pykmip-veeam:latest
Verify:
# Check container status (should show "Up")
podman ps | grep pykmip

# Check logs (should show no errors, just deprecation warnings are OK)
podman logs pykmip-veeam

# Test TLS connection
openssl s_client -connect localhost:5696 \
  -cert ~/pykmip-veeam/certs/veeam-client-cert.pem \
  -key ~/pykmip-veeam/certs/veeam-client-key.pem \
  -CAfile ~/pykmip-veeam/certs/ca-cert.pem
You should see Verify return code: 0 (ok) then press ctrl+c to exit
Next copy these 2 files to the Veeam server (I used the windows Veeam 13 version)
~/pykmip-veeam/certs/ca-cert.pem
~/pykmip-veeam/certs/veeam-client.pfx
VERY IMPORTANT!
I had to import the ca-cert.pem both into the Trusted Root store and the Personal store as otherwise when adding the KMS server to Veeam It was not able to check the CRL.
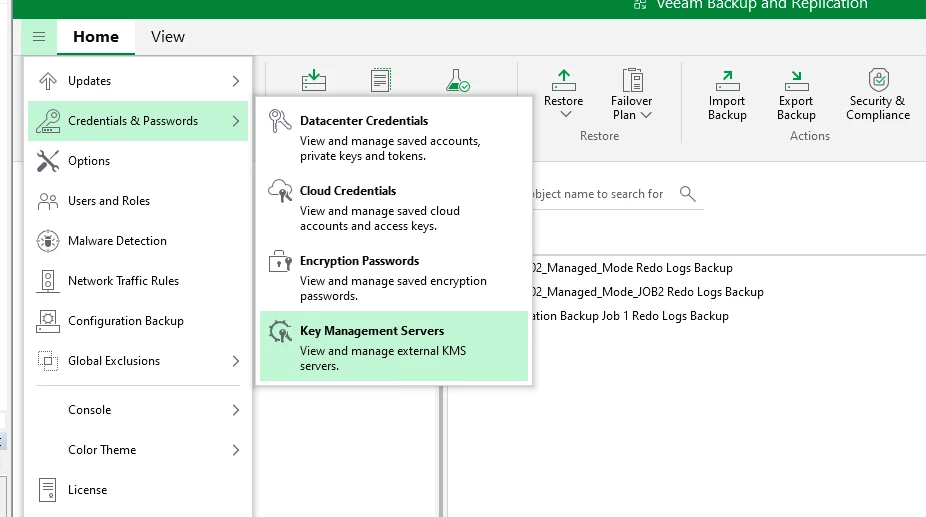
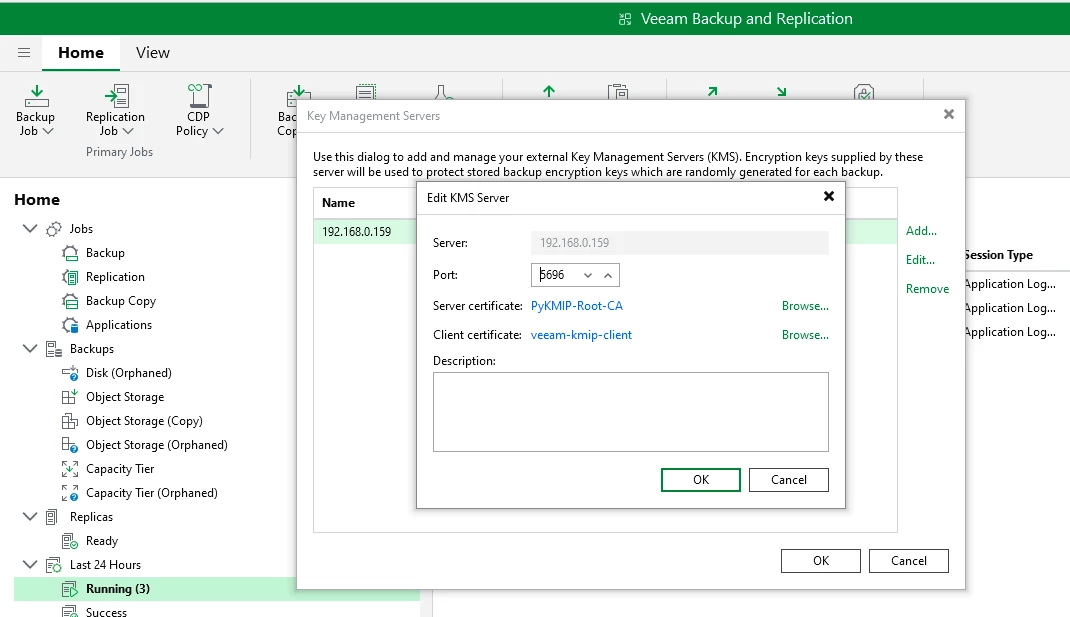
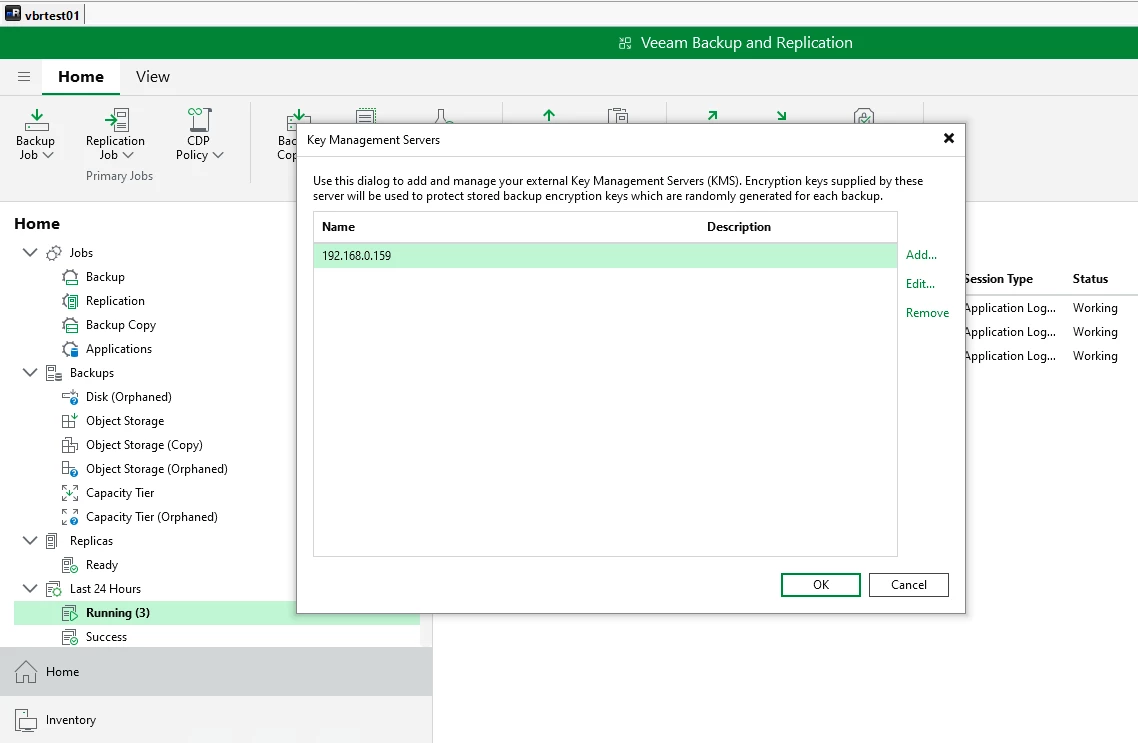
Now head over to Veeam and add the KMS server:
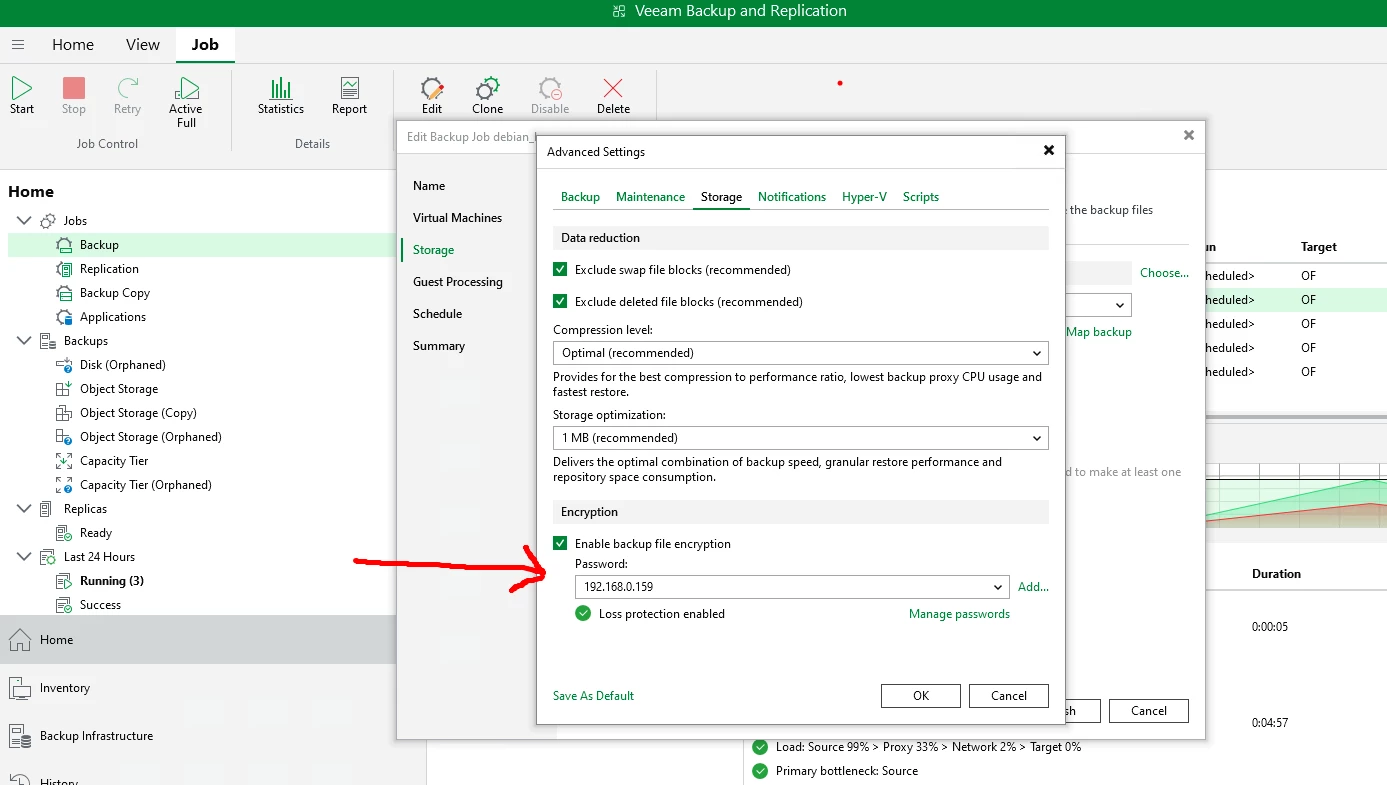
I next created a new job and chose the newly added KMS server:
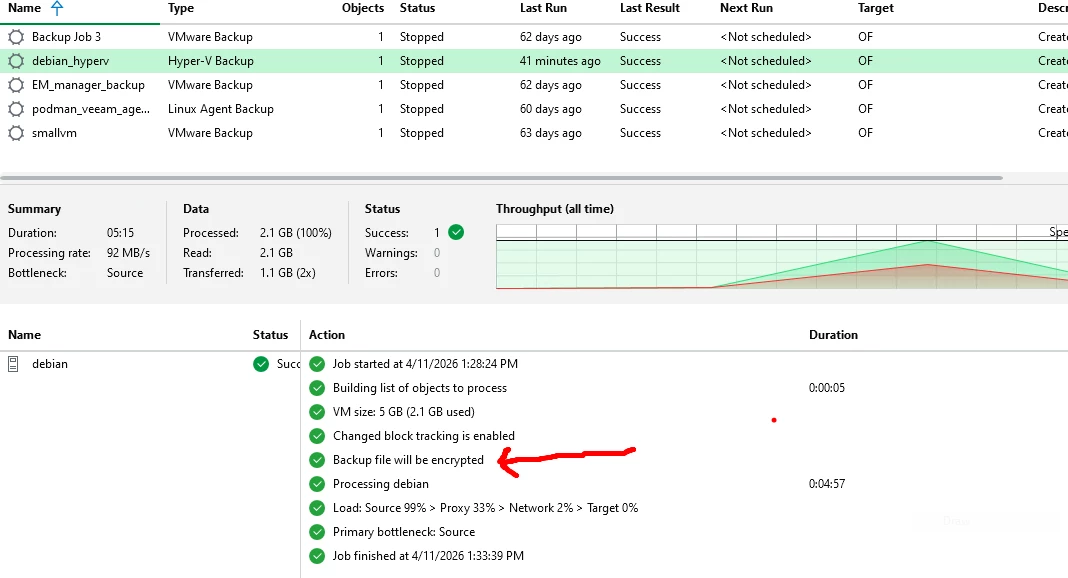
I did run into a few issues though which are listed here I jammed my un-translatable notes into Claude to clean them up:
Certificate Configuration
- Issue: Standard server certificates not working
- Solution: Configure server certificate as intermediate CA with
pathlen:0and CRL signing capability (per Veeam requirements)
- Solution: Configure server certificate as intermediate CA with
CRL Distribution
- Issue: CRL needed by Veeam for certificate validation
- Solution: Create CRL server (Nginx on port 8090) serving CRL via HTTP
- Issue: CRL distribution points must be in certificates
- Solution: Include
crlDistributionPoints = URI:http://<SERVER_IP>:8090/crl.pemin OpenSSL config
- Solution: Include
Windows Certificate Store
- Issue: "The revocation function was unable to check revocation" error
- Solution: Import CA certificate to BOTH Windows stores:
Cert:\LocalMachine\Root(Trusted Root Certification Authorities)Cert:\CurrentUser\My(Personal)
- This was THE critical fix!
- Solution: Import CA certificate to BOTH Windows stores:
Certificate/Key Matching
- Issue: Certificate and private key mismatch errors
- Solution: Use
openssl x509 -reqto sign CSR instead ofopenssl cato ensure correct key pairing
- Solution: Use
FQDN Matching
- Issue: Server name validation failures
- Solution: Use exact FQDN in Veeam "Server" field that matches certificate Subject CN (not hostname or IP)
Container Permissions
- Issue: PyKMIP container unable to read certificate files
- Solution: Set proper permissions (
chmod 644on certs,chmod 755on directory)
- Solution: Set proper permissions (
SELinux Context
- Issue: Podman volume mounts showing as
nobody:nogroupinside container- Solution: Files owned by UID 994 on host
Certificate Validity
- Issue: Certificates with validity > 825 days rejected by Windows
- Solution: Limit certificate validity to 825 days (Windows/Chrome requirement)
PyKMIP Python Version
- Issue: PyKMIP requires Python 3.11+ for TLS support
- Solution: Install Python 3.11 from deadsnakes PPA in Ubuntu container
No CRL Fetching Observed
- Issue: No HTTP traffic to port 8090 seen in Wireshark
- Solution: CA certificate must be in Personal store for Veeam to select it AND in Trusted Root for Windows to perform CRL validation
This was a lot of fun (when it worked that is!) and educational. In a couple of days I will setup a brand new podman instance and try from scratch.
Actually I will create a video where I go through the whole setup on the new vanilla podman host rather than just the summary that I had created. Stay Tuned!