

With the release of Veeam Backup for Microsoft Azure v4, I thought now would be a good time to discuss how to handle account permission changes. This tends to be required when Veeam release updates to the Veeam Backup for Microsoft Azure product, typically required to support new functionality.
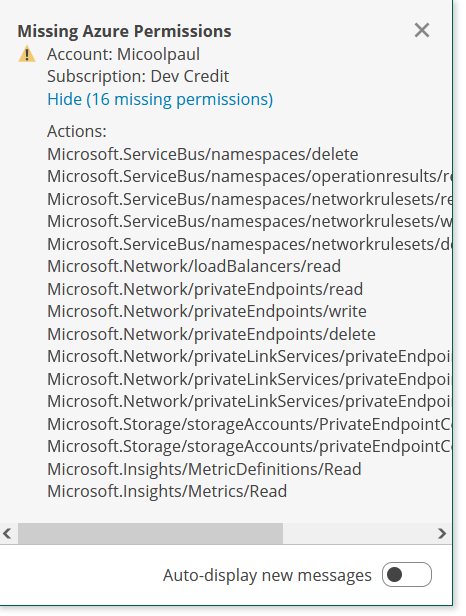
Once you sign into Veeam Backup for Microsoft Azure after an update, you’ll likely have a notification similar to the above, depicting the missing permissions.
There are two ways to update the permissions, and I’m going to take you through them both now.
Method 1: Let Veeam Update its Permissions
Yep, Veeam can handle this for you, and it’s really easy.
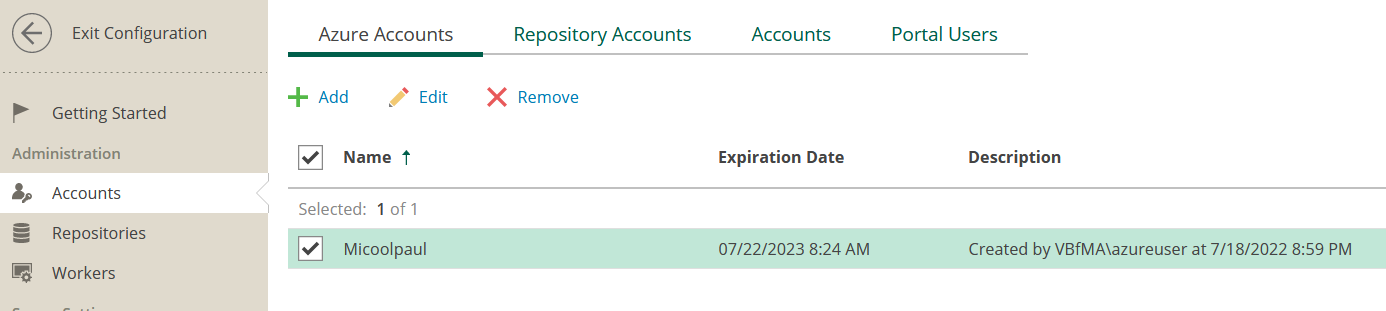
Step One: Enter the Configuration section of the Web UI. Navigate to Administration > Accounts. Find your Azure account, select ‘Edit’.
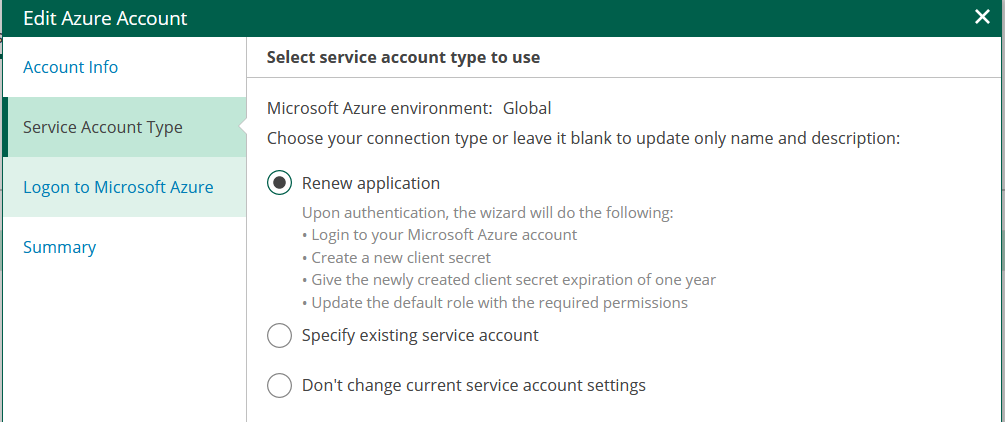
Step Two: Within the Edit Azure Account screen, edit any name & description details if required, otherwise click next to enter the ‘Service Account Type’ screen.
Step Three: Choose the ‘Renew application’ option.
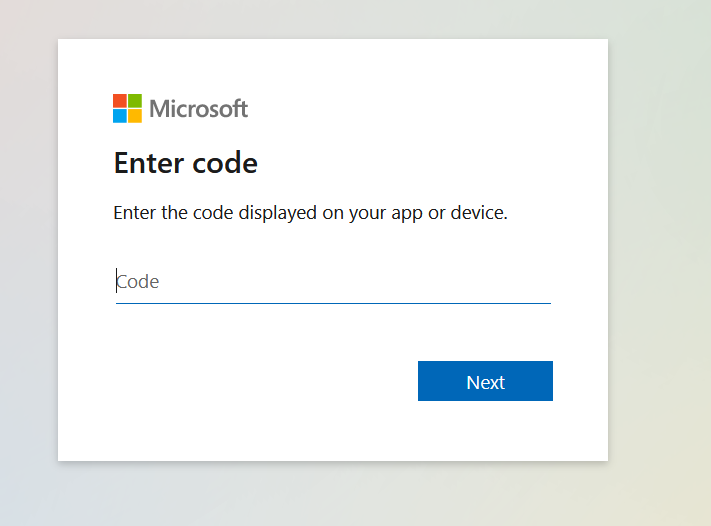
Step Four: You’ll then be asked to logon to Microsoft Azure, click the hyperlink for Microsoft Device Login, authenticate and enter the generated code to complete authentication. You’ll be prompted to authorise sign-in to Microsoft Azure Cross-platform Command Line Interface as part of this process, this is mandatory.
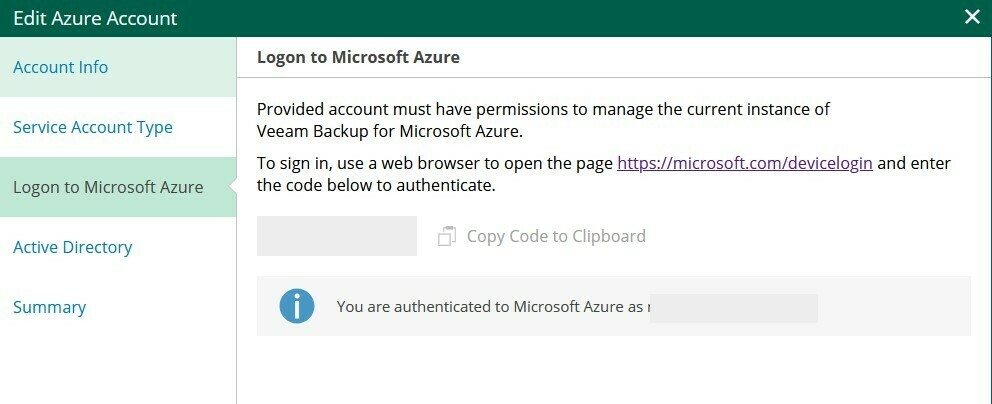
Once you’ve successfully authenticated, you’ll see a message stating ‘You are authenticated to Microsoft Azure as USERNAME@DOMAIN.TLD’, continue.
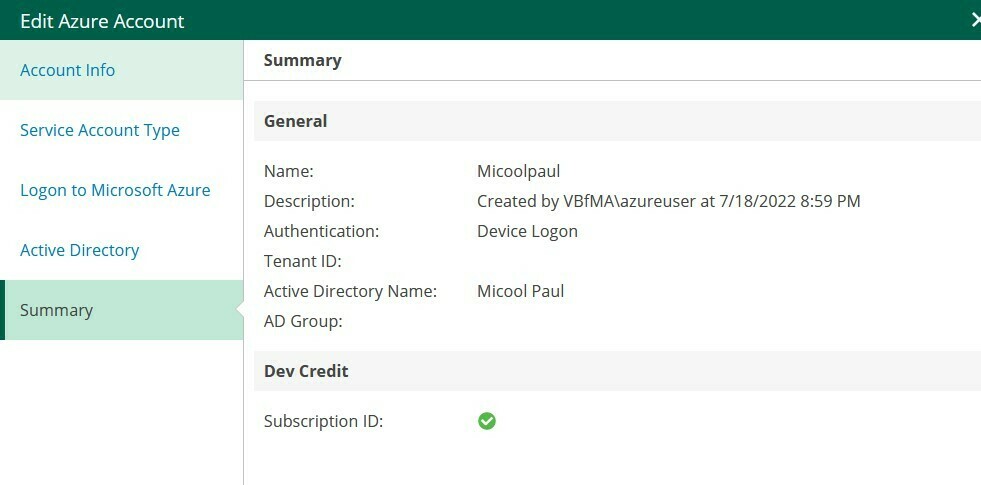
Step Five: Click through the remaining prompts to complete the Edit Azure Account process, no further edits are necessary.
Note: This will not dismiss the notification automatically that the permissions are missing, but it will update the permissions, you can validate this for yourself by reading Method Two and confirming your permissions have updated.
Method 2: Manually Edit the Veeam Service Account Role
If you utilised Veeam originally to create a service account, Veeam will have deployed its own custom role for access controls, we can amend the permissions on this.
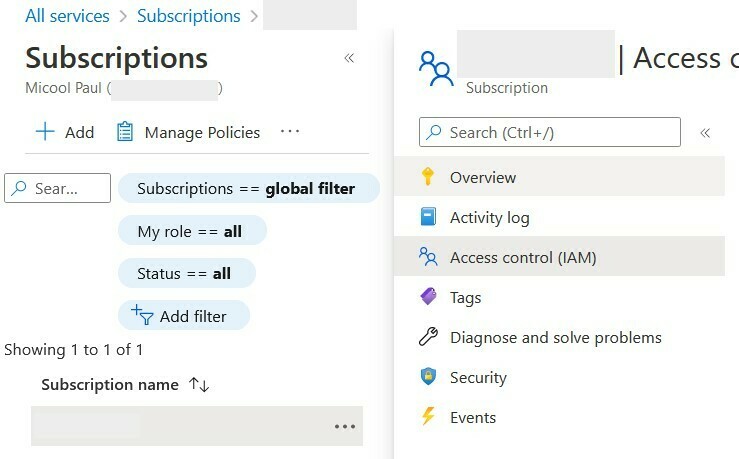
Step One: Once connected to the Azure Portal, click on any ‘scope’ such as a management group, subscription, resource group or resource.
Step Two: Within the resource, select ‘Access control (IAM)’
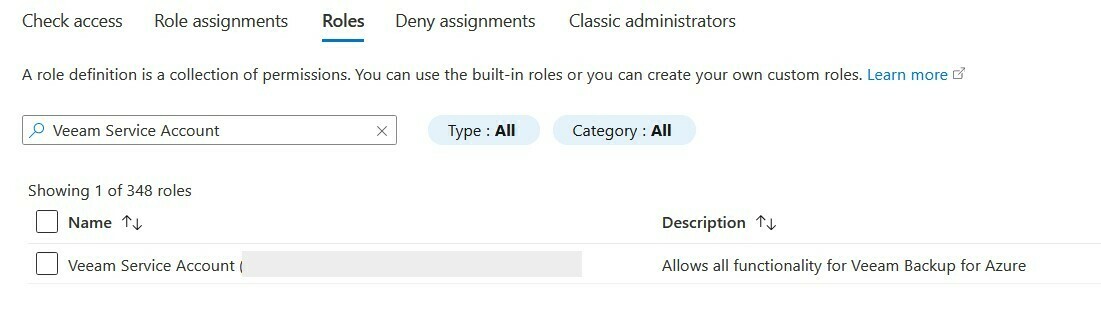
Step Three: Navigate to the ‘Roles’ Tab and search for ‘Veeam Service Account’ or any custom role you may have previously created for this purpose.
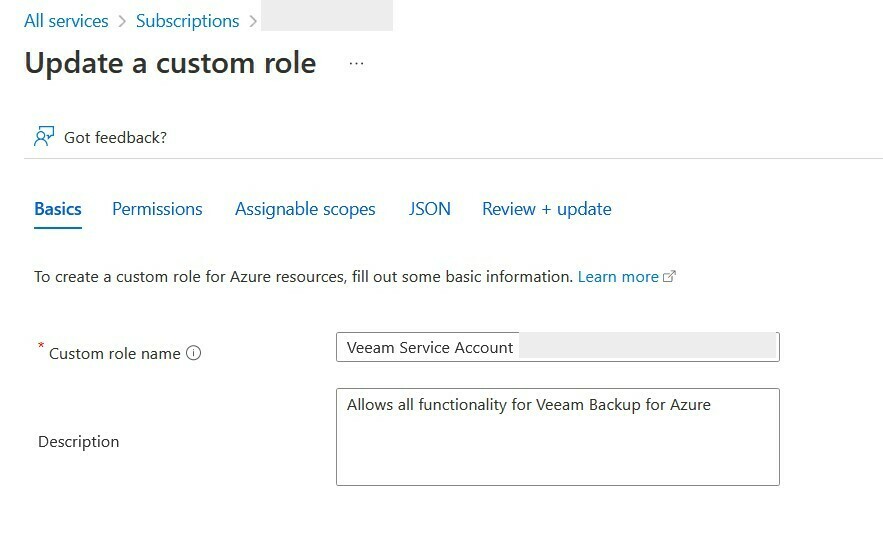
Step Four: Select the ‘…’ to the right of the role, select Edit. We’ll now enter the ‘Update a custom role’ screen.
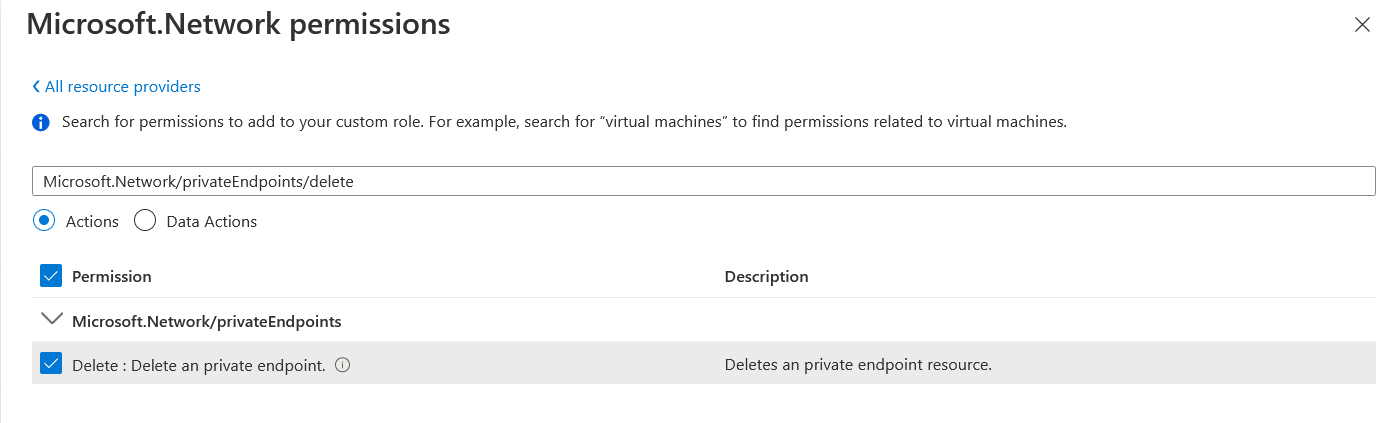
Step Five: Proceed to the ‘Permissions’ tab, and select ‘Add permissions’, if Veeam has previously been managing this for you, it’s likely you only need to add 16 permissions, the list of these is below:
Microsoft.ServiceBus/namespaces/delete
Microsoft.ServiceBus/namespaces/operationresults/read
Microsoft.ServiceBus/namespaces/networkrulesets/read
Microsoft.ServiceBus/namespaces/networkrulesets/write
Microsoft.ServiceBus/namespaces/networkrulesets/delete
Microsoft.Network/loadBalancers/read
Microsoft.Network/privateEndpoints/read
Microsoft.Network/privateEndpoints/write
Microsoft.Network/privateEndpoints/delete
Microsoft.Network/privateLinkServices/privateEndpointConnections/read
Microsoft.Network/privateLinkServices/privateEndpointConnections/write
Microsoft.Network/privateLinkServices/privateEndpointConnections/delete
Microsoft.Storage/storageAccounts/PrivateEndpointConnectionsApproval/action
Microsoft.Storage/storageAccounts/privateEndpointConnections/write
Microsoft.Insights/MetricDefinitions/Read
Microsoft.Insights/Metrics/Read
You can choose to copy these strings one at a time into the search box, or navigate at a higher level such as to “Microsoft.SerivceBus/namespaces” and select all the ones you need at the same time.
Once you have added these, select the ‘Review + update’ button at the bottom of the screen.
Step Six: On the ‘Review + update’ screen, you’ll see an output of all assigned permissions, both previously existing and new, as well as the assigned scope(s). Select Update to complete.
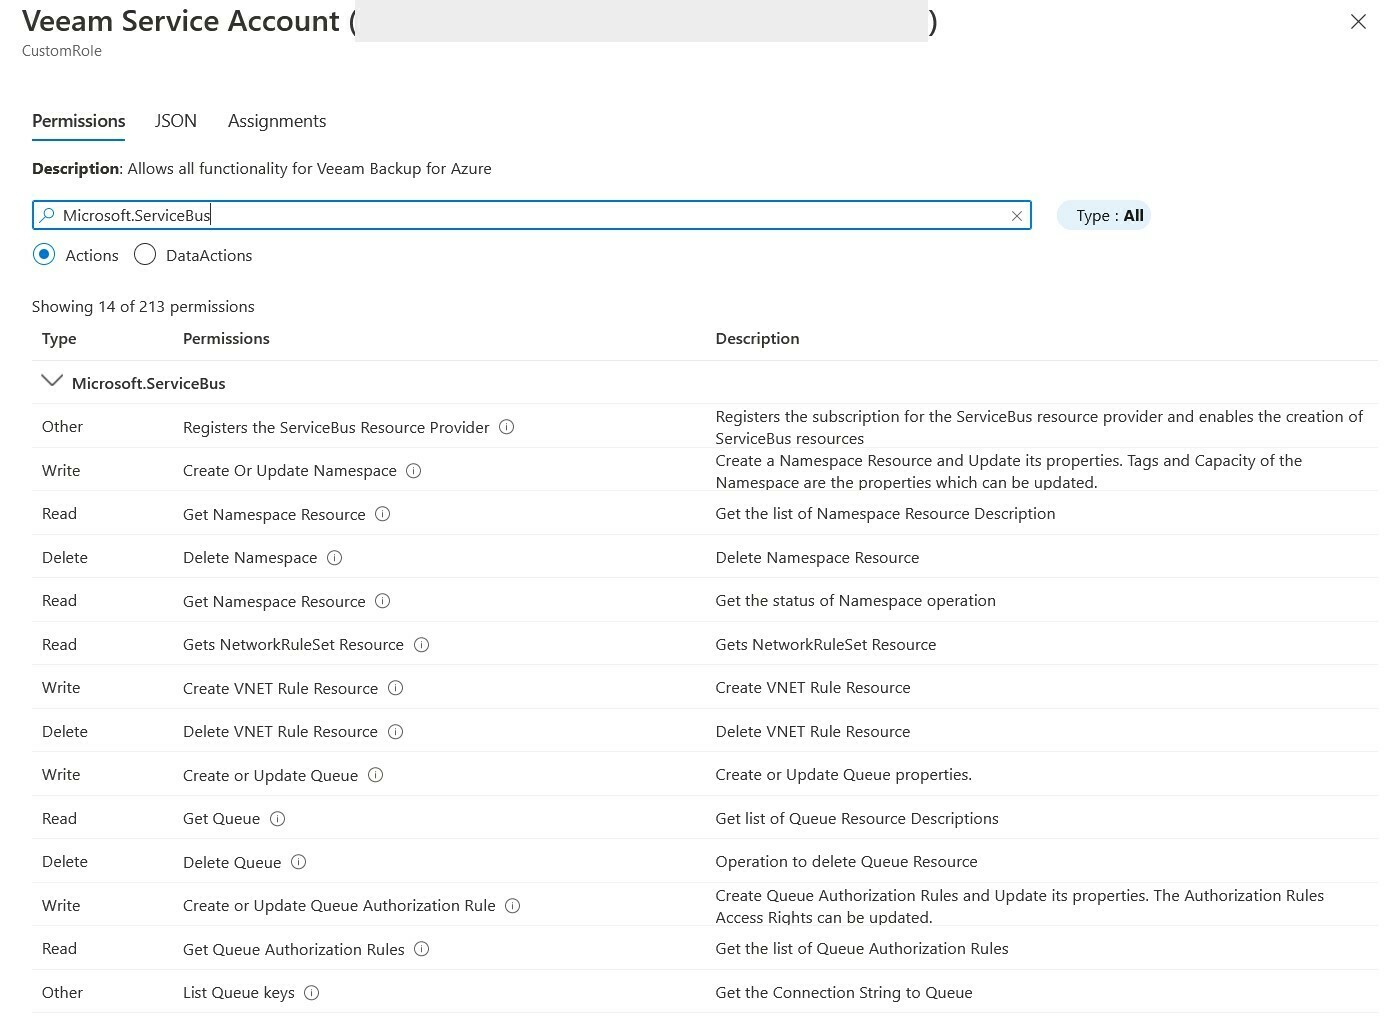
Step Seven: To confirm the permissions have been successfully assigned, from the ‘Access control (IAM)’ > Roles menu, find your Veeam Service Account again, and under the ‘Details’ column, select ‘View’.
Conclusion:
It doesn’t matter which way you amend the permissions, as long as you have all of the required permissions to allow Veeam Backup for Microsoft Azure to carry out the tasks you ask of it.
If you ever feel like you’ve gone horribly off-piste and might not have all of the permissions you need, don’t panic. Firstly, Veeam will tell you if required permissions aren’t assigned, within the Web UI. Secondly, Veeam supply a list of all required permissions, so if you believe you may have granted too many permissions, you can trim this list down to align with the permissions required only. The list for v4 is currently available here.
